Back-to-school crafts for the days when bedtime, school bags and questions about returning to class start piling up, without making more useless clutter and the little things kids aren’t ready for yet.
School will be starting again soon, and the long vacation is slowly running out of days.
The children may still be enjoying late mornings and unplanned afternoons, but school is beginning to creep back into everyday conversation.
The uniform may still be hanging in the wardrobe, and the school bag may be tucked away somewhere, but bedtime is getting a little earlier and school supplies are starting to come back into view.
These last few days don’t have to be filled with one big activity. Sometimes a simple craft is enough to give an afternoon some purpose while letting a child make something they can take into the new school year.
Instead of another paper apple that ends up sitting on a shelf, they can make something they will actually use, something that gets them thinking about school, or simply something they can enjoy making with their hands before the holiday ends.
That is what these back-to-school crafts are about: useful, thoughtful projects for those in-between days when school is close, but your child is still very much at home.
Before the school routine begins again, make the transition more meaningful with First-Day-of-School Time Capsule: A Craft to Make With Your Child Before School Starts.
How to Choose the Right Craft When School Starts in a Few Days

With only a few days left, the best craft isn’t necessarily the quickest or cutest one. Choose it based on what your child needs from the activity.
A useful project can give them something to organize, carry or use at school.
A child who has questions about a new class or school may benefit more from a simple project that opens up conversation.
For younger children, a visual checklist or sequence can turn everyday school preparations into something they can understand and practise.
Practical preparation matters because returning to school involves more than buying supplies. Children may need to adjust sleep and morning routines, organize what they need, and become familiar with new people, places or schedules.
Keep the child’s age and interests in mind, too. An older child may enjoy designing a notebook cover or organizer, while a younger child may get more from making a picture-based school-day chart.
The closer school is, the more useful it is to choose a craft that connects naturally to something the child will actually do once school begins.
Brighten a craft session with Sunflower Crafts for Kids: The Suncatcher and 14 More Easy Ideas They’ll Beg to Make Again.
Routines & Transition
1. School-Morning Flip Chart

The first few school mornings can feel very different from holiday mornings. A child who has spent weeks waking up whenever they want may suddenly need to remember several things in the right order.
A school-morning flip chart gives them a simple visual reminder they can follow without an adult repeating every step.
What you need
- Cardboard or thick paper
- Plain paper
- Scissors
- Glue or tape
- Markers or crayons
- A hole punch and string, or paper fasteners
How to make it
Cut several cards of the same size and connect them along one edge so they can turn like pages.
Give each card one morning task, such as:
- Wake up
- Get dressed
- Brush teeth
- Eat breakfast
- Pack school bag
- Put on shoes
- Leave for school
For a younger child, draw a simple picture beside each task. An older child can write the words themselves.
Keep the chart somewhere the child can actually see it in the morning rather than putting it away as a decoration.
Make it fit the child’s real morning
Don’t copy a six-step routine from a craft template and assume it will work for every family. The useful version is the one that reflects your child’s actual school morning.
A child who eats breakfast before getting dressed can arrange the cards differently. Another may need a reminder to take medication or a lunchbox, although anything medical should be handled according to the family’s normal routine rather than turned into a craft instruction.
The point is simply to make the sequence visible.
Visual schedules are commonly used to help children understand routines and transitions, particularly when a sequence has several steps.
Broken crayons do not have to go straight into the bin. Melted Crayon Art for Kids: What to Do With Broken Crayon Pieces gives them a second life.
2. My First Week of School Mini-Book
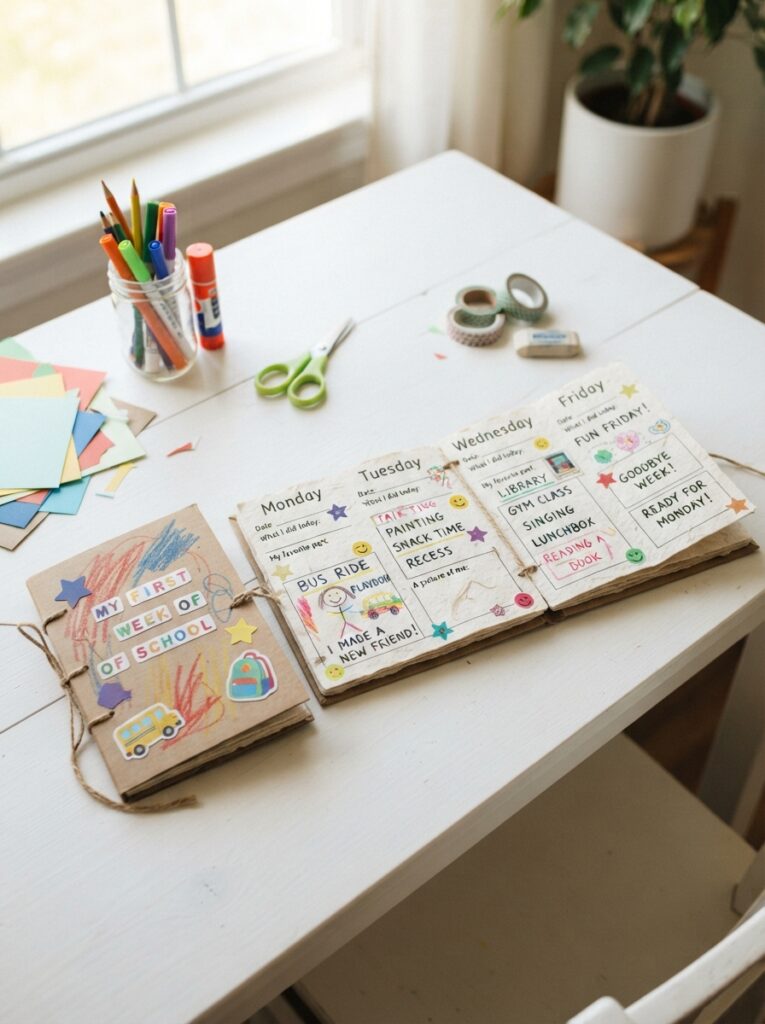
The first day gets most of the attention, but the first week is what a child actually has to settle into.
A small handmade book can give them a place to think about that week without turning the activity into a lesson.
What you need
- 5–6 sheets of paper
- Cardboard for the cover
- Stapler, tape or string
- Pencils, crayons or markers
Fold the pages and join them down the middle. Give each page a simple heading:
Monday
Tuesday
Wednesday
Thursday
Friday
Then leave space beneath each heading for something the child can draw or write.
You don’t need to tell them what they must put on each page. You could offer prompts such as:
- Something I did
- Someone I talked to
- Something I enjoyed
- Something I want to remember
- Something I still have a question about
For a younger child, drawing may be easier than writing. An older child might prefer short sentences.
Why make this before school starts?
The book gives the child something concrete to think about when school is still just an idea on the calendar. It can also become a simple record of how the first week actually felt rather than another piece of school-themed decoration.
Don’t frame it as a way to guarantee a smooth first week. The value is in giving the child a small, personal way to notice and record what happens.
Before stocking up on craft supplies, check 15 Must-Have Crafting Tools Beginners Often Forget -That Make DIY Projects Easier for the tools that can make projects much easier.
3. School-Day Responsibility Wheel
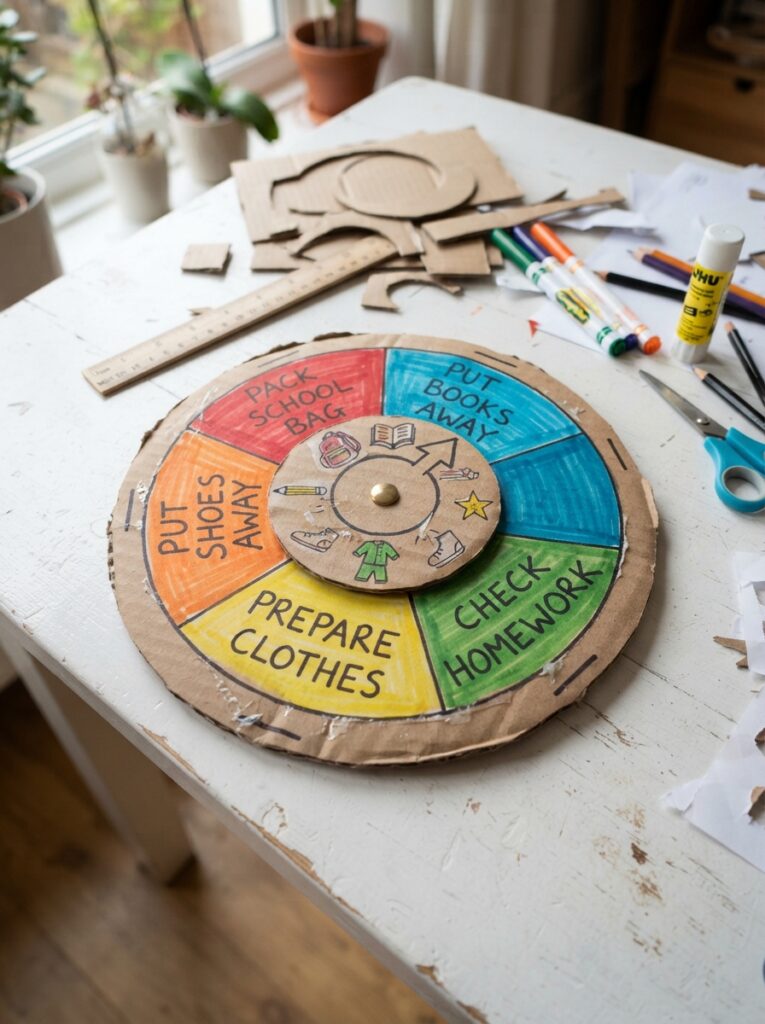
Children don’t suddenly become independent because a new school term begins. There are usually small jobs they need to remember—putting things back, checking their bag, preparing what they need and taking responsibility for simple tasks.
A school-day responsibility wheel turns those jobs into something the child can see and interact with.
What you need
- Two pieces of cardboard
- Scissors
- Markers
- Paper fastener
- Ruler
Cut two circles, with one slightly smaller than the other.
On the larger circle, divide the surface into sections and write one responsibility in each section, such as:
- Pack school bag
- Put lunchbox away
- Put shoes in their place
- Check homework
- Put books back
- Prepare clothes for tomorrow
Cut a small window or pointer into the top circle and attach the two pieces through the centre with a paper fastener so the wheel can turn.
Keep the responsibilities realistic
This shouldn’t become a chart full of chores simply because the child is going back to school.
Choose tasks the child is already capable of doing with their age and level of independence. A five-year-old and a twelve-year-old should not have the same responsibility wheel.
The wheel can also be used as a conversation starter before school resumes:
“Which of these things do you already know how to do? Which one do you still need help with?”
That makes the craft more useful than simply decorating a cardboard circle. It gives the child a chance to think about what they will be responsible for when the holiday routine ends.
Turn letter practice into something children can build with Letter B Craft for Preschool: Build a Bulldozer That Makes Letter Recognition Click.
Organization & Preparation
4. School Bag Packing Checklist Wheel
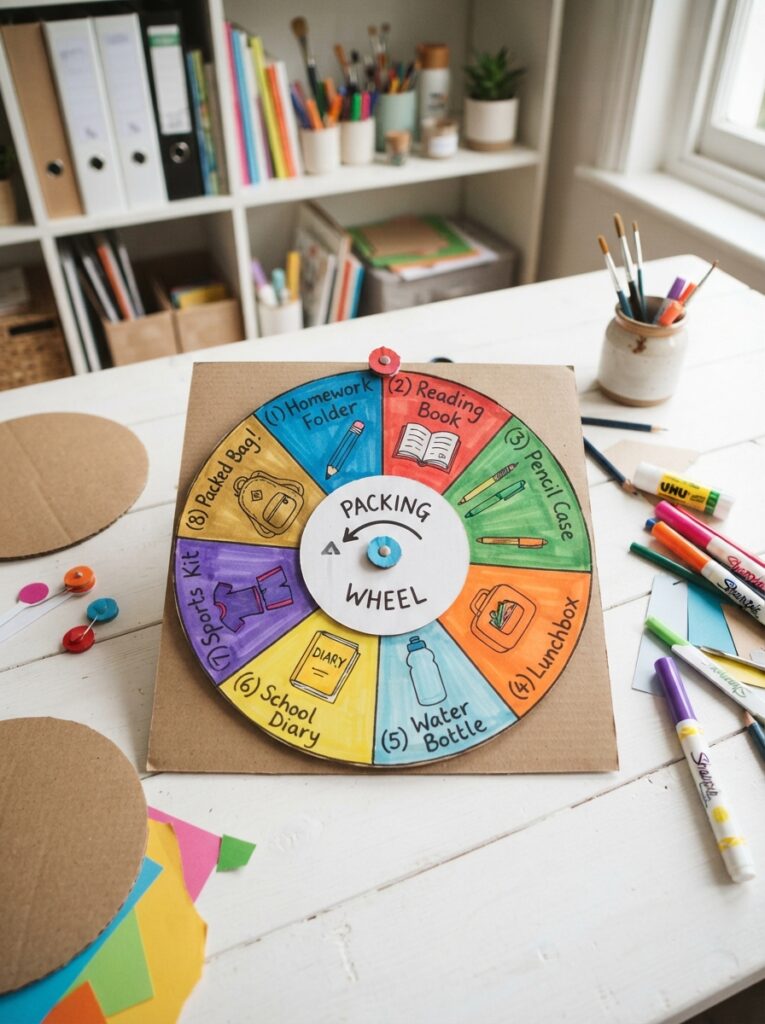
A child can know what belongs in a school bag and still forget half of it when the morning gets busy. A school bag packing checklist wheel gives them a simple way to check what needs to go in before leaving home.
For this back-to-school craft, you can use cardboard from a cereal or delivery box, paper, scissors, a marker and a paper fastener.
How to make it
Cut two cardboard circles. Make the second one slightly smaller than the first.
Divide the larger circle into sections and write one item in each section, such as:
- Homework
- Reading book
- Pencil case
- Lunchbox
- Water bottle
- School diary or planner
- Sports kit
Cut a small viewing window in the top circle. Join both circles through the centre with a paper fastener so the top circle can turn.
As the child checks each item, they can turn the wheel to the next section.
Make the checklist match the child’s school
Don’t fill it with supplies the child doesn’t actually use. A primary-school pupil may need a reading book and lunchbox, while an older student may need different books, equipment or sports clothing.
The best checklist is therefore based on the child’s real school requirements, not a generic back-to-school supply list.
It can also be useful to make the wheel together before school resumes. Let the child decide which items belong on it. That turns packing from something an adult simply does for them into a routine they can gradually participate in.
Give an empty carton another purpose with Milk Carton Bird Feeder Craft to Get Preschoolers Outside and Off Screens.
5. DIY Homework Folder With a “To Do / Done” System
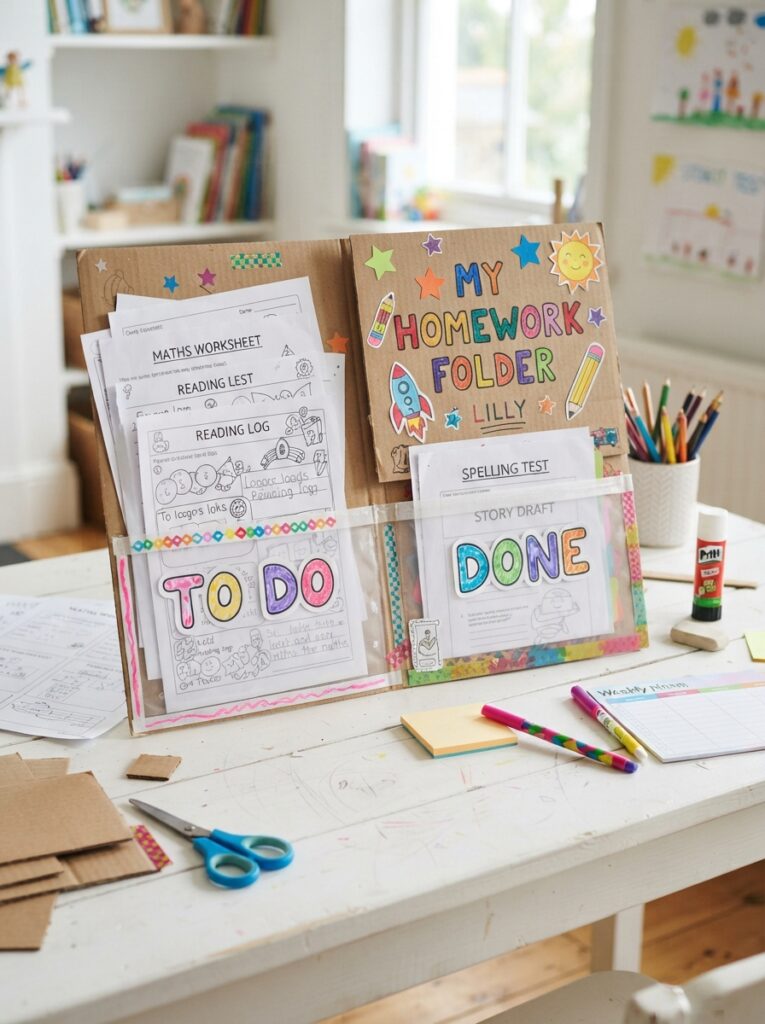
Loose worksheets have a way of disappearing into school bags.
A simple To Do / Done homework folder gives children two clearly separated places for work that still needs attention and work that has been completed.
What you need
- A sturdy file folder or two pieces of cardboard
- Coloured paper or scrap paper
- Glue
- Scissors
- Marker
- Tape, if needed
Divide the inside into two sections.
Label one:
TO DO
and the other:
DONE
You can make the dividers from folded cardboard or attach two large pockets made from paper.
For a child who brings home several worksheets, each unfinished task goes into TO DO. Once completed, it moves to DONE.
Give it a little personality
This is one of those back-to-school crafts where the child can personalize something without making the personalization the whole point.
They might add their name, a simple pattern, their favourite colours or a small drawing to the cover.
Keep the inside easy to use. Too many pockets, labels and decorations can make a simple homework system harder to maintain.
One important detail
The folder should support the child’s existing homework routine, not replace the school’s instructions or the family’s system.
Some schools use digital platforms, planners or specific folders for assignments, so check what your child’s teacher or school already requires before creating a separate system.
For younger children, an adult may still need to check the folder. The goal isn’t to make the child completely responsible overnight; it’s to give them a clear physical place to see what still needs doing and what is finished.
When siblings are different ages, Fall Crafts for Siblings of Different Ages: 9 Projects the Whole Family Can Do Together offers projects everyone can take part in.
6. Cardboard School Supply Sorting Tray
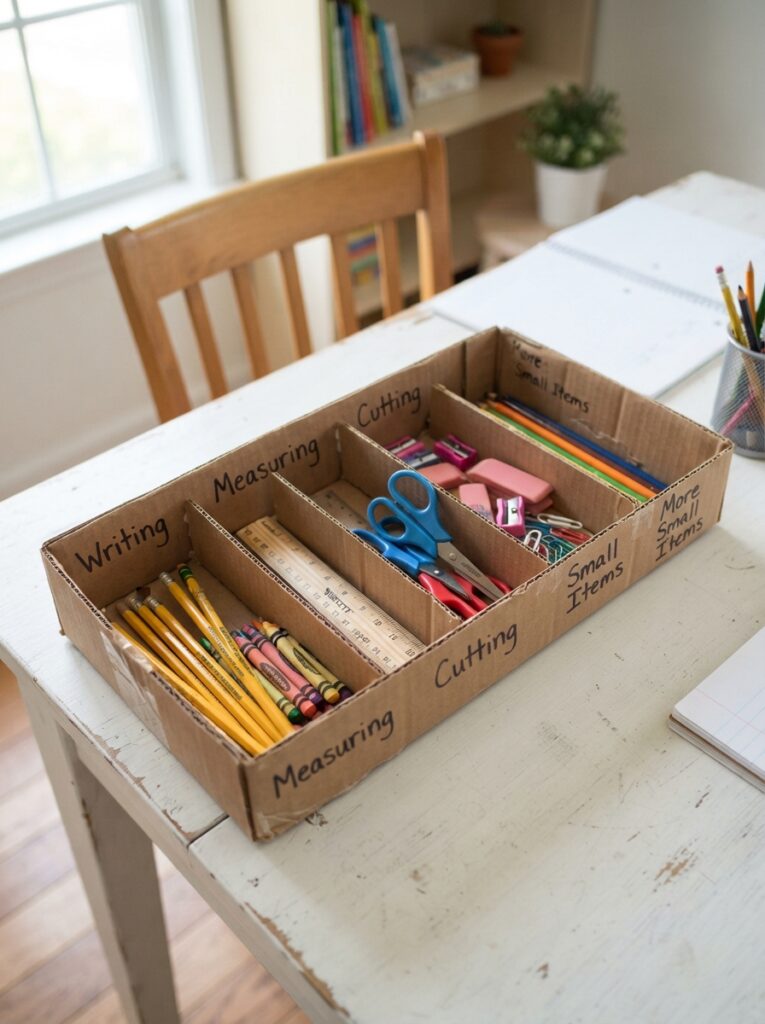
Before school starts, spread out the supplies your child will actually use and let them decide how they want to keep them together.
A shallow cardboard tray can become a small home for the things that tend to get separated, pencils in one section, measuring tools in another, scissors and other small items somewhere they can be found easily.
You don’t need a special storage box. A sturdy food box, delivery carton or other clean piece of packaging can provide enough cardboard for the job.
What you need
- A shallow cardboard box or sturdy cardboard
- Scissors
- Ruler
- Glue or tape
- Marker
- Scrap paper for covering, if desired
How to make it
Start with a shallow box or make a tray by folding and joining pieces of cardboard.
Cut a few strips of cardboard and place them across the inside to create sections.
Don’t decide on the compartments before seeing what your child actually needs to store. Put the supplies on the table first, group similar items together, then make the dividers fit those groups.
Simple labels such as Writing, Measuring, Cutting and Small Items are enough.
Let the contents decide the design
A sorting tray works better when it reflects the child’s real supplies. There is no need for six tiny compartments when four broad sections will do the job.
The child can also help decide where everything belongs. That small decision-making step makes the tray easier to use later because the arrangement is familiar to them.
Once school begins, the tray can stay at the child’s study area and give pencils, rulers, scissors and other frequently used supplies a consistent place to return to.
Keep a stash of simple materials handy for 13 Popsicle Stick Crafts for Kids That Actually Keep Them Busy and Boosts Creativity.
7. Personalized Notebook Subject Dividers
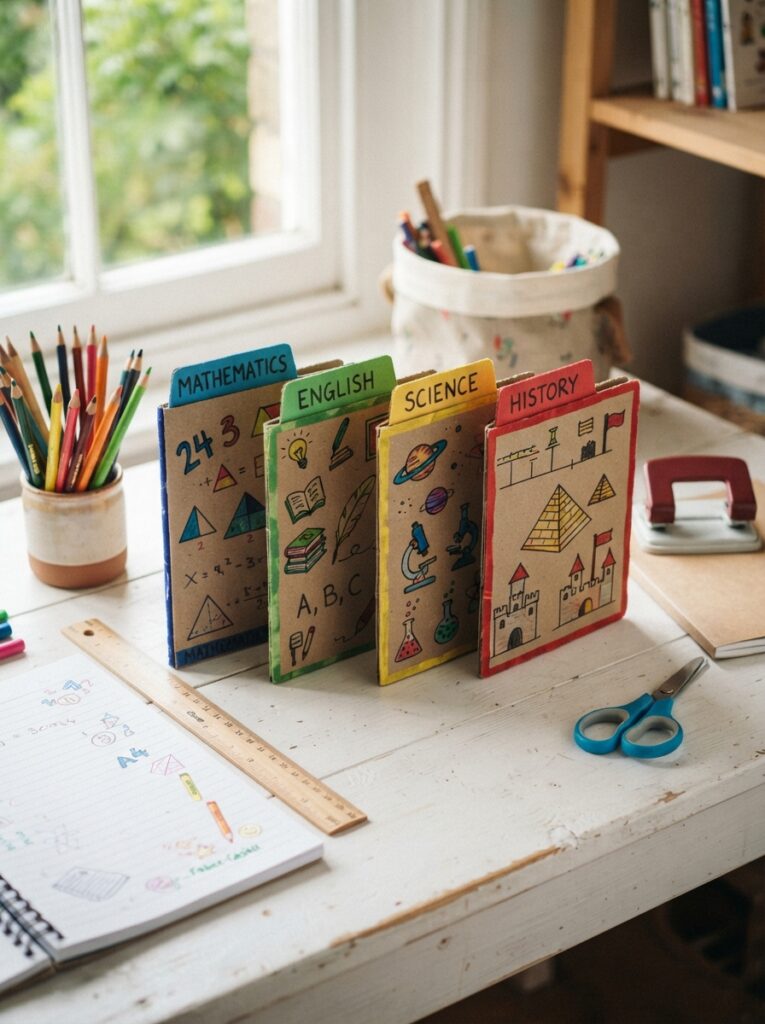
When several notebooks or subjects start competing for space, finding the right page can become unnecessarily frustrating.
Subject dividers give children a simple visual way to separate their notes, particularly when they use a binder, multi-section notebook or folder.
What you need
- Cardstock or thick paper
- An old file folder or cereal box
- Scissors
- Ruler
- Hole punch, if using a ring binder
- Pens, pencils or markers
How to make them
Measure the pages they will sit alongside and cut the cardboard or cardstock slightly smaller than the notebook or binder cover.
Make one divider for each subject and write the subject name clearly at the top.
For example:
- Mathematics
- English
- Science
- History
Add a small tab that sticks out beyond the page. Each tab can have a different colour, pattern or simple symbol to make subjects easier to distinguish.
If the dividers are going into a ring binder, punch holes that match the binder’s existing rings.
Personalize without making them difficult to use
A child can draw on the dividers, add their initials or choose a different pattern for each subject.
Keep the subject name large and easy to read, though. The divider has a practical job first; decoration comes second.
This is particularly useful for an older child who has several subjects to manage. Instead of searching through one thick stack of papers, they can quickly move to the section they need.
And because the dividers can be made from cardboard packaging or an old folder, the project doesn’t require buying a new set of stationery just to get started.
Rainy weather does not have to mean bored children. Indoor Activities for Kids on Rainy Days That Actually Keep Them Busy has more ideas for staying occupied indoors.
8. Things I Need to Remember” Hanging Reminder Board
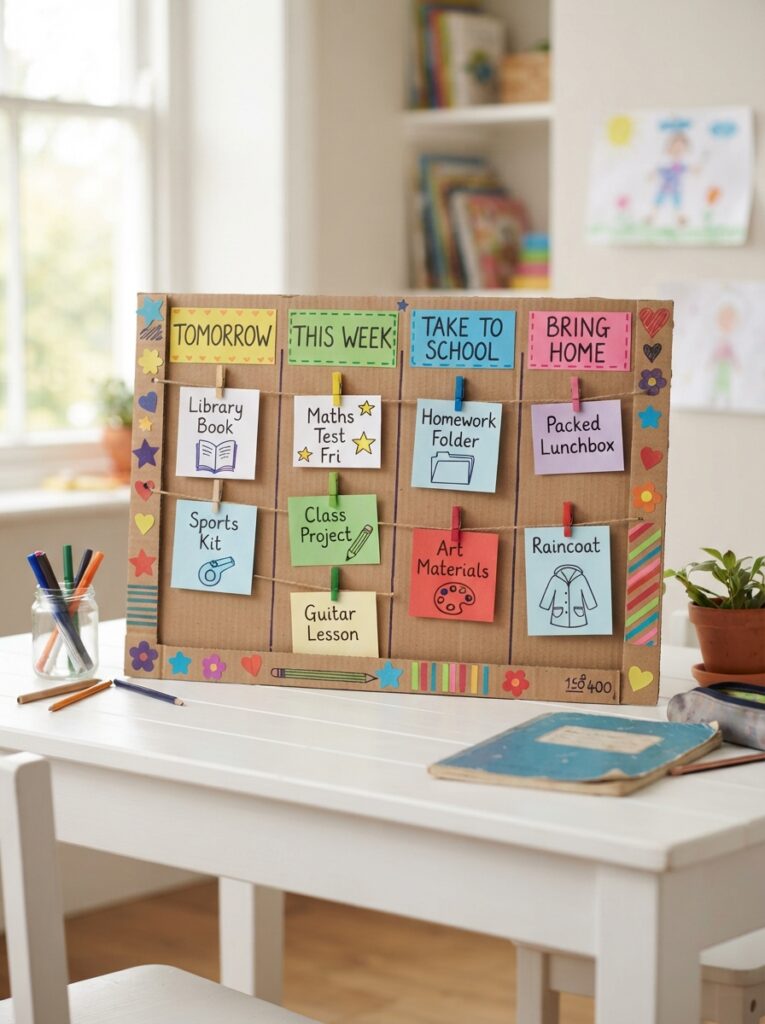
Some school information is easy to forget because it isn’t part of the child’s everyday routine yet: which day to take sports clothes, what needs to go back to school, when library books are due, or what needs to be packed the night before.
A small reminder board can keep those details somewhere visible instead of relying entirely on memory.
What you need
- Cardboard
- Scrap paper
- String or ribbon
- Glue or tape
- Marker
- Clothes pegs or paper clips
Cut the cardboard into a rectangle and divide it into a few sections. You might use:
Tomorrow
This Week
Take to School
Bring Home
Attach small paper cards, clips or pegs beneath each heading.
The child can then add reminders such as:
- Take reading book
- Bring sports kit
- Return library book
- Pack art materials
- Take permission slip
Keep it connected to real school information
Don’t pre-fill the board with a generic list of school tasks. The child should add reminders based on what their actual school requires.
That is what makes this more than a decorated notice board.
Place it somewhere the child naturally passes each day, near their study area, bedroom door or school-bag station.
Once school starts, the board can change with the week’s actual reminders rather than becoming another piece of decoration nobody looks at.
The goal isn’t to make a child responsible for everything. It is to move a few reminders out of an adult’s head and onto something the child can see, check and gradually learn to manage.
For those short windows between school and everything else, try 10 Super Fun After-School & Homework-Friendly Crafts Kids Can Make in 20 Minutes.
Communication & Emotional Preparation
9. What I Want to Know About My New School” Question Book
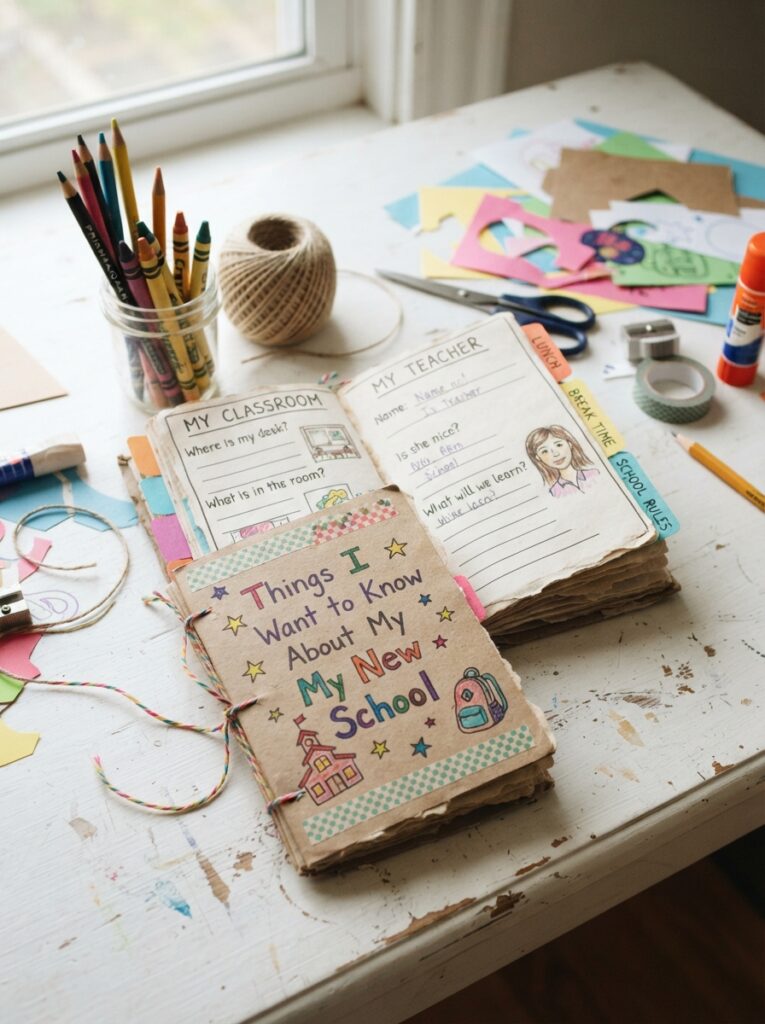
Starting a new school can leave a child with a long list of small questions that adults may not realize they have. Where do I put my bag? What happens at lunchtime? Who do I ask when I need help? Where is the toilet? What happens if I get lost?
A question book gives those questions somewhere to go.
What you need
- 4–6 sheets of paper
- A piece of cardboard for the cover
- Stapler, string or tape
- Pencil or markers
Fold the pages together and attach them along one edge. On the cover, write:
Things I Want to Know About My New School
Inside, leave plenty of space for the child to write or draw questions.
You can give them a few prompts to get started:
- My classroom
- My teacher
- Break time
- Lunch
- Getting home
- School rules
- Things I don’t understand yet
Don’t fill the book with answers yourself. Let the child decide what they genuinely want to know.
What makes this useful
The finished book can become a practical question list for a parent, teacher or school orientation visit.
That is much more useful than telling a child to “stop worrying” about something they don’t understand.
It can also reveal questions you might otherwise miss. A child may not say, “I’m worried about navigating a new school,” but may write, “What do I do if I can’t find my classroom?
Skip the predictable turkey this year with Thanksgiving Crafts for Young Children Who Want Something More Interesting Than the Usual Handprint Turkey.
10. Back-to-School Feelings Pocket Book

A child doesn’t always have the words, or the desire, to sit down and explain exactly how they feel about going back to school.
A pocket book gives them another option: they can draw, write a word, or simply choose a pocket that feels right.
What you need
- Coloured paper or plain paper
- Cardstock or thin cardboard
- Glue
- Scissors
- Markers
- Small scraps of paper
Make a small booklet from folded paper. On different pages or pockets, write:
I’m excited about…
I’m worried about…
I don’t know yet…
I want to ask…
I’m looking forward to…
Cut small pieces of paper for the child to write or draw on and place inside the appropriate pocket.
Younger children can use drawings or single words. Older children may prefer writing a sentence.
Don’t turn it into a test of feelings
There is no correct number of worries a child should have, and they don’t need to fill every pocket.
The useful part is having a low-pressure way to start a conversation. If a child puts “I don’t know anyone” in the worried pocket, for example, you now have something specific to talk about rather than asking the broad question, “Are you worried about school?”
For a child who expresses significant or persistent distress about school, a paper craft isn’t a substitute for support from a parent, teacher or appropriate professional. The craft is simply a communication aid.
Make alphabet practice more playful with Train Craft Ideas for Kids That Make Learning the Alphabet Fun With Things You Already Have.
Everyday School Use
11. Reading Tracker Bookmark
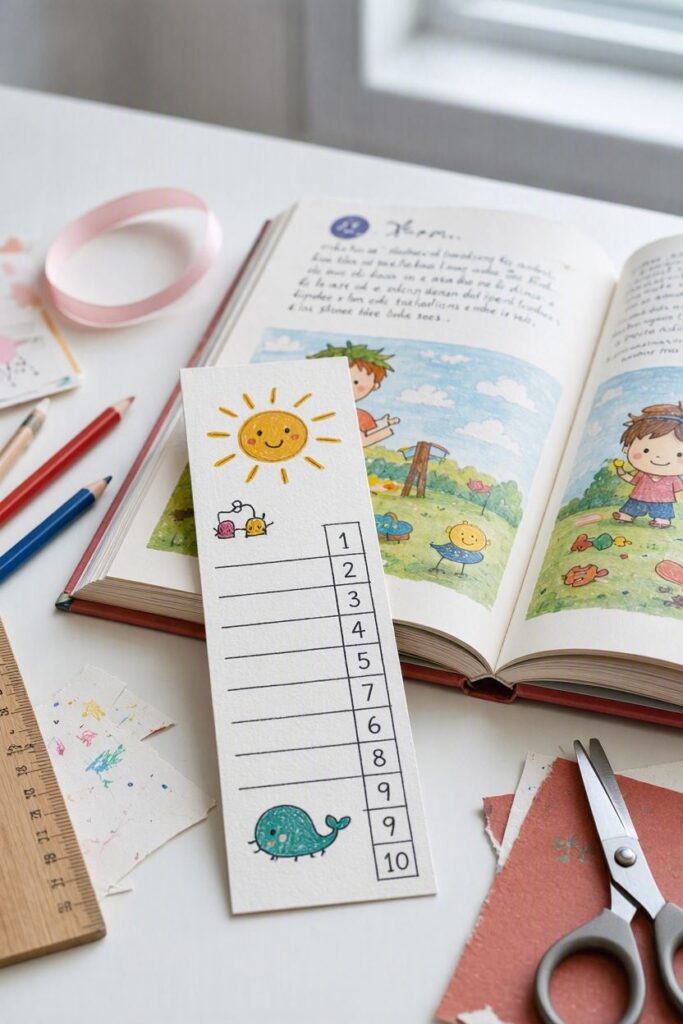
A bookmark usually has one job: keep your place. But a child who is just beginning to read longer books may need a little more help remembering where they stopped, especially when reading happens in short sessions after school.
Turn an ordinary bookmark into a tiny reading record they can keep inside the book.
What you need:
- Cardstock or a piece of an old folder
- Ruler
- Pencil
- Scissors
- Markers or coloured pencils
- Hole punch and ribbon or string, optional
- Clear tape or book-covering film, optional
How to make it:
Cut a strip of cardstock about 5–6 cm wide and 15–20 cm long. Let your child decorate the front, but leave one side or the bottom section available for the tracker.
The tracker can be as simple as a row of boxes numbered 1–10. Each time your child finishes a reading session, they can colour one box.
For a child who is reading independently, make the tracker a little more informative. Add small spaces for:
Date: ______
Started on page: ______
Stopped on page: ______
You could also add a tiny section saying “Remember this” where your child can write a character’s name, a new word, a question, or something interesting from the day’s reading.
The important part is choosing a system your child can actually use. Tracking every page may be unnecessary for a young reader, while an older child may find page numbers helpful when a book is spread over several days.
Cover the finished bookmark with clear tape or book-covering film if you want to make the cardstock more durable.
Let the bookmark teach something, too
While making it, explain that keeping track of reading is not the same as rushing to reach a certain number of pages.
A child can read three pages carefully and still have made progress. They can stop at a natural point, mark where they finished, and return to the book later without having to guess where they left off.
You can also ask them to choose what they want to track. Pages, chapters, reading days, or books finished can all work differently depending on the child and the reading task.
That makes this one of the back-to-school crafts worth making before the holiday ends: the finished bookmark goes straight into a book, and the child learns a small organisational habit they can carry into the school year.
Add an unexpected texture to painting with Bubble Wrap Painting: The Easy Texture Trick That Turns Bored Kids Into Little Artists.
12. DIY Emergency Contact Card Holder for a School Bag
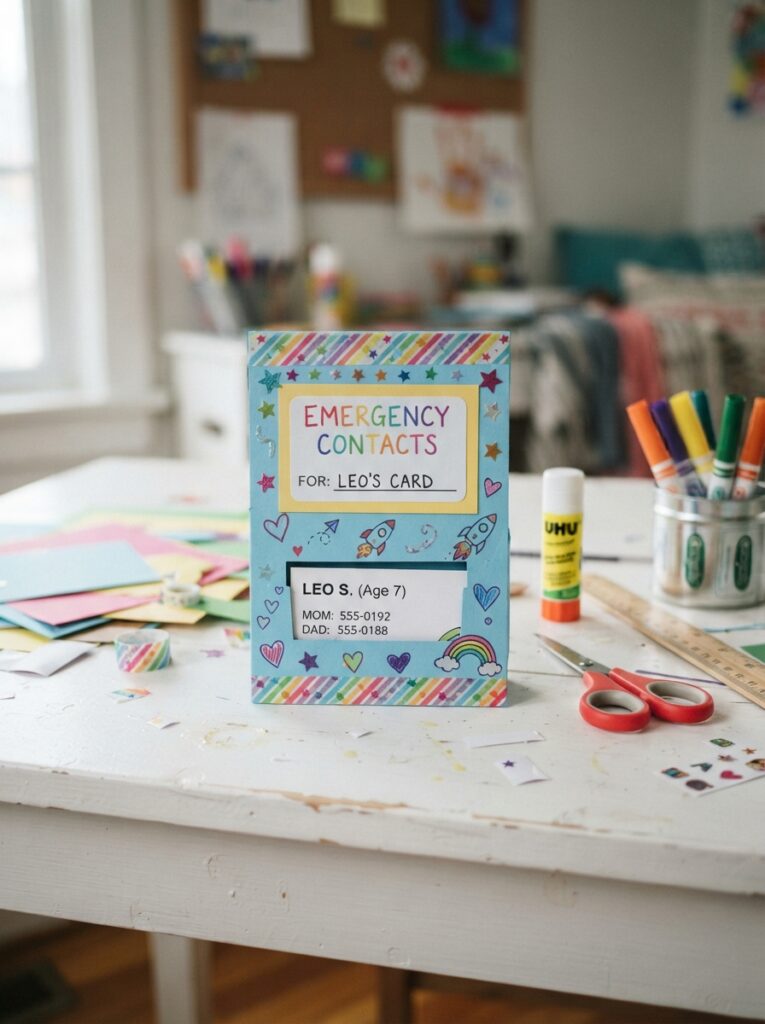
There is one piece of school preparation that rarely feels exciting enough to make a child want to talk about it: what happens when they need help and the usual adult isn’t there?
Making an emergency contact card holder gives you a natural reason to have that conversation before school starts. Your child can make the holder, help decide where it will stay in the bag, and learn which trusted adults they can turn to when they need assistance.
What you need:
- Cardstock or a piece of an old folder
- Scissors
- Glue or strong tape
- Ruler
- Marker
- Hole punch
- String, ribbon, or a small loop for attaching it inside the bag
- Clear tape or transparent plastic for covering the card, optional
How to make it:
Cut two pieces of cardstock slightly larger than the contact card. Place them together and seal three sides with glue or tape, leaving the top open so the card can slide in and out.
You can make the holder plain or let your child decorate the front with their name, initials, or a small design. Keep the decoration on the holder rather than putting personal information where it can be easily seen.
Then make the contact card that goes inside.
Keep the information limited to what your child and an appropriate adult may actually need, such as:
- Your child’s name
- A parent or caregiver’s name
- One or two current phone numbers
- Another approved emergency contact, if needed
- Any information the school specifically requires
Don’t put private details on the outside of the bag. A home address, passwords, detailed personal information, or anything your child does not need to share publicly should stay off the card holder.
Attach the holder somewhere inside the school bag where it can be found without having to empty everything out. Check the numbers before school starts, and remember to update the card when contact details change.
Turn the craft into a safety lesson
This is the part worth doing while you’re making it.
Ask your child simple questions such as:
“Who would you ask for help at school?”
“What would you do if you couldn’t find your teacher?”
“What if you needed to call me?”
The answers may show you that your child knows less about the school’s help system than you assumed.
You can then explain who the trusted adults are and what your child should do in that particular school.
The card is a backup. It shouldn’t replace teaching a child how to seek help, and it shouldn’t make them responsible for handling an emergency on their own.
That makes this more than one of the back-to-school crafts they make during the last days of vacation. It becomes a small preparation exercise for something children rarely think about until they need it.
Craft time can also introduce children to culture through 12 African Art Projects for Kids That Teach Culture, Not Just Craft.
Back-to-School Crafts by the Child’s Actual Situation

The best back-to-school crafts depend less on the child’s age than you might expect. What matters is what they are actually dealing with as school gets closer.
A child returning to the same class may need something completely different from a child starting at a new school. One may need help getting back into a morning routine, while another may have questions they haven’t thought to ask yet.
Use that as your starting point.
“School is starting, but we haven’t got back into our routine yet.”
Start with the School-Morning Flip Chart or School-Day Responsibility Wheel.
Outcome: Your child can practise the same morning sequence for several days before school starts and identify which steps they can handle alone and where they still need help.
“My child is starting at a new school.”
The “What I Want to Know About My New School” Question Book may be more useful than another decorative project.
Outcome: Your child finishes with a written list of their own questions, giving you specific things to answer before school starts or ask during a school visit.
“My child keeps forgetting what needs to go into the school bag.”
Try the School Bag Packing Checklist Wheel.
Outcome: Your child has one personalised checklist to work through before leaving home instead of relying entirely on memory. After a few practice runs, you can see which items they still regularly miss.
“My child has lots of little questions about going back.”
The Back-to-School Feelings Pocket Book gives those thoughts somewhere to go without requiring a serious sit-down conversation.
Outcome: Your child can put specific thoughts into separate categories such as excited about, worried about, don’t know yet, and want to ask. You then have something concrete to discuss instead of trying to guess what is bothering them.
“My child already feels comfortable about school.”
Don’t manufacture a problem that isn’t there.
A Reading Tracker Bookmark, Notebook Subject Dividers, or Homework Folder may be a better choice.
Outcome: The finished craft has a defined job from the first week of school—tracking reading, separating subjects, or sorting unfinished and completed work. There is no need to turn a comfortable child into a child who needs “preparation.”
“My child is becoming more independent.”
Try the School Bag Packing Checklist Wheel, Responsibility Wheel, or Things I Need to Remember Reminder Board.
Outcome: Instead of an adult giving every reminder, your child has a visible prompt for specific tasks. Start with one or two responsibilities they can realistically manage, then add more as they become familiar with the routine.
“My child just wants to make something.”
Let them.
The My First Week of School Mini-Book can be kept completely separate from school preparation.
Outcome: The child finishes the holiday with a book they can actually use during the first week, filling in a page each day with something they did, noticed, enjoyed or still wondered about.
Not every child needs a visual schedule, feelings activity or organisational system. Sometimes the right back-to-school craft is simply one that gives them something enjoyable to make during the last days of vacation.
The useful question isn’t “Which craft should every child make?”
It’s “What would actually help this child right now?”
That small change can keep the craft time purposeful without turning the last days of vacation into another set of tasks to complete.
Foam sheets are another easy material for focused hands-on play. See Easy Foam Sheet Crafts for Kids That Keep Them Focused, Creative, and Productively Busy at Home.
What to Do With the Finished Crafts Before School Starts

Once the glue has dried and the last marker has gone away, don’t feel pressured to find a place for every craft in the school bag.
Some projects were made to be used. Others were made to help a child practise something, put a thought into words, or simply have something to remember from the end of the holiday.
A quick sort can help.
Use
These are the projects that have a job to do once school begins.
Put the reading tracker inside a book. Keep the homework folder with the child’s school materials. Place the contact card holder inside the school bag. Subject dividers can go into a binder or notebook.
Before packing anything, check that the finished craft actually fits the way your child’s school works. A homemade organiser isn’t useful if the school already has a different system they expect children to follow.
Practise
Some crafts are more useful before school starts.
Use the morning flip chart for a few days while the child gets used to the school-day sequence. Try the responsibility wheel during evening preparation. Use the bag-packing wheel when getting things ready for the next day.
This gives a child a chance to practise the routine while there is still time to adjust it.
Maybe breakfast needs to come before getting dressed. Maybe the sports kit only needs to go in on certain days. The craft can change as you figure out what actually works.
Talk
The question book and feelings pocket book don’t need to go anywhere near the school bag.
Sit with your child and look through them together. You may find questions they haven’t mentioned in conversation or concerns you didn’t know were on their mind.
You don’t have to solve every concern immediately. Sometimes knowing exactly what a child is wondering about gives you something specific to explain, practise or ask the school about.
Keep
Some projects don’t need a practical purpose at all.
The mini-book about the first week of school, a particularly thoughtful drawing, or a craft your child spent a long time making can stay at home. Put it in a memory box, folder or another place where it won’t disappear among everyday school papers.
That matters because back-to-school crafts don’t all need to become school equipment.
A child can make something because it helps them prepare. They can make something because it gives them a way to talk. And they can make something simply because they enjoyed making it.
Once you sort the finished projects that way, you don’t end up with twelve new things that need to be packed, displayed or managed. Each craft gets to do what it was actually made to do.
Halloween does not have to mean ghosts and monsters. Halloween Crafts for Kids Who Don’t Like Scary Decorations: 15 Cute Ideas Without the Creepy Stuff keeps the season fun without the creepy bits.
Conclusion
The last days of vacation don’t have to become a countdown of everything that still needs to be done before school.
A child can use this time to make something, but also to practise, question, organise, notice and prepare in ways that feel natural to them.
That is what makes these back-to-school crafts more worthwhile than simply making something with a school-themed design.
You don’t need to finish the whole list. Look at what your child is finding difficult, what they are curious about, or what they are ready to take more responsibility for, then choose one project that meets that need.
Pick one, make it together, and let the conversation or practice that comes with it be part of the preparation.
Before you leave, also read:
Children who benefit from more hands-on activities can try 15 Sensory DIY Craft Ideas for Kids With Special Needs That Support Learning Through Play.
When the goal is a calmer activity, DIY Sensory Bottles: How to Make a Calming Jar for Kids to Ease Big Emotions is another simple project to keep in your craft rotation.