Need Halloween room decor kids will actually want to display? Try these handmade ideas that turn simple crafts into spooky room decorations.
Some kids want their Halloween decorations to be more than something they hang up for a few weeks.
They want to make something that feels like theirs, the kind of decoration they can point to and say, “I made that.”
But a craft that looks good on the table does not automatically work as room decor. It has to suit the place where it will be displayed, stay in good shape once it is up, and make sense around furniture, windows and a sleeping area.
Age matters too, especially when a project involves small pieces, scissors, cords or materials that can break.
The display spot can also change which project makes sense.
A paper garland can span a wall or doorway, while a small haunted-house scene is better suited to a bookshelf or dresser. Window decorations need their own considerations, particularly if they could interfere with opening the window, blinds or other fittings.
So instead of choosing a Halloween craft first and figuring out where to put it later, start with the space. Where will the finished piece go? What size and material make sense there? And can the child make it at an age-appropriate level?
That approach gives kids more than another craft to finish and forget. It gives them something they can actually use as part of their Halloween room decor.
The ideas below focus on spooky decorations kids can make themselves, with a tips on place to display each one once it is finished.
Turn your Halloween creativity into extra income with Halloween Crafts to Make and Sell: 21 Ideas to Cash In on the Spookiest Season.
Choose the Display Spot Before Choosing the Craft

1. Start With the Space, Not the Craft
Before a child starts cutting paper or painting pumpkins, look at where the finished decoration is going.
The same Halloween craft can work beautifully in one part of a bedroom and be awkward in another.
The display area affects the decoration’s size, weight, shape and how it needs to be attached. It also affects what should be kept out of the way of windows, doors, furniture and sleeping areas.
Wall: Think Flat and Lightweight
Walls give children plenty of room to create a larger Halloween display, but lightweight decorations are the practical choice.
Good options include:
- paper bat or ghost silhouettes
- a handmade Halloween banner
- framed Halloween drawings
- layered paper scenes
- a small collection of children’s Halloween artwork
A wall is also a good place to group several small pieces into one display instead of trying to make one large decoration.
Bedroom Door: Make One Clear Focal Piece
A door already gives you a defined area, so a child does not need several decorations competing for attention.
Ideas that suit the space include:
- a small Halloween wreath
- a handmade “Boo” sign
- a ghost or pumpkin door hanger
- a narrow Halloween banner
Keep decorations clear of the handle, hinges and the part of the door that needs to open and close freely.
Window: Consider the Window Before Decorating It
Windows can make Halloween decorations visible from inside and outside, but they need more thought than a wall.
Paper bats, moons, ghosts and other lightweight silhouettes can work well. A child can also make translucent designs that allow some light through.
The important part is not blocking the normal use of the window or interfering with blinds, shades or their cords.
For younger children, accessible window-covering cords are a separate safety concern, so decorations should not create another reason for a child to reach toward them.
Shelf, Dresser or Bookcase: Use Small Pieces as a Group
A shelf does not need a dozen Halloween crafts. A few pieces with different heights can create a more interesting display.
This is where small projects such as:
- a cardboard haunted house
- handmade paper pumpkins
- a framed Halloween drawing
- a small decorated container
- a miniature Halloween scene
can make more sense than a large wall decoration.
It also gives children a place to display three or four favourite pieces without putting everything they make on the walls.
Around the Bed: Keep the Decoration Out of the Sleeping Area
This is the one area where I’d be more selective.
A child may want Halloween lights, hanging ghosts or other decorations around the bed, but anything that can fall onto the bed, create a loose cord or contain small detachable parts deserves a second look.
For this area, simple, lightweight decorations placed away from the sleeping surface are a better starting point than elaborate hanging displays.
Avoid open flames altogether; the U.S. CPSC recommends flameless alternatives for Halloween decorations and warns about fire risks from candles around combustible decorations.
Not every Halloween craft needs to be creepy. Halloween Crafts for Kids Who Don’t Like Scary Decorations: 15 Cute Ideas Without the Creepy Stuff keeps things playful and kid-friendly.
Spooky Halloween Wall Decor
1. Paper Bat Wall Decor

Paper bat wall decor turns simple black paper cutouts into a small Halloween scene on a bedroom wall.
The craft itself is easy, but the arrangement is what makes it look like room decor rather than a handful of paper bats.
Make the bats in different sizes and turn them in slightly different directions so they appear to be flying across the wall.
What You’ll Need
- Black construction paper or lightweight cardstock
- Pencil
- Bat template
- Scissors
- Removable wall-safe adhesive
Cardstock works well when you want the bats to hold their shape and possibly reuse them next Halloween. Younger children can trace and decorate the shapes while an adult handles the cutting if needed.
How to Make the Bats
- Make one bat template.
Draw a simple bat shape on paper or use a child-friendly template. - Trace several bats.
Trace the shape onto black paper, changing the size for some of the bats. You don’t need dozens. A small group can make a stronger display when you give them enough space. - Cut them out.
Cut carefully around each shape. The bats don’t need perfectly identical wings, so small differences are fine. - Plan the arrangement first.
Lay the bats out on the floor or another large surface. Move them around until the child likes the direction they’re taking. - Attach them to the wall.
Use an adhesive appropriate for the wall surface and follow its instructions.
Turn the Bats Into a Wall Scene
This is where the craft starts to feel like Halloween room decor.
Instead of putting the bats in a straight line, create movement across the wall. Start with a few larger bats and gradually use smaller ones as they move upward or toward another part of the room.
For example, a child could make the bats appear to fly:
- upward toward the ceiling
- across an empty wall above a desk
- around a paper moon
- toward a Halloween picture
- from one side of the wall toward a doorway
You don’t have to fill the whole wall. A deliberate cluster can work better than covering every available space.
Let the Child Build the Composition
Give the child control over the final arrangement. They can decide which bats fly together, which ones sit farther apart and where the group begins and ends.
Adding a paper moon or a few stars can turn the bats into a larger scene, but keep the extra pieces simple so the bats remain the main feature.
One Thing to Check Before Hanging Them
Look at the wall from the doorway before attaching everything. A display that looks scattered up close can look much more balanced when viewed from across the room.
Also keep the bats clear of windows, blinds, vents and anything that needs to move freely.
Since the decoration is temporary, choose a removable hanging method that suits the wall rather than assuming every adhesive will come off cleanly.
Coordinating the whole family? Family Halloween Costumes: 17 Fun Ideas to Make Everyone Look Like a Team, From Toddlers to Parents has ideas for bringing different ages into one theme.
2. Paper Ghost Wall Scene

A paper ghost wall scene uses several simple ghost shapes to create a Halloween display on a bedroom wall.
Instead of making one large ghost, kids can create a little group and arrange them as if they are floating through the room.
The fun part is giving each ghost a slightly different expression and position.
What You’ll Need
- White paper or lightweight cardstock
- Pencil
- Scissors
- Black marker
- Optional colored paper for small details
- Removable wall-safe adhesive
Make a Small Ghost Family
Start with a simple ghost shape: a rounded head, a loose body and an uneven bottom edge.
Cut several ghosts in different sizes. Then give them different faces. One might look surprised, another happy and another a little sleepy.
The shapes don’t need to match perfectly. In fact, small differences make the finished scene feel more handmade.
How to Make the Ghosts
- Draw the ghost shapes.
Keep the outline simple enough for the child to trace and cut. - Make different sizes.
Create a mixture of large, medium and small ghosts. - Add the faces.
Use a black marker for the eyes and mouths. Kids can decide what personality each ghost has. - Test the scene before hanging it.
Arrange the ghosts on the floor or another large surface first. This makes it easier to experiment without repeatedly moving them on the wall.
Create a Ghost Scene Instead of a Row
A straight row of ghosts can look more like a classroom craft display. Give them different heights and spacing so they appear to float.
For example, place a larger ghost lower on the wall and let two or three smaller ones drift upward toward the ceiling. Another option is to have the ghosts move toward a paper moon, with the smallest ones furthest away.
The arrangement doesn’t need to cover a large section of the bedroom. A compact scene can have more impact when the wall around it remains clear.
Where This One Can Become Part of the Room
The best spot depends on the shape of the scene.
Above a desk: Let the ghosts float across the empty wall above the desk, keeping the lowest pieces high enough that they don’t interfere with anything on the work surface.
Beside a bookshelf: Arrange smaller ghosts vertically so they appear to be floating alongside the shelves rather than competing with the books.
Above a reading corner: Create a small group with a paper moon and a few stars to make that section of the room feel like its own Halloween scene.
On an empty bedroom wall: Spread the ghosts from lower to higher positions to create the impression that they’re drifting across the room.
Around a mirror: A few small ghosts can sit around the outer edges of the mirror, leaving the reflective surface clear.
Keep the Scene Friendly
Not every Halloween room needs frightening decorations. For younger children especially, simple faces and rounded shapes can make the ghosts feel playful rather than scary.
Let the child decide whether the ghosts should look silly, sleepy, surprised or slightly spooky.
A Small Detail That Matters
Thin paper can curl at the edges after it has been on the wall for a while. Lightweight cardstock will usually hold its shape better.
Before attaching the ghosts, also check that the adhesive suits the wall surface. And keep the finished pieces away from windows, blinds, vents and other areas that need to move or remain accessible.
Before those pumpkins end up in the trash, see What to Do With Leftover Pumpkins After Halloween: 9 Uses Before They Rot.
3. Halloween Silhouette Wall Art
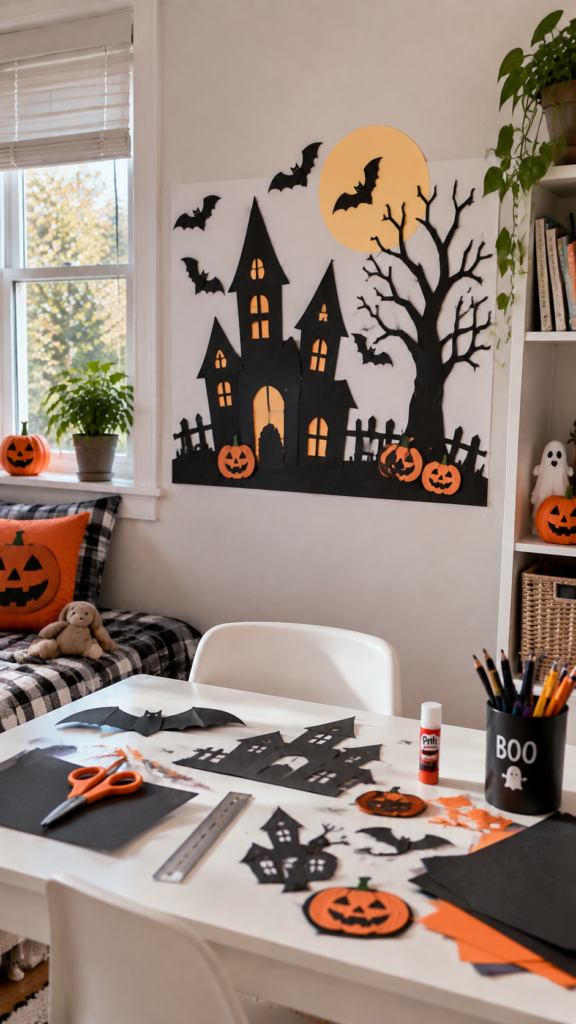
Halloween silhouette wall art gives kids a way to make a larger piece of Halloween room decor without needing complicated drawing skills.
The idea is simple: choose a spooky shape, cut it from dark paper or cardstock, and place it against a lighter background. A haunted house, crooked tree, cat, witch’s hat or group of pumpkins can all work.
What makes this different from the paper bats is that the silhouette becomes one main piece of wall art rather than a collection of small shapes.
Choose a Scene That Fits the Room
Start with the part of the room where the finished artwork will go.
A wide section of wall can handle a horizontal haunted-house scene, while a narrower space may suit a tall crooked tree or a large black cat.
Keep the design simple enough that the main shape is still easy to recognize from across the room. Too many tiny details can disappear once the artwork is hanging on the wall.
What You’ll Need
- Black construction paper or lightweight cardstock
- White or orange paper for the background
- Pencil
- Scissors
- Glue or double-sided adhesive
- Optional ruler
Cardstock makes a sturdier finished piece, especially if the child wants to keep the Halloween room decor for another year.
How to Make the Silhouette
- Choose the main shape.
Pick one subject rather than trying to fit an entire Halloween scene into one small piece. - Sketch it simply.
Draw the outline on black paper. Don’t worry about adding lots of detail. The silhouette needs a strong outer shape. - Cut it out.
Carefully cut around the outline. Younger children may need an adult to handle more complicated sections. - Add a background.
Mount the black silhouette against white, cream or orange paper so the shape stands out. - Finish the edges.
Trim the background neatly and attach the finished piece to a wall-safe backing or frame.
Make the Artwork Part of the Room
A single silhouette can work as a focal point above a desk, dresser or reading area.
For a larger display, make two or three related pieces instead of one crowded artwork. For example, a haunted house could sit in the centre with a small moon on one side and a crooked tree on the other.
Another option is to make several small silhouettes and place them vertically on a narrow wall section. That can work particularly well beside a bookshelf or bedroom door.
Let the Child Choose the Mood
The same basic craft can look completely different depending on the subject.
A black cat and crescent moon can create a quieter Halloween look. A haunted house with crooked trees feels more traditional, while pumpkins and stars can make the display friendlier for younger children.
The child doesn’t need to copy a complicated reference image. A few recognizable shapes can be enough to make the finished piece feel intentional.
Before It Goes on the Wall
Check the artwork from different parts of the bedroom. Make sure the silhouette remains visible and isn’t hidden by furniture, curtains or other decorations.
If you’re mounting it directly to the wall, use a method appropriate for that surface. If the child wants to reuse the artwork next year, placing it in a simple frame can make storage and future display much easier.
Adults who want to craft without spending the whole day cleaning up can find easier options in Halloween Craft Ideas for Adults Who Don’t Want a Big Mess or Anything That Takes All Day.
4. DIY Halloween Picture Frames

A picture frame gives kids something they can actually keep on a desk, dresser, shelf or bedside table rather than making a decoration that has nowhere to go.
For Halloween room decor, the child can decorate a plain frame with a few seasonal details and then add a Halloween drawing, photograph or small piece of artwork inside.
The frame becomes part of the room while the picture gives the decoration a personal connection.
Start With a Simple Frame
Use a plain wooden, cardboard or sturdy craft frame. It doesn’t need to be expensive or elaborate.
The child can paint it black, orange, purple or another Halloween-inspired color, then add a few decorations around the edges.
Possible details include:
- paper bats
- tiny pumpkins
- stars
- ghosts
- spiderwebs
- small leaves
- Halloween stickers
Keep the decorations around the border rather than covering the entire frame. The picture inside should still be easy to see.
What You’ll Need
- Plain craft frame
- Acrylic or washable craft paint, depending on the frame material
- Paintbrush
- Pencil
- Paper or cardstock for decorations
- Glue suitable for the frame material
- Drawing, photograph or artwork for the centre
If younger children are making the frame, choose materials that match their age and supervise paint, scissors and small decorative pieces as needed.
How to Make It
- Prepare the frame.
Wipe it clean and remove any pieces that should not be painted. - Add the base color.
Paint the frame and allow it to dry completely before decorating it further. - Make the Halloween details.
Cut small bats, ghosts, pumpkins or other shapes from paper. You can also draw details directly onto the frame if the material allows it. - Attach the decorations.
Keep the embellishments concentrated around the border so the frame doesn’t become too busy. - Add the picture.
Use a Halloween drawing, a photo from a previous Halloween or even a handwritten Halloween message.
Where the Finished Frame Can Go
This craft works because it can move around the room without needing a large empty wall.
Place one on a desk beside school supplies, on a dresser with other seasonal items, or on a bookshelf where the frame can lean against the wall.
A small collection can also work. For example, two or three frames with different Halloween drawings can create a little display on a shelf without taking over the room.
If the frame will sit near a sleeping area, keep it stable and away from places where it could be knocked down.
Make It Something the Child Can Keep
Instead of making the frame completely Halloween-specific, the child could decorate only the outer border and change the picture inside each year.
That gives the craft a life beyond one Halloween. This year’s ghost drawing could be replaced with a pumpkin picture next year, while the decorated frame stays part of the child’s room.
That small change also makes the project more useful than a decoration designed to be thrown away after the season.
Halloween Door Decor
5. Paper or Felt Ghost Door Hanging

A bedroom door gives kids another place to use their Halloween room decor without putting more pieces on the wall.
A simple ghost hanging can sit on the inside of the bedroom door, where the child can see it every time they enter the room. Paper works well for a lightweight version, while felt makes a sturdier decoration that can be stored and reused.
What Makes This Different From Wall Decor?
The door is a moving surface, so the decoration needs to stay lightweight and shouldn’t interfere with the door opening or closing.
That makes a flat ghost shape a better choice than a bulky decoration with lots of pieces sticking out.
You can make one large ghost for a simple look or create three smaller ghosts hanging together.
What You’ll Need
For a paper version:
- White cardstock
- Black marker
- Scissors
- Ribbon or string
- Hole punch
- Tape or another suitable attachment method
For a felt version:
- White felt
- Black felt or fabric marker
- Scissors
- Ribbon
- Fabric glue, if needed
How to Make It
- Create the ghost.
Draw a rounded ghost shape with a wavy bottom and cut it out. - Add the face.
Use a marker for a simple pair of eyes and a mouth, or cut small facial shapes from black felt. - Add the hanging loop.
Punch a hole near the top of a paper ghost or attach a ribbon to the felt version. - Test the length.
Hold the finished ghost against the door before attaching it permanently. Make sure it won’t hang low enough to catch on furniture or interfere with the door. - Hang it securely.
Use a method that suits the door surface and keeps the decoration stable.
Make the Door Part of the Halloween Scene
One large ghost can work well in the centre of the door, but a small group can create more interest.
For example, three ghosts could hang at slightly different heights. You could give each one a different expression or make them different sizes.
Another option is to add a small paper moon above them or a few stars around the edges. Keep the additions flat so the door can still open and close normally.
Let Kids Choose the Ghosts’ Personalities
This craft doesn’t need a complicated design to look finished.
One ghost might look happy, another surprised and another sleepy. Kids can also give the ghosts names or add a short Halloween message to the bottom.
That personal detail is what can make a simple door hanging feel like their Halloween room decor, rather than a decoration copied from a store.
Before Hanging It
Check the full movement of the door after the decoration is attached. It shouldn’t block the handle, catch against the frame or prevent the door from opening and closing normally.
For younger children, avoid adding small loose pieces that could detach easily. A simpler face drawn directly onto the ghost is often enough.
6. Mini Halloween Wreath
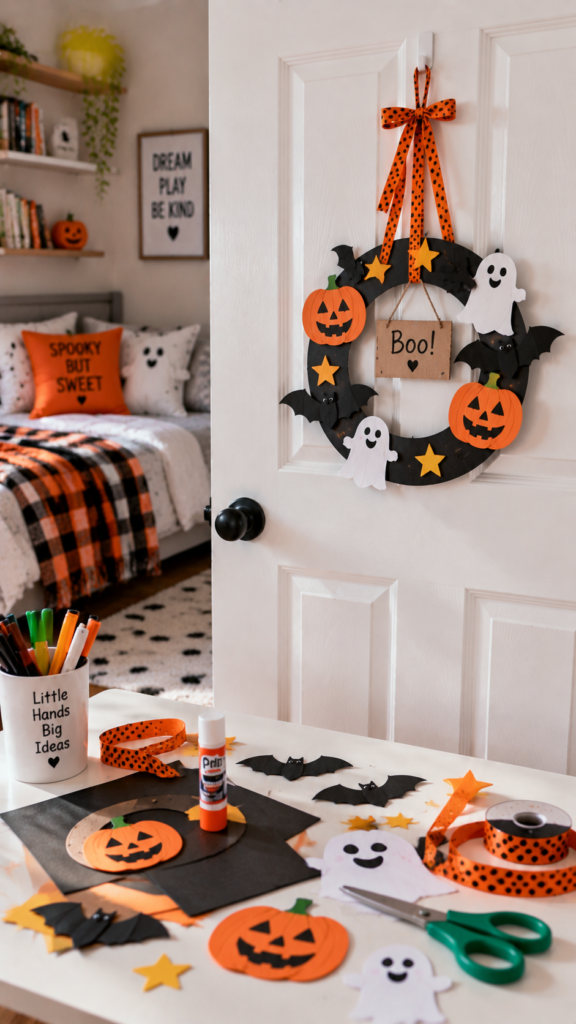
A wreath doesn’t have to be a large front-door decoration. A mini Halloween wreath can give a child’s bedroom a small seasonal focal point and works especially well when the room doesn’t have much empty wall space.
Kids can make the base from paper, cardboard or a simple craft ring, then decorate it with a few Halloween shapes.
Why Make It Small?
A large wreath can become heavy once you add decorations. A mini version is easier for a child to handle and gives you more options for displaying it indoors.
It can hang on a bedroom door, sit against a wall on a shelf, or become part of a small Halloween display on a dresser.
The size also makes it easier to store when Halloween is over.
What You’ll Need
- Cardboard or a lightweight craft ring
- Green, black, orange or purple paper/felt
- Scissors
- Glue suitable for the materials
- Ribbon or string
- Optional Halloween shapes such as bats, pumpkins, stars or ghosts
Make the Wreath Base
If you’re using cardboard, cut a circle and remove the centre to create a ring.
The child can cover the ring with strips of paper or felt, or decorate the cardboard directly. There is no need to cover every part of the base if the finished design will have enough decorations to fill the space.
Add a Simple Halloween Theme
Choose one main idea instead of attaching every Halloween symbol you can find.
For example:
- Bat wreath: black bats around the ring with a small orange moon
- Ghost wreath: white ghost shapes with simple faces
- Pumpkin wreath: orange pumpkins with a few green leaves
- Spooky night wreath: stars, a moon and a small black cat
Keeping one idea running through the wreath makes the finished Halloween room decor look more intentional.
How to Finish It
- Decorate the base.
Cover or paint the cardboard ring if necessary. - Prepare the shapes.
Cut out the Halloween pieces the child wants to use. - Arrange before gluing.
Lay everything around the wreath first. This helps you see whether some areas look too crowded. - Attach the pieces.
Glue the decorations in place and allow everything to dry fully. - Add a hanging loop.
Tie ribbon or string at the top once the wreath is finished.
Where a Mini Wreath Works Best
A bedroom door is an obvious choice, but it isn’t the only one.
A small wreath can hang above a desk, sit against a bookshelf, or become part of a dresser display with a few other handmade decorations.
If you have several crafts from this list, the wreath can also connect them. For example, a child could place the mini wreath on a shelf underneath the paper bat wall display or near the Halloween picture frame.
That helps the room feel decorated as one space rather than like separate crafts placed wherever there happened to be room.
A Good Reason to Keep the Design Simple
The wreath should still be recognizable as a wreath from a few feet away.
If the child covers the entire surface with tiny decorations, the circular shape can disappear. A few larger shapes with some of the base still visible will usually make the finished piece easier to read.
And because this is indoor Halloween room decor, keep the finished wreath lightweight and securely displayed, especially if it will hang on a door that gets opened and closed frequently.
Add a thoughtful touch to Halloween night with Halloween Treat Bags for Neighbors: What to Put Inside for a Thoughtful Halloween Surprise.
7. Boo or Enter If You Dare Door Sign

A Halloween door sign gives kids a simple way to mark their bedroom as their own spooky space. It can be playful rather than frightening, and the child can choose the wording, colors and decorations.
The easiest version uses cardstock, but cardboard or craft foam can make a sturdier sign that can be brought out again next Halloween.
Choose the Message First
The words will determine the shape and size of the sign.
“Boo” works well for a small, simple sign. “Enter If You Dare” needs more room, especially if the child wants to decorate around the lettering.
Other short options include:
- “Spooky Room”
- “Beware”
- “Haunted Hangout”
- “Ghosts Welcome”
- “Witch’s Room”
Let the child choose the message rather than treating the lettering as something they simply have to copy.
What You’ll Need
- Cardstock, cardboard or craft foam
- Pencil
- Ruler
- Scissors
- Markers or paint
- Ribbon or string
- Glue
- Optional Halloween decorations such as paper bats, stars or pumpkins
How to Make It
- Cut the sign shape.
A rectangle is easiest, but an oval, circle or irregular spooky shape can make it more interesting. - Plan the lettering.
Lightly sketch the words first so you know they will fit before using paint or markers. - Add the main decorations.
Keep the lettering as the focus. A few bats, stars, pumpkins or a small ghost around the edges are enough. - Add the hanging loop.
Punch two holes near the top and thread ribbon through them, or use another suitable hanging method. - Check the finished sign on the door.
Make sure it doesn’t cover the handle, peephole or any other part of the door that needs to remain visible or accessible.
Make the Sign Match the Child’s Room
The sign doesn’t have to look like a traditional black-and-orange Halloween decoration.
A child who likes cute decorations might use smiling ghosts and pastel colors. Someone who prefers a spooky look could choose black lettering, a crooked border and a few bats.
This also makes the project more personal. The child isn’t simply making a Halloween sign; they’re deciding how they want their bedroom entrance to look.
Give the Sign a Little More Character
Instead of making the sign completely flat, kids can add one or two layered paper details.
A ghost can overlap the corner of the lettering, a bat can extend slightly beyond the edge, or a paper moon can sit behind the main words.
Just keep the finished sign light enough to hang securely and avoid adding anything that could catch on the door frame.
Where It Works Best
The obvious spot is the child’s bedroom door, but an inside-facing sign can also work if the child wants to see it whenever they enter their room.
If the bedroom door opens directly into a narrow hallway, keep the sign flat and close to the door so it doesn’t become an obstruction.
8. Hanging Bat or Pumpkin Banner

Long, narrow spaces can be awkward to decorate with individual crafts. A hanging banner solves that by stretching one simple idea across the space.
Cut repeated Halloween shapes from cardstock and string them along ribbon, yarn or twine. Bats create a darker look, while pumpkins make the decoration feel brighter and more playful.
Start With One Main Shape
Choose either bats or pumpkins rather than mixing several shapes into one banner.
Keeping one shape throughout makes the pattern easier for kids to create and gives the finished banner a more finished look. The pieces can still vary slightly in size, and pumpkins can have different expressions.
What You’ll Need
- Black cardstock for bats or orange cardstock for pumpkins
- Pencil
- Simple bat or pumpkin template
- Scissors
- Hole punch
- Ribbon, yarn or twine
- Markers for pumpkin faces
- Optional paper stars or leaves
Make the Banner
- Trace the shapes.
Create one simple template that the child can trace repeatedly. - Cut the pieces.
Make enough shapes to suit the space you’re decorating. Fewer pieces may work better for a short shelf or desk wall, while a longer wall may need more. - Add the details.
Give the pumpkins different faces, or keep the bats simple. A few small details can be enough. - Punch the holes.
Make two small holes near the top of each shape so the pieces can hang from the string. - Thread everything together.
Leave a little space between each shape instead of pushing them tightly together.
Measure the Space Before You Cut Everything
The length of the banner should suit the place where it will hang.
A short banner can sit above a desk without overwhelming the space. A longer one can stretch across the open wall above a bookshelf or along a bedroom doorway.
You can also make a small banner for the front edge of a shelf or dresser. In that case, keep the pieces small enough that they don’t hide whatever is being displayed underneath.
Let the Banner Hang Naturally
The string doesn’t need to be pulled completely straight. Leaving a little slack creates a gentle curve and gives each shape room to hang naturally.
Pumpkins can alternate between different expressions, while bats can face slightly different directions. Those small changes keep the banner from looking like the same shape was copied and pasted over and over.
Use It to Connect the Room
This banner can also bring together some of the other handmade decorations.
Black bats can repeat the shapes used in the paper bat wall decor, while orange pumpkins could appear again on a picture frame or shelf display.
Repeating one or two colors or shapes around the room helps the decorations feel connected without requiring every craft to match.
Keep the Finished Banner Out of the Way
Use a lightweight material and make sure the hanging method suits the surface.
If the banner crosses a doorway, check that it stays clear of the door and frame. If it hangs near a window, make sure it doesn’t interfere with blinds, curtains or anything that needs to move.
The best spot is somewhere the child can enjoy the decoration without having to work around it every time they use the room.
Halloween Window Decor
8. Moon-and-Star Silhouettes

Moon-and-star silhouettes turn simple paper shapes into a small Halloween night-sky display for a child’s room.
The craft works particularly well when you want something spooky without filling the space with ghosts, bats or scary faces.
The moon can act as the main shape while smaller stars surround it, creating a simple scene that can work above a desk, reading corner or another open section of wall.
What You’ll Need
- Black, dark blue or other colored cardstock
- Yellow, white or light-colored paper for the moon and stars
- Pencil
- Moon and star templates
- Scissors
- Removable wall-safe adhesive
Lightweight cardstock is useful because the shapes will stay flatter once attached to the wall. Younger children can trace the shapes and help arrange the finished pieces while an adult handles any difficult cutting.
How to Make the Moon and Stars
- Make the templates.
Draw a crescent moon and several simple star shapes, or use child-friendly templates. - Trace the shapes.
Trace one large moon and several stars onto your chosen paper. Vary the star sizes so they don’t all look identical. - Cut them out.
Carefully cut around each shape. Simple silhouettes work better than designs with lots of tiny details. - Plan the scene.
Place the moon and stars on the floor first. Try different arrangements before deciding where everything will go. - Attach the pieces.
Use an adhesive suitable for the wall surface and follow its instructions.
Turn the Shapes Into a Night-Sky Scene
The arrangement can completely change how this craft looks as Halloween room decor.
Place the moon slightly higher than the stars and let the smaller shapes spread outward. You could make the stars appear to move away from the moon, cluster them closely around it or create a gentle curve across the wall.
For example, the display could sit:
- above a desk with the moon toward one side
- over a reading corner to create a simple night-sky backdrop
- above a bookshelf with the stars gradually getting smaller
- on an empty wall beside other Halloween decorations
- around a small Halloween picture or silhouette
You don’t need many pieces. Leaving some empty wall around the scene helps the moon and stars remain visible.
Give the Child More to Experiment With
The child can decide whether the scene should look calm, spooky or playful.
They could make one large moon with tiny stars around it, create several different star shapes or add a few small clouds. Another option is to place a black cat or haunted-house silhouette underneath the moon.
If other decorations already occupy the wall, keep the extra elements limited. The moon-and-star scene should complement the room rather than compete with everything else.
One Thing to Check Before Hanging Them
Look at the arrangement from across the room before attaching all the pieces. Small stars that look nicely spaced on the floor may appear too far apart once they’re on a large wall.
Keep the pieces away from windows, blinds, vents and anything that needs to move freely.
Since the decoration is temporary, choose a removable hanging method that suits the wall surface and follow the manufacturer’s instructions.
Once Halloween is over, shift toward holiday shoppers with November Craft Fair Ideas: Handmade Products Worth Making and Selling for Early Holiday Shoppers.
9. Ghost Shapes

Ghost shapes turn simple white paper cutouts into a light Halloween display that kids can arrange on a wall, shelf or other open part of their room.
The shapes don’t need complicated details. Different sizes, expressions and positions can make a group of simple ghosts look like they’re floating together rather than sitting separately.
What You’ll Need
- White construction paper or lightweight cardstock
- Pencil
- Ghost template
- Scissors
- Black marker
- Removable wall-safe adhesive
Cardstock is useful if the ghosts need to stay flat for several weeks. Younger children can draw the faces and help arrange the finished shapes while an adult handles the cutting if necessary.
How to Make the Ghosts
- Draw one ghost template.
Keep the shape simple, with a rounded head and an uneven bottom edge. - Trace several ghosts.
Make some larger and some smaller. Changing the proportions gives you more options when arranging them. - Cut them out.
Cut carefully around each ghost. Slight differences between the shapes can make the finished display feel more handmade. - Give them different faces.
Use a black marker to add eyes and mouths. One ghost can look happy while another looks surprised or sleepy. - Test the arrangement.
Place the ghosts on the floor first and experiment with their positions before attaching them.
Turn the Ghosts Into a Scene
A group of ghosts can become part of the Halloween room decor when you give them some direction.
Instead of placing them in a straight row, make some appear higher than others. A few smaller ghosts can float toward the ceiling while larger ones sit lower on the wall.
You could arrange them:
- around a paper moon
- floating above a desk
- beside a bookshelf
- moving across an empty wall
- around a Halloween picture
Leaving some space between the ghosts helps each shape remain visible.
Let the Child Create the Personalities
The faces give kids an easy way to make the decoration their own.
They can give each ghost a different expression, add tiny bows or hats, or decide which ghost looks like the leader of the group. Those small choices can make a simple paper craft feel much more personal.
One Thing to Check Before Hanging Them
Check the arrangement from across the room before attaching the ghosts permanently. Small gaps can look much larger on the wall than they did on the floor.
Keep the pieces away from windows, blinds, vents and other areas that need to remain accessible. Use an adhesive suitable for the particular wall surface.
10. Pumpkin Faces

Pumpkin faces give kids a chance to turn simple orange paper shapes into a Halloween display without needing to carve a real pumpkin.
The interesting part is that every pumpkin can have a different expression. A few different faces arranged together can create a cheerful display for a bedroom wall, shelf or dresser.
What You’ll Need
- Orange construction paper or cardstock
- Green paper for stems
- Pencil
- Pumpkin template
- Scissors
- Black paper or marker for the faces
- Glue
- Removable wall-safe adhesive if hanging them
Cardstock makes the pumpkins sturdier, especially if you want to save them for another Halloween.
How to Make the Pumpkin Faces
- Make the pumpkin shapes.
Draw a simple pumpkin outline or use a template. Make several sizes if you want the finished display to have more variation. - Cut out the pumpkins.
Cut around each shape and add a small green paper stem if you like. - Plan the faces.
Sketch the eyes and mouth lightly before cutting or drawing them. This gives the child a chance to experiment with different expressions. - Add the faces.
Use black paper for bold shapes or draw directly onto the pumpkin with a marker. - Arrange the pumpkins.
Try different groupings before deciding where they will go.
Make Each Pumpkin Look Different
Pumpkin faces don’t all have to look like traditional jack-o’-lanterns.
One pumpkin can have triangle eyes, another can have round eyes, and another can have a silly smile. Kids can also make one face look sleepy or surprised.
This turns the craft into a small exercise in facial expression and design. They have to think about how changing the eyes and mouth changes the personality of the same basic shape.
Use the Pumpkins as Part of the Room
A small group can sit on a dresser or bookshelf, while a larger collection can create Halloween room decor across an open wall.
Try arranging them:
- in a row above a desk
- in a loose cluster beside a bookshelf
- around a Halloween picture
- along the front of a shelf
- in different sizes across a bedroom wall
A few pumpkins usually look more intentional than covering the entire space with identical shapes.
Give the Display Some Connection
The pumpkins can also work with other handmade decorations in the room.
For example, a child could use the same orange paper for pumpkin faces and the small details on a Halloween picture frame. Repeating one color helps separate crafts feel like parts of the same display.
One Thing to Check Before Displaying Them
Paper pumpkins are lightweight, but they can still curl if the paper is very thin. Cardstock will usually hold its shape better.
Before attaching them to a wall, test the adhesive on the surface according to its instructions and keep the pumpkins away from anything that needs to open, close or move.
Taking the Halloween fun to the parking lot? Trunk-or-Treat Decorating Ideas: 11 Themes You Can Set Up Fast for Every Skill Level can help you pull together a themed setup without making it complicated.
11. Translucent Tissue-Paper Shapes

Translucent tissue-paper shapes offer a softer alternative to solid cardstock decorations.
Because some light can pass through the paper, the shapes can look different depending on where they are displayed and how much natural light reaches them.
Ghosts, pumpkins, moons and stars all work well for this technique.
What You’ll Need
- Colored tissue paper
- Pencil
- Simple Halloween templates
- Scissors
- Clear contact paper or another suitable transparent backing
- Ribbon or string if making a hanging decoration
Tissue paper is much more delicate than cardstock, so the finished pieces need a little more care. A transparent backing can help give the shapes enough structure to hang or display them.
How to Make the Shapes
- Choose the shapes.
Start with simple designs such as moons, stars, pumpkins or ghosts. Avoid very narrow sections that can tear easily. - Trace the shapes.
Lightly trace each shape onto the tissue paper. - Cut carefully.
Use sharp scissors and work slowly because tissue paper can tear more easily than regular craft paper. - Add a backing if needed.
Place the tissue-paper shapes between or onto a suitable transparent backing to give them more stability. - Decide how they will be displayed.
They can become part of a hanging banner, a window display or a small light-catching arrangement.
Let the Light Become Part of the Decoration
This craft works differently from solid paper shapes because the light affects how the finished decoration looks.
Place colored tissue-paper ghosts or pumpkins near a window where daylight can pass through them. A combination of different colors can create a softer, layered effect.
For a bedroom wall away from natural light, the translucent quality may be less noticeable. In that case, a hanging arrangement near a well-lit area will show the material to better advantage.
Keep the Design Simple
Tissue paper doesn’t need lots of decoration to look interesting.
Try layering two slightly different shades to create a richer color, or place a small star inside a larger moon shape. You can also combine translucent shapes with solid cardstock pieces so the display has different textures and levels of opacity.
Give Kids Room to Experiment
This craft can teach a simple lesson about how materials behave differently.
A solid piece of cardstock blocks most of the light, while tissue paper allows some light through. Layering two pieces can change the appearance again.
Kids can experiment with different colors and overlapping shapes before deciding which combination they like best.
One Thing to Keep in Mind
Tissue paper is more fragile than cardstock, so it works best in a spot where it won’t be handled frequently.
If you use it near a window, make sure the decoration doesn’t interfere with blinds, curtains or the window itself. Keep the finished pieces away from open flames and other heat sources, and use a suitable hanging method for the surface.
Shelf and Bookcase Decor
12. Small Cardboard Haunted House

A small cardboard haunted house gives kids a chance to make Halloween room decor that can sit on a shelf, dresser or desk rather than hang from a wall.
The structure doesn’t need to be elaborate. A simple house with a few windows, a door and a crooked roof can become the centre of a small Halloween display.
What You’ll Need
- Lightweight cardboard from a clean box
- Pencil
- Ruler
- Scissors or craft knife
- Black, grey or brown paper
- Glue
- Markers or paint
- Optional Halloween details such as paper bats, pumpkins or ghosts
An adult should handle a craft knife or any difficult cutting. Younger children can draw, paint and decorate the house once the pieces are ready.
How to Make the Haunted House
- Plan the house.
Sketch the front, sides and roof before cutting anything. Keep the structure small enough to sit safely on the intended shelf or table. - Cut the pieces.
Cut the cardboard into the main wall and roof sections. Score fold lines where needed so the pieces are easier to assemble. - Add the openings.
Draw simple windows and a door. You can cut them out or draw them directly onto the front. - Assemble the house.
Glue the pieces together and allow the structure to dry completely before decorating it. - Add the spooky details.
Use paper, markers or paint to add crooked windows, a dark door, roof tiles or small Halloween characters.
Build a Little Halloween Scene Around It
The haunted house becomes more interesting when it has a little space around it.
Place it in the centre of a shelf and add a few small paper bats, pumpkins or ghosts around the base. A piece of dark paper underneath can also help define the scene.
On a dresser or desk, keep the surrounding decorations low enough that the house remains the main feature. You don’t need a large collection of pieces to make the display feel complete.
Let Kids Decide What Makes It Haunted
A haunted house doesn’t have to look frightening.
Kids can give it crooked windows, a silly ghost in the doorway, oversized pumpkins or a moon behind the roof. They can also experiment with how different shapes change the appearance of the house.
This makes the project more than a decorating exercise. Building the structure introduces simple ideas about shapes, folding, balance and how separate pieces come together to form a three-dimensional object.
Give the House a Stable Base
Cardboard can become top-heavy once you add a roof and decorations. Before putting it on a shelf, check that it sits flat and doesn’t wobble when lightly touched.
Keep the finished house away from the edge of a shelf or dresser, and choose a display spot where it won’t be knocked over during normal use.
13. Halloween Character Figurines Made From Paper or Cardboard
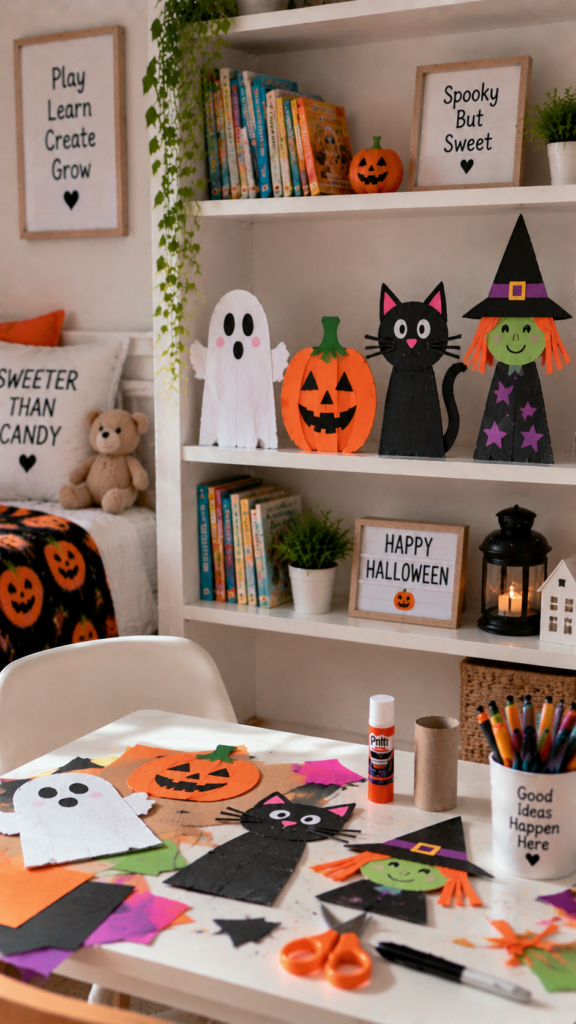
Halloween character figurines give kids another way to create Halloween room decor that can stand on its own.
Instead of making a flat decoration, they can turn paper or cardboard into small standing characters such as ghosts, witches, black cats, pumpkins, skeletons or monsters.
A few characters together can become a little Halloween scene on a shelf or desk.
What You’ll Need
- Cardstock or lightweight cardboard
- Pencil
- Scissors
- Markers, crayons or paint
- Glue
- Small pieces of colored paper
- Optional cardboard strips for stands
Cardboard gives the characters more stability, while cardstock works well for smaller figurines. Use materials that are sturdy enough to stand without making the finished figures unnecessarily heavy.
How to Make the Figurines
- Choose the characters.
Start with two or three characters that can work together in the same scene. - Draw the shapes.
Sketch each character on cardstock or cardboard. Keep the outline simple enough to cut without too many narrow sections. - Add the details.
Draw faces, clothes, hats, ears or other features. Colored paper can also add details without requiring complicated painting. - Create the stands.
Cut small strips of cardboard, fold them into simple supports and attach them to the backs of the characters. Another option is to cut a small slit in the bottom of the character and slide it into a cardboard base. - Test the balance.
Stand each figure on a flat surface and adjust the base if it tips over.
Turn the Characters Into a Small Display
A single figurine can sit beside a picture frame or on a bookshelf, but several characters can create a more interesting piece of Halloween room decor.
For example, a child could make a ghost, pumpkin and black cat and arrange them together on a shelf. A witch could stand beside a small cardboard house, while tiny bats hang above the scene.
Vary the height of the characters so they don’t all appear to sit on exactly the same level. The tallest figure can sit toward the back while smaller ones go in front.
Let Each Character Have a Personality
Kids can use the same basic shape in completely different ways.
A ghost could look sleepy, a pumpkin could have a funny face and a black cat could look surprised. They can also choose whether their characters look spooky, silly or friendly.
That choice gives the child more ownership of the finished display and makes the figurines feel like characters they created rather than generic Halloween decorations.
Make the Scene Changeable
Don’t glue every character together.
Keeping the figurines separate means the child can rearrange the scene throughout October. The ghost can move from beside the pumpkin to the other side of the shelf, or the characters can be combined with the cardboard haunted house from the previous craft.
This also makes the decorations easier to pack away when Halloween is over.
Check the Display Surface
Make sure each figurine has a stable base before leaving it on a shelf or desk. Avoid placing small figures where they can easily fall onto the floor or where younger children might pull them down.
If the figurines contain small detachable pieces, consider the child’s age before using them as room decor.
13. Mini Paper Pumpkin Display

A mini paper pumpkin display turns a few simple paper pumpkins into a small Halloween arrangement for a shelf, desk, dresser or bedside table.
Instead of making one large decoration, kids can create several pumpkins in different sizes and expressions.
The display works especially well in a smaller space where a full wall decoration might feel like too much.
What You’ll Need
- Orange construction paper or cardstock
- Green paper for stems and leaves
- Pencil
- Scissors
- Glue
- Black marker
- Small pieces of cardboard for standing bases
How to Make the Paper Pumpkins
- Draw the pumpkin shapes.
Make several simple pumpkin outlines, varying the sizes so they won’t all look identical. - Cut them out.
Cut around each pumpkin carefully. Younger children can draw the shapes and decorate them while an adult handles the cutting if needed. - Add the details.
Draw different faces, from simple triangle eyes to silly expressions. Add stems and small leaves with green paper. - Make them stand.
Glue each pumpkin to a small folded cardboard base or attach a strip of cardboard behind it to create a stand. - Test the pumpkins.
Place them on a flat surface and adjust the bases if any pumpkin tips forward or backward.
Build a Small Pumpkin Scene
Rather than lining the pumpkins up at exactly the same height, place the largest one slightly behind the smaller pumpkins. This gives the display some depth without needing many extra decorations.
A child could arrange them:
- across a bedroom shelf
- along the back of a desk
- beside a stack of books
- around a small Halloween sign
- next to the cardboard haunted house from another craft
A few pumpkins can be enough. Leaving some empty space around the display helps the individual shapes stand out.
Give Each Pumpkin Its Own Personality
Kids can make one pumpkin happy, another surprised and another a little spooky. They can also change the colors slightly with yellow, white or purple details instead of making every pumpkin identical.
If you’re making several Halloween room decor pieces, repeat one or two colors across the pumpkins so they connect visually with the other decorations in the room.
Keep the Display Easy to Move
Don’t glue the pumpkins permanently to the shelf or to other decorations. A freestanding display lets the child rearrange the pumpkins, move them to another part of the room or add new characters later.
Check that the finished pumpkins sit securely on their bases, especially if the display will go on a desk or bedside table where it may get bumped.
Fall craft fairs are another opportunity to put those making skills to work. What to Make and Sell This Fall: 15 Fall Craft Fair Project Ideas Worth Your Table Space can help you choose projects with a place on your table.
Halloween Bedside Decor
14. Small Handmade Signs

Small handmade signs give kids a way to add words and messages to their Halloween decorations. Instead of making one large wall sign, they can create small pieces that sit on a shelf, desk, dresser or beside another decoration.
Messages can be spooky, funny or completely silly depending on what the child likes.
What You’ll Need
- Cardstock or lightweight cardboard
- Pencil
- Ruler
- Scissors
- Markers, crayons or paint
- Colored paper
- Glue
- Optional: craft sticks or cardboard strips for a stand
How to Make the Signs
- Choose a short message.
Keep it brief enough to read quickly. Ideas include “Boo!”, “Spooky Stuff,” “Beware,” or “Enter If You Dare.” - Cut the sign shape.
A rectangle is easiest, but kids can try a pumpkin, ghost, coffin or crooked wooden-sign shape. - Add the lettering.
Sketch the words lightly in pencil first, then trace over them with a marker or paint. - Decorate around the message.
Add small bats, stars, pumpkins, spiders or simple borders without covering the words. - Add a stand if needed.
A folded piece of cardboard at the back can turn the sign into a freestanding decoration.
Give Each Sign a Different Job
A sign doesn’t have to sit by itself. Place a “Boo!” sign beside a group of paper ghosts or put “Beware” near the cardboard haunted house.
You can also make two or three small signs and spread them around the room rather than putting them all together.
Let the Words Be Part of the Craft
This project gives children room to experiment with lettering, spacing and decoration. They can choose block letters, crooked writing or oversized words to make the sign look more playful.
Before displaying it, check that the sign stands securely and doesn’t block anything the child needs to reach.
15. Battery-Operated Decorative Lighting

Battery-operated lights can add a soft glow to a Halloween display without relying on an open flame. Kids can make simple paper shapes or lantern-style covers to use around the lights, creating a small illuminated decoration.
What You’ll Need
- Battery-operated LED string lights or flameless LED lights
- Black, orange, purple or white paper
- Pencil
- Scissors
- Tape or glue
- Optional: tissue paper for translucent shapes
How to Make the Display
- Choose the light source first.
Use lights designed for decorative use and follow the manufacturer’s instructions. - Make simple Halloween shapes.
Cut out small pumpkins, ghosts, bats, moons or stars from paper. - Add details.
Draw faces or cut simple openings into the shapes so the light can show through. - Arrange the lights.
Place them around a shelf, along the back of a desk or around a small Halloween display. - Add the paper shapes carefully.
Keep the paper away from parts of the light that become warm and don’t cover the lights unless the product instructions specifically allow it.
Use the Lights to Highlight a Display
The lighting works best when it supports another decoration rather than becoming the entire display.
For example, a short strand can sit behind paper pumpkins, around a cardboard haunted house or beneath a shelf where the glow can be seen without creating a tangled mess.
Keep the Lighting Kid-Friendly
Choose battery-operated LED lights rather than candles or other open flames. Check the lights and battery compartment before use, and keep cords, batteries and small detachable parts away from younger children who might handle or swallow them.
Don’t place the lights where they could interfere with doors, windows or anything that needs to move freely.
16. Fabric Accents

Scraps of fabric can add texture to Halloween room decor without making the room feel covered in paper decorations.
A small piece of black, orange, purple or Halloween-print fabric can become a shelf runner, chair accent, small hanging, or decorative bow.
What You’ll Need
- Halloween-themed or plain fabric scraps
- Scissors
- Ribbon or twine
- Fabric markers, if desired
- Optional: felt shapes, fabric glue, needle and thread
How to Make the Fabric Accents
- Choose the fabric.
Pick one or two colors that already appear in the room or match the child’s other Halloween decorations. - Decide how you’ll use it.
A narrow strip can work across a shelf or dresser, while a small square can become a decorative cloth for a desk or bedside table. - Add simple Halloween details.
Kids can draw small pumpkins, ghosts or bats with fabric markers. Felt shapes can also be attached to the fabric. - Finish the edges if needed.
Fold and glue or sew the edges if the fabric frays easily. Some fabrics can simply be cut and left unfinished. - Add the accent to the display.
Place it underneath paper pumpkins, beside a handmade sign or around a small Halloween scene.
Use Fabric to Connect Different Decorations
Fabric can help separate several small crafts from one another while still making them feel like part of the same display.
For example, an orange fabric strip could sit underneath paper pumpkins on a shelf, while a matching piece becomes a small bow on a handmade Halloween sign.
Keep the Fabric Away From Heat
Don’t place loose fabric near decorative lights, heaters, candles or other heat sources. Keep long strips away from walkways, door hinges and places where they could easily get caught or pulled.
Need a group costume that works for different body types? Plus-Size Group Halloween Costumes: 11 Costume Ideas That Fit the Group, Not Just the Theme offers ideas beyond the usual one-size-fits-all approach.
How to Make Handmade Halloween Decor Look Like Decor, Not Just Crafts

Making a Halloween craft is one thing. Making it look like it belongs in a room is another.
The difference usually comes down to how you finish and arrange it, not how complicated the craft is.
1. Give the Crafts Some Space
Don’t feel pressured to fill every shelf or wall. A few paper bats spread across an empty wall can look more intentional than twenty packed into one corner.
Leave some breathing room between pieces so each decoration can be seen.
2. Repeat a Few Colors
Choose two or three main colors and let them appear across different crafts. Black and orange, for example, can connect paper pumpkins, signs, fabric accents and wall decorations.
You don’t need every piece to match exactly.
3. Mix Sizes and Heights
A display made entirely from pieces of the same size can look flat. Put larger decorations behind smaller ones, or combine wall pieces with tabletop decorations.
This creates layers without requiring more crafts.
4. Group Related Pieces Together
Instead of scattering every craft around the room, create small scenes.
Paper ghosts can sit near a handmade “Boo” sign. A cardboard haunted house can have paper pumpkins around it. Bats can fly above the whole arrangement.
The pieces start to look like one display rather than separate projects.
5. Don’t Overdecorate
More crafts don’t automatically make better Halloween room decor. Once a space starts feeling crowded, stop adding pieces.
A child can make plenty of crafts during October without displaying every single one.
12 Easy Seasonal Craft Projects to Make All Year Round (One for Every Month) is a handy starting point when you want a craft idea that matches the time of year.
Conclusion
Halloween room decor doesn’t have to look professionally styled. Sometimes the pieces that matter most are the ones a child made, chose and feels proud to display.
Let them decide what belongs in their space, then give them room to make it their own.
Looking for more Halloween crafts for kids? Keep exploring 3niters Corner for more ideas they can make and actually use.