Your pot size determines everything. How to make a macramé plant hanger that fits, holds, and hangs straight the first time.
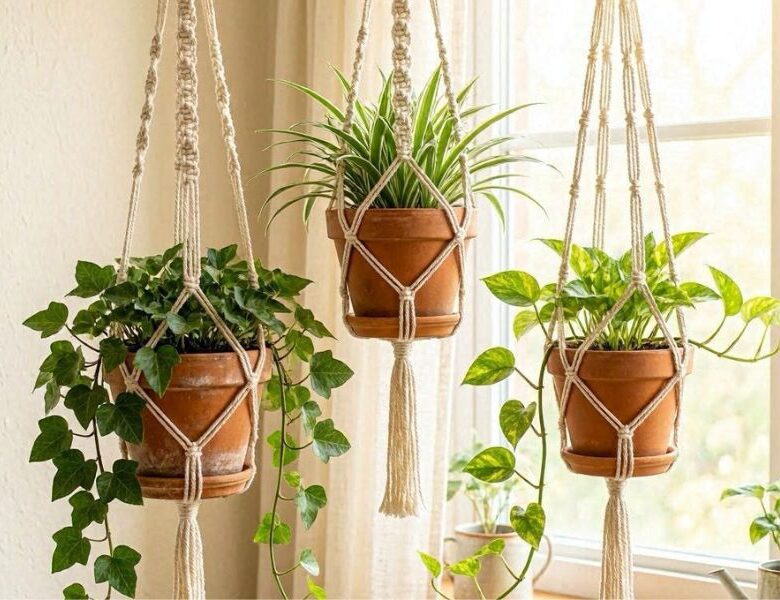
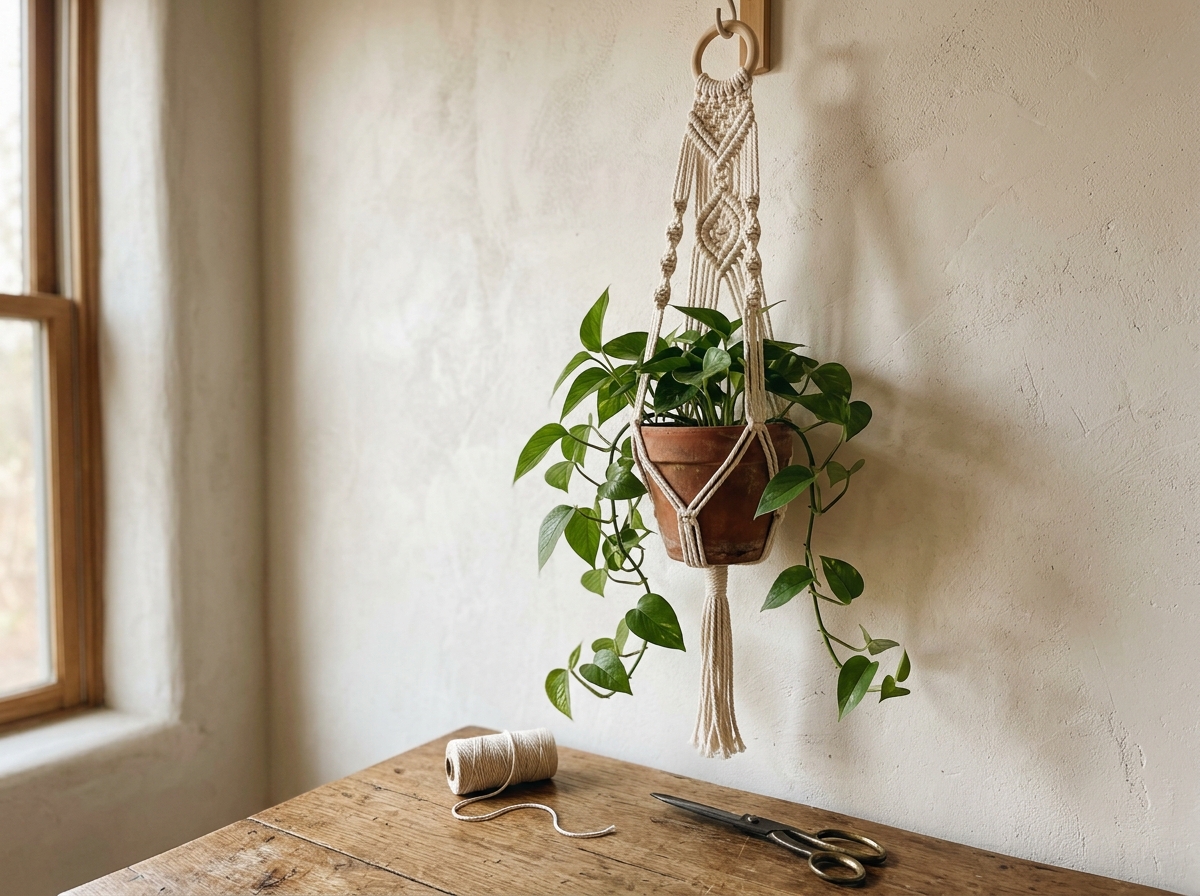
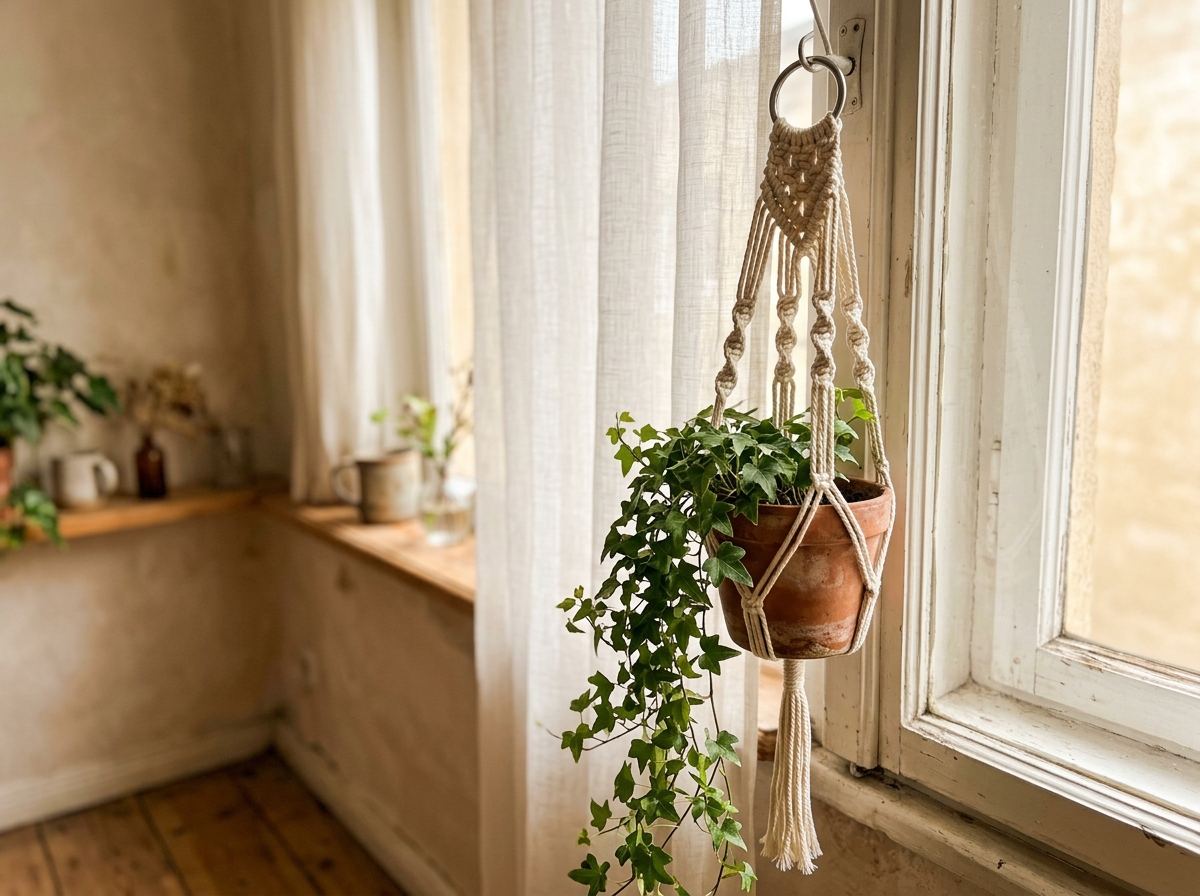
There is something quietly satisfying about a plant suspended in mid-air, held up by nothing but knotted cord and a ceiling hook. No shelf and no stand, just a handmade hanger doing exactly what it was designed to do, and looking beautiful while doing it.
A macramé plant hanger is one of the few home décor pieces you can start in an afternoon, hang the same evening, and genuinely be proud of.
But getting there requires knowing three things: how much cord your specific pot actually needs, how to build a basket that holds the pot without it slipping through, and how to keep your knot tension even so the finished piece hangs straight.
Get those three things right before you start and the rest follows naturally.
This post walks you through every decision, cord type, cord length, knot sequence, pot fitting, and hanging, in the exact order you need to make them. Not after your cord runs out or after the pot slips through, rather before any of that happens.
By the time you finish reading, you will have everything you need to sit down, knot your first macramé plant hanger, and hang it the same day.
New to fiber crafts? Before tying your first knot, read Macramé for Beginners: What It Is, What You Need, and How to Start to understand the essential tools, terminology, and techniques that make learning macramé much easier.
Just Before You Start

Most people pick their cord before they think about their pot. That single misstep is what causes most plant hanger problems, just like wrong cord thickness, wrong length, wrong knot spacing, before a single knot is tied.
Your pot is the starting point. Everything else works backward from it.
✅ How Pot Size Affects Your Entire Plan
The diameter of your pot determines your cord thickness, how many cords you need, and how tightly to space your basket knots. Here is the breakdown:
Small pots — up to 15cm / 6 inches diameter
- 3mm single-strand cotton cord
- 8 cords is sufficient
- A lightweight wooden or metal ring works fine
- Basket knots can sit closer together, small pots need a snugger cradle
Medium pots — 15cm to 25cm / 6 to 10 inches diameter
- 4mm or 5mm cord for better structure and weight support
- 8 cords standard
- Use a sturdier metal ring — the pot is heavier and the ring takes more strain
- Space basket knots slightly wider to accommodate the pot’s diameter
Large or heavy pots — 25cm and above / 10 inches plus
- 5mm cord minimum, anything thinner will stretch under the weight
- Consider 12 cords instead of 8 for a stronger, more supportive basket
- Metal ring only — wooden rings are not reliable at this weight
- Knot spacing needs testing with the actual pot before finishing the basket.
✅ How to Check If Your Ring Can Hold the Weight
The ring and ceiling hook must support the full weight of your pot, not the empty pot, but the pot filled with soil and watered. That weight is significantly heavier than most people expect.
- A standard 6-inch pot with wet soil weighs approximately 1.5 to 2kg / 3 to 4 pounds
- A large 10-inch pot with wet soil can weigh 4 to 5kg / 9 to 11 pounds
Before you hang anything, check the weight rating printed on your ceiling hook packaging. If there is no rating listed, do not use it for a heavy pot.
A metal ceiling hook rated for at least 5kg / 11 pounds covers most indoor plant hanger uses safely.
You can also check by:
1. The tug test
Once your hanger is complete and the ceiling hook is installed, hang the empty hanger first and pull down on it firmly with both hands before placing the pot inside. If the hook shifts, loosens, or the ring deforms at all under hand pressure alone, it will not safely hold a full pot.
2. Weigh your pot before you hang it
Place your pot, filled with soil and freshly watered, on a kitchen or bathroom scale before hanging. This gives you the exact weight you are working with, not an estimate. Then compare that number directly against the weight rating on your ceiling hook packaging.
3. Check the ring material under pressure
Hold your finished hanger by the ring with both hands and press your thumbs firmly against opposite sides of the ring. A wooden ring that flexes or creaks under hand pressure is not strong enough for a heavy pot. A metal ring should not bend at all. If it does, the gauge of the metal is too thin.
4. Test the ceiling hook with water first
Fill a bag or bucket with water to roughly the same weight as your full pot, use your kitchen scale to match it, and hang that from the hook for 30 minutes before trusting it with your plant. If the hook holds without pulling away from the ceiling, your installation is secure.
Once you’ve finished your plant hanger, give it something beautiful to hold. Explore these DIY Farmhouse Planter Ideas That Don’t Look Cheap and Fit Every Space for stylish containers that complement your handmade macramé project.
What You Need to Make a Macramé Plant Hanger
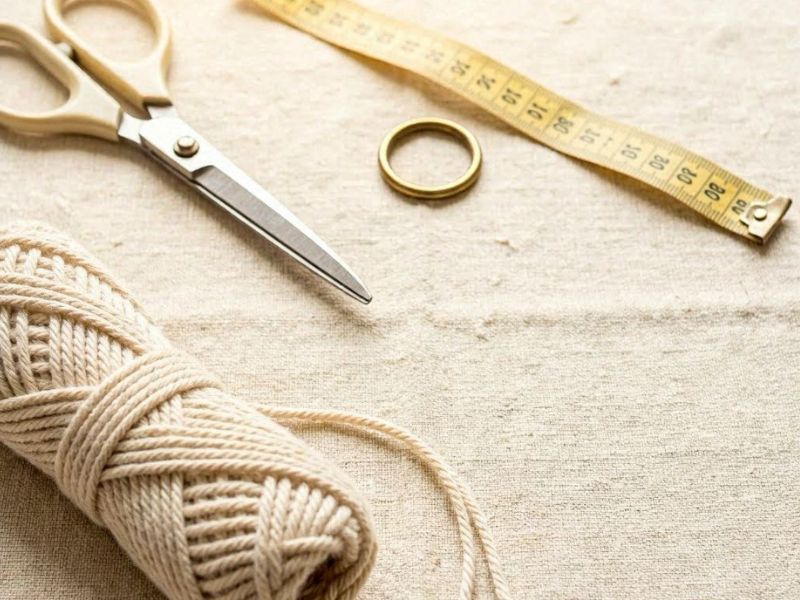
✅ Cord
The cord you buy determines how your finished hanger looks, how long it lasts, and whether you run out halfway through.
For a basic plant hanger with a finished length of around 40 inches / 1 metre using 3mm cotton cord, you need approximately 104 feet / 32 metres total,cut into 8 cords of 13 feet / 4 metres each.
If you are making a spiral plant hanger the same finished length, increase that to 160 feet / 49 metres.
Spiral knots consume significantly more cord than square knots, this is not a small difference and it catches beginners off guard every time.
For 5mm cord, add approximately 65% to all measurements. Thicker cord builds faster but uses considerably more length per knot.
Natural cotton is the most beginner-friendly material, soft on the hands, easy to unknot when you make a mistake, and widely available.
Avoid nylon or polyester cord for indoor hangers. They do not knot with the same grip as cotton and the finish looks noticeably different.
✅ Working Cords vs Filler Cords — What This Means for Cutting
This is where most beginners make their first mistake, cutting all cords to the same length.
In a square knot, not all four cords do the same job:
- Working cords — the 2 outer cords — actively wrap, loop, and tie the knot. They consume 4 to 6 times the finished project length.
- Filler cords — the 2 inner cords — sit in the centre and are knotted around. They consume only 1.5 to 2 times the finished project length.
Cutting every cord to the same length means your working cords run out before your filler cords, and there is no clean way to fix that mid-project.
Always ensure your outer cords are longer before you start knotting.
For a basic plant hanger, cutting all 8 cords to the same starting length works because the pattern is simple and cord consumption is relatively even, but the moment you add more complex knotting, this changes.
✅ The Ring — Wood vs Metal and What Size to Use
For most beginner plant hangers, a 2-inch / 5cm ring is the right starting size. It gives the cords enough room to fan out evenly at the top without bunching or spreading too thin.
- Wooden rings — lightweight, suit small to medium pots, and give a natural aesthetic. Not suitable for heavy pots.
- Metal rings — stronger, more reliable under weight, and the better choice for medium to large pots or anything hanging from a ceiling hook long term.
Ring diameter matters more than most people realise when learning how to make a macramé plant hanger.
A ring that is too small causes all 16 cord ends to crowd together, making the gathering knot bulky and the top of the hanger look compressed. A ring that is too large leaves visible gaps between cords at the top that no amount of knotting can fix later.
✅ Everything Else
Sharp fabric scissors, not kitchen scissors. Cotton cord flattens and frays when cut with a blunt blade, which makes finishing the fringe at the bottom look untidy. One clean cut is what separates a professional-looking finish from a ragged one.
A measuring tape, for cutting cords accurately before you start. Guessing cord lengths is how you end up short.
A hook, doorknob, or clothes rail to hang your work from while you knot, this is non-negotiable. Knotting flat on a table creates uneven tension because gravity is not working with you.
The hanger looks fine on the table and then tilts or sags once it is hung. Always knot with the piece hanging so every knot tightens under the same conditions it will live in permanently.
Step by Step — How to Make a Simple Macramé Plant Hanger
This tutorial is written for a medium pot with a diameter of 15 to 20cm / 6 to 8 inches, using 3mm single-strand natural cotton cord and a 2-inch metal ring.
Read and Follow each step.
Step 1: Unravel and Cut Your Cord
Before you cut anything, unravel your cord fully from the roll.
Cotton cord that has been wound tightly develops a memory, it twists back on itself while you are knotting, which creates uneven tension throughout the project. Lay it out flat or hang it loosely for a few minutes before cutting.
Now cut:
- 8 cords, each 4 metres / 13 feet long
- 1 extra cord, 60cm / 24 inches long — this is for your gathering knot only
Keep the extra cord separate so you do not accidentally use it as a working cord.
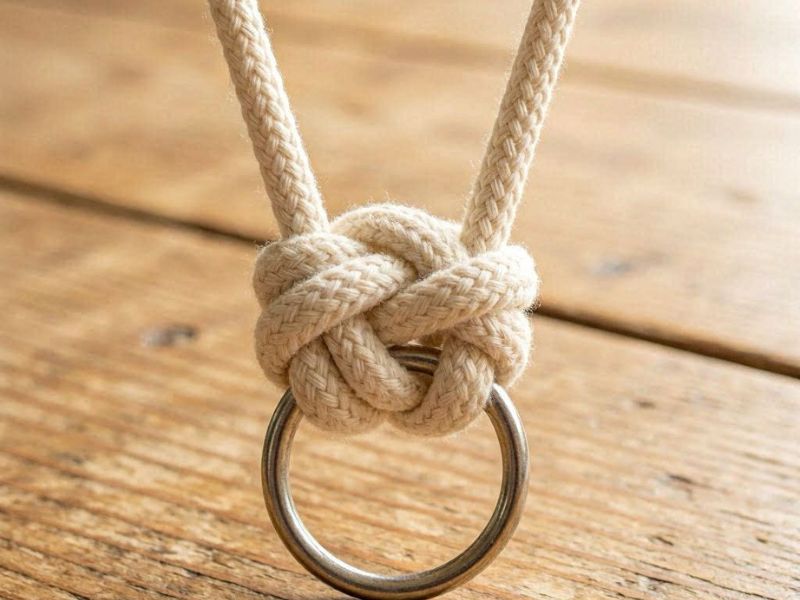
Step 2: Attach All 8 Cords to the Ring Using Lark’s Head Knots
Fold one cord in half. Place the folded loop over the top of the ring. Pull both loose ends down through that loop and pull firmly until the knot sits snug against the ring.
Repeat for all 8 cords.
You now have 16 cord ends hanging from the ring, 2 ends per cord, 8 cords total. Before moving on, slide all the knots close together so they sit evenly around the ring with no large gaps between them.
Step 3: Tie a Gathering Knot Directly Below the Ring
Take your 60cm extra cord and form a small loop at one end, leaving a short tail of about 5cm pointing upward. Place this alongside all 16 hanging cords directly below the ring.
Wrap the long tail firmly and repeatedly downward around all the cords, including over the small loop at the bottom.
Aim for 8 to 10 tight wraps. Once you are happy with the wrap, pass the long tail through the bottom of the loop.
Now pull firmly on the short top tail, this draws the loop and the tucked end up inside the wraps and locks the knot completely. Trim both tails close to the wrap.
This gathering knot is the foundation of the entire hanger. A loose one here means the whole piece shifts while you are knotting. Pull it tight.
Step 4: Divide the Cords Into 4 Groups of 4
Separate your 16 cords into 4 even groups of 4 cords each. Each group forms one arm of the hanger.
Spread the groups evenly around the ring, think of them as sitting at 12 o’clock, 3 o’clock, 6 o’clock, and 9 o’clock. Equal spacing here is what keeps the finished hanger hanging straight. If one arm sits too close to another, the basket will be lopsided and the pot will tilt.
Step 5: Tie the Arms With Square Knots
Take one group of 4 cords. Leave 10 to 15cm / 4 to 6 inches of bare cord below the gathering knot before tying your first knot, this bare section creates the open drop between the ring and the decorative section of each arm.
Now tie a sequence of square knots on that group:
- The 2 outer cords are your working cords, they do all the movement
- The 2 inner cords are your filler cords, they stay still and are knotted around
For each square knot,take the left outer cord and cross it over the 2 filler cords, then pass the right outer cord over the left cord, behind the fillers, and up through the loop on the left side.
Pull both outer cords firmly and evenly to tighten. That is one half. Repeat from the right side to complete one full square knot.
Tie 6 to 8 square knots per arm for a clean decorative section.
Repeat on all 4 groups, checking that each arm has the same number of knots and the bare section above the first knot is the same length on every arm.
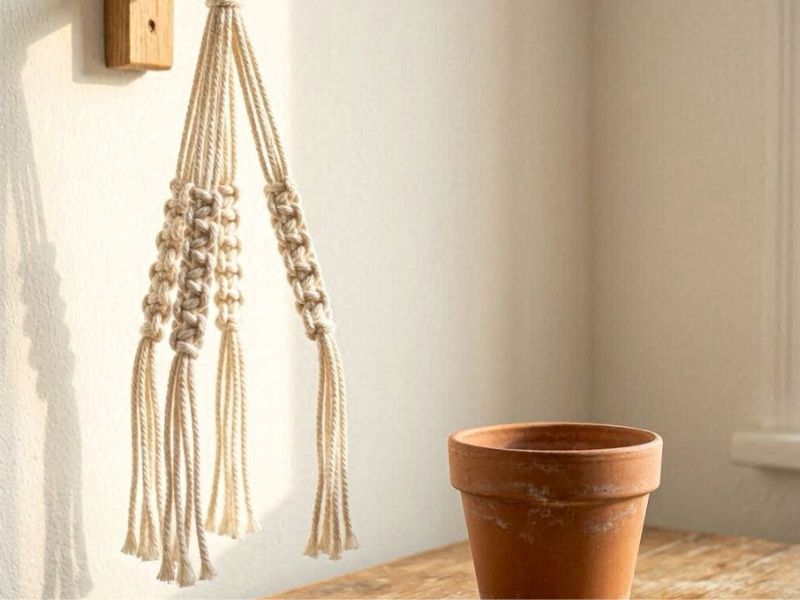
Step 6: Build the Basket With Alternating Square Knots
This is the section that holds your pot, get this right and the whole project works.
Leave a gap of approximately 8 to 10cm / 3 to 4 inches below the last square knot on each arm.
Now take 2 cords from one arm and 2 cords from the arm directly next to it, combine them into a new group of 4 and tie one square knot. Repeat this process all the way around, connecting each arm to the one beside it with one alternating square knot.
This creates the net-like basket structure that cradles your pot.
Before you go any further, place your pot into the basket now and check the fit. The pot should sit securely without slipping through and without the cord cutting into the rim.
If the pot slips through, the gap between your arms is too wide, untie the alternating square knots and move them closer to the arm knots above. If the pot sits too high and the basket feels too tight, move the alternating knots slightly lower.
This test fitting step takes two minutes and saves you from finishing the entire hanger only to discover the pot does not sit correctly.
Once the fit is right, tie a second row of alternating square knots approximately 5cm / 2 inches below the first row to deepen the basket and add more support under the pot.
Step 7: Gather All Cords at the Bottom
Place your pot back into the basket. Hold all 16 cord ends together below the pot and slide your hand down until you find the point where the base of the pot sits comfortably, not so tight that the cord digs in, not so loose that the pot wobbles.
Mark that point with a loose overhand knot as a placeholder, then remove the pot.
Tie a final gathering knot at that marked point using the same wrapping technique from Step 3, wrap tightly, pull the loop up inside the wrap, trim the tails clean.
This gathering knot is the base of the entire hanger. Make it as tight and neat as the one at the top.
Step 8: Trim the Fringe
You now have 16 cord ends hanging below the final gathering knot. This is your fringe.
Cut the cord ends a few centimetres longer than your desired final length, you will trim again after unravelling. Now unravel each cord end by separating the individual fibres with your fingers or a stiff-bristled brush.
Brushing the fibres out fully transforms the cord into soft, fluffy fringe that looks completely different from the raw cut ends.
Once all cords are unravelled and brushed, hold the fringe together and make one final trim to even out the ends. A straight cut across the bottom gives a clean finish. A slight V-shape trim, cutting the outer cords a little shorter than the centre, gives a more decorative, flowing finish.
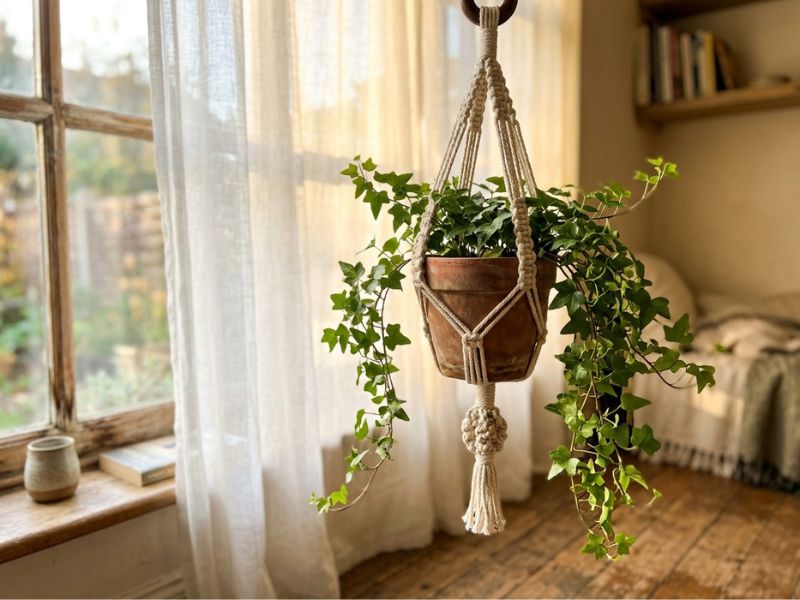
Hang your completed plant hanger from a hook, place your pot inside, and step back.
That is a finished macramé plant hanger, made entirely by your hands.
Once your macramé plant hanger is complete, the next question is what to put in it. These 11 Bathroom Plants That Thrive in Humidity and Help Reduce Dampness Where Mold Grows—Even in Low Light are excellent choices for adding greenery to bathrooms and other challenging indoor spaces.
The 4 Knots This Plant Hanger Uses
Knowing how to make a macramé plant hanger comes down to four knots. Not ten. Not twenty. Just four, and two of them you will use on repeat throughout the entire project.
✅ The Lark’s Head Knot
This is how every cord attaches to the ring. Fold your cord in half, place the folded loop over the ring, then pull both loose ends down through the loop and tighten. Done once per cord at the start, then you move on and never think about it again.
✅ The Gathering Knot (Wrapping Knot)
This knot appears twice, once at the top to bundle all cords together below the ring, and once at the bottom to close the basket and create the fringe base. It is the most skipped-over knot in most guides, which is why so many beginners find it confusing.
Here is exactly how it works:
- Take an extra piece of cord and form a small loop at one end, leaving a short tail pointing upward
- Place it alongside all the cords you want to gather
- Wrap the long tail tightly and repeatedly downward around all the cords, including over the loop
- Once you have enough wraps, pass the long tail through the bottom of the loop
- Pull firmly on the short top tail, this draws the loop and the tucked end up inside the wraps and locks everything in place
- Trim both tails close to the wrap
The result is a clean, tight bundle with no visible knot ends.
✅ The Square Knot
This builds the arms of the hanger, the long decorative sections that run from the ring down to the basket.
Four cords per group, two working cords on the outside, two filler cords in the middle. Alternate sides with every knot to get clean flat rows. Tie the same side repeatedly and the band spirals, which brings us to the next knot.
4. The Spiral Knot (Half Square Knot)
This is actually a square knot tied from the same side every single time. The result is a naturally twisting rope effect that looks intentional and textured.
Many beginners produce this accidentally and assume they have made an error. They have not, they have just discovered an alternative design.
Whether you want flat arms or spiral arms is purely a visual choice. Both are structurally sound.
Why Your Plant Hanger Might Not Look Right — And How to Fix It
One of the most important things to understand when learning how to make a macramé plant hanger is that most problems have a specific cause, and a specific fix. Here is what to look for and exactly what to do about it.
-
Pot Keeps Slipping Through
The gap between your alternating square knots is too wide for your pot’s diameter. This is purely a spacing issue, not a knotting error.
Untie the alternating square knots in the basket section and move them closer to the arm knots above.
Re-knot, then test fit the pot again before tying the final gathering knot at the base. Always test fit before finishing, it takes seconds and saves the entire project.
-
Arms Are Uneven Lengths
Two possible causes, and both happen before the knotting begins.
The first is cutting cords to uneven lengths before you start. Lay all 8 cords flat against each other before attaching them to the ring and confirm the ends are perfectly aligned.
The second, and most common, is placing the working cords on the inside instead of the outside. The 2 outer cords in each group of 4 are the working cords. They wrap, loop, and consume cord with every knot tied.
If those longer cords end up on the inside by mistake, the outer cords run short fast, sometimes halfway through the arm section, leaving you with nothing left to knot with and no clean way to fix it without starting that arm again.
Always double-check before tying your first square knot that your longest cords are on the outside of each group.
-
Knots Look Loose and Sloppy
This is almost always a tension problem caused by knotting flat on a table. When the piece lies flat, gravity is not involved, you are pulling cords sideways and the knots tighten inconsistently. The same hanger that looked fine on the table hangs loose and uneven on a hook.
Always knot with the piece hanging. The weight of the cords below creates natural downward resistance that helps every knot tighten evenly and consistently. Even hanging from a doorknob makes a visible difference.
-
The Hanger Tilts to One Side
The arms are not evenly spaced around the ring. When one arm sits slightly closer to another, the weight distribution is off and the finished hanger pulls to one side when hanging.
The only real fix is to go back to Step 4 and redistribute the groups evenly before the arm section is completed. Catching it early costs a few minutes. Catching it after the basket is done costs considerably more.
Test-hang the piece after Step 5, before you build the basket, by placing a light object in the ring and checking that all 4 arms hang at equal distances. That one check eliminates this problem entirely.
A handmade plant hanger is proof that beautiful décor doesn’t have to be expensive. For more budget-friendly ideas, see How to Decorate Your Home When You’re Broke But Have Good Taste and create a stylish home without overspending.
How to Hang Your Macramé Plant Hanger Safely
The hanger is done. Where and how you hang it matters just as much as how you made it.
Use a hook rated for more than the full weight of your pot soil and water included, not just the empty pot. If the hook packaging does not show a weight rating, do not use it.
For plaster or drywall ceilings, always use a hook with a wall anchor. Plaster alone will not hold, it will pull away from the ceiling over time, especially with the slow movement of a hanging plant. Drill into a ceiling joist where possible for the most secure hold.
For curtain rods or clothes rails, use a rated S-hook. Not every rod is built to bear hanging weight, so check the rod’s own weight limit before using it as a hanging point.
Before drilling, have someone hold the hanger in position at the desired location while you step back and check placement. Confirm the pot clears the wall, if the pot diameter is 20cm, the hook needs to sit at least 10 to 12cm away from the wall so the hanger hangs freely without the pot pressing against it.
One hook in the wrong place means a second hole in your ceiling. Take the extra minute.
You Now Have Everything You Need
Learning how to make a macramé plant hanger is not about being naturally crafty. It is about having the right information before you start, and now you do.
You know how your pot size determines every cord decision before you buy anything. You know exactly how much cord to cut, which cords go on the outside, and how to build a basket that actually holds the pot. And if something looks off, you now know the exact cause and the exact fix.
That is the difference between a first project you are proud of and one you abandon halfway through.
Hang your plant hanger, put your favourite pot inside, and enjoy what your hands just made.
When you are ready for the next project, the macramé wall hanging builds directly on everything you have just learned, same knots, bigger canvas, more room to make it your own.
Frequently Asked Questions
✅ Can I use a macramé plant hanger outdoors?
Yes, but your cord choice changes. Natural cotton degrades quickly in rain and direct sun. For outdoor use, choose nylon, polypropylene, or weather-treated polyester cord. These hold up against moisture and UV exposure without rotting or weakening over time.
✅ What plants work best in a macramé plant hanger?
Trailing and cascading plants are the best fit, pothos, ivy, spider plants, tradescantia, string of hearts, and most ferns. They grow downward naturally and look intentional in a hanging hanger.
Avoid top-heavy plants with large root systems, the pot weight and instability make them a poor match for a hanging structure.
✅ Can I wash a macramé plant hanger?
Yes. Hand wash in cool water with a small amount of mild detergent. Do not put it in a washing machine, the agitation tangles and weakens the cord. Reshape it while damp and hang it to dry completely before placing a pot back inside. Never dry it in direct sunlight as this yellows natural cotton.
✅ What can I put in a macramé plant hanger besides a plant?
A glass vase with dried or seasonal cut flowers works beautifully and removes the watering concern entirely. Lanterns, hanging storage baskets, and decorative bowls also work well depending on the hanger’s basket size. The structure holds anything that fits the basket, it does not have to be a plant.
✅Can I hang a macramé plant hanger without drilling into the ceiling?
Yes. A curtain rod with an S-hook works for lighter pots. Adhesive ceiling hooks, such as Command hooks, are a good option for very lightweight plants and fake plants only.
A wooden wall hook mounted into a stud is a strong alternative for anyone who cannot or does not want to drill into the ceiling. Always confirm the hook’s weight rating matches your full pot weight before hanging.