How will the kids spend a snowy afternoon when the power goes out? These snow day crafts for kids use simple supplies for fun, screen-free projects.
The school-closing message came in last night.
By mid-morning, the snow is deep, the lights flicker once, and then the house goes quiet. No Wi-Fi, no tablet, no television, and going out for craft supplies is hardly an option.
Twenty minutes later, a kid asks, “What can we do?”
That question gets harder when the usual snow-day activities depend on something you no longer have. A printer cannot make a template, a hot glue gun is useless, and even a simple craft that needs good lighting becomes difficult once daylight starts fading.
These 17 snow day crafts kids can make when the power goes out are built around that problem.
The projects use materials such as paper, cardboard, string, yarn and fabric scraps, with ideas that range from making and building to drawing, storytelling and simple paper engineering.
They don’t require a powered craft machine to get started, and several can be adapted around the light and supplies available at home.
One practical detail matters during an outage: choose battery-powered lighting rather than using candles around children, and keep any craft involving scissors, small pieces or other tools appropriate to the child’s age.
The goal is to make the unexpected day at home easier, not create another problem to manage.
If you’re reading this before the storm, gather a small box of basic supplies while you still have good light. If the power is already out, start with the projects that suit the daylight and materials you have right now.
Rainy afternoons are easier when there is something ready to make. Indoor Activities for Kids on Rainy Days That Actually Keep Them Busy has more ideas.
Snow Day Crafts Kids Can Make While the Power Is Out
1. Six-Pointed Paper Snowflakes, and a Card to Catch Real Ones
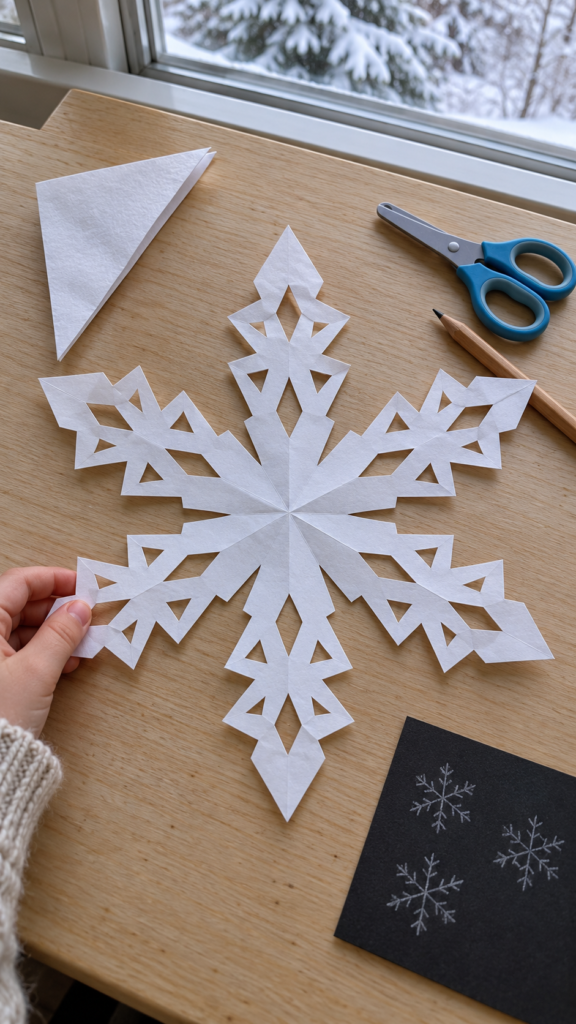
Paper snowflakes do not have to be the usual four- or eight-point designs. With the right folds, kids can make one with six main points, giving them a chance to see something that connects directly to real snow.
Snow crystals have six-fold radial symmetry because ordinary ice forms with a hexagonal crystal structure.
Their finished shapes can be very different, though. Temperature and humidity affect how a crystal grows, so some snow crystals become plates, columns, needles or branching shapes rather than the familiar star.
That makes this more than a cutting exercise. Once the paper snowflake is finished, kids can use a simple catch card to look at real snow and see how closely the two compare.
What you’ll need
- A sheet of thin white paper
- Scissors suitable for the child’s age
- A pencil
- A protractor, optional but helpful for making the folds evenly
- Black cardstock or dark construction paper
- White pencil or white gel pen
- Magnifying glass, if available
Fold the paper
Start with a square sheet of paper. A sheet of printer paper can be trimmed into a square, or a coffee filter can be used instead.
- Fold the square diagonally to make a triangle.
- Fold the triangle in half once, then open that fold. This gives you a crease showing the centre line.
- Open the triangle flat again. Use the centre point of the original square as your guide for dividing the paper into six equal sections.
- Fold the two sides inward so the paper forms a narrow wedge with six layers of the original sheet around the centre.
- Check the folded wedge before cutting. The edges should line up as evenly as possible. Small differences are fine, but large uneven folds will make the finished snowflake uneven.
- Trim the wide end of the wedge into a straight edge, curve or point.
The important part is that the folded paper is divided into six sections around the centre. That repeated six-way arrangement is what gives the finished snowflake its six main points.
Cut the snowflake
Now comes the part kids usually enjoy most.
Cut small triangles, curves and notches along the folded edges. Leave enough paper between the cuts so the snowflake stays connected when it is opened. Avoid cutting all the way across the folded wedge.
Try different patterns on each side, but remember that every cut will be repeated when the paper is unfolded. A small triangle near one edge can become six matching triangles around the finished snowflake.
When the cutting is finished, unfold the paper slowly. Flatten it under a book for a few minutes if the folds are stubborn.
Then count the main points.
There should be six.
Make a snowflake catch card
The second part of the activity only works where real snow is falling, but it gives kids something to investigate instead of simply making a decoration.
Cut a piece of black cardstock roughly the size of a postcard. Use a white pencil to divide it into a few small spaces where children can draw what they find.
They can label each space with simple observations such as shape, number of points and what it looks like.
Before taking the card outside, leave it somewhere cold for a few minutes. A warm surface can melt delicate snow crystals as soon as they land.
When snow is falling, place the card outside and try to catch individual crystals. Look at them quickly with a magnifying glass and draw what you see.
There is no need to find a perfect six-armed star.
Real snow crystals come in many forms, and several crystals can also stick together as they fall. NOAA notes that snow-crystal shape changes with the temperature and humidity experienced during growth.
Compare the two
Bring the paper snowflake and the catch card back inside and look at them side by side.
Ask the kids:
- Does the real crystal have six-fold symmetry?
- Does it have obvious branches, or is it more like a plate or column?
- Which parts of the paper design look like the real crystal?
- What would you change about the next paper snowflake?
The paper version will probably look much more regular than the real snow.
That’s part of the fun. The craft gives children a controlled six-point pattern to make, while the real crystals show how much variation can happen in nature.
Power-outage note: Make the paper snowflake while there is still enough daylight to see the folds and cuts clearly.
The catch-card observation can be done outside during the snowfall, then the drawings can be finished indoors with a battery-powered light if needed.
Safety: Choose scissors appropriate for the child’s age and ability, and supervise younger children when cutting.
If craft materials are being used with very young children, keep small loose pieces away from children under 3 because of choking hazards. CPSC also recommends following safety and labeling information on children’s art materials.
Pinecones and twigs can become part of the Christmas decorations. 12 Christmas Nature Crafts for the Kids Who Keep Bringing Pinecones and Winter Finds Home
2. Make a Door Draft Snake
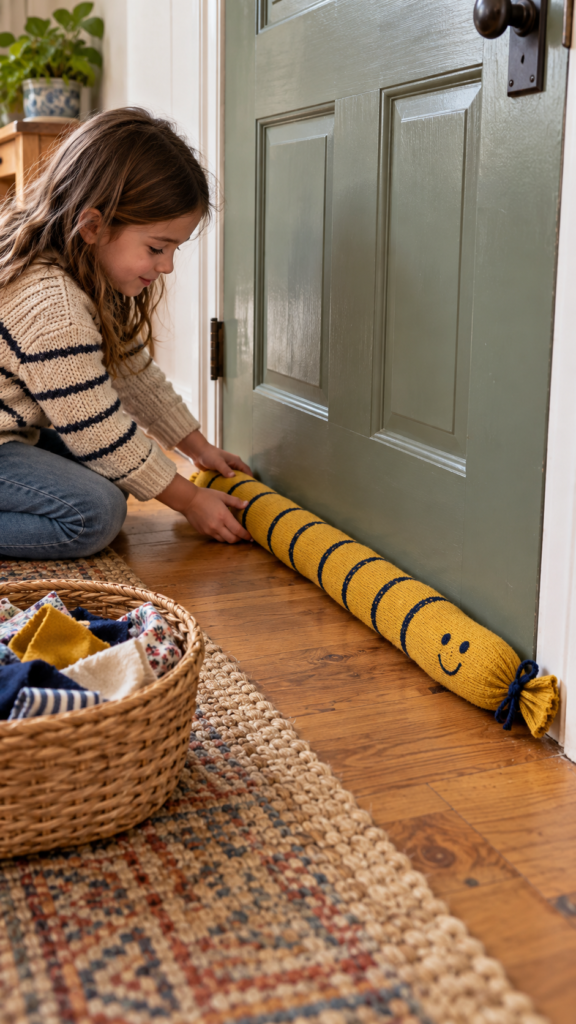
When the power goes out during a snowstorm, cold air can make an already chilly room feel even colder, especially around gaps beneath exterior doors.
A draft snake is a useful craft with no electricity because kids can make one from household materials and then put it to work.
CDC winter-storm guidance recommends using towels or rags to block gaps under doors, closing off rooms that aren’t needed, and covering windows with blankets at night to help conserve heat during a power outage.
A draft snake is simply a more reusable, kid-made version of the towel-under-the-door idea.
What you’ll need
- A long sock, such as a knee-high or adult crew sock, or one leg from an old pair of tights
- Fabric scraps, old socks or clean rags for filling
- Yarn or a strong rubber band
- A paper cone or rolled sheet of paper to make a simple funnel
- Fabric markers and optional felt scraps or yarn for decorating
- A piece of string or tape measure
How to make it
- Measure the door. Check the width of the door where the draft snake will sit. It should be slightly longer than the bottom edge so it can cover the gap from one side to the other.
- Decorate before filling. A flat, empty sock is much easier to draw on. Slide a piece of cardboard inside so the marker doesn’t bleed through, then add stripes, scales, spots or a face.
- Fill the snake. Place the paper funnel into the opening and add fabric scraps, old socks or clean rags a little at a time.
Shake the filling down as you go. Fabric is a good choice because it is easy to find around the house and doesn’t create loose grains that can spill out. - Leave it flexible. Don’t pack the filling tightly. The snake needs to bend enough to sit along the bottom of the door.
- Tie the end securely. Knot the open end and check that no filling can escape. An adult can handle this step for younger children.
- Put it to work. Lay the finished draft snake along the inside bottom of an exterior door where you can feel cold air coming through.
A draft snake reduces drafts; it does not heat the room. Warm clothing, blankets and other appropriate ways of staying warm are still important during a winter power outage.
It can also become part of the children’s snow-day routine.
Once they finish making it, they can check the doors around the house and see where a draft is coming from. Start with exterior doors and the room where the family is spending time rather than trying to block every doorway in the house.
One practical note: some fabric markers recommend heat-setting their ink with an iron. Skip that step during the outage. The children can decorate the snake now and wash it later, when the power is back.
Never use a gas oven, grill, camp stove or other fuel-burning appliance to heat the house during a power outage. Fuel-burning equipment can produce carbon monoxide, which can build up indoors.
Short on time after school? 10 Super Fun After-School & Homework-Friendly Crafts Kids Can Make in 20 Minutes fits a tighter afternoon.
3. Make a Window Pinhole Projector
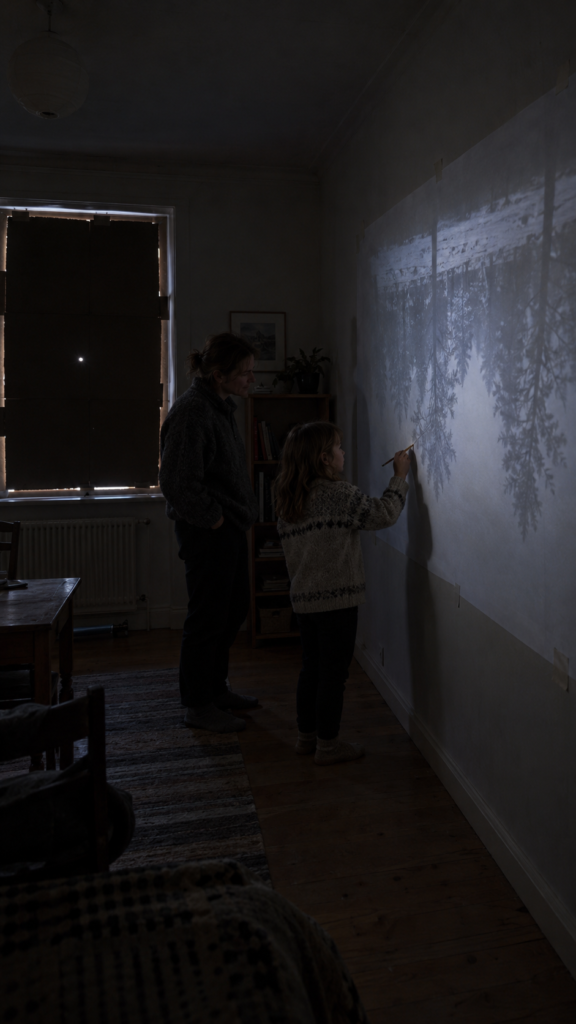
A small hole in a darkened window can project the snowy scene outside onto a wall. There is no screen or electricity involved; the daylight does the work.
The principle is simple: light travels in straight lines.
Rays from the top of a tree can pass through the tiny opening and land lower on the opposite wall, while rays from the bottom travel upward. The result is an upside-down image of the scene outside.
This type of arrangement is called a camera obscura.
It makes an unusual screen-free snow day activity for kids, especially when the usual entertainment is unavailable during a power outage.
What you’ll need
- Black poster board or dark cardboard large enough to cover most of the window
- Painter’s tape
- Pencil and scissors
- A push pin
- Small piece of aluminum foil, optional
- A blanket or dark fabric to block stray light
- White paper for catching and tracing the image
- Pencils or crayons for drawing
Set it up
- Choose the window. A view with strong contrast works best, such as dark tree trunks, branches or a roof against bright snow.
- Cover the window. Tape dark cardboard over the glass and cover gaps around the edges so as little outside light as possible enters the room. If the tape doesn’t stick well to cold glass, attach it to the window frame instead.
- Make a small opening. Start with a hole roughly the size of a pencil eraser in the middle of the cardboard.
- Darken the room. Close curtains or use blankets to block other sources of light, while keeping exits and walkways clear.
- Look for the image. Place a sheet of white paper on the wall opposite the window. The outdoor scene may appear faintly on it, upside down.
- Try another hole size. Cover the first opening with a small piece of aluminum foil and make a slightly smaller or larger hole. A smaller opening can produce a sharper but dimmer image, while a larger opening lets in more light but can make the image less distinct.
- Experiment with the paper. Move the paper closer to or farther from the window and watch how the size and brightness of the projected scene change.
The image will not necessarily be bright or perfectly sharp. A cloudy day, heavy snowfall, the size of the window and the amount of stray light in the room can all affect the result. The point is to experiment with the setup rather than expect a camera-quality picture.
Turn the projection into a craft
Once the image appears, tape a clean sheet of paper where the projected scene is visible. Kids can lightly trace the outlines of trees, rooftops, fences or other shapes they can see.
When they’re finished, remove the paper and turn it around. They now have a snow-day landscape drawn from a projected image, made without a camera, printer or powered craft tool.
Remind children never to look directly at the sun through the opening. The projector should be aimed at an indoor wall or sheet of paper, not used for viewing the sun.
4. Snow Depth Stick and Snow-to-Water Test
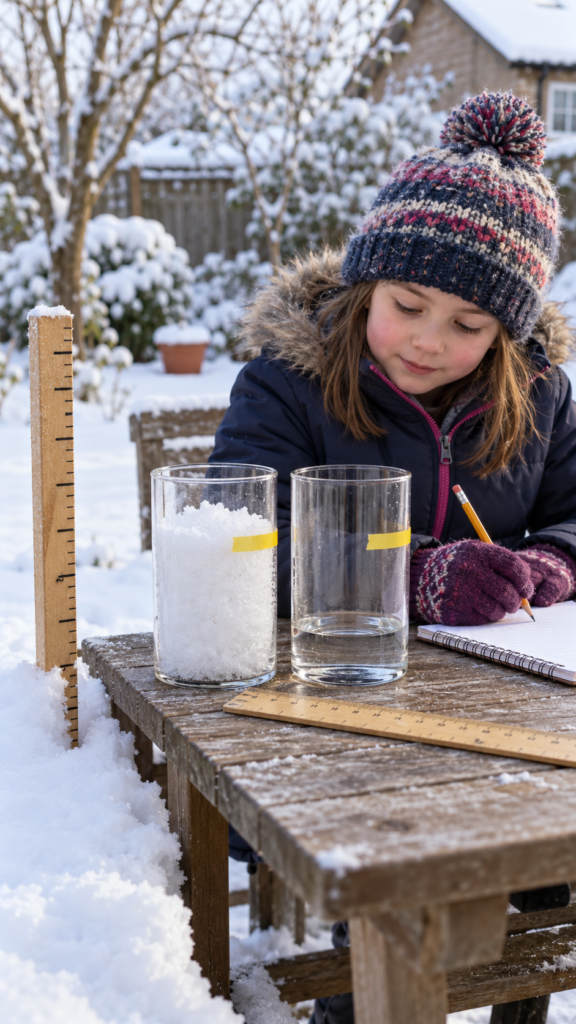
“How much snow did we get?” is a question every kid asks on a snow day. A homemade snow stick lets them answer it with a real measurement.
It also teaches them how weather volunteers do it. This is one of the best crafts with no electricity if you have kids who like numbers, because it needs only a stick, a jar and some snow.
The jar test also teaches something most adults don’t know: snow is mostly air. Melt a jar of it and you’ll find the water is only a fraction of the height.
Meteorologists ask volunteers to measure snow by hand, because snowfall is harder to measure automatically than other weather.
What you’ll need
- A wooden yardstick, or a paint stirrer for shallow snow
- A ruler and a permanent marker
- A straight-sided clear jar or cup, with the same width from top to bottom
- Masking tape
- A flat, light-colored board or plastic lid (this is a “snow board”)
- Paper and pencil
- An outdoor thermometer (optional)
How to make the stick
- Use the ruler to mark every inch along the stick, starting from the bottom end. Number each mark.
- Mark every half inch with a shorter line, then decorate the stick with stripes or a face.
- Write “SNOW STICK” at the top with the date.
How to measure snow depth
- Pick the spot. The National Weather Service advises choosing an area where the snow looks of average depth and avoiding drifts. Open ground away from trees and walls works best.
- Push straight down. Don’t tilt the stick. Weather observers call that “slant-sticking,” and it gives a wrong reading.
- Stop at the bottom of the snow. On grass, measure to the base of the snow, not down into the ground, because that inflates the number.
- Measure about five spots and average them. The NWS suggests around 5 readings, especially if wind caused drifting.
Kids add the numbers and divide by five, which gives you built-in math practice.
New snow versus snow depth
These are different measurements. Snow depth is the total on the ground, including older snow.
New snowfall is what fell recently. If there was snow on the ground before the storm, set the snow board out on top of it and measure the new snow on the board.
The NWS measures new snow to the nearest tenth of an inch and total depth to the nearest whole inch. A kid-made stick can’t be that precise, so tell them to read to the nearest quarter inch.
How to do the snow-to-water test
- Spoon fresh snow into the jar without pressing it down. Fill it to a clean line.
- Put a strip of tape at the snow level.
- Let it melt at room temperature. Snow melts above 32°F (0°C), so if your house is colder than that, it won’t melt. Don’t melt it over a flame or heat source.
- When it’s melted, put a second tape strip at the water level.
- Measure both heights with the ruler. Use the metric side for small amounts. Divide the snow height by the water height to get the ratio.
For example, 3 inches of snow that melts to 0.3 inches of water is a 10:1 ratio.
What the ratio tells you
A common rule of thumb says average snowfall is about 10 inches of snow for every 1 inch of liquid. The real number changes a lot with the snow.
Wet snow might be near 5-to-1, while fluffy snow can exceed 15-to-1, and dry, powdery snow can reach 20-to-1. Wet snow flakes pack together with less air between them. Fluffy snow traps more air.
Tell kids their home result won’t be exact. Wind, packing and how fast the snow melts all affect it. A different ratio from the textbook one isn’t a mistake, and it’s a good thing to talk about.
Outdoor rules
- Set a timer for 10 to 15 minutes, and have kids come in and warm up between trips.
- Watch for numb fingers, toes, ears or nose. Bring kids in at the first sign.
- In an outage, keep everyone away from downed or sagging power lines. Measure only in the yard areas an adult has checked.
Take it further: After the outage, an adult can look up CoCoRaHS, the volunteer network that collects snow reports.
It has its own training and measuring tools, so a kid-made stick is a practice run, not an official report.
Keep December traditions simple with Elf on the Shelf Alternatives for Parents Tired of Coming Up With Ideas Every Night: 9 Low-Effort Traditions Kids Still Love.
5. Make an Outage Log Booklet
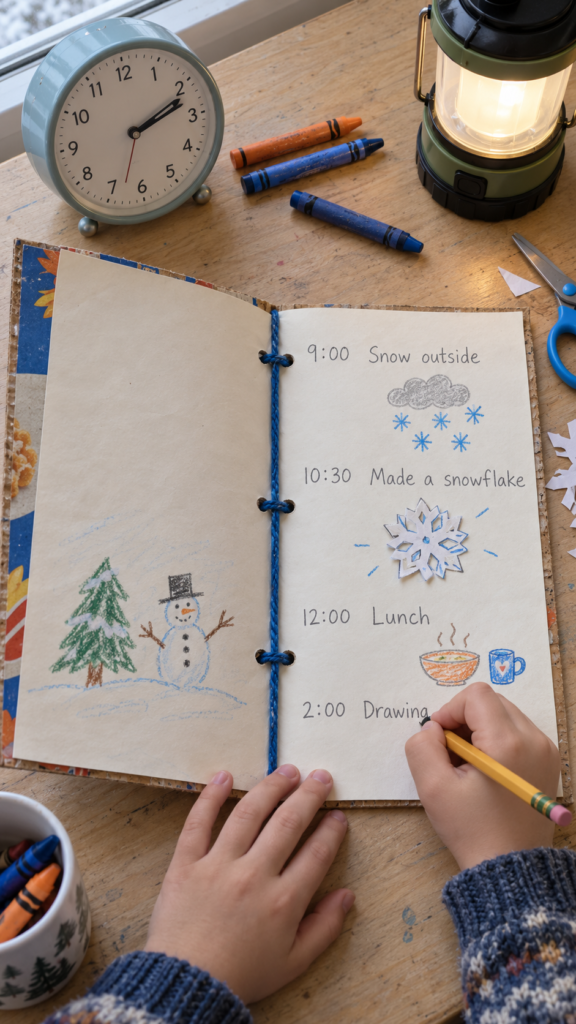
The power goes out, everyone asks when it will come back, and then the hours start to blur together. Give kids a small job instead: make a booklet and keep track of the day.
This is one of the more practical snow day crafts for kids because the finished booklet becomes part journal, part weather record and part activity tracker.
Kids can record when the power went out, how much snow is outside, what the indoor temperature is, what they have made and when the lights finally come back.
What you’ll need
- 4 to 6 sheets of plain paper
- One piece of cardstock or cereal-box cardboard for the cover
- Yarn or thick thread
- A blunt tapestry needle
- Pencil
- Ruler
- Push pin or sharp pencil for making the binding holes, adult use only
- Indoor thermometer, optional
- Battery-powered clock or watch, optional
Put the booklet together
- Stack the paper and cardboard cover together.
- Fold the whole stack in half and press the crease firmly.
- An adult can place three small marks along the crease: one near the top, one in the middle and one near the bottom.
- Punch the three holes through the folded stack.
- Thread the yarn through the middle hole from the inside, leaving a short tail.
- Take the needle through the top hole, then back through the bottom hole.
- Bring it through the middle hole again.
- Tie the two ends together around the long stitch inside the booklet and trim the excess.
Kids can decorate the cover with a snowstorm drawing, the date or a title such as “Our Snow Day Without Power.”
Give each page a job
Rather than leaving children with a blank notebook, give them a few things to record.
Page 1: Date, time the power went out and weather outside
Page 2: Indoor temperature at different times
Page 3: Snow depth from the snow-measuring activity
Page 4: Crafts and games completed during the outage
Last page: Time the power came back on and one thing they liked about the day
Younger children can draw instead of writing. Older kids can make a simple table or line graph from their temperature readings.
This also works as one of the power outage activities for kids because it gives them something to return to throughout the day. They don’t have to finish it in one sitting.
Keep the booklet and pencil in a place with enough light for writing. A battery-powered lantern can help after dark, but there is no need to use a phone or tablet to complete it.
Bring the Christmas story into craft time with 12 Nativity Crafts That Walk Kids Through the Story of Jesus’ Birth, at Home or Sunday School.
6. Make a Cardboard Winter Weaving
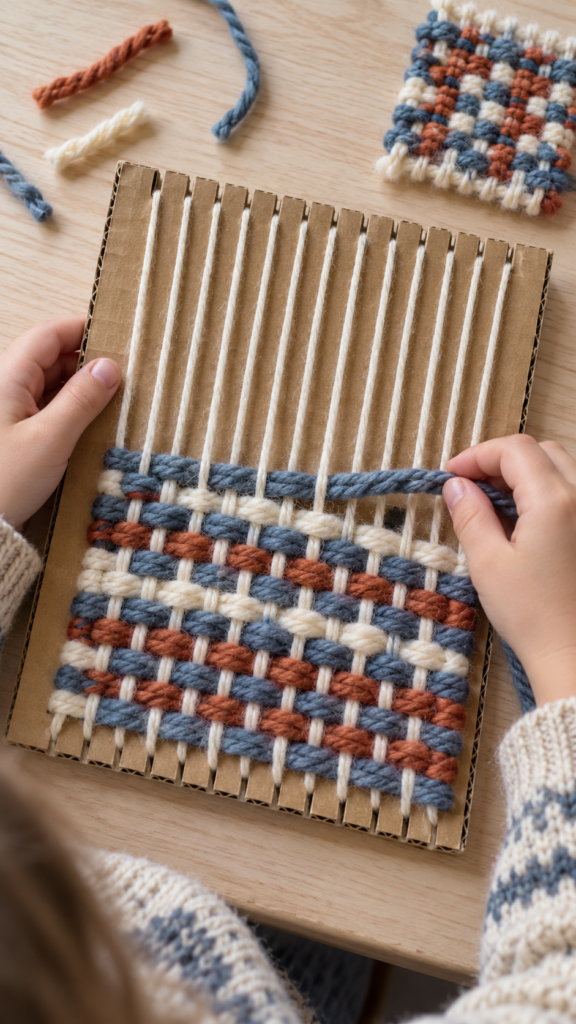
A piece of cereal-box cardboard can become a small loom, giving kids something they can keep weaving while the snow day carries on.
This snow day craft for kids uses yarn and cardboard rather than a sewing machine, glue gun or other powered tool. It is also a good way to use up short pieces of leftover yarn that are too small for larger projects.
What you’ll need
- A piece of cereal-box cardboard or another thin, sturdy piece of cardboard
- Pencil
- Ruler
- Scissors
- Yarn in one or more colours
- Optional: fabric scraps, ribbon or strips of old T-shirt
Make the cardboard loom
- Cut the cardboard into a rectangle roughly 6 by 8 inches. It does not need to be exact.
- Use the ruler to mark small lines about half an inch apart along the top and bottom edges.
- Cut a shallow notch at each mark. Keep the notches opposite one another so the yarn can run straight across the loom.
- Wrap one long piece of yarn vertically between the top and bottom notches. This creates the warp, or the threads that stay in place while the child weaves.
- Tie the ends securely at the back.
Start weaving
Cut a separate piece of yarn and weave it over and under the vertical threads.
On the next row, reverse the pattern: where the yarn went over the first thread, take it under instead.
Keep repeating the pattern and gently push each new row toward the one before it. Kids can change colours whenever they want or add narrow strips of fabric for a different texture.
The finished piece doesn’t need to become anything complicated. A small woven square can be:
- A doll or stuffed-animal blanket
- A little wall hanging
- A pretend rug for a cardboard house
- A bookmark
- A textured piece for a winter collage
The nice thing about weaving during a power outage is that there is no single moment when the craft has to be finished. Kids can make a few rows, stop for a snack or another activity, and come back to it later.
For younger children, use thicker yarn and make the spaces between the cardboard notches wider. An adult should handle the initial cardboard cutting, especially when making the small notches.
A cardboard loom also gives kids a simple introduction to how woven fabric is constructed: some threads stay in place while another thread travels over and under them to build the fabric row by row.
Teen crafters may prefer projects that feel less childish. Thanksgiving Crafts for Teens Who Think Crafts Are for Little Kids: 7 Ideas That Don’t Look Like Kindergarten Projects
7. Make a Cereal-Box Shadow Theatre
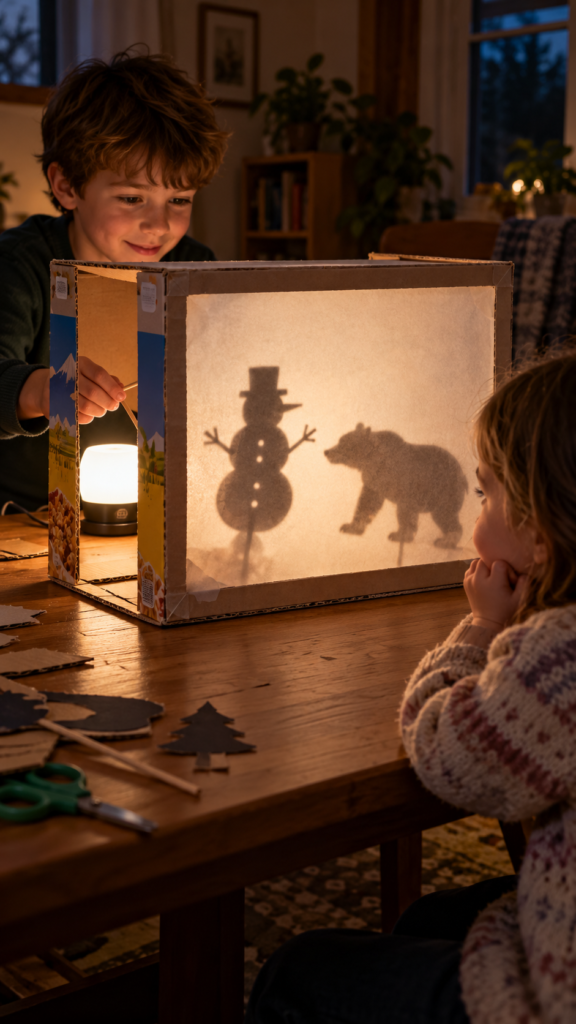
Once the afternoon gets dark, a cereal box can become a tiny theatre. Kids make the stage, cut out the characters and then put on a show using one LED light.
Shadow puppetry has a long history in different parts of Asia, including Indonesia and China, although the traditions and styles vary between regions.
For this snow day craft for kids, the interesting part is much simpler: a puppet blocks the light, leaving a dark shape on the screen behind it.
What you’ll need
- An empty cereal box
- Wax paper, baking parchment or tracing paper
- Thin cardboard for the puppets
- Straws or craft sticks
- Tape
- Scissors
- Marker
- One LED lantern, headlamp or flashlight
Build the theatre
- Cut the top flaps from the cereal box.
- Turn the box so the large front panel faces the audience.
- Cut a large rectangle from the front, leaving a border of about an inch around the edges.
- Tape the wax paper or parchment over the opening from the inside. Pull it reasonably tight so the screen doesn’t sag.
- Remove most of the back panel so light can reach the screen.
- Draw simple characters on thin cardboard. Bold outlines work better than tiny details.
- Cut them out and tape a straw or craft stick to the back of each one.
Place the light behind the puppets and hold the puppets between the light and the paper screen. The audience sits on the opposite side of the box.
Experiment with the shadows
Move a puppet closer to the light and watch its shadow become larger. Move it closer to the screen and the shadow becomes smaller and generally more defined.
Kids can also experiment with the angle of the puppet, the distance from the screen and the position of the light. One flashlight is enough. Using several lights can create multiple shadows and uses more battery power.
Then give the characters a story:
- A snowman who can’t find his hat
- A bear who loses one mitten
- A child who hears a strange noise in the attic
- A family trying to find something to do during a power outage
A simple beginning, problem and solution is enough. The performance can keep going long after the box itself is finished.
Safety: Use an LED light rather than a candle around paper and cardboard. Keep the light stable and make sure the setup isn’t blocking a doorway or walkway.
Cute can work better than creepy for younger children. Halloween Crafts for Kids Who Don’t Like Scary Decorations: 15 Cute Ideas Without the Creepy Stuff
8. Make Silhouette Portraits
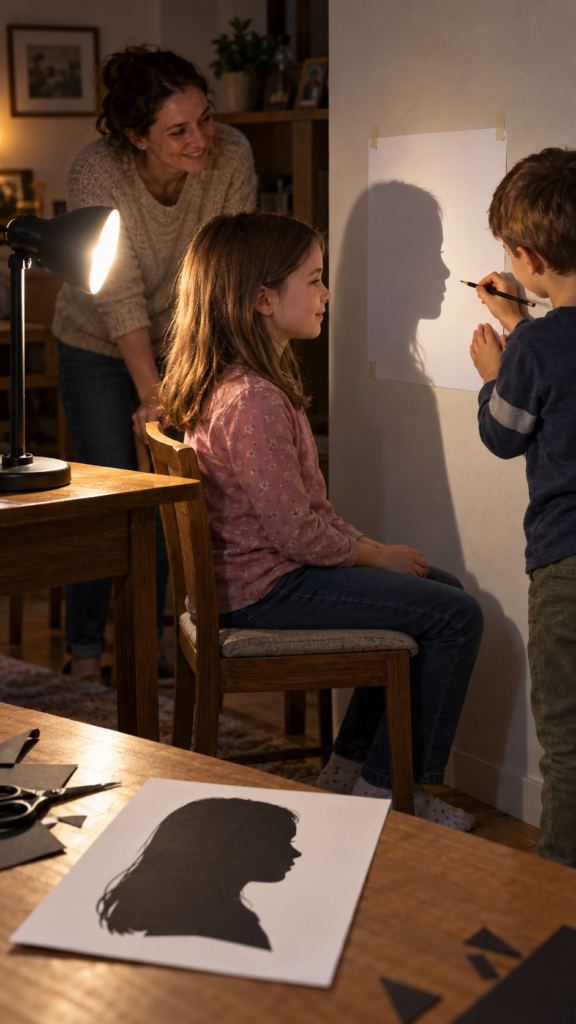
A lamp, a sheet of paper and a willing family member can become a portrait-making activity without a camera or printer.
Silhouette portraits became especially popular in Europe during the 18th century and were made as inexpensive profile portraits. Museums still hold examples of these cut-paper portraits from the period.
For a power outage activity for kids, the process is simple enough to do by hand and the finished portrait makes a keepsake from the snow day.
What you’ll need
- White paper
- Black construction paper
- White cardstock or another sheet of light-coloured paper for mounting
- Pencil
- Scissors
- Tape
- Glue stick or double-sided tape
- One LED lantern or flashlight
Trace the profile
- Tape the white paper to a wall at about the sitter’s head height.
- Have the person sit sideways so you can see the outline of their forehead, nose, lips and chin.
- Place the LED light several feet away so it casts the person’s profile onto the paper.
- Trace the edge of the shadow in pencil. The shadow may have a slightly fuzzy edge, so follow the middle of it.
- Remove the paper and place it over the black construction paper.
- Cut along the profile line.
- Mount the black shape onto white cardstock and write the person’s name and date on the back.
You can make a second picture from the same outline by mounting the leftover white profile shape on black paper. That gives kids two contrasting portraits from one cutting session.
For a younger child who won’t sit still long enough, use the profile of a favourite stuffed animal instead.
Help children retell Esther’s story through hands-on projects. Esther Craft Ideas: 13 Crafts That Retell Her Story for Kids, From Her Crown to Purim
9. Send Paper Morse-Code Messages
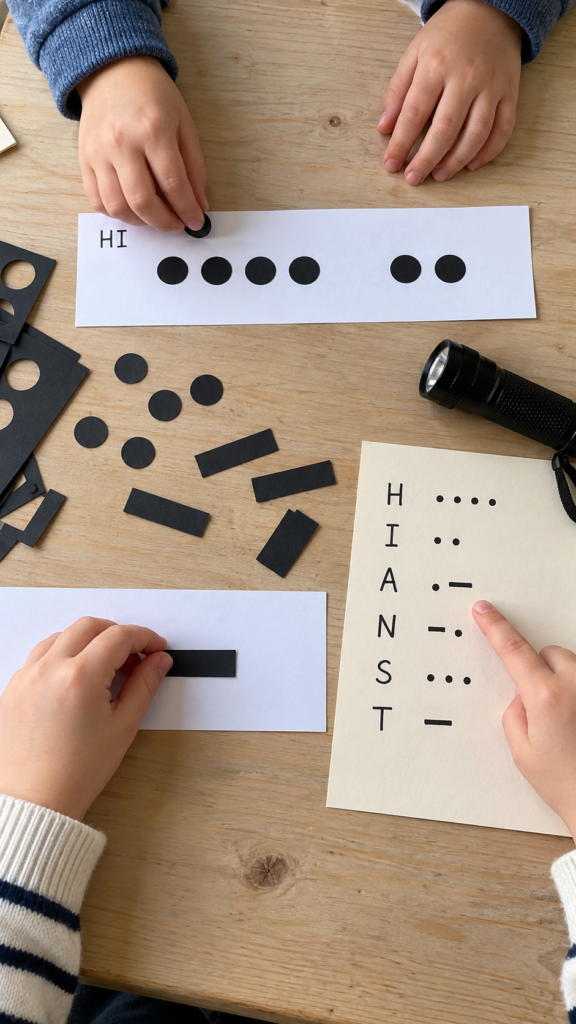
A power outage can make an ordinary hallway feel surprisingly far away. Kids can turn that into a game by making secret messages with dots and dashes, then sending them across the room with a flashlight.
Morse code represents letters and numbers with combinations of short and long signals. In light or sound signaling, a dot is shorter than a dash.
The international SOS distress signal is three dots, three dashes and three dots, sent as one continuous signal rather than as three separate letters. The international maritime radio conference adopted SOS as a distress signal in 1906.
What you’ll need
- White paper
- Black paper
- Scissors
- Tape or glue
- Pencil
- One flashlight
- A hand-drawn Morse code chart
Make the messages
- Draw a simple Morse code chart on a sheet of paper.
- Cut small paper dots and longer paper dashes.
- Pick a short word such as SNOW, HI or a child’s name.
- Arrange the dots and dashes on a strip of paper to spell the word.
- Leave a small space between letters so another child can tell where one letter ends and the next begins.
- Swap messages and use the chart to decode them.
Once they understand the code, turn off unnecessary lights and try sending short messages with a flashlight. A short flash can represent a dot and a longer flash a dash.
Keep the messages short at first. SOS can be introduced as a real distress signal rather than a game signal, and children should know that it is not something to use for pretend emergencies.
This makes a good screen-free snow day activity because kids can spend time making the code strips, decoding them and then trying to send their own messages.
Turn the Feeding of the 5,000 into a simple Bible craft with Five Loaves and Two Fish Crafts for Kids: 7 Easy Ideas From the Feeding of the 5,000.
10. Make a Cardboard Tangram
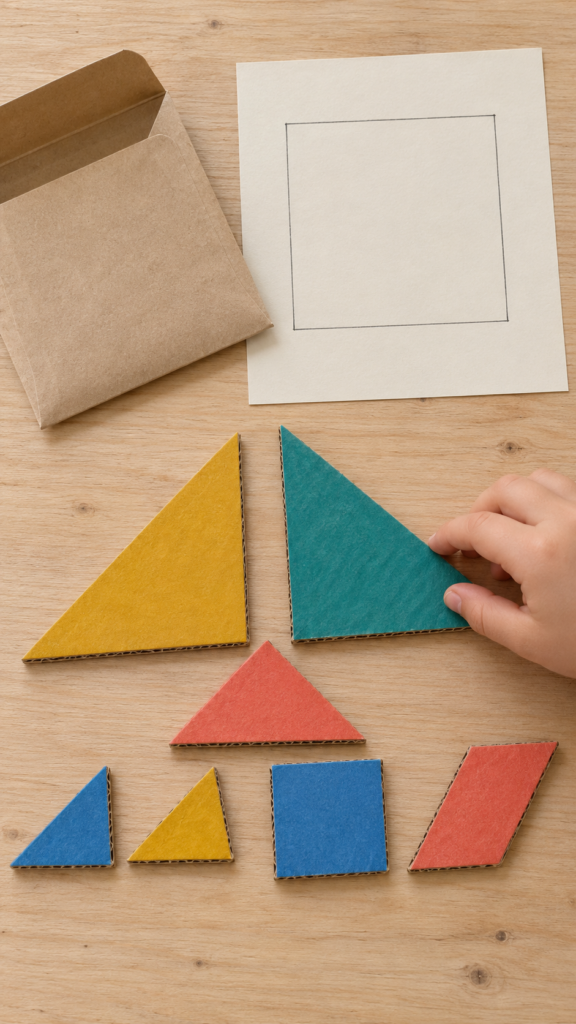
Seven pieces cut from one square of cardboard can provide a surprisingly long challenge. A traditional tangram consists of five triangles, one square and one parallelogram, which can be rearranged to make different figures.
For this version, cereal-box cardboard is enough. Once the pieces are cut, the electricity-free craft becomes a puzzle kids can keep returning to throughout the day.
What you’ll need
- Thin cardboard from a cereal box
- Ruler
- Pencil
- Scissors
- Markers
Make the pieces
The easiest way to avoid a complicated set of measurements is to print or draw a standard tangram pattern before the power goes out.
If you don’t have one, an adult can draw a standard seven-piece tangram onto an 8-inch square using a ruler and then let the children decorate and cut the pieces.
Colour each piece differently before cutting. That makes it easier to identify the shapes while children are learning how they fit together.
Try the puzzle
Start with simple challenges:
- Put all seven pieces back into the original square.
- Make a larger square using only selected pieces.
- Make a triangle.
- Make a house.
- Make an animal.
- Create a shape of your own and challenge someone else to copy it.
The pieces don’t have to become a particular picture. Part of the challenge is working out how the shapes rotate, flip and fit together.
Keep the finished pieces in an envelope or small container so the tangram becomes a no-electricity activity for kids that can come back out during the next rainy or snowy day.
Safety: Because the pieces are small, keep them away from children under 3.
Questions about kindness can lead naturally into 7 Good Samaritan Craft Ideas for Kids Who Ask “Why Didn’t Anyone Else Stop?.
11. Make a Folded Winter Story Theatre
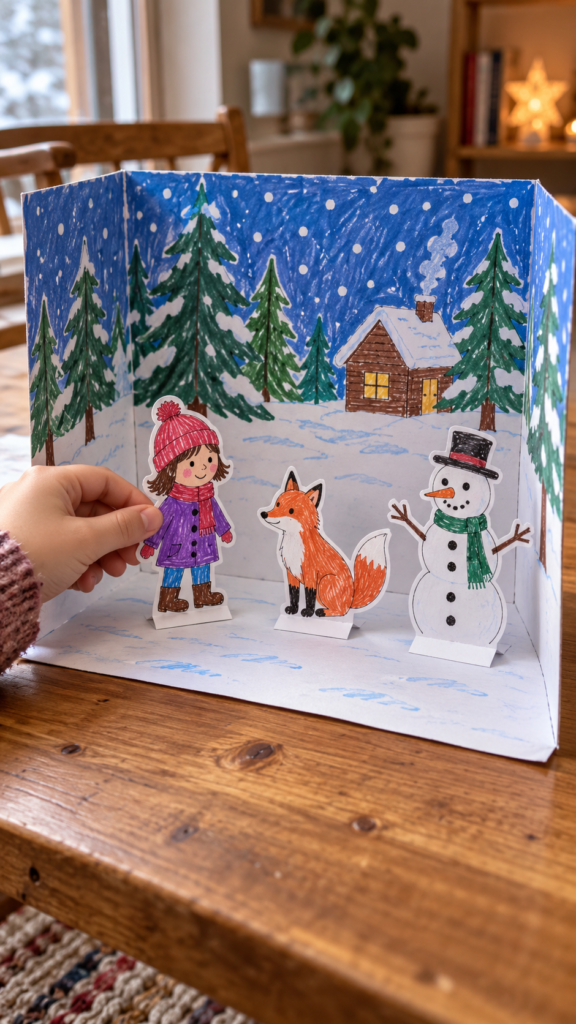
A flat sheet of paper is easy to knock over. Fold it into sections, though, and it becomes a little stage that can stand on its own.
This is one of those winter crafts for kids that turns into play once the making is finished. Kids create the backdrop, characters and story, then use a lantern after dark to put on a performance.
What you’ll need
- Cardstock or a piece of thin cardboard
- Pencil and markers
- Scissors
- Tape
- Smaller pieces of cardstock for characters
Build the stage
- Fold the large sheet into three sections, like folding a letter.
- Bring the two outside sections slightly forward so the structure can stand.
- Draw a winter scene on the centre panel: snow-covered ground, trees, a house or anything the children imagine.
- Add simple trees or other scenery to the side panels to make them look like stage wings.
- Fold the bottom edge of the centre panel forward to create a small stage floor.
- Draw characters on separate pieces of cardstock.
- Cut them out and fold a small tab at the bottom of each character so they can stand.
Give them a story
Write three questions on scraps of paper:
Who is there?
What goes wrong?
How do they fix it?
Each child can answer the questions and turn the answers into a short performance.
Do the drawing and cutting near a window while there is daylight. When it gets dark, use one LED lantern to light the little theatre.
Children can follow Noah’s story one scene at a time with Noah’s Ark Crafts for Kids: 9 Ideas That Walk Through the Whole Story, One Craft at a Time.
12. Build a Cardboard Winter Village
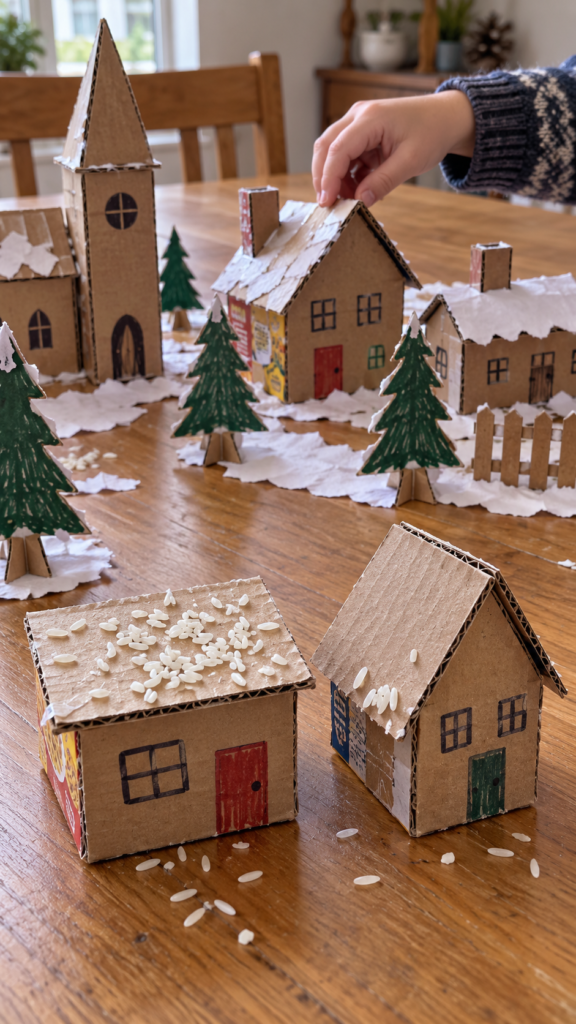
A few cereal boxes can become houses, shops, trees and snowy streets. Instead of making every building identical, let kids experiment with different roof shapes and see what happens when they add their own pretend snow.
Snow load is a real consideration for buildings in snowy regions, and the amount of water contained in snow varies with the type of snow.
That gives children a useful reason to compare a flat roof with a sloped one rather than simply decorating cardboard houses.
What you’ll need
- Cereal boxes and other thin cardboard
- Ruler
- Pencil
- Scissors
- Tape or glue stick
- Markers
- White paper for snow
- Optional: small scraps of cardboard for trees, fences and signs
Build a simple house
- Cut a long cardboard rectangle for the walls.
- Mark equal sections for the front, side, back and other side of the house.
- Leave a small tab at one end for joining the walls.
- Fold along the marked lines and tape the tab to form the house.
- Cut a separate piece for the roof and fold it down the middle to make a simple pitched roof.
- Tape the roof onto the walls.
- Add doors, windows, trees, signs and paths with smaller cardboard pieces.
Kids can make several houses in different shapes rather than trying to build one perfect model.
Test the roofs
Make one building with a flatter roof and another with a steeper roof. Sprinkle a small amount of dry rice or another loose material over each roof and gently tilt the models.
The steeper roof may let the material slide off more readily. That doesn’t mean every snowy building needs a steep roof, real roof design depends on many factors, but it gives children a simple model for thinking about slope and gravity.
Use white paper scraps to create snow-covered ground and let the village grow as the day continues.
Keep it safe: Never put a real candle inside a cardboard house.
If you want a light in the village, use a suitable battery-powered LED light and follow its instructions. Keep button batteries and small detachable parts away from young children.
Bring a little sunshine to craft time with Sunflower Crafts for Kids: The Suncatcher and 14 More Easy Ideas They’ll Beg to Make Again.
13. Make Blind Texture Investigation Cards
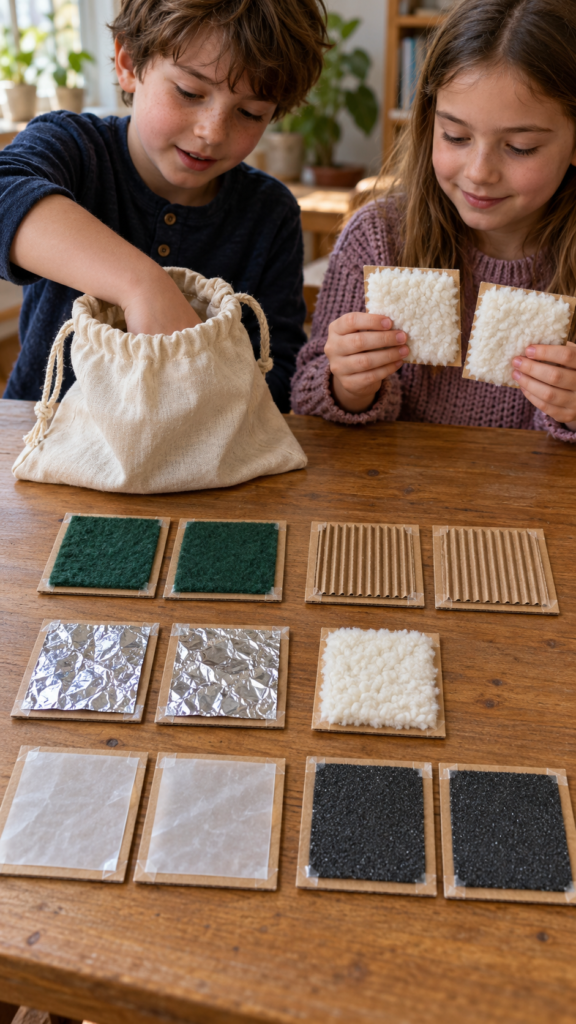
Once the daylight fades, some crafts become difficult simply because they need to be seen.
This one works differently. Kids can make the cards while there is still light, then use their fingertips to investigate them when the room gets darker.
The idea is simple: make matching pairs from different materials, hide the cards from view and identify them by touch.
It turns ordinary scraps around the house into a small guessing game that can keep going through a power outage.
What you’ll need
- Cereal-box cardboard or index cards, cut into about 3-inch squares
- Two pieces of each texture
- Sandpaper, felt, crinkled foil, corrugated cardboard, yarn, fleece, burlap or smooth wax paper
- Tape
- Scissors
- A pillowcase or cloth bag
Make the texture cards
- Make two cards for each material.
- Cut each material slightly smaller than the cardboard.
- Tape the material firmly to the front of each card.
- Make sure each pair feels the same when touched.
Tape is particularly useful here because the cards can be made without waiting for glue to dry in a cold room.
Three ways to play
Find the matching pair. Place the cards face down. With eyes closed, pick two cards and feel them carefully. Keep the pair if the textures match.
Put them in order. Choose several different surfaces and arrange them from roughest to smoothest. Sandpaper makes a good comparison because different grit sizes have noticeably different textures.
Mystery bag. Put several cards into a pillowcase. Without looking, pick one and describe it before guessing the material. Words such as ridged, scratchy, soft, slippery, fuzzy and smooth give children a reason to pay attention to the differences they feel.
Sliding the fingertips across a surface rather than simply pressing on it can make small differences easier to notice.
Add a Braille connection
Once the texture game is finished, make a tiny raised-dot alphabet.
Braille uses six possible dot positions arranged in two columns of three. Louis Braille developed the system as a teenager in the 19th century. Start with just five letters so children can learn the pattern rather than trying to memorize the whole alphabet at once.
| Letter | Dots |
| A | 1 |
| B | 1, 2 |
| C | 1, 4 |
| D | 1, 4, 5 |
| E | 1, 5 |
Draw the six positions on a card and add raised dots using suitable stickers or another securely attached material. Let children feel each pattern with their fingertips and try to identify the letters.
This is an introduction to how a raised-dot writing system works, not a substitute for learning Braille.
Safety: Keep the game seated and don’t have children walk around with their eyes closed. Avoid loose small pieces with children under 3.
Broken crayons do not have to go straight in the bin. Melted Crayon Art for Kids: What to Do With Broken Crayon Pieces puts them to use.
14. Finger-Knit a Winter Cord
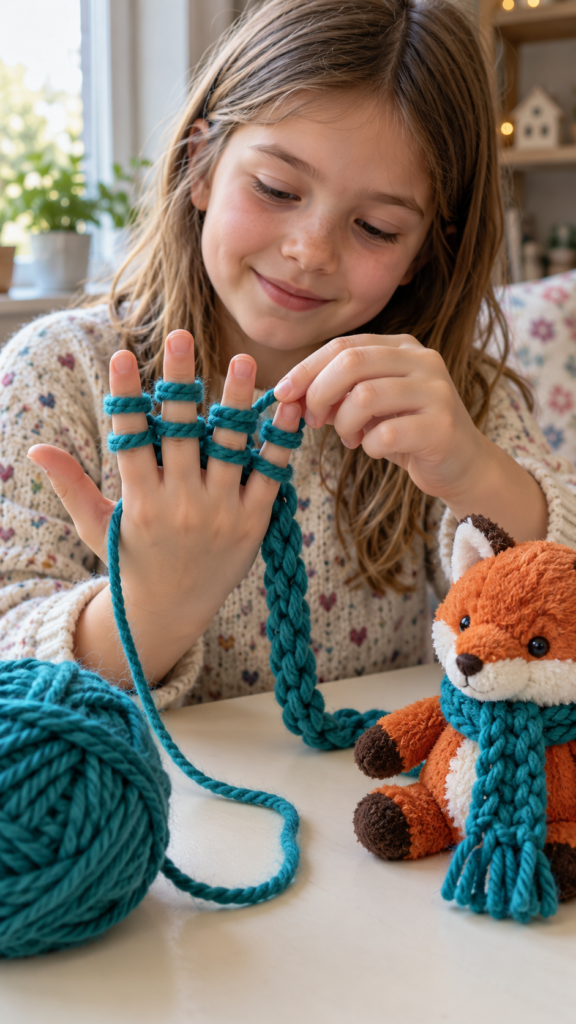
Finger knitting turns yarn into a cord using your fingers instead of knitting needles. That makes it useful when the usual craft equipment is packed away or the power is out.
A short first project is enough. The finished cord can become a tiny scarf for a stuffed animal, a doll’s headband, a bookmark or a hanging decoration.
What you’ll need
- One ball of bulky yarn
- Scissors
Bulky yarn is easier for beginners to see and manipulate than very thin yarn.
Start the four-finger method
- Leave a 4- to 5-inch tail and lay the yarn across your hand.
- Weave the working yarn over and behind your four fingers so that each finger has two strands.
- Starting with the forefinger, lift the lower strand over the upper strand and off the finger. Repeat across the other three fingers.
- You should now have one loop on each finger.
- Bring the working yarn across your fingers again so each finger has two strands.
- Lift the lower loop over the upper loop and off each finger.
- Keep repeating the pattern. The knitted cord will begin to grow behind your hand.
Don’t pull the loops tight. They need enough room to lift over the fingers.
Finish the cord
When the cord is long enough, move the loop from one finger to the next and continue lifting the lower loop over the upper one until only one loop remains. Cut the yarn, pull the tail through that final loop and tighten it.
A child learning for the first time may only make a few inches. That’s enough for a toy scarf or small decoration, and there is no need to turn the first attempt into a full-size project.
This craft needs light when the technique is being learned because the loops can be difficult to see in a dark room. Once the pattern is familiar, the repetitive movement becomes much more tactile.
Safety: Keep finished cords and loose yarn away from babies and young children. Don’t make a neck-worn item for a baby or young child.
Sensory-friendly projects can make craft time more accessible. 15 Sensory DIY Craft Ideas for Kids With Special Needs That Support Learning Through Play
15. Make a No-Sew Fleece Blanket for a Stuffed Animal
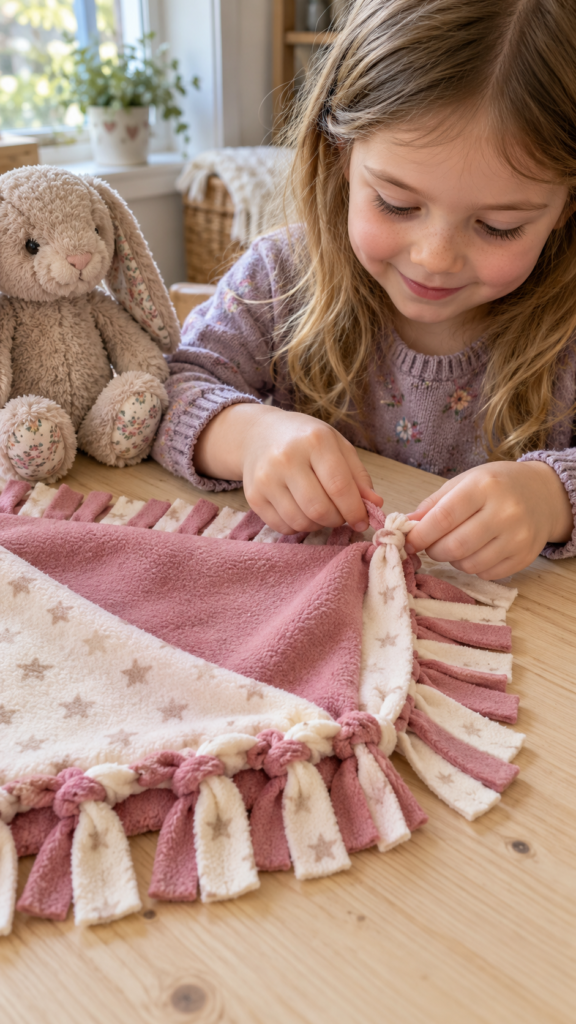
A stuffed animal can get its own little winter blanket, and kids can make it without a needle, thread or sewing machine.
The project is a scaled-down version of the tied fleece blankets often made from two pieces of fleece. For a small toy, the cutting and tying are much quicker, so it works well as a snow day craft that can be finished in one sitting.
What you’ll need
- Two fleece squares, about 12 inches each
- Ruler
- Sharp fabric scissors
An adult should handle the cutting if the scissors are too difficult for the child to use safely.
Make the blanket
- Place the two fleece pieces together with the wrong sides facing each other.
- Cut a 2-inch square from each corner through both layers.
- Cut fringe around all four sides, making each strip about ¾ inch wide and 2 inches deep.
- Take one front strip and its matching back strip.
- Tie the two strips together with a knot close to the blanket edge, then tie them again.
- Continue around the blanket until all the pairs are knotted.
- Keep the knots firm but don’t pull so hard that the fleece edge puckers.
For a simpler version, use one layer of fleece and knot the individual fringe pieces.
The child can choose the colours, measure the fringe, count the strips and do the tying while an adult handles the cutting.
That keeps the project genuinely child-made without making the child responsible for the sharpest part.
For very young children: Don’t use this as a baby blanket or leave a young child with the finished item unsupervised. Loose bedding, soft objects and stuffed animals should not be placed in an infant’s sleep space.
Turn Daniel’s story into a hands-on Sunday school activity with Daniel and the Lion’s Den Craft: A Sunday School Activity for Kids That Teaches Courage and Faith.
16. Make Cardboard Lacing Winter Shapes
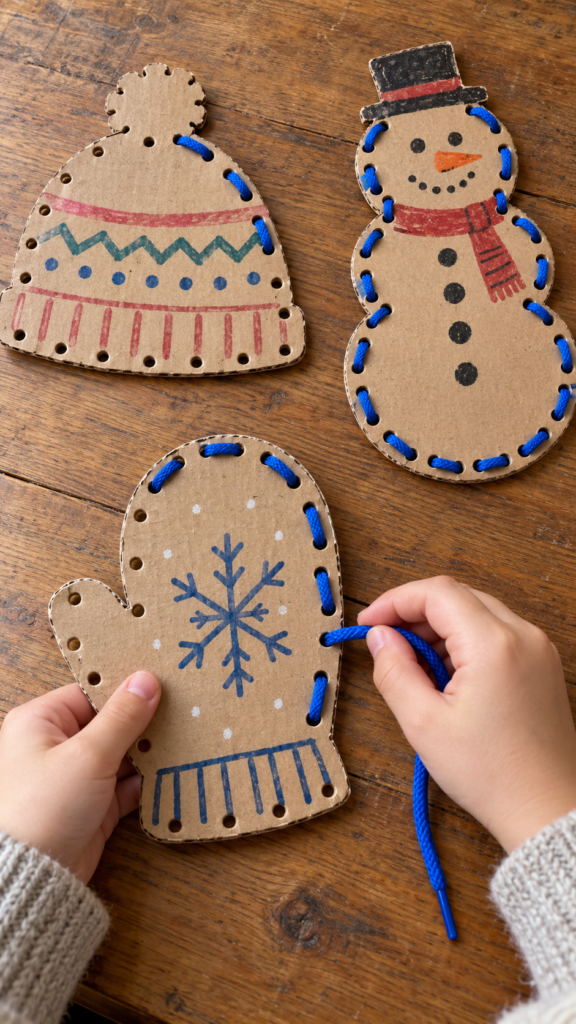
A cereal box can become a mitten, winter hat, snowman or tree that kids lace with yarn. Once the holes have been made, the activity is quiet, portable and doesn’t depend on a bright room.
It also gives children a simple introduction to the over-and-through movement used in hand sewing.
What you’ll need
- Cereal-box cardboard
- Pencil and marker
- Scissors
- Hole punch
- Shoelace or thick yarn
- Tape
Make the shape
- Draw a simple winter shape on the cardboard. A mitten, hat, snowman or tree is easy to cut.
- Cut out the shape.
- Punch holes around the edge, leaving a little space between each hole.
- For younger children, make the holes larger and farther apart and use a thick shoelace.
- Tape one end of the lace to the back of the first hole so it doesn’t pull through.
- Thread the lace through the holes around the shape.
Try a simple running stitch first: go down through one hole, then back up through the next.
Older children can try wrapping the lace over the edge between holes, creating a basic whipstitch effect.
Once the shape is laced, it can become part of a winter garland, a pretend sewing project or a decoration for a cardboard winter village.
Why it works during an outage: The cutting and hole-punching need good light, but the main activity is simply threading and can continue with much less light once the child knows where the next hole is.
Safety: An adult should handle the hole punch if the child cannot use it safely. Keep the lace length manageable and supervise younger children.
Make alphabet practice more playful with Train Craft Ideas for Kids That Make Learning the Alphabet Fun With Things You Already Have.
17. Make a Pretend Campfire With an LED Light
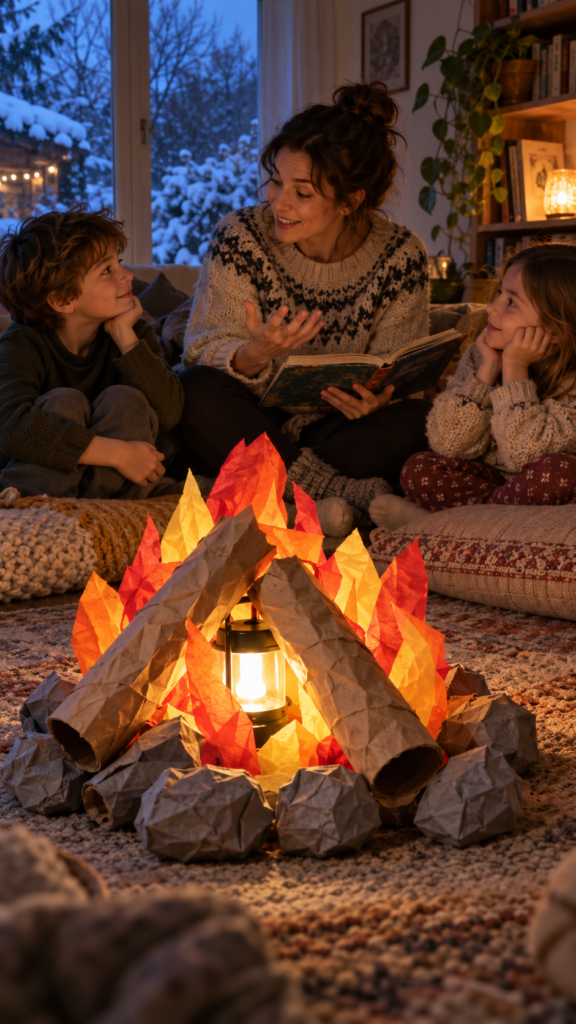
A snowstorm can make a real campfire impossible, but kids can still create a little circle of “firelight” indoors.
This is a pretend fire made from paper, cardboard and an LED light. It gives children something to build and then becomes the centre of a story, song or family game.
What you’ll need
- Newspaper or brown paper bags
- Orange, red and yellow tissue paper
- Gray paper
- Tape
- Scissors
- An LED lantern or flashlight
Build the pretend fire
- Roll newspaper or brown paper into several logs and tape them closed.
- Lean the paper logs together like a small campfire.
- Crumple gray paper into loose “stones” and arrange them around the logs.
- Cut orange, red and yellow tissue paper into irregular flame shapes.
- Tape the tissue flames around a paper cup or cardboard tube.
- Place the LED light underneath or inside the paper structure so the light shines through the tissue.
- Dim the other lights and sit around the finished campfire.
Keep the flames loose rather than making a solid paper cone. The light can then shine through several layers of tissue and create a softer flickering effect when the paper moves.
Turn it into a story circle
The pretend fire can become the setting for a family story. One person starts with a sentence such as, “The snow had stopped, but something was moving outside the cabin…”
Each person adds one sentence before passing the story to the next person.
Younger children can add a sound, character or single event instead of a full sentence. Older children can introduce a problem that the group has to solve.
A study of storytelling among the Ju/’hoansi of southern Africa found that nighttime conversations in that community contained substantially more storytelling than daytime conversations.
That finding describes one community, not a universal rule about families, but it is an interesting reminder of how a dark, relaxed setting can lend itself to stories.
Safety: Use an LED light only. Never put a candle inside the paper campfire. During a power outage, battery-powered flashlights or lanterns are safer around children than candles.
Never use a charcoal grill, camping stove, generator or other fuel-burning appliance indoors for heat or light because of carbon monoxide and fire risks.
Explore cultural crafts with 12 African Art Projects for Kids That Teach Culture, Not Just Craft.
Conclusion
A few simple supplies can go a surprisingly long way when the day doesn’t go as planned. These snow day crafts for kids give them something to make, test, play with and come back to without needing a complicated setup.
Save the unfinished projects, too. A snowflake experiment can turn into a weather journal, the cardboard village can keep growing, and the yarn or fabric scraps can be used for another project later.
Still looking for things kids can do indoors? Take a look at these screen-free activities for days when staying home wasn’t part of the plan.
You Can Also Read:
- Coffee filters become colourful butterfly wings in Coffee Filter Butterfly Craft for Kids (Easy Stained Glass Effect Craft Idea).
- Foam sheets make a useful starting point for simple projects. Easy Foam Sheet Crafts for Kids That Keep Them Focused, Creative, and Productively Busy at Home
- No-mess crafting gets easier with 13+ Pipe Cleaner Crafts for Kids That Are Simple, Fun, and Completely Mess-Free.
- Keep a few craft sticks nearby for 13 Popsicle Stick Crafts for Kids That Actually Keep Them Busy and Boosts Creativity.