That tiny fist won’t stay small forever. Make a salt dough handprint keepsake for babies before those hands change.
There is a moment, somewhere between the fourth feeding and the fifth load of laundry when you look down and realize your baby’s hand has already changed.
The fingers are longer. The wrist crease you memorized is gone. And you didn’t get a single photo of it.
That is what this craft is really about. It’s about pressing pause on a hand that will never be this small again and keeping the proof in something that will outlast a phone upgrade, a flooded basement, and forty years of moves.
A salt dough handprint keepsake costs almost nothing to make. But what it captures, the exact curve of your baby’s palm, the indent of each tiny finger, the little crease lines that are entirely their own, is something no photograph quite manages to hold.
Make it once. Make it now. Hands don’t wait.
If you are looking for more easy craft ideas to do with little ones, this post on Safe and Easy Slime Craft Ideas for Kids is a great place to start.
Most parents reach for an ink pad or a little pot of paint first. It seems like the easiest option.
But with a baby, easy and clear are two different things. A newborn’s hand is curved, not flat. When you press it onto paper, you get the heel of the palm and maybe two fingertips, and a lot of smudge in between.
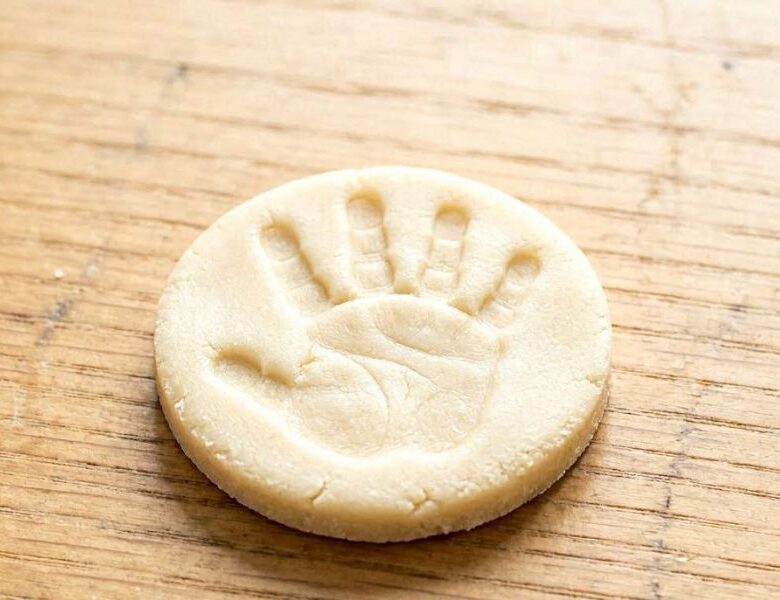
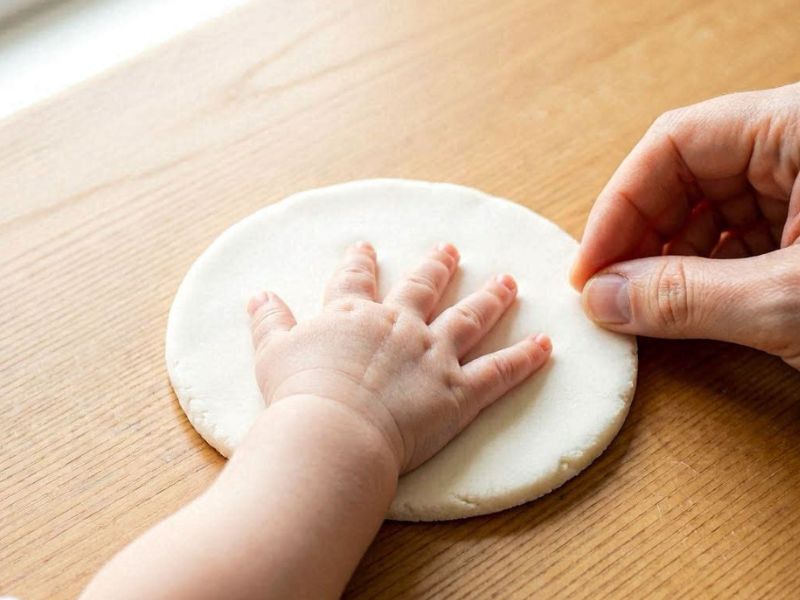
Salt dough is different because it meets the hand where it is.
You press the hand down into soft dough and it captures everything, the curve of the palm, the tiny lines across each knuckle, the individual shape of every finger. Things a flat surface simply cannot pick up.
That is the difference between a print and a keepsake. A paint smear fades and curls at the edges.
A salt dough impression stays exactly as it was the day you made it, sitting on a shelf ten, twenty, thirty years from now.
For a sensory painting activity that requires almost no setup, Bubble Wrap Painting is one kids ask to do again and again.
What You Need (and what flour NOT to use)
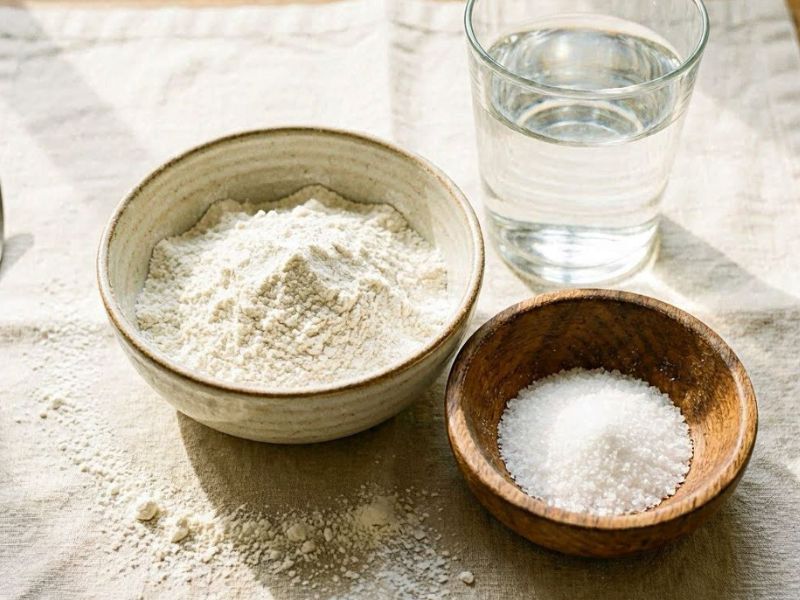
Salt dough is made from three things you most likely already have in your kitchen: all-purpose flour, table salt, and warm water. That is the entire ingredient list. No special trips to the craft store, no expensive materials.
Each ingredient has a job:
- All-purpose flour gives the dough its structure and body
- Table salt acts as a natural preservative that keeps the finished keepsake from growing mould over time
- Warm water brings everything together and makes the dough soft enough to capture a clear impression.
When you are ready to take crafting outdoors, this guide on How to Make Seed Paper with Kids turns a simple afternoon into something that actually grows.
How to Make (Step by Step)

Use plain all-purpose flour only. Self-rising flour has a leavening agent built in, which causes the dough to puff up in the oven and distort the handprint you worked hard to get.
It is one of the most common reasons a first attempt fails, and it is completely avoidable.
Baking temperature matters more than most people expect. If your oven displays Celsius and you set it to 200 thinking it means Fahrenheit, you will be baking at nearly double the correct temperature. The outside of your keepsake will harden and brown too fast while the inside stays raw.
- Correct temperature: 200°F (roughly 93°C)
- The goal is low, slow, and patient
- When in doubt, go lower and give it more time
Get these two things right before you begin and you are already ahead of most first attempts.
How to Make The Dough
Making salt dough is straightforward, but the details matter, especially when what you are pressing into it is a baby’s hand. Follow these steps carefully and the dough will work with you, not against you.
What You Will Need
- 2 cups all-purpose flour
- 1 cup table salt
- 1 cup warm water (added gradually, not all at once)
- A large mixing bowl
- A rolling pin
- Parchment paper
- A baking tray
- A round cookie cutter or bowl rim (4–5 inches wide)
- A straw (for making a hanging hole if needed)
- A butter knife or blunt knife for trimming
1. Mix the Dry Ingredients First
Add the flour and salt into a large bowl and mix them together thoroughly before adding any water. This ensures the salt is evenly distributed through the dough from the start, which matters for both texture and preservation.
2. Add the Water Slowly
Pour the warm water in a little at a time while stirring continuously. Do not pour it all in at once.
Different brands of flour absorb water at different rates, which means you may need slightly less than a full cup, or just a little more. You are looking for a dough that comes together without being sticky or crumbly.
- Too sticky: add a little more flour, one tablespoon at a time
- Too dry and crumbly: add more water, one teaspoon at a time
- The right consistency feels soft, smooth, and easy to press your finger into without it sticking
3. Knead Until Smooth
Turn the dough out onto a lightly floured surface and knead it for at least 5 to 10 minutes. This step is not optional.
Kneading develops the structure of the dough and removes any lumps or grainy patches from the salt. When it is ready, it should feel smooth, pliable, and slightly elastic, similar to play dough. If it still feels rough or uneven, keep going for another minute or two.
4. Roll it to the right thickness
This is where many people get it wrong in both directions.
- Too thin (under 5mm): the dough dries out too fast in the oven, which causes cracking
- Too thick (over 10mm): the outside hardens before the centre has a chance to dry, leaving a soft, doughy middle even after hours of baking
- The sweet spot is 5–7mm thick — roughly the depth of two stacked pound coins or two quarters
Roll the dough between two sheets of parchment paper for the most even result. This also prevents sticking without needing to add extra flour, which can dry out the surface.
For a seasonal painting activity that is just as fun indoors, this Q-Tip Firework Painting Craft for Kids is a 4th of July favourite that works any time of year.
5. Get the handprint before you cut the shape
Here is the tip that makes the biggest difference with babies: do not cut the shape first and then try to get the handprint inside it. A baby’s hand will not cooperate with a pre-cut circle.
Instead, press the handprint into a larger, open piece of dough first, then cut around it afterwards using a bowl rim, cookie cutter, or knife.
To get the best impression:
- Have everything ready before you bring the baby over, dough rolled, surface clear, second adult on hand if possible
- Gently stroke the back of the baby’s hand from wrist to knuckles to encourage the fingers to splay open naturally
- Press the hand firmly and evenly straight down into the dough, then lift it straight back up, do not drag or slide
- Make sure every fingertip has made contact with the dough before lifting
- Wash the baby’s hands immediately after, the salt content in the dough is high and should not stay on skin for long
If the first impression is not clear, smooth the dough over gently and try again. You have time.
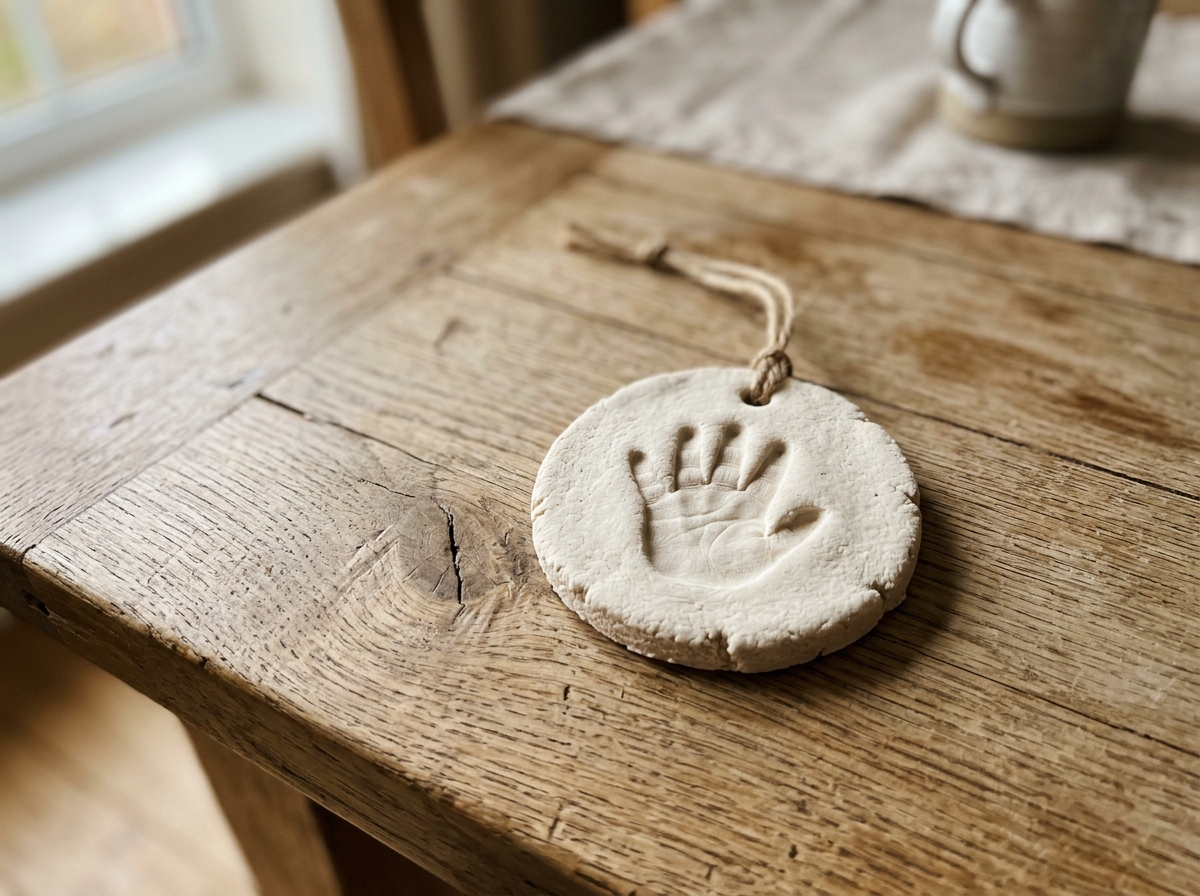
6. Cut the Shape and Add a Hanging Hole
Once you have a print you are happy with, use a bowl rim or large cookie cutter to cut a clean shape around it.
If you want to hang the finished keepsake, use a straw to poke a clean hole near the top of the dough before it goes into the oven. It is nearly impossible to add the hole neatly after baking.
Transfer the cut piece carefully onto a parchment-lined baking tray, keeping it flat, and it is ready for drying or baking.
If you want crafts that teach as much as they entertain, these 12 African Art Projects for Kids are worth bookmarking.
The Palmar Grasp Reflex: The real reason your baby won’t open their hand
Babies are born with what is called the palmar grasp reflex, the same instinct that makes them curl their tiny fingers around yours so tightly.
It is completely normal and a sign that everything is working exactly as it should.
The challenge is timing. This reflex keeps their hands balled into fists for the first few months, usually relaxing somewhere between three and six months of age, which is precisely the window when most parents are trying to capture those newborn-tiny hands.
Knowing this one thing is essential.
Never Force The Hand Open
Trying to prise a baby’s fingers apart will not work and will upset both of you. The key is to work with the reflex, not against it. Here is what actually helps:
- Stroke the back of the hand. Gently run your finger from the wrist towards the knuckles along the back of the hand. This naturally encourages the fingers to splay open without any force at all.
- Catch them in deep sleep. During deep sleep, the grasp reflex relaxes on its own. Look for limp limbs, steady breathing, and no flickering eyelids, you will often find the hand is already half-open and ready. This is the single most reliable technique for newborns.
- Feed first, then try. A full, drowsy baby is a relaxed baby. Hungry babies clench their fists tighter. Just after a feed, when they are content and heavy-eyed, is one of the best moments to attempt the print.
- Warm the hand first. Cold hands clench tighter. If the fingers feel cool, cup the hand gently in yours for a moment before pressing it into the dough.
- Use distraction for older babies. Sing, talk, or pull a funny face. A baby focused on your voice is far less focused on keeping that fist shut. Have a second adult handle the distraction while you handle the dough.
Before you throw away another empty roll, check out these Toilet Paper Roll Crafts for Kids that turn everyday waste into genuinely skill-building projects.
When the hand opens, move quickly
The moment the fingers splay, bring the dough up to the hand rather than pulling the hand down to the dough.
One confident, even press straight down, then lift straight up. Do not drag or slide. The whole window may last only a second or two, so have everything ready before you begin.
What if the hand still will not cooperate? Start with the feet
Footprints are far easier at the newborn stage. Hold the foot gently by the ankle and roll it from heel to toe into the dough, and it naturally opens out.
Many parents capture a beautiful footprint in the early weeks and come back for the handprint at three to six months once the reflex has settled. There is no rule that says both have to happen on the same day.
The best age to attempt a salt dough handprint
There is no single right answer, but here is an honest guide:
- 0–8 weeks: The hands are at their most tiny and precious, but the grasp reflex is strongest. Use the sleep technique or the stroking method. Expect it to take a few attempts.
- 3–6 months: The reflex has usually relaxed, hands open more willingly, and the fingers are still gorgeously small. This is the sweet spot for most parents.
- 6–12 months: Try picking the baby up and leaning them gently forward. Most babies will instinctively put their hands out in front of them, a natural reflex that gives you a lovely open palm to work with.
Whichever age you choose, you are capturing them exactly as they are right now. That is the whole point.
If you need something that keeps kids focused for longer stretches, these Easy Foam Sheet Crafts for Kids are quietly one of the most underrated craft supplies out there.
Baking vs Air Drying: which is right for a baby keepsake
Once your salt dough handprint keepsake for babies is pressed and shaped, you have two options for drying it: the oven or air drying. Both work. But they behave differently, and for a baby’s handprint, where every tiny crease and finger line matters, the method you choose makes a real difference.
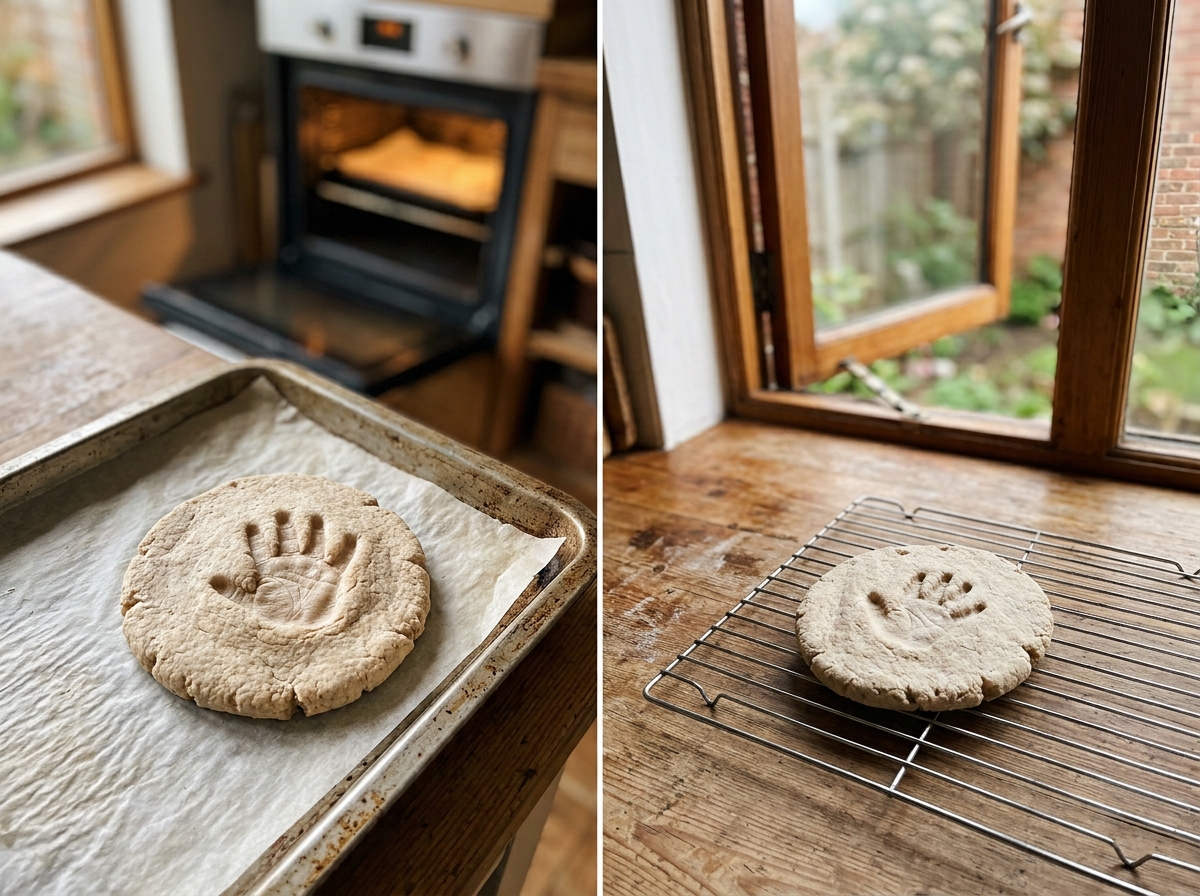
Baking In The Oven
The oven is the faster option and works well when done correctly. The non-negotiable rule is low and slow.
- Bake at 200°F (93°C) for a minimum of 2 to 3 hours. The goal is to dry the dough completely without browning or cracking.
- If you have the time, let the piece air dry for a full day before putting it in the oven. This cuts down on baking time and significantly reduces the risk of puffing.
- Flip the keepsake halfway through so the underside dries evenly, a bottom that stays soft is one of the most common complaints, and flipping solves it
- Check every 30 minutes after the first hour. It is done when it feels firm to the touch with no soft or spongy patches
- Do not rush it by turning the heat up, higher temperature is the number one cause of a ruined keepsake
Air Drying
Air drying takes longer but it is the gentler method. Expect 48 to 72 hours in a warm, dry spot. Place the piece on a wire rack rather than a flat surface so air can circulate underneath, and flip it once halfway through to prevent the bottom from staying damp.
The advantage of air drying is control. Without heat involved, there is no risk of puffing, browning, or the outside hardening before the inside is ready.
Fine details, the kind that make a baby’s handprint worth keeping, are better preserved when the dough dries slowly and evenly.
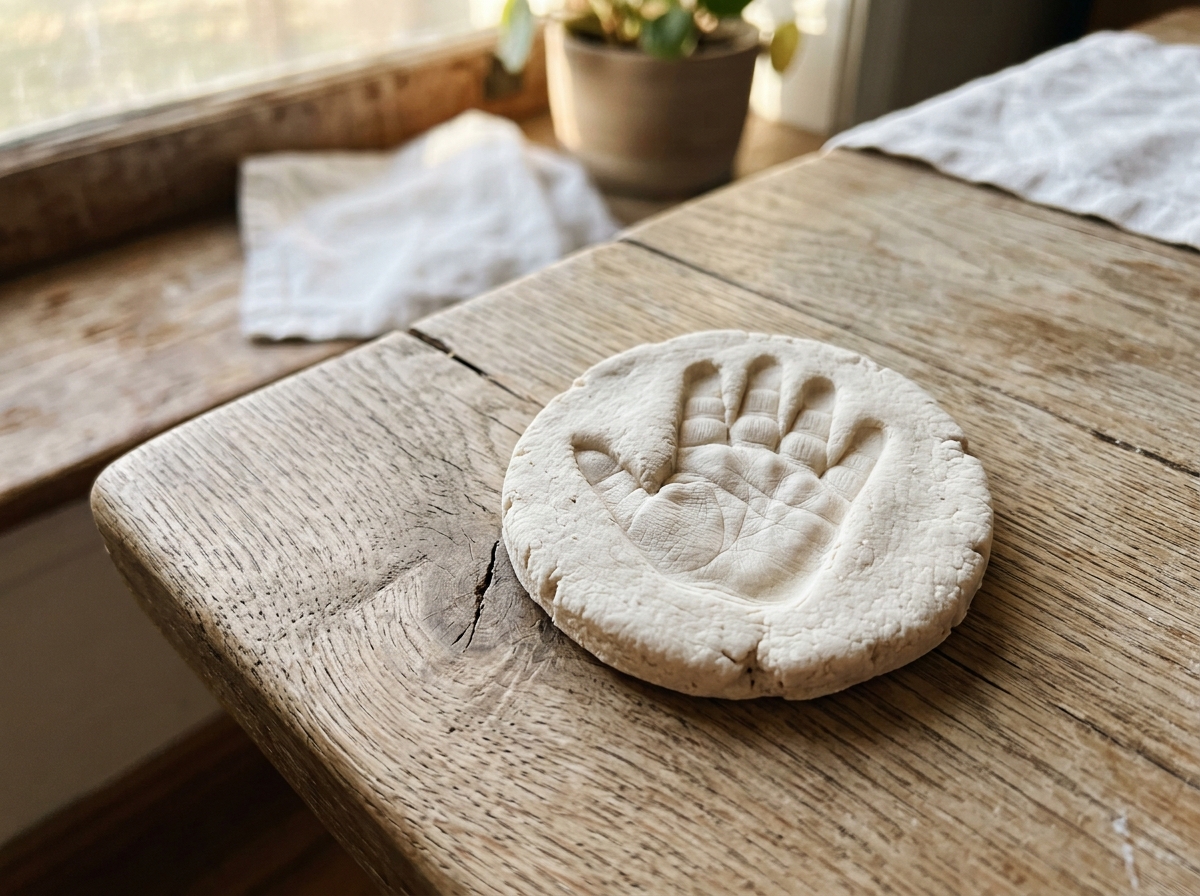
Which method is right for a baby’s handprint?
For a salt dough handprint keepsake for babies specifically, air drying is the lower-risk route.
A baby’s hand leaves shallower, finer impressions than an older child’s, the lines are delicate, the finger indentations are small, and any distortion from heat is harder to recover from.
If you are short on time, the oven works, just let it air dry for a day first and keep the temperature firmly at 200°F. If you have 48 to 72 hours and no rush, skip the oven entirely and let time do the work. The result will be worth the wait.
For a completely mess-free option on busy days, these 13+ Pipe Cleaner Crafts for Kids are simple enough for toddlers and engaging enough for older kids too.
Why Your Salt Dough Cracked or Puffed (and how to fix it)
Regardless of how careful you are, you run into problems with their first salt dough handprint keepsake for babies.
The good news is that most issues have a clear cause, and a simple fix.
Here is what goes wrong and exactly what to do about it.
1️⃣ The Handprint Cracked
Cracking is the most common complaint, and it almost always comes down to one of two things.
Cracking happens when drying is uneven or the oven temperature is too high, causing the outside to harden too quickly while the inside is still moist. When the surface sets before the centre has dried, the tension between the two causes the top to split.
How to fix it:
- Always bake at 200°F (93°C) — never higher
- Let the piece air dry for at least a day before putting it in the oven
- Make sure the dough is rolled to an even thickness of 5–7mm before pressing the handprint
- Cool the piece slowly inside the oven with the door slightly ajar rather than pulling it out into room temperature suddenly
If hairline cracks appear after the piece has fully dried, a small amount of white school glue pressed gently into the crack and left to dry can blend in well once painted over.
2️⃣ The Dough Puffed Up In The Oven
Puffing distorts the handprint and is one of the most frustrating outcomes because it usually happens after you have already done the hard part. It is caused by one of three things:
- Oven temperature set too high — the most common cause by far
- Self-rising flour used instead of plain all-purpose flour — the leavening agent in self-rising flour activates in heat and causes the dough to rise
- Dough rolled too thin — thin dough has less structure to hold its shape under heat
How to fix it:
- Double-check your oven is set to Fahrenheit, not Celsius, 200°C is nearly double the correct temperature
- Use only plain all-purpose flour, every single time
- Roll the dough to 5–7mm and no thinner
- Air dry for 24 hours before baking to give the dough time to begin setting before heat is introduced.
And if you want something beautiful with very little effort, this Coffee Filter Butterfly Craft for Kids creates a stunning stained glass effect that looks far harder than it is.
3️⃣ The bottom is Still Soft After Baking
This is more common than most posts admit. The top looks firm and dry, but when you turn it over, the underside still has give.
How to fix it:
- Flip the piece over and return it to the oven on the lowest temperature setting
- Alternatively, flip it and leave it to air dry overnight,the underside just needs more exposure to air
- Next time, place the keepsake on a wire rack inside the oven rather than directly on the tray so heat can reach both sides
4️⃣ The Dough is Too Sticky or Too Dry
This happens at the mixing stage and is easy to correct before you ever get to the handprint.
- Too sticky: knead in more plain flour one tablespoon at a time until the dough no longer clings to your hands or the surface
- Too dry and crumbly: add warm water one teaspoon at a time, kneading between each addition, until the dough comes together smoothly
The right consistency feels soft and pliable, like play dough that holds its shape but does not crack when you bend it.
One last thing worth knowing
Most salt dough handprint keepsake for babies failures are not about the craft being difficult, they are about one small detail being off. The flour type, the oven setting, the dough thickness. Get those three right and the rest follows naturally.
For a craft that keeps little hands busy and genuinely builds creativity, these 13 Popsicle Stick Crafts for Kids are simple to set up and satisfying to finish.
How to Paint and Personalise It
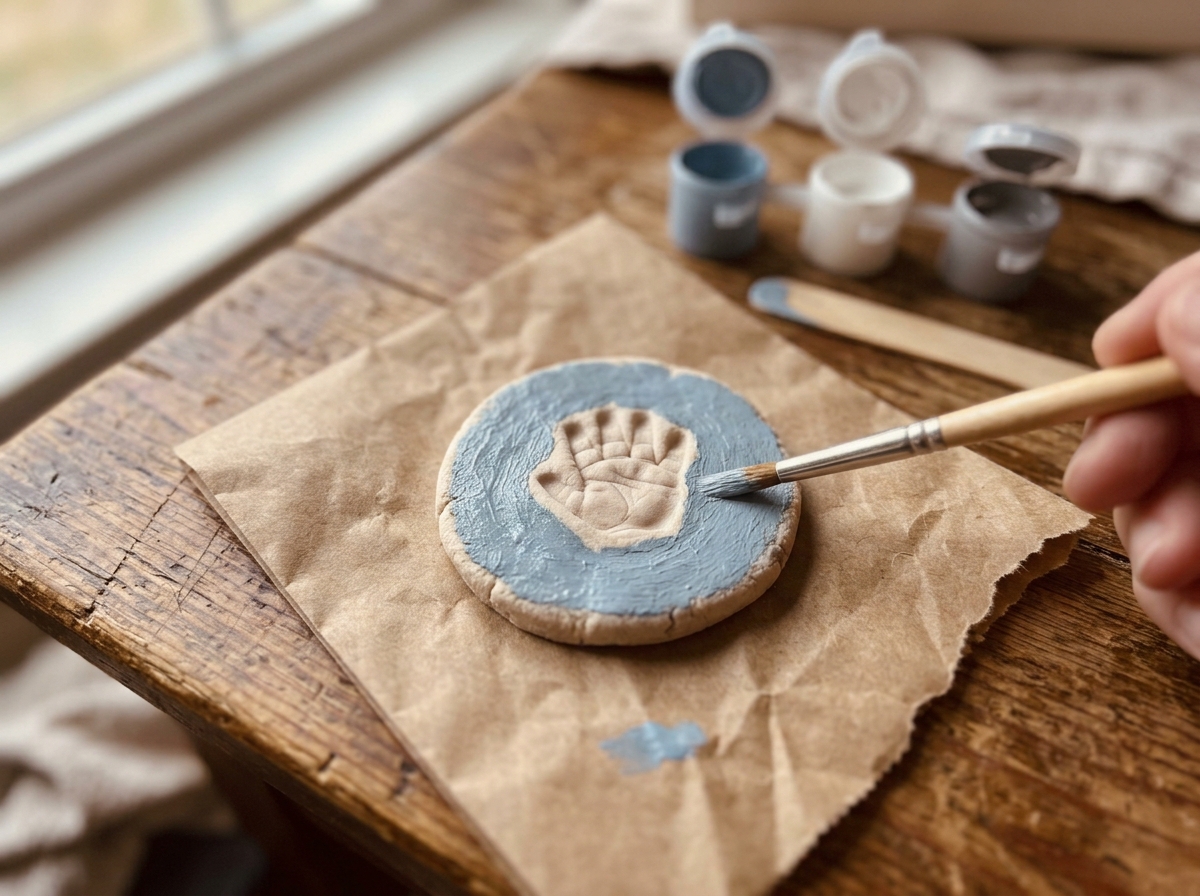
Once your salt dough handprint keepsake for babies is fully dry, painting is what brings it to life.
Acrylic craft paint gives the most vibrant, durable finish. For babies who may put their hands near their mouths during the process, non-toxic washable tempera paint is the safer choice.
A few simple rules:
- Paint the background colour first, then the handprint on top once the base coat is fully dry
- Let each layer dry completely before adding the next, rushing this is how colours bleed into each other
- A white or cream base coat over the whole piece first gives a cleaner, more finished look before you add colour
The detail that most people skip, and should not: flip the keepsake over and write the baby’s full name, date of birth, and age on the back with a permanent fine-tip marker.
This is what turns a salt dough handprint keepsake for babies into an actual record. Twenty years from now, nobody will remember exactly how old those hands were. The back of the piece will.
Little ones who love animals will get a lot out of these Farm Animal Crafts for Toddlers — each one is designed to build fine motor skills while keeping playtime genuinely fun.
How to Seal it so it Lasts for Decades
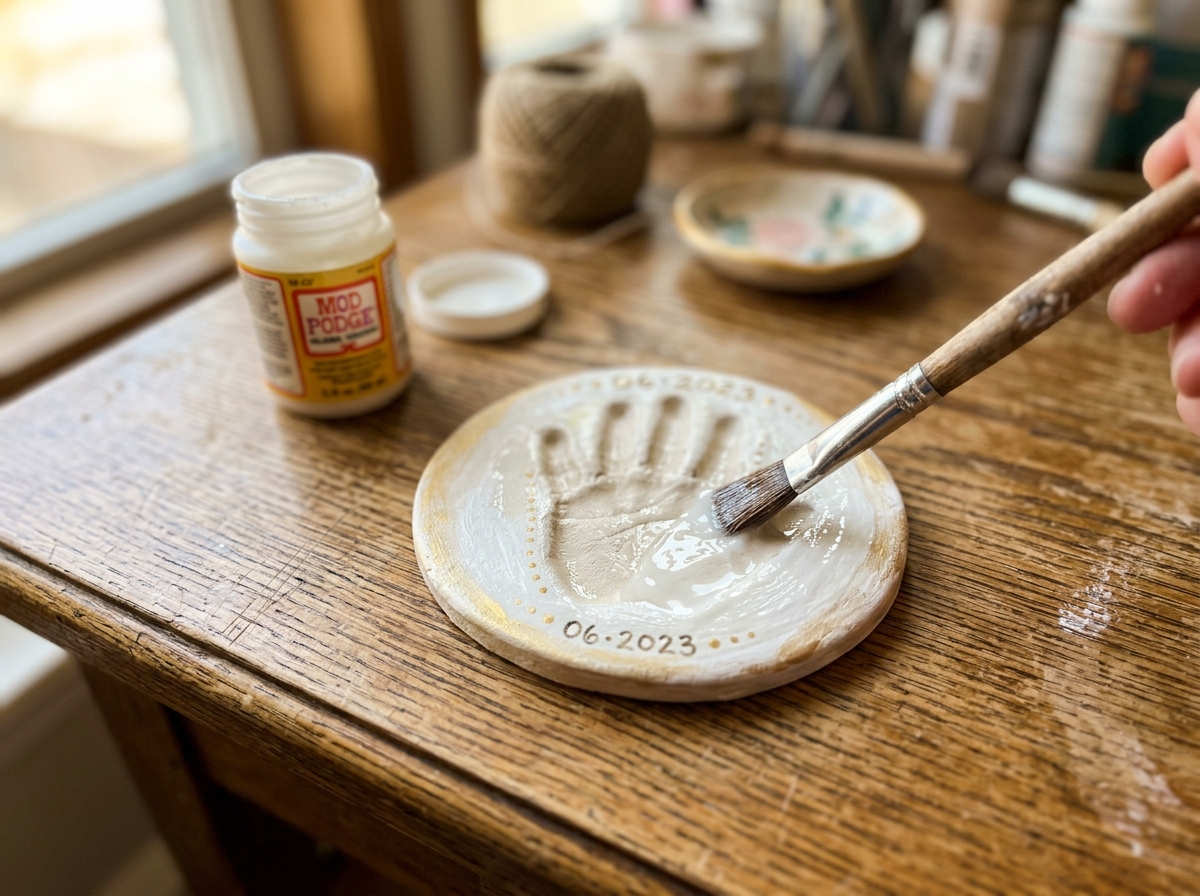
Sealing is not optional, it is what separates a keepsake that lasts a lifetime from one that softens, cracks, or discolours within a few years.
Apply Mod Podge or a clear acrylic spray sealant to all sides of the piece, including the edges. Allow it to fully dry, then apply a second coat for the best long-term protection.
Salt is a natural preservative, which is why a properly made salt dough piece resists mould on its own. But humidity is the real long-term enemy. Sealing creates a barrier against moisture so the piece stays hard, clear, and intact no matter where it is stored or displayed. Store finished keepsakes in a cool, dry place, never in a basement or bathroom where humidity fluctuates.
How to display it Beyond Hanging it on the Tree
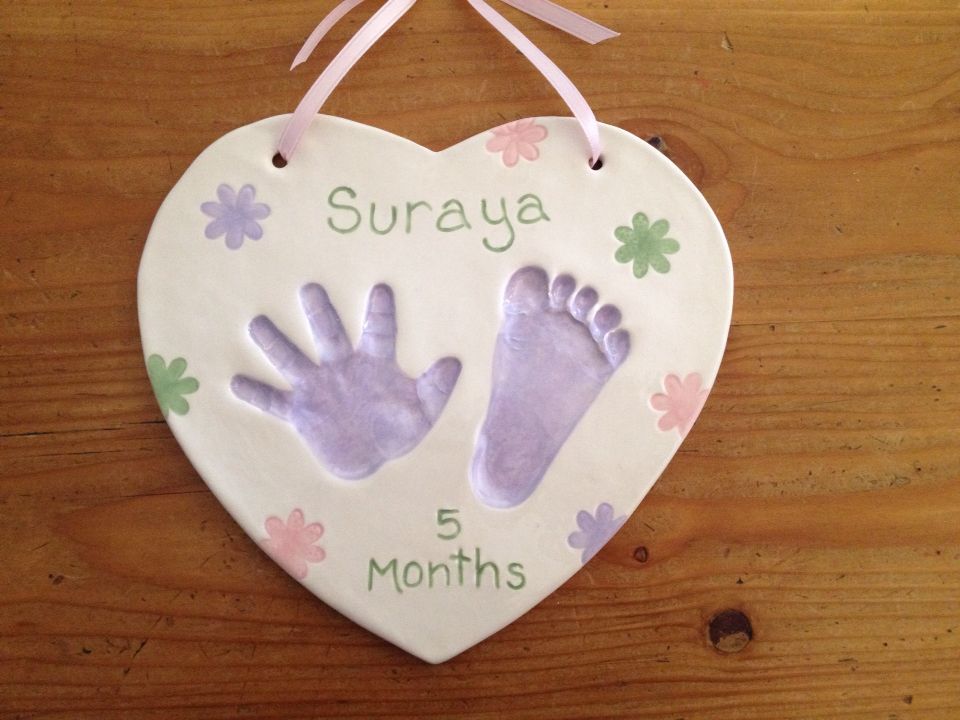
Photo credit: @Unknown
A salt dough handprint keepsake for babies deserves more than a box in a cupboard. Here are ways to display it that actually do it justice:
- Shadow box frame on the nursery wall, deep enough to hold the piece without glass pressing against it
- Deep box frame with the keepsake super-glued inside and hung as wall art
- Gallery wall collection using command strips to avoid wall damage, or suspended from a dowel rod with twine to display multiple prints from different ages side by side
- Grandparent gift — write the child’s name and the date on the back of the frame before wrapping it
- Annual birthday tradition — make one every year on the baby’s birthday and display them together as they grow. The difference in hand size from year to year tells its own story.
On days when energy is low and you need something quick to set up, these 13 Easy Egg Carton Craft Ideas for Preschoolers turn a piece of recycling into a full afternoon of creativity.
Your baby’s hands will not stay this small for long
A salt dough handprint keepsake for babies is one of those things you will never regret making, and might always regret not making. Three ingredients, one afternoon, and you have something that holds exactly who your baby was at this size, at this age, at this moment.
Make it this week. Make it while those hands are still this small.
And when it is done, sealed, labelled, and hanging on the wall, you will understand why parents have been making this craft for generations.