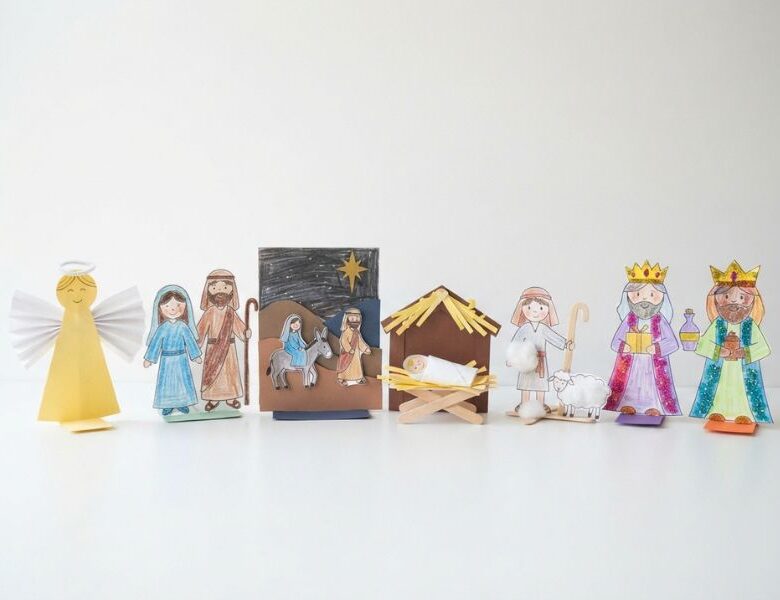
Want children to understand more than the manger scene? These Nativity crafts for kids turn the Christmas story into hands-on, memorable activities.
What if the Nativity story children see in a Christmas scene is only the middle of the story?
There were moments before the manger, people who received news they did not expect, a journey that had to be made, and visitors who arrived later with gifts.
Put those moments together, and the familiar Nativity scene starts to tell a much bigger story.
That makes crafting a useful way to slow the story down. Instead of making a manger craft and moving on, children can create something connected to each part and gradually piece together what happened.
These Nativity crafts for kids follow that journey in order, with ideas that leave room for Bible reading, questions and conversation at home or in Sunday School.
Help kids explore Esther’s story through Esther Craft Ideas: 13 Crafts That Retell Her Story for Kids, From Her Crown to Purim.
Where the Nativity Story Begins
The Nativity story does not begin with Mary and Joseph arriving in Bethlehem.
Before Jesus was born, Mary received an unexpected message from the angel Gabriel, Joseph had to understand what was happening, and Mary visited Elizabeth.
The details come mainly from Luke 1–2 and Matthew 1–2, with each Gospel telling different parts of the story.
Luke gives us Mary, Elizabeth, Bethlehem, the shepherds and the angels, while Matthew tells us about Joseph, the Magi and the star.
That gives children more to make than just a manger.
Each craft can bring one moment to life, helping them see who was there, what happened and what came next. The first moment to explore is the message that Gabriel brought to Mary.
Turn the Good Samaritan story into a hands-on lesson with 7 Good Samaritan Craft Ideas for Kids Who Ask “Why Didn’t Anyone Else Stop?.
1. Gabriel Announces Jesus’ Birth to Mary
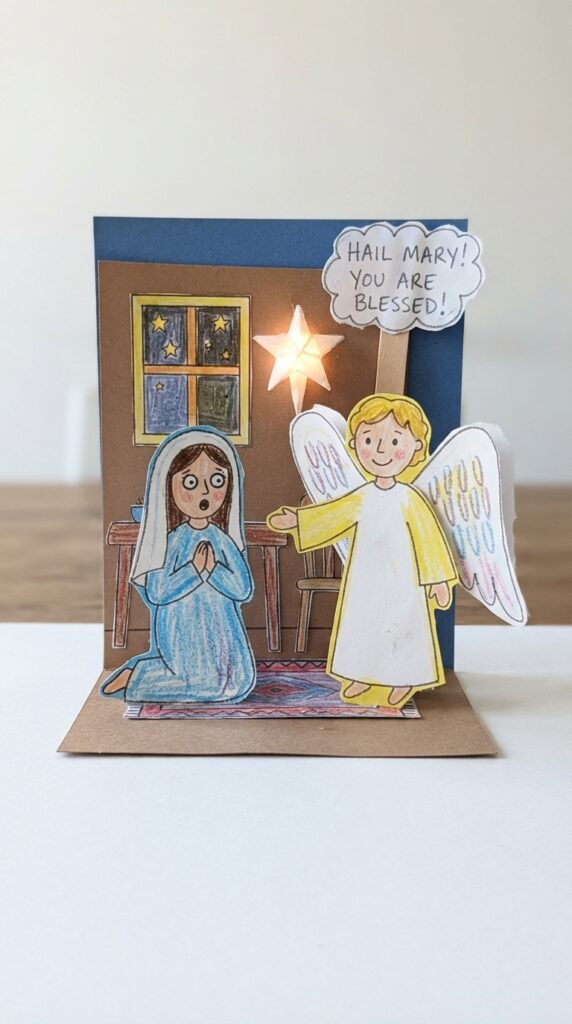
Mary’s part in the Nativity story begins with a message she could not have expected. In Luke 1:26–38, God sends the angel Gabriel to Mary in Nazareth and tells her that she will have a son and name Him Jesus.
Gabriel explains that Jesus will be great and will be called the Son of the Most High.
Mary asks how this will happen, and Gabriel tells her that the Holy Spirit will come upon her. Mary then responds, “I am the Lord’s servant,” accepting what she has been told.
This makes the announcement a natural place to begin the crafts. Before children see the manger, shepherds or wise men, they can first meet Mary and Gabriel and learn about the message that set the story in motion.
Why This Scene Comes First
This craft gives children a starting point for understanding that Jesus’ birth was announced before the journey to Bethlehem ever happened.
It also introduces Mary at an important point in the story and gives children a chance to remember what Gabriel came to tell her.
Rather than making a generic angel craft, create a scene that shows Gabriel bringing the message to Mary. A paper scene, movable figures or a simple standing diorama can all work.
Materials
- Cardstock or construction paper
- Scissors
- Glue
- Markers, crayons or coloured pencils
- Craft sticks, optional
- Paper fasteners, optional for movable figures
How to Make the Gabriel and Mary Scene
- Cut out simple figures for Mary and Gabriel from cardstock or construction paper.
- Let the children add facial features, clothing and other simple details with crayons or markers.
- Create a background on another sheet of cardstock. A simple home setting is enough; there is no need to build an elaborate scene.
- Glue the figures onto the background, or attach them to craft sticks so children can move them around the scene.
- Add a speech bubble beside Gabriel with a short phrase from the passage, such as “Do not be afraid, Mary.”
- Write Luke 1:26–38 somewhere on the finished craft so the children can connect the scene to the Bible passage.
Keep the Message in the Craft
As the children work, bring their attention back to what Gabriel came to announce. He was not simply visiting Mary; he was telling her about the son she would have and the name she was to give Him.
You could ask:
“What did Gabriel come to tell Mary?”
For younger children, you can help them remember the answer by pointing back to the speech bubble or the details they added to the scene.
Mary has now received the news, but there is another person she is about to visit who will become an important part of this early part of the story. The next craft follows Mary to Elizabeth.
Walk through the Bible story with Noah’s Ark Crafts for Kids: 9 Ideas That Walk Through the Whole Story, One Craft at a Time.
2. Mary Visits Elizabeth
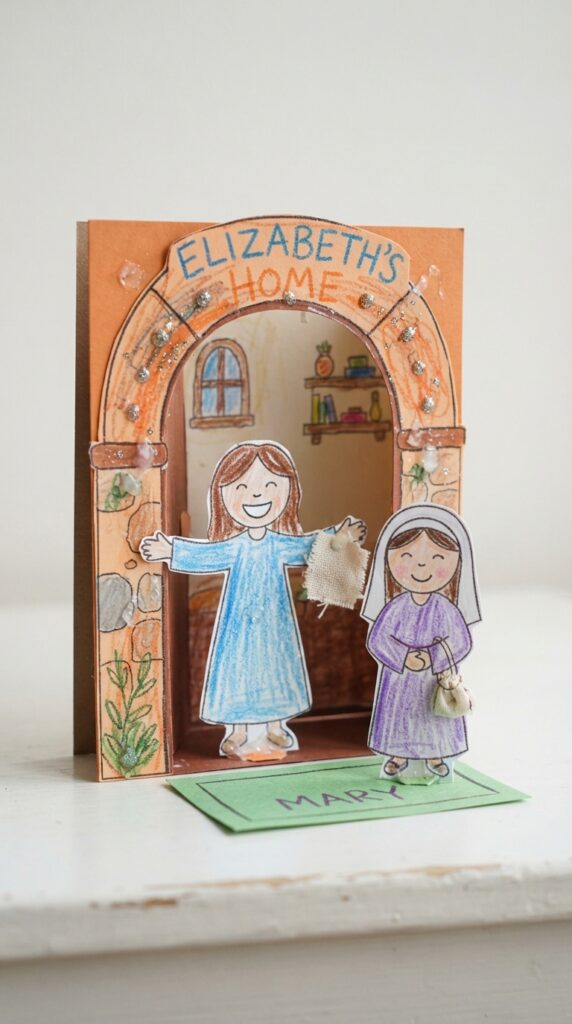
After Gabriel’s visit, Mary travels to the hill country to visit her relative Elizabeth. Luke 1:39–45 describes what happens when Mary enters Elizabeth’s home and greets her.
Elizabeth’s unborn baby leaps in her womb, and she is filled with the Holy Spirit.
She calls Mary blessed and recognizes that Mary is the mother of her Lord. The scene gives children another part of the story to picture before Jesus is born, and it shows Elizabeth responding to the news Mary has received.
This makes a two-person doorway scene a good fit for the passage. Instead of creating two figures without context, children can show Mary arriving at Elizabeth’s home and use short speech bubbles to represent parts of their greeting.
A Visit Worth Remembering
This scene can help children notice that Mary was not the only person who knew something important was happening. Elizabeth also recognized the significance of Mary’s visit and spoke about the child Mary was carrying.
You can ask:
“What did Elizabeth know when Mary came to visit her?”
For younger children, keep the answer simple: Elizabeth understood that Mary was carrying the child God had promised.
Materials
- Cardstock or construction paper
- Scissors
- Glue
- Markers, crayons or coloured pencils
- Craft sticks, optional
- Paper fasteners, optional
- Small pieces of paper for speech bubbles
How to Make the Mary and Elizabeth Doorway Scene
- Fold a sheet of cardstock in half to create a simple standing background.
- Cut out Mary and Elizabeth from construction paper or cardstock. Let the children add their clothing and other simple details.
- Draw or cut out a doorway on the background where Elizabeth can stand.
- Place Mary outside the doorway and Elizabeth inside to show the moment Mary arrives at her home.
- Add small speech bubbles beside the figures. Use short phrases from Luke 1:40–45 rather than filling the scene with long passages.
- Glue the figures in place, or attach them to craft sticks if you want children to act out the greeting.
- Write Luke 1:39–45 at the bottom of the scene as a reminder of where this part of the story comes from.
Let the Children Retell the Visit
Once the craft is finished, have the children use Mary and Elizabeth to retell what happened. Who arrived? Who was already at home? What happened when Mary greeted Elizabeth?
This also gives you a chance to point out something children may miss in a typical Nativity scene: Jesus had not been born yet. Mary was still carrying Him when she visited Elizabeth.
Mary has now shared the news with Elizabeth, and the next part of Luke’s account stays with Mary as she responds to everything that has happened.
3. Mary’s Song of Praise
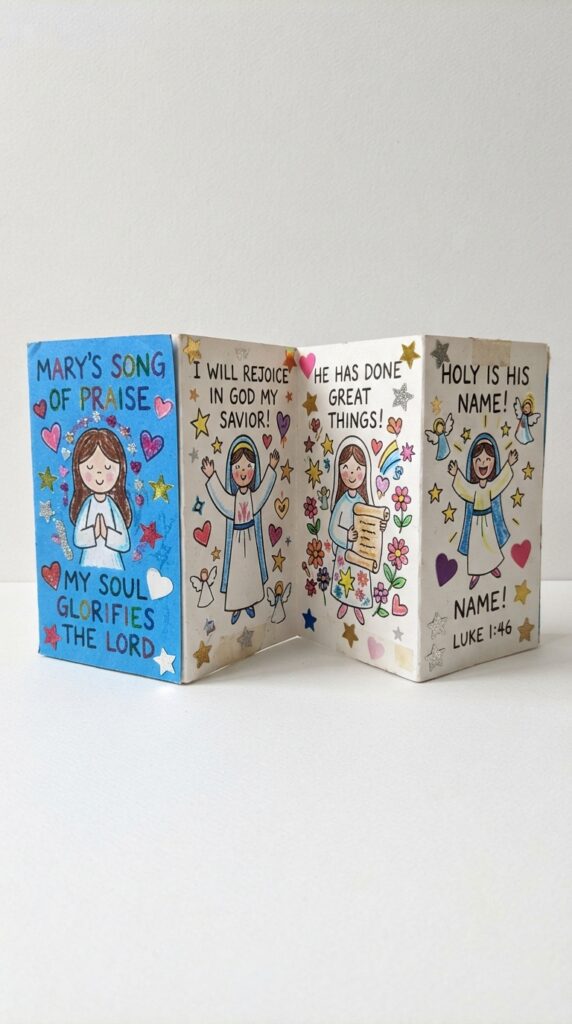
Mary’s visit to Elizabeth does not end with a simple greeting. In Luke 1:46–55, Mary responds with a song of praise to God, often called the Magnificat. She speaks about God’s greatness, His mercy and the way He has remembered His promises.
For this craft, children can make a fold-out Mary’s song with several panels.
Each panel can contain a short, child-friendly statement that captures one idea from the passage, such as praising God for His greatness, remembering His mercy or recognizing that God keeps His promises.
This makes one of these Nativity crafts for kids more than a decorative Christmas activity. It gives children a way to see that the story includes Mary’s response to what God was doing, not only the events surrounding Jesus’ birth.
Turn Mary’s Words Into a Craft
Instead of asking children to memorise the whole passage, let each panel represent one idea from Mary’s song.
For example, one panel could say “God is great.” Another could say “God is merciful.” A third could say “God remembers His promises.”
These are simplified teaching phrases, not quotations from a particular Bible translation. If you want to use direct Bible wording, read from the translation your family or Sunday School uses and choose short phrases from it.
Materials
- Cardstock or construction paper
- Scissors
- Glue
- Crayons, coloured pencils or markers
- Stickers or simple paper decorations, optional
- Bible for reading Luke 1:46–55
How to Make Mary’s Fold-Out Song
- Cut a long strip of cardstock and fold it into three or four equal panels.
- Write one simple idea from Mary’s song on each panel.
- Let the children decorate each section with drawings that match the words. A heart could represent mercy, for example, while a simple crown could represent God’s greatness.
- Add a small picture of Mary to the front panel with the title “Mary’s Song of Praise.”
- Write Luke 1:46–55 on the final panel so children know where the ideas came from.
- Open the finished craft from one panel to the next and let the children explain what each statement means.
What Mary’s Song Helps Children Notice
The song gives children another way to understand Mary’s place in the story. She is not simply waiting for Jesus to be born. She responds to God with praise and speaks about what He has done and the promises He has made.
Ask:
“What are some things Mary praised God for?”
That question can lead children back to the passage instead of turning the craft into a lesson based on ideas that are not actually in the text.
Mary has praised God for what is happening, but another important person still needs to understand what this means for him. Matthew’s account now brings Joseph into the story.
Give a Sunday school lesson a creative activity with Daniel and the Lion’s Den Craft: A Sunday School Activity for Kids That Teaches Courage and Faith.
4. Joseph Learns About the Baby
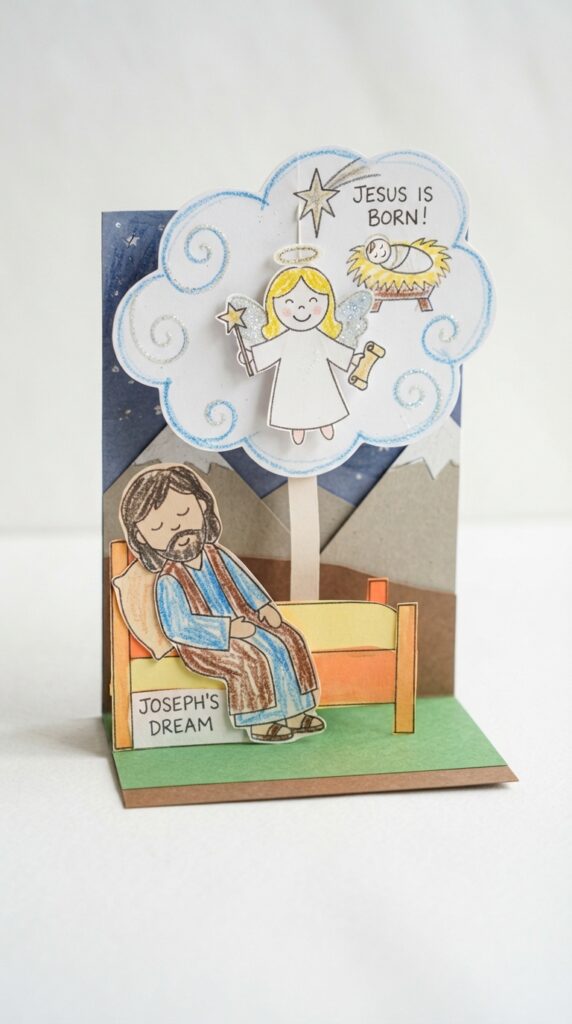
Joseph’s part in the Nativity story can easily disappear into the familiar picture of Mary and Joseph standing beside the manger. But Matthew 1:18–25 gives him an important moment before Bethlehem.
Joseph learns that Mary is expecting a child, and Matthew explains that the child was conceived through the Holy Spirit.
While Joseph is considering what to do, an angel appears to him in a dream and tells him not to be afraid to take Mary as his wife. The angel also tells him to name the child Jesus.
A dream-message craft can show this part of the story clearly. Make Joseph on one side of a fold-out card and the angel’s message on the other, so children can open the scene and reveal what Joseph was told.
Joseph’s Part in the Story
This is an important detail to teach because Joseph was not simply added to the Nativity picture at the end. Matthew shows that he had to respond to what he had learned before Jesus was born.
The angel gave Joseph specific instructions: he was to take Mary as his wife and give the child the name Jesus. Matthew then tells us that Joseph did what the angel commanded.
That gives children something concrete to remember about Joseph without guessing about emotions the Bible does not describe in detail.
Materials
- Cardstock
- Construction paper
- Scissors
- Glue
- Markers or crayons
- Pencil
- Paper fastener, optional
- Craft stick, optional
How to Make Joseph’s Dream-Message Craft
- Fold a sheet of cardstock in half to create two sides for the scene.
- Draw or cut out a simple figure of Joseph and attach him to the first side.
- Create an angel figure for the second side. Keep the design simple enough for children to make themselves.
- Add a cloud-shaped or speech-bubble panel beside the angel to represent the message Joseph received in his dream.
- Write a short teaching phrase such as “Name Him Jesus” on the panel. If using a direct Bible quotation, copy it from the Bible translation you are teaching from.
- Let the children decorate the scene and add Matthew 1:18–25 at the bottom.
- For a movable version, attach Joseph or the angel with a paper fastener so the figures can be moved as the story is retold.
The Detail Children Should Remember
When children retell the Nativity story, Joseph can easily become the man standing beside Mary at the manger. This craft gives them a fuller picture.
Joseph received the message in a dream, learned that the child was to be named Jesus, and then followed the angel’s instruction.
You can ask:
“What did the angel tell Joseph to do?”
That question prepares children for the next event in the story: Mary and Joseph’s journey to Bethlehem.
5. Mary and Joseph Travel to Bethlehem
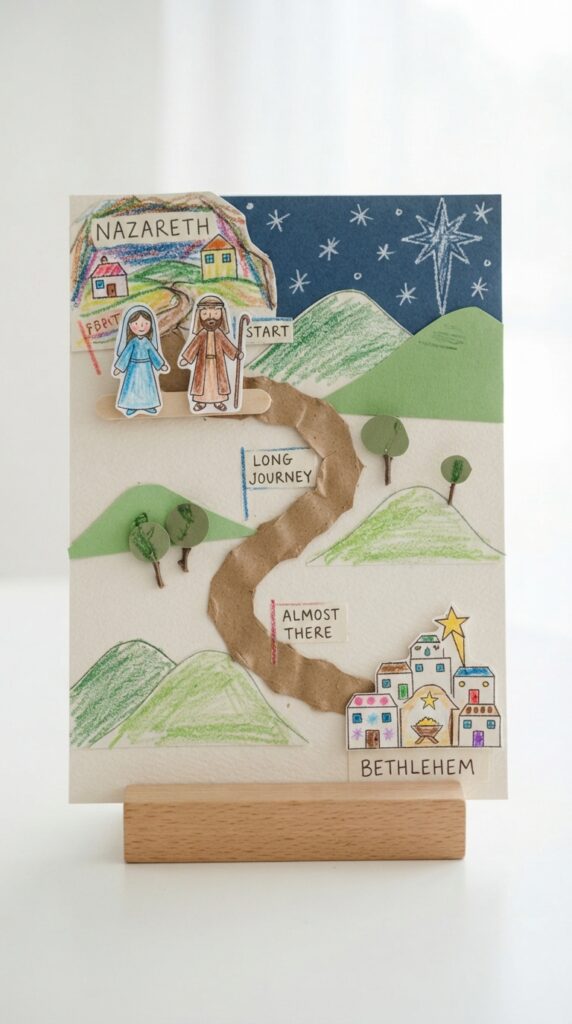
The story now moves from Mary and Joseph’s home in Nazareth to Bethlehem. Luke 2:1–5 explains that Caesar Augustus ordered a registration, so Joseph travelled to Bethlehem because he belonged to the family line of David. Mary went with him.
This is a good place to move away from another standing-character craft and let children follow the journey themselves.
A simple Bethlehem journey map can show Nazareth at one end, Bethlehem at the other and Mary and Joseph as movable pieces travelling along the route.
The map does not need to claim an exact walking route or distance. Its purpose is to help children understand that Bethlehem was another place and that Mary and Joseph had to travel there before Jesus was born.
Materials
- Cardstock or a large sheet of paper
- Construction paper
- Scissors
- Glue
- Markers or crayons
- Small paper figures of Mary and Joseph
- Craft sticks or paper fasteners, optional
How to Make the Bethlehem Journey Map
- Draw a simple path across the paper, leaving space at both ends for Nazareth and Bethlehem.
- Label the two places clearly and add simple drawings to help children tell them apart.
- Make small figures of Mary and Joseph from paper or cardstock.
- Attach the figures to craft sticks, or use paper fasteners to create movable pieces.
- Add a few simple landmarks, hills or roads along the path. These do not need to represent the exact historical route.
- Let the children move Mary and Joseph along the path as you retell Luke 2:1–5.
A Simple Way to Teach the Journey
The map gives children something concrete to follow while you explain why Mary and Joseph went to Bethlehem.
Ask:
“Why did Mary and Joseph travel to Bethlehem?”
That question helps children connect the place with the reason for the journey instead of remembering Bethlehem only as the town where Jesus was born.
And once they reach Bethlehem, the story reaches its most important moment.
Bring the story of Zacchaeus to life with Creative Zacchaeus Crafts: More Than Just a Man in a Tree.
6. Bethlehem and the Birth of Jesus
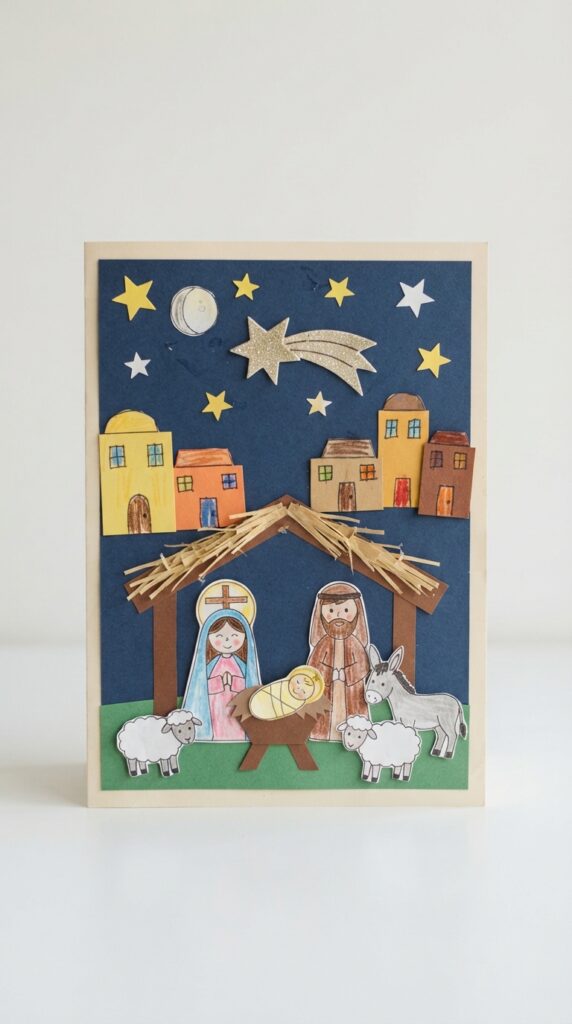
Mary and Joseph have reached Bethlehem, and this is where Jesus is born. Luke 2:6–7 tells us that Mary gave birth to her firstborn son, wrapped Him in swaddling cloths and laid Him in a manger.
For this craft, create a Bethlehem night scene with a simple town silhouette and an opening where the birth scene can be placed. Children can add Mary, Joseph and the newborn Jesus as they learn what Luke records about the birth.
The familiar Christmas picture often includes a detailed stable and an inn, but the Bible passage gives us more certain details than those decorations.
Luke says Jesus was laid in a manger because there was no place for them in the kataluma, a term that translations render in different ways.
Rather than building the craft around a particular idea of what the building looked like, use the wording of the Bible translation you are teaching from.
Materials
- Dark and light cardstock
- Construction paper
- Scissors
- Glue
- Markers or crayons
- Small piece of paper or cardstock for baby Jesus
- Optional: star stickers or white paper for simple night-sky details
How to Make the Bethlehem Night Scene
- Use dark cardstock as the background for the night scene.
- Cut simple building shapes from another sheet of paper and arrange them across the bottom to create a Bethlehem skyline.
- Leave a small opening in the scene where the birth figures can be placed.
- Make simple figures of Mary, Joseph and baby Jesus.
- Add the figures to the opening and write Luke 2:6–7 somewhere on the scene.
- Let children add a few stars or other simple details to the night sky without overcrowding the scene.
What Children Can Notice
This craft gives children a chance to slow down and look at what Luke specifically tells us about Jesus’ birth.
He was born in Bethlehem, wrapped in swaddling cloths and laid in a manger.
Those details matter because the manger is about to become important again. The shepherds will not simply be told that a baby has been born. They will be given a specific sign that will help them identify Him.
That makes the next craft a natural continuation of this scene.
Make alphabet practice more hands-on with Train Craft Ideas for Kids That Make Learning the Alphabet Fun With Things You Already Have.
7. Baby Jesus in the Manger
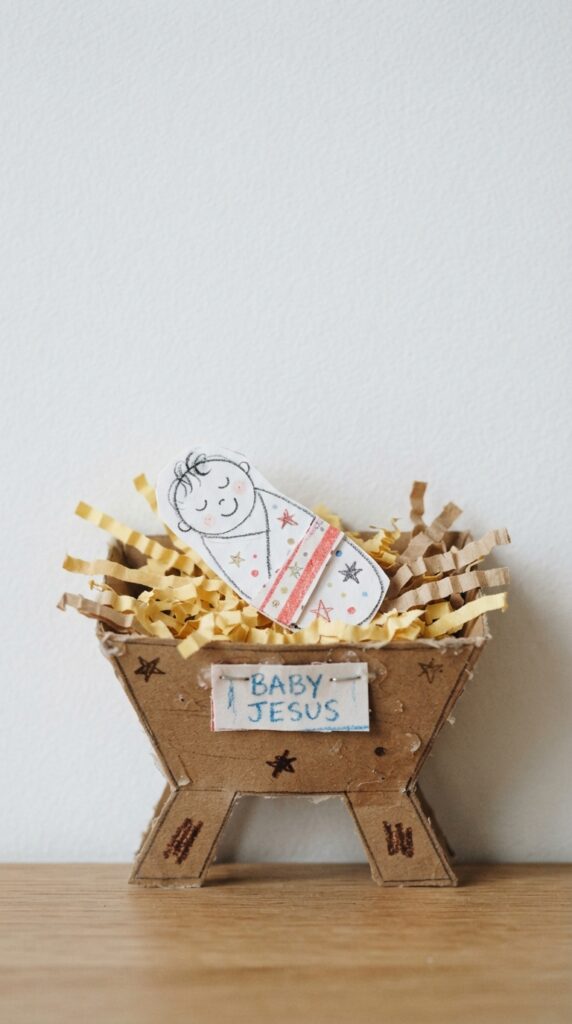
The manger can look like just another part of a Christmas display, but in Luke 2:8–12, it becomes much more than decoration.
When the angel announces Jesus’ birth to the shepherds, the shepherds are given a sign: they will find a baby wrapped in cloths and lying in a manger.
A working manger craft makes that detail easier for children to understand. Instead of gluing baby Jesus permanently into the scene, create a small manger where children can place and remove the baby figure as they retell the story.
Materials
- Small cardboard box or folded cardstock
- Brown construction paper
- Glue
- Scissors
- Cotton wool or shredded paper, optional
- Small piece of cardstock for the baby figure
- Crayons or markers
How to Make the Working Manger
- Fold a small piece of cardstock into a shallow manger shape, or use a small clean cardboard box.
- Cover the outside with brown paper if desired.
- Add a little shredded paper or cotton wool to represent the material inside the manger.
- Draw a small baby figure on cardstock and cut it out.
- Wrap the paper baby loosely in a small piece of light-coloured paper to represent the swaddling cloths.
- Place the baby in the manger, but leave it removable.
- Write Luke 2:7 and Luke 2:12 beside the finished craft.
What the Manger Tells Us
Children may already know that Jesus was laid in a manger, but this craft gives them a reason to remember why that detail matters in the story.
The angels tell the shepherds that they will find the baby wrapped in cloths and lying in a manger. So the manger becomes part of the sign that helps the shepherds know they have found the right child.
You can ask:
“What sign were the shepherds given to help them recognize Jesus?”
Now the craft has done more than recreate a familiar Christmas image. It has helped children remember a detail they will encounter again when the story reaches the shepherds.
Add a cultural learning element to craft time with 12 African Art Projects for Kids That Teach Culture, Not Just Craft.
8. The Angels Appear to the Shepherds
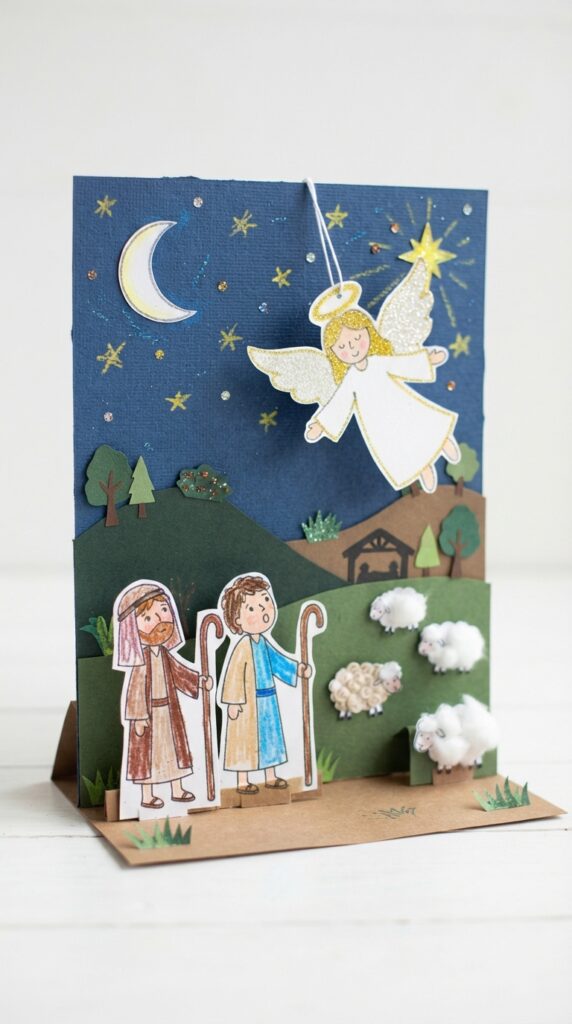
The shepherds were not at the manger when Jesus was born. Luke 2:8–14 places them out in the fields at night, looking after their flock. Then an angel of the Lord appears, and the glory of the Lord shines around them.
The angel tells them not to be afraid and announces that a Saviour has been born in Bethlehem.
The shepherds are also given a sign: they will find a baby wrapped in cloths and lying in a manger. Then a multitude of the heavenly host appears, praising God.
For these Nativity crafts for kids, a dark-field-to-bright-sky scene can show that sudden change.
Start with a dark paper field and add a flap, opening panel or movable angel that reveals a brighter section of the sky.
Materials
- Dark blue or black cardstock
- White or light-coloured paper
- Construction paper
- Scissors
- Glue
- Markers or crayons
- Paper fastener, optional
- Craft stick, optional
How to Make the Shepherds and Angels Scene
- Use dark cardstock as the background for the shepherds’ field at night.
- Cut out one or two simple shepherd figures and a few sheep.
- Create an angel from light-coloured paper and attach it to a craft stick or paper fastener.
- Add a flap or opening panel over part of the dark sky.
- Behind the flap, place a brighter section with simple stars or rays of light.
- Let the child open the panel to reveal the angel as you read the relevant part of Luke 2:8–14.
- Add a small section for the words “Glory to God in the highest”, using the Bible translation you are teaching from.
What Was Happening Before the Angels Came?
The shepherds were simply doing their work in the fields when the announcement came. That detail is worth keeping in the craft because it gives children a clearer picture of the scene Luke describes.
Ask:
“What were the shepherds doing before the angels appeared?”
The answer is right in the passage: they were living out in the fields and keeping watch over their flock at night.
The announcement changes what happens next. The shepherds do not stay in the fields wondering about the message. They decide to go and see the child for themselves.
For a sensory project that keeps little hands occupied, try Safe and Easy Slime Craft Ideas for Kids — Non-Toxic Projects That Keep Them Busy for Hours.
9. The Shepherds Go to Bethlehem
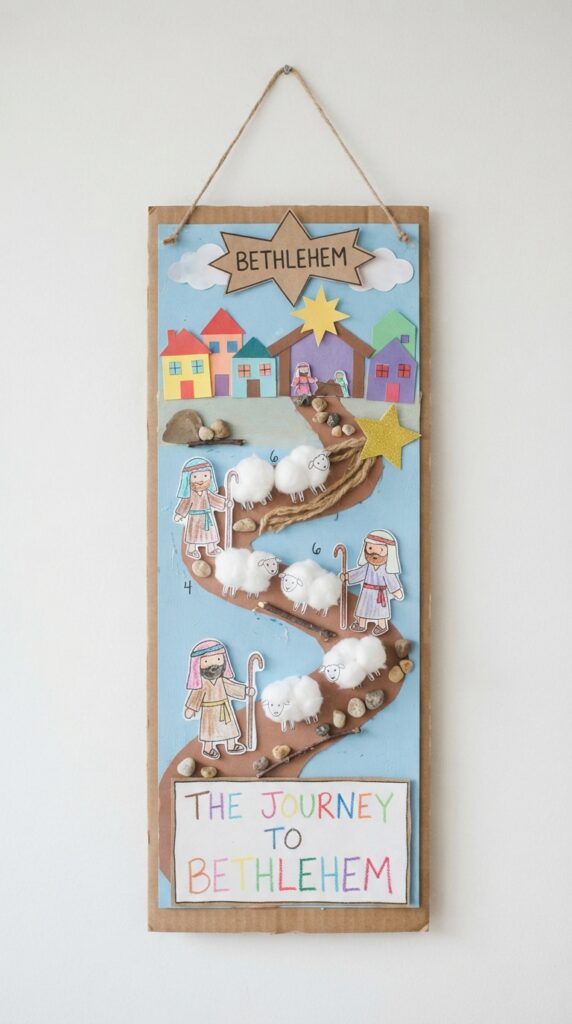
Once the angels leave, the shepherds talk about what they have heard and decide to go to Bethlehem. Luke 2:15–16 says they go quickly and find Mary, Joseph and the baby lying in a manger, just as they had been told.
A shepherd trail craft works especially well here because it shows the action that follows the announcement.
Children can move the shepherd figures from the field toward Bethlehem instead of simply adding them to a finished Nativity scene.
Materials
- Cardstock or construction paper
- Scissors
- Glue
- Markers or crayons
- Small paper shepherd figures
- Craft sticks or paper fasteners
- Yarn or strips of paper, optional, for the trail
How to Make the Shepherd Trail
- Draw a simple path across a sheet of cardstock, starting with a field and ending at Bethlehem.
- Label the two points “The Fields” and “Bethlehem.”
- Make small shepherd figures and a few sheep from paper.
- Create a small manger scene at the Bethlehem end of the path.
- Attach the shepherds to craft sticks so children can move them along the trail.
- Read Luke 2:15–16 and let the children move the figures as they retell what the shepherds did.
- Add Luke 2:15–16 to the finished craft.
Let the Craft Follow Their Decision
The important part here is the shepherds’ response. They have heard the announcement, and now they choose to go and see what has happened.
Ask:
“Where did the shepherds go after the angels left?”
As children move the figures along the path, they can name what the shepherds eventually found: Mary, Joseph and the baby lying in a manger.
That gives the shepherds a clear place in the sequence. They first hear the news, then travel to see the child.
But their part in the story does not end when they leave Bethlehem.
Create a colourful project with Coffee Filter Butterfly Craft for Kids (Easy Stained Glass Effect Craft Idea).
10. The Shepherds Share What They Heard
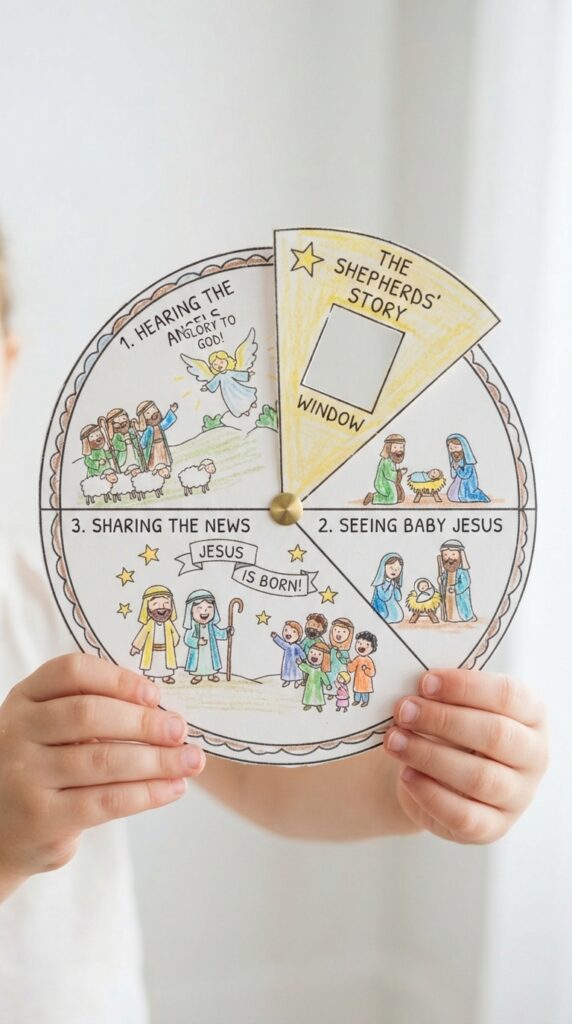
After finding Jesus, the shepherds have something to tell. Luke 2:17–20 says they made known what had been told to them about the child. The people who heard them were amazed, and the shepherds later returned, glorifying and praising God.
A story-sharing wheel can help children follow those three parts of the shepherds’ experience: what they heard, what they saw and what they did afterward.
This is one of those Christmas Bible crafts for kids that can lead to an actual retelling of the passage instead of simply producing another character for a Nativity display.
Materials
- Two sheets of cardstock
- Scissors
- Glue
- Markers or crayons
- Paper fastener
- Pencil or ruler
How to Make the Shepherds’ Story Wheel
- Cut two large circles from cardstock.
- Divide the top circle into three sections.
- Label the sections with simple questions: “What did they hear?” “What did they see?” and “What did they do?”
- Draw or glue a shepherd figure in the centre.
- Attach the two circles with a paper fastener so the top circle can turn.
- Let children add short answers or drawings in each section.
- Read Luke 2:17–20 together and use the wheel to retell the shepherds’ experience.
From Shepherds to Storytellers
The shepherds do more than visit Jesus and disappear from the story. They tell others what they have been told about the child, then return glorifying and praising God.
For older children, ask:
“What did the shepherds tell people after they saw Jesus?”
For younger children, you can turn the question into a simple retelling activity: “What did they hear? What did they see? What did they do next?”
That helps children see the whole sequence, the angels announced Jesus’ birth, the shepherds went to Bethlehem, they found the child, and then they shared what they had heard.
The story now moves beyond the shepherds. Matthew introduces another group of visitors who followed a star and came to see Jesus later.
Turn an everyday household item into a creative activity with Toilet Paper Roll Crafts for Kids That Turn Everyday Waste into Fun, Skill-Building DIY Projects at Home.
11. The Star and the Magi
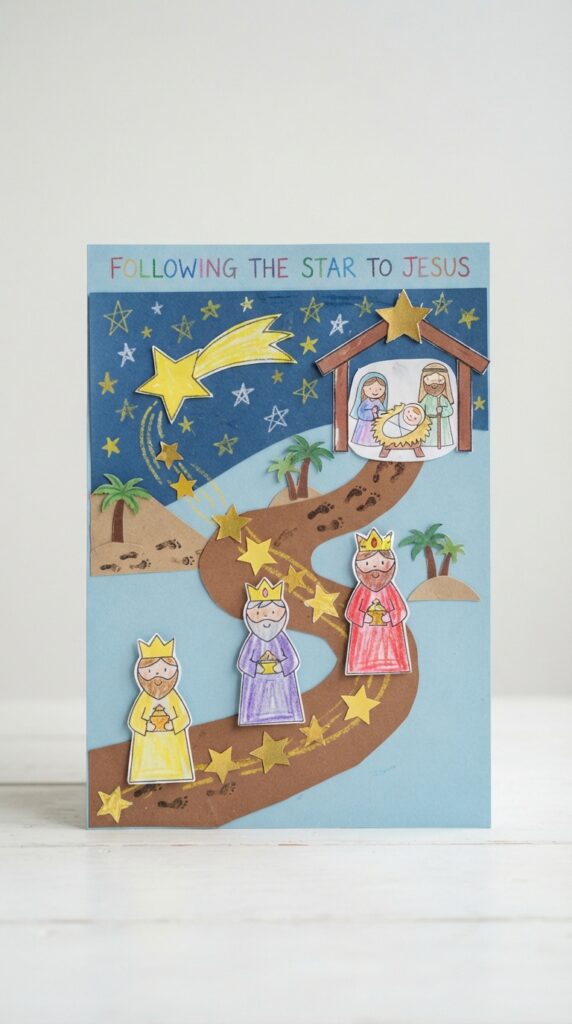
The story does not end with the shepherds. In Matthew 2:1–12, Magi from the East arrive in Jerusalem after Jesus has been born.
They have seen His star and come looking for the child they understand to be the king of the Jews.
Their journey takes them first to Jerusalem, where they speak with King Herod.
After learning more about where the child was to be born, they continue on their way. Matthew says the star they had seen goes before them and leads them to the place where the child is.
A star-path craft can help children follow that movement. Instead of placing the Magi beside the manger from the beginning, make a trail with a star at different points along the path, leading toward Jesus.
Materials
- Cardstock or construction paper
- Scissors
- Glue
- Markers or crayons
- Gold or yellow paper for the star
- Small paper figures for the Magi
- Craft sticks, optional
How to Make the Star Path
- Draw a winding path across a sheet of cardstock.
- Cut out a large star and several smaller stars from yellow or gold paper.
- Place the stars along the path toward a simple picture of the child Jesus.
- Make paper figures for the Magi and attach them to craft sticks if you want them to move.
- Add Jerusalem as one point on the path, then continue the trail toward the child.
- Let children move the Magi along the path as you read selected parts of Matthew 2:1–12.
- Write a short reminder on the page: “Matthew 2 — after Jesus was born.”
A Detail That Changes the Nativity Scene
One detail is worth pointing out here: Matthew does not say that the Magi arrived on the night Jesus was born. His account introduces them after Jesus’ birth, and later describes them entering a house to see the child.
The Bible also does not say there were three Magi. It tells us about three gifts, but it does not give the number of visitors.
You can ask:
“Did the Magi come before Jesus was born or after?”
That simple question helps children separate the shepherds’ visit from the later visit of the Magi instead of combining every Nativity character into one scene.
The Magi have followed the star and found Jesus. Now the story gives us another detail children often see in Christmas pictures: the gifts they brought.
Keep the crafting simple with Easy Foam Sheet Crafts for Kids That Keep Them Focused, Creative, and Productively Busy at Home.
12. The Magi Bring Their Gifts
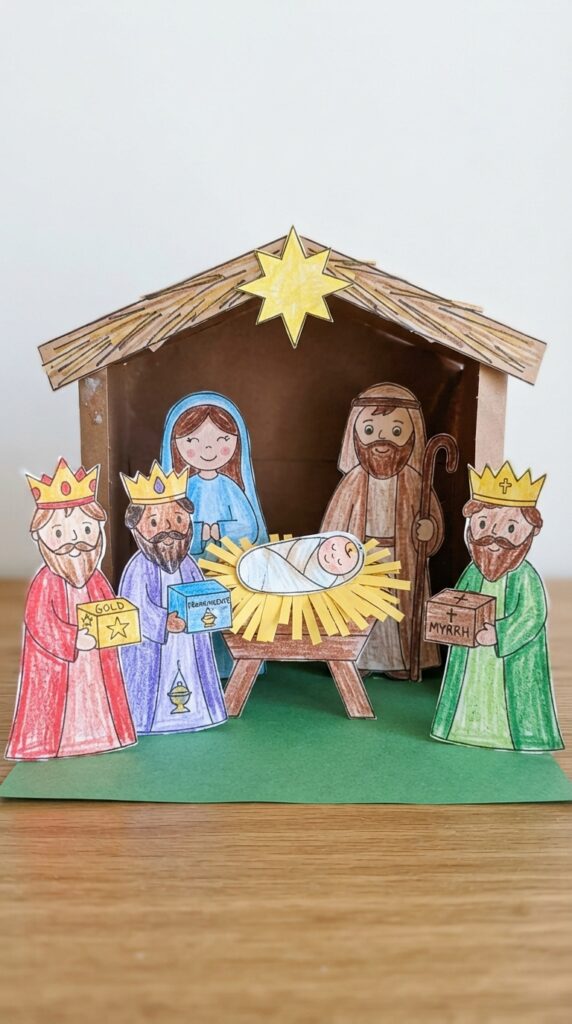
When the Magi find Jesus, Matthew 2:11 says they enter the house, see the child with Mary, bow down and worship Him. Then they open their treasures and present gold, frankincense and myrrh.
A three-gift box craft gives children a simple way to remember those details.
Instead of making three loose gift shapes, create three small compartments that open to reveal the names or pictures of the gifts.
This also gives you a chance to correct another common shortcut in Nativity scenes. Matthew describes the Magi visiting Jesus in a house, so this craft does not need to place them beside the manger.
Materials
- Small cardboard box or cardstock
- Construction paper
- Scissors
- Glue
- Markers or crayons
- Three small pieces of paper for the gift labels
- Optional: gold-coloured paper for decoration
How to Make the Three-Gift Box
- Use a small box with a lid, or fold cardstock into a simple three-section box.
- Divide the inside into three spaces.
- Label the sections gold, frankincense and myrrh.
- Let children decorate each section with simple drawings or patterns.
- Add a small paper figure of a Magi or a star to the outside of the box.
- Read Matthew 2:11 and let the children open each section as they name the gift.
- Write Matthew 2:1–12 on the back so the craft remains connected to the passage.
What the Three Gifts Tell Us
The Bible names the gifts, but it does not explain their symbolism in this passage.
So rather than assigning a special meaning to each one as though Matthew does, let children remember what the text actually tells us: the Magi brought gold, frankincense and myrrh and presented them to Jesus.
Ask:
“How many gifts did the Magi bring, and what were they?”
You can also ask an older child to find the answer directly in Matthew 2:11.
That brings the craft sequence to a natural stopping point.
Children have followed the story from Gabriel’s announcement to Mary, through Bethlehem, the shepherds’ visit and the later arrival of the Magi, with each craft helping them place another event where it belongs.
Need mess-free ideas? 13+ Pipe Cleaner Crafts for Kids That Are Simple, Fun, and Completely Mess-Free has plenty to try.
How to Use the Crafts Without Turning Them Into a 12-Day Lesson
You do not need to complete all 12 Nativity crafts for kids in one sitting. The sequence can work just as well as a flexible way to connect a Bible story with a hands-on activity.
At Home
Read one part of the Nativity story, then make the craft that matches it. Afterward, ask a simple question about what happened in that part of the story. The conversation helps children put words to what they have made instead of treating the craft as a separate activity.
In Sunday School
Choose one craft to follow the Bible passage you are teaching that day. For example, after reading about the shepherds visiting Jesus, children could make the shepherd trail and then retell what happened using their finished pieces.
Across Several Weeks
You can also build the story gradually, making one or two crafts each week. Keep the finished pieces together in story order so children can see how one event leads to the next.
That gradual approach also gives children more opportunities to use art to represent ideas, practise language and retell parts of a story.
Research on children’s art experiences connects creative activities with areas such as symbolic thinking, language and visual-spatial development, while conversations about children’s artwork can support their artistic and language development.
Put those craft sticks to work with 13 Popsicle Stick Crafts for Kids That Actually Keep Them Busy and Boosts Creativity.
Keep Thanksgiving crafting interesting for younger children with Thanksgiving Crafts for Young Children Who Want Something More Interesting Than the Usual Handprint Turkey.
How to Adapt Nativity Crafts for Different Ages
The same Nativity crafts for kids can work for toddlers, preschoolers and early elementary children when you the adult adjusts the task rather than expecting every child to complete it in the same way.
Toddlers
Keep the focus on simple actions such as placing, sticking, tearing paper, stamping and naming characters. An adult can prepare the pieces in advance and let the child add them to a simple Nativity scene craft.
Take the shepherd trail as an example. Give the child a prepared paper path, a few shepherd figures and a picture of Bethlehem. The child can stick the shepherds onto the path while the adult names them and says, “The shepherds went to Bethlehem to see Jesus.”
Preschoolers
Preschoolers can take on more of the assembly. Let them put the characters and scenery together, choose where each piece belongs and answer simple questions about the Bible story.
Using the same shepherd trail, a preschooler could glue the pieces, move the shepherds along the path and answer questions such as, “Where were the shepherds before they went to Bethlehem?” and “Who told them about Jesus?”
These Nativity crafts for preschoolers work well when children can make choices while the adult keeps the story clear.
Give siblings of different ages a project they can enjoy together with Fall Crafts for Siblings of Different Ages: 9 Projects the Whole Family Can Do Together.
Early Elementary Children
Older children can handle more planning and independent construction. They can sequence events, add short Bible references, label characters or explain why a particular person appears in the story.
With the shepherd trail, an older child could arrange three small cards in order: the angels announce Jesus’ birth → the shepherds go to Bethlehem → the shepherds tell others what they heard.
They could then add Luke 2:8–20 as the Bible reference and explain the sequence in their own words.
The same approach works with Christmas Nativity crafts, Jesus birth crafts, Christian Christmas crafts for kids and Nativity crafts for Sunday School.
The project does not have to become more complicated just because the child is older. The adult can increase the amount of cutting, writing, sequencing, explaining or independent decision-making instead.
Children develop motor, language and planning abilities at different rates, so age labels are better used as guides than strict rules.
Adjusting the task lets one craft serve different children without claiming that every project is automatically easy for every age.
Conclusion
The best Nativity crafts for kids do more than give children something to make. They give them a simple way to remember the people, places and events that make up the story of Jesus’ birth.
Whether you use one Christmas Bible craft for kids at home, in Sunday School or across several weeks, let the craft lead back to the Bible story and a simple conversation.
Ready to start? Pick one craft from the list and let the Nativity story unfold from there.