See how wabi-sabi DIY home decor turns the most natural materials into a home that actually feels like one.
There is a specific kind of exhaustion that comes from feeling like your home is never quite done. Like you are always one throw pillow, one gallery wall, one furniture swap away from it finally feeling right.
If that sounds familiar, wabi-sabi might be the permission you did not know you needed.
This Japanese philosophy, born from 15th century Zen Buddhist teachings, does not ask you to buy anything new or start over. It asks you to look differently. At the chip in your ceramic mug.
The knot in your wooden table. The curtain that pools slightly on the floor. Wabi-sabi sees beauty in exactly these things, in impermanence, in natural rawness, in the honest marks of time and use.
These 11 DIY projects will show you exactly how to bring that into your home, using natural materials that cost very little and require zero perfection.
What Wabi-Sabi Actually Means
Wabi-sabi is a Japanese philosophy that has been part of Japanese culture since the 13th century, deeply rooted in Zen Buddhism. But the two words that make it up, wabi and sabi, did not always mean what they mean today.
Wabi originally carried a negative meaning, pessimism, mourning, the anxious feeling of a wish unfulfilled.
By the 16th century that shifted entirely, becoming a positive expression of finding simple beauty in having less. Today it speaks to the quiet dignity of things that are rough, humble, and unfinished.
Sabi carries the meaning of discovering beauty in something that has deteriorated or aged over time, the sense that an object has a life and history reflected in its unique patina, unlike anything artificially made.
Together they form something that resists a neat definition, and that is actually the point. An official record of wabi-sabi philosophy has never been written down. Its teachings have been passed from teacher to student, in the spirit of transience itself.
Writer Leonard Koren perhaps came closest when he described it as the beauty of things imperfect, impermanent, and incomplete, the direct opposite of the Western idea that beauty must be perfect, lasting, and grand.
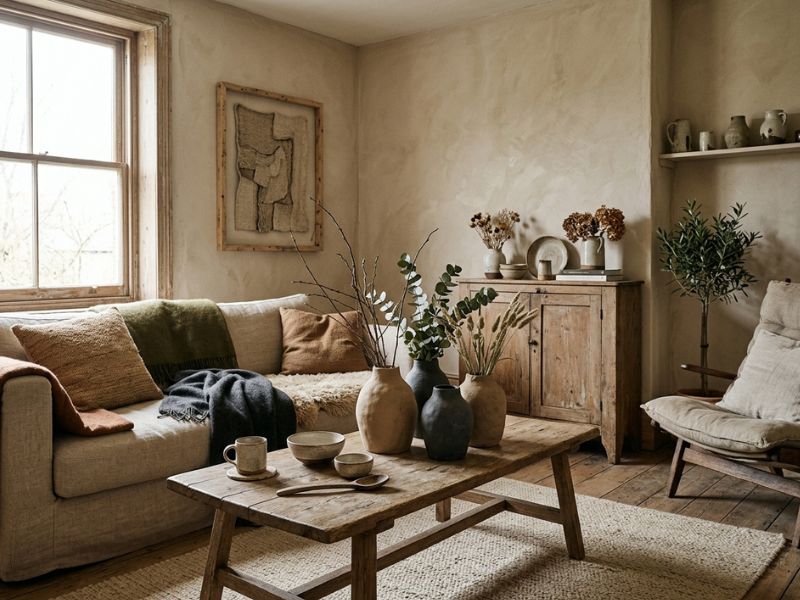
In your home, this means one thing practically: nothing needs to be finished to be beautiful.
The worn edge of a wooden shelf, the uneven glaze on a handmade bowl, the visible crack in a ceramic vase, wabi-sabi does not ask you to hide these. It asks you to see them differently.
What Makes a DIY Project Wabi-Sabi?
Not every handmade project qualifies as wabi-sabi DIY home decor, and that distinction matters before you start making anything.
A wabi-sabi project works with nature, not against it. The materials that belong here are stone, wood, clay, and textured textiles like jute, linen, and wool, things that age honestly and carry texture you can feel.
The imperfections you will create are not mistakes to fix. Uneven edges, visible brush strokes, asymmetry, these are the design. If it looks a little rough, a little human, a little unrepeatable, you are doing it right.
And perhaps most importantly: the value is in the process, not the finished object. You are not making a wabi-sabi thing, you are practicing wabi-sabi.
How it feels to make it matters as much as how it looks on your shelf. Keep those three things in mind as you work through each project below.
Wabi-Sabi isn’t limited to indoor spaces. 4th of July Patio Decor Ideas That Make Small Spaces Feel Party-Ready offers inspiration for creating a welcoming outdoor area using thoughtful details, natural textures, and a less-is-more approach.
Wabi-Sabi DIY Home Decor
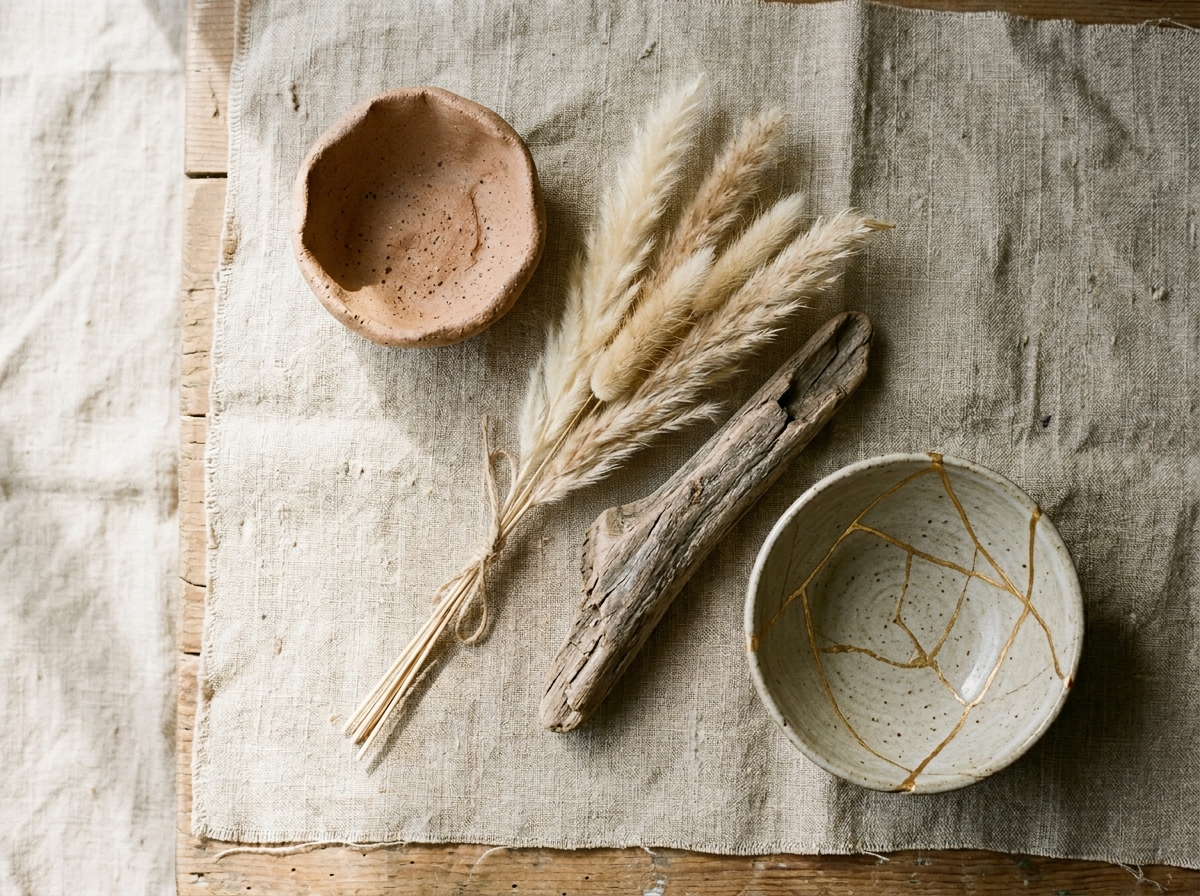
1: Kintsugi Broken Bowl Repair
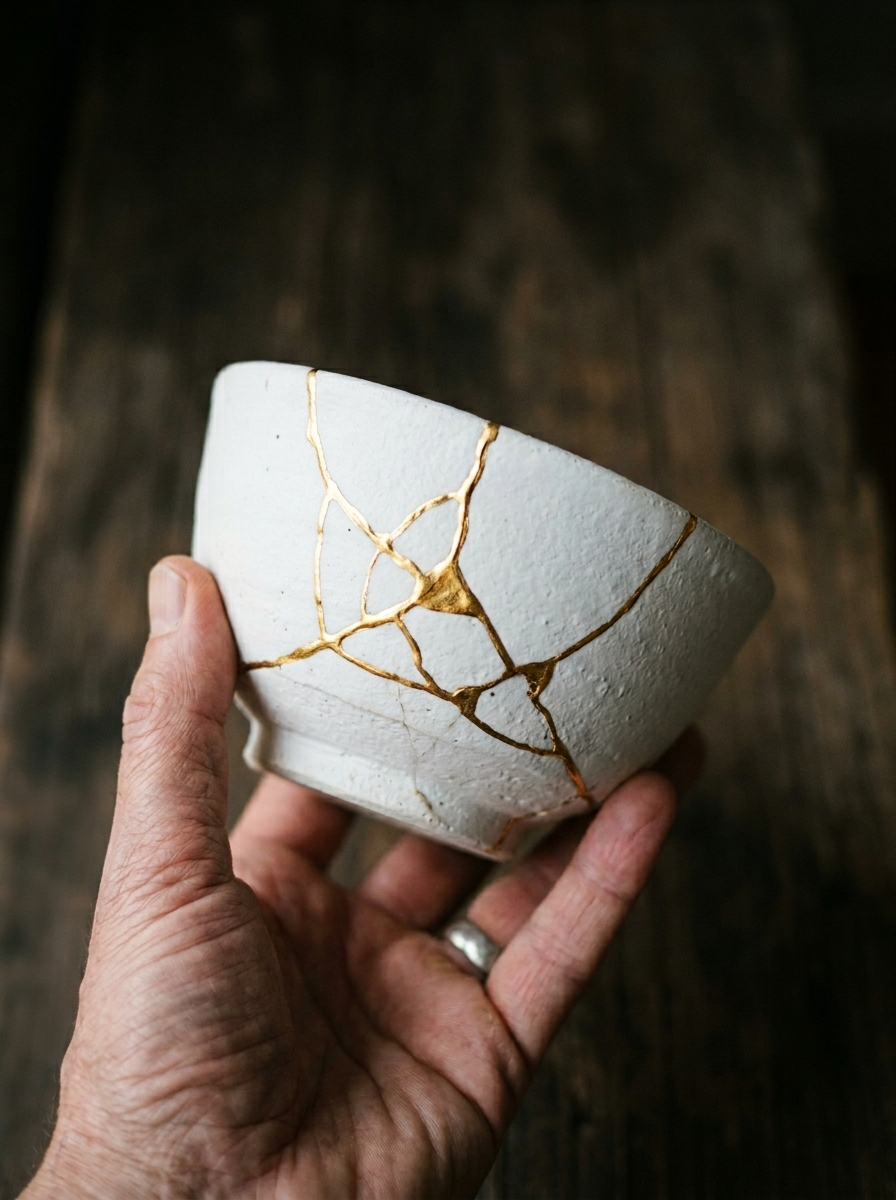
You know that chipped mug sitting at the back of your cupboard? Do not throw it away. That crack is exactly what you need.
Kintsugi is the Japanese art of repairing broken pottery with gold, rooted in the wabi-sabi principle of celebrating imperfections rather than discarding them.
The crack does not disappear, it becomes the most beautiful part of the piece. This is the most iconic wabi-sabi DIY project you can make at home, and the modern version using epoxy and gold mica powder makes it genuinely accessible to a complete beginner.
Why it is wabi-sabi: You are not restoring the bowl to how it looked before. You are making the damage visible and golden, proof that something broke, survived, and became more interesting because of it.
What you need:
- A broken ceramic, bowl, mug, or plate
- Two-part epoxy glue
- Gold mica powder
- A fine brush
- Mixing tray or scrap cardboard
- Rubber gloves
- Masking tape
How to make it:
Step 1 — Clean and prep your pieces.
Wipe every broken edge with a dry cloth to remove dust, oil, or moisture. Any dirt trapped under the epoxy will weaken the bond. Work on a flat surface in a well-ventilated area and put on rubber gloves before opening your epoxy, the fumes are strong even with ventilation.
Step 2 — Mix your golden adhesive
Combine equal parts epoxy resin and hardener first, then mix in your gold mica powder until you reach the colour and shimmer you want. Work quickly, epoxy hardens fast, so only mix what you can use within 10 minutes. Mix in small batches for better control.
Step 3 — Apply and join
Using your fine brush, paint a thin, even layer of the gold mixture along one broken edge. Press the pieces firmly together and hold for a minute. Use masking tape to hold the joined pieces in place while the epoxy cures, and glue smaller fragments together first before working up to the larger joins.
Step 4 — Brighten the gold.
While the adhesive is almost dry but still slightly tacky, sprinkle a little extra mica powder directly over the cracks to intensify the gold effect. Place masking tape around each crack first to keep the surrounding ceramic clean.
Step 5 — Let it cure and display it
Leave the piece untouched for at least 24 hours. Once fully cured, brush off any excess mica powder with a dry brush. Then put it somewhere visible, on a shelf, on your table, somewhere it will be seen. A repaired bowl hidden in a cupboard defeats the entire point.
2. Air-Dry Clay Pinch Pot
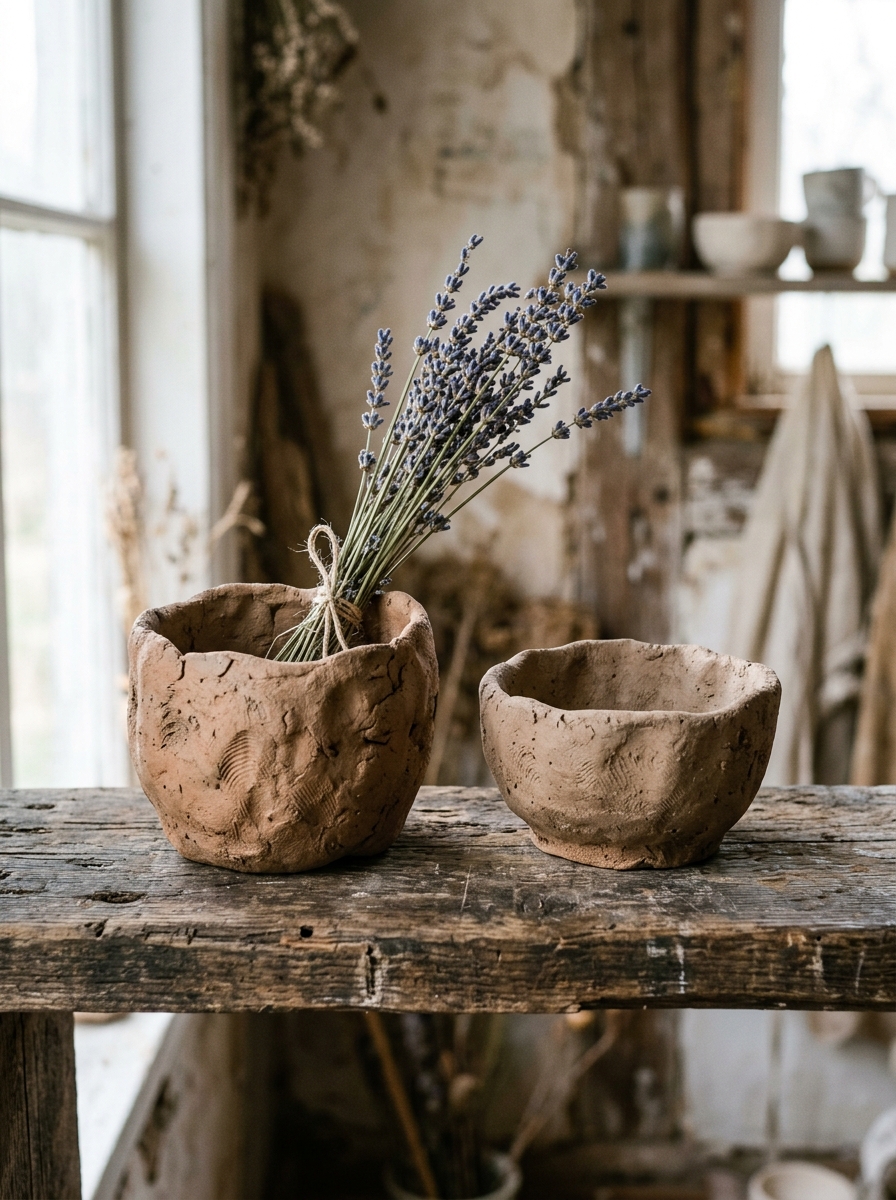
Before wheels, before kilns, before every pristine ceramic you have ever seen on a shelf, there was this. Two hands, a ball of clay, and nothing else.
The pinch pot is one of the oldest forms of pottery in human history, and it is the most honest wabi-sabi DIY home decor project you can make because there is genuinely no way to make two that look the same.
Why it is wabi-sabi: The fingerprint marks pressed into the walls, the slightly lopsided rim, the uneven base, none of these are mistakes. They are the evidence that a human being made this, and that is exactly what makes it worth displaying.
What you need:
- Air-dry clay
- A small bowl of water
- Fine-grit sandpaper
- Muted acrylic paint in earth tones, clay, beige, warm white, or leave it unpainted entirely
- Linseed oil or olive oil for a natural finish (optional)
How to make it:
Step 1 — Start with a ball
Roll a piece of clay gently between your hands into a smooth, round ball. The size of the ball determines the size of your finished pot, a ball roughly the size of a clementine orange makes a good small bowl.
Step 2 — Open it up
Press your thumb into the centre of the clay, pushing almost all the way down to the bottom but not quite, leave enough clay at the base to form the floor of your vessel. This is your starting hole.
Step 3 — Pinch and turn
Gently pinch the clay between your thumb on the inside and your fingers on the outside. Turn the ball a little after every pinch to build even walls as you go. Do not rush this, slow, even pressure gives you better control. And do not overwork it. Air-dry clay starts to dry out the more you handle it, and pinch pots are meant to be simple and organic in shape.
Step 4 — Smooth and shape
Dip a finger lightly in water and run it along the rim to smooth any rough or cracked edges. Gently tap the base of the pot on a flat surface to create a stable, flat bottom so it sits without wobbling.
Step 5 — Dry, sand, and finish
Leave your pinch pot to dry completely typically 24 to 48 hours depending on humidity and how thick your walls are. Do not rush this step or place it in direct sunlight, as fast drying causes cracking. Once fully dry, lightly sand any rough spots. Then paint in a muted earth tone or leave it the natural clay colour, both are completely wabi-sabi.
Use it on your shelf, your bedside table, or your desk as a catch-all for rings, keys, or small objects. Its imperfection is the point.
3. Driftwood Wall Hanging
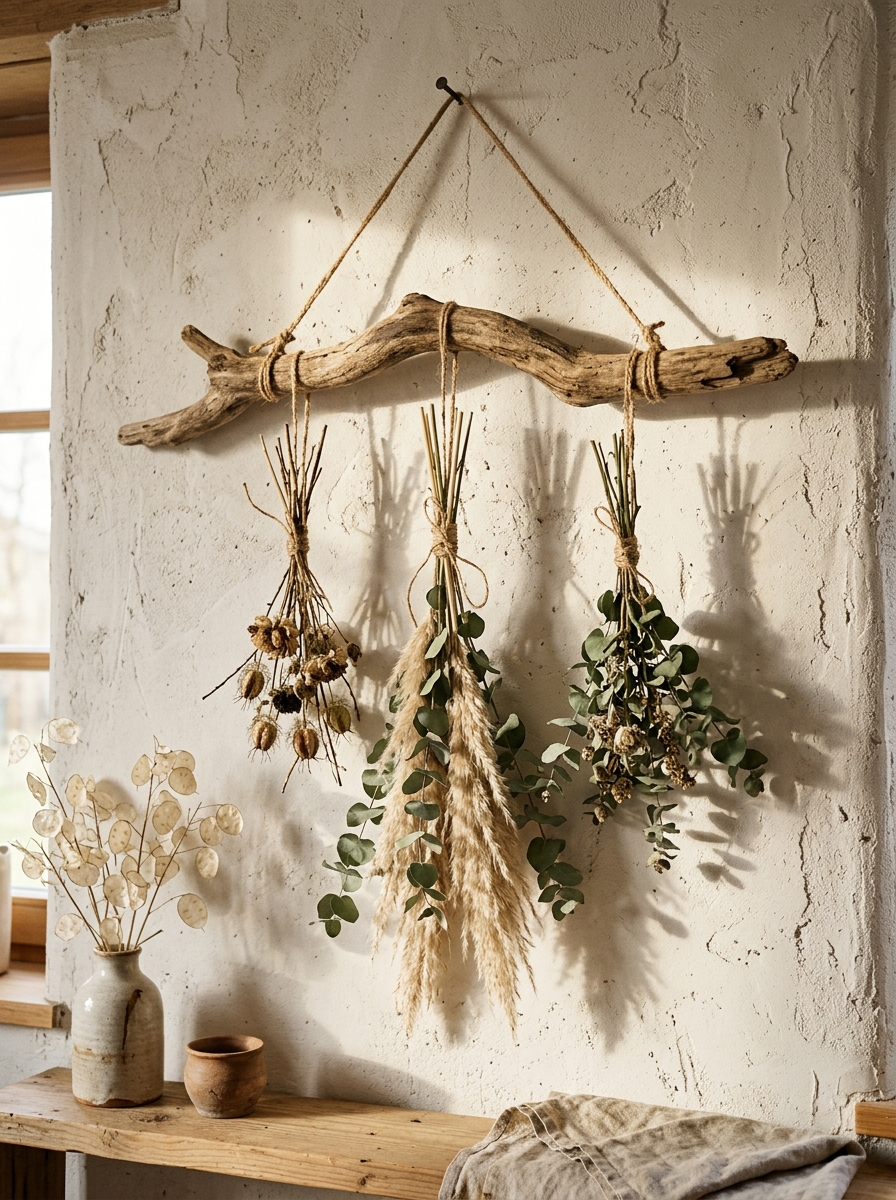
You do not need to buy art for your walls. You need to go outside and look down.
A piece of driftwood found on a beach, riverbank, or even picked up on a walk carries something no store-bought decor can replicate, a history you did not manufacture.
Natural materials like driftwood, twigs, and branches make for simple wabi-sabi wall art where each piece is completely unique and tells a story through its natural form. This project requires almost no skill, just intention.
Why it is wabi-sabi: The wood already did most of the work before you touched it. Water, sun, and time shaped it into something no human hand could reproduce. Your job is simply to hang it well.
What you need:
- One solid driftwood branch or stick, naturally shaped
- Jute twine or natural cotton cord
- Dried botanicals — pampas grass, eucalyptus, dried flowers, or seed pods
- A stiff brush for cleaning
- Optional: small additional twigs or branches to layer
How to make it:
Step 1 — Clean your driftwood
Remove any dirt and debris with a stiff brush, then lightly sand off any loose bark. If you collected your driftwood from a beach, soak it in a bleach solution of two cups bleach per gallon of water before bringing it indoors to remove any salt, bacteria, or insects. Let it dry completely before moving on.
Step 2 — Create your hanging cord
Cut a length of jute twine or natural rope, go for a natural material rather than synthetic for an authentic, rustic feel. Tie each end securely around the driftwood branch, leaving enough length to hang it at the height you want. Double knot both ends.
Step 3 — Attach your botanicals
Gather your dried stems into small loose bundles, mix textures where you can, something feathery like pampas grass with something structural like a dried seed pod. Tie each bundle directly onto the driftwood using short lengths of jute twine. Space them unevenly, symmetry is not the goal here.
Step 4 — Layer and adjust
Step back and look. Add or remove stems until the arrangement feels balanced without being matching. Let some pieces hang longer than others. Leave the ends untrimmed for a more natural, organic approach rather than cutting everything to a uniform length.
Step 5 — Hang it
Use strong hooks or nails and make sure your hanging point is secure, especially if the piece is heavy. Then leave it alone. Dried botanicals will shift and settle slightly over time, that movement is not a flaw. It is the piece continuing to live on your wall.
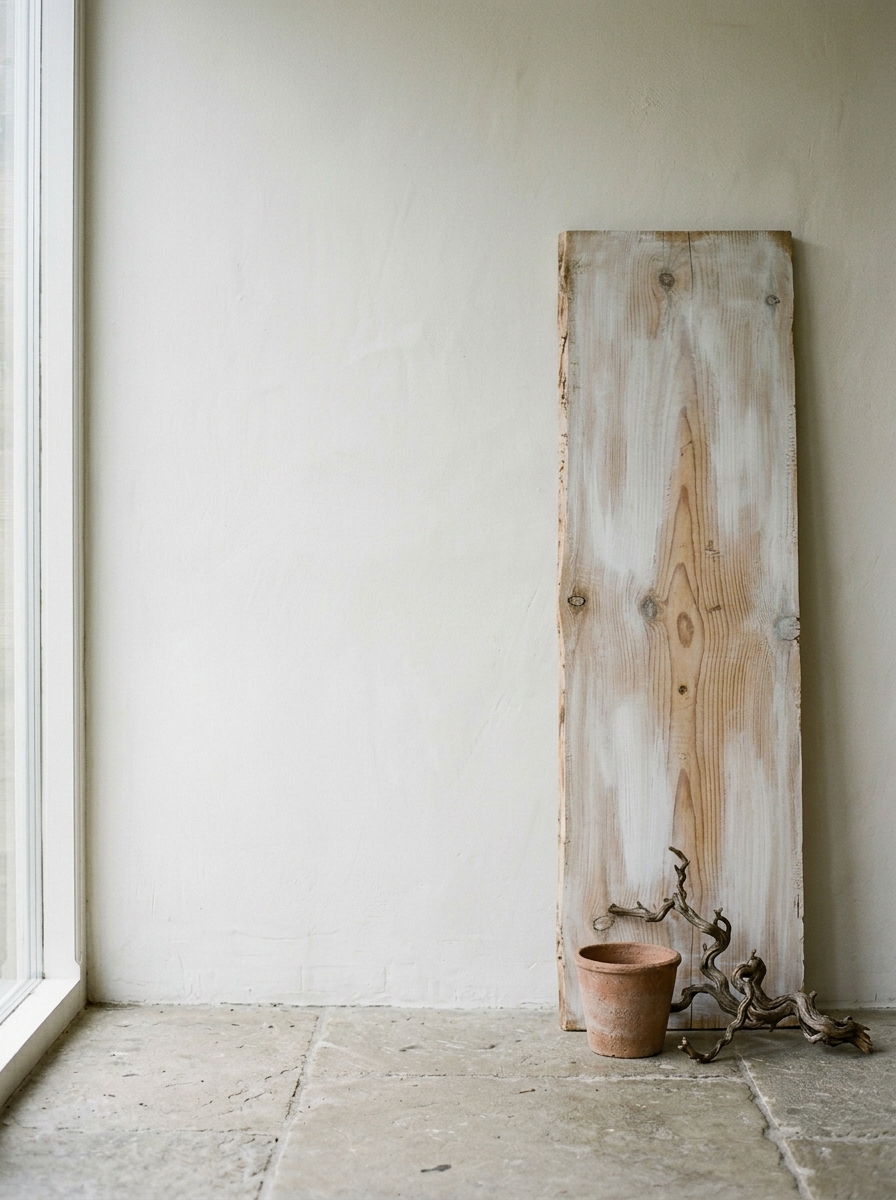
4. Limewash Textured Wall Panel
Most people hear “limewash” and picture a full room overhaul, scaffolding, drop cloths, a weekend lost. This project asks for none of that.
A single raw wood board, brushed with a diluted limewash mixture and hung on the wall as an accent panel, delivers the same aged, mineral-textured effect without touching a single permanent surface in the home.
This is wabi-sabi DIY home decor working at its most restrained, one panel, one wall, one quiet statement. Limewashed walls are a hallmark of the purist wabi-sabi home, quiet, monastic, with low-sheen finishes that feel aged rather than decorated.
Bringing that effect onto a movable wood panel makes it completely beginner-friendly and entirely commitment-free.
Why it is wabi-sabi: Limewashing is a centuries-old technique used to add a beautiful weathered patina to surfaces, and the imperfect quality is very forgiving, making it ideal for beginners.
The uneven coverage, the soft clouding effect, the areas where the base wood shows through, none of these are errors. They are exactly what makes limewash beautiful.
What you need:
- A raw wood board or reclaimed wood panel, any size, though 30x60cm reads well on a wall
- White chalk paint or matte white latex paint
- Water
- A wide, stiff-bristled brush — a deck brush or large wall brush works well
- Fine sandpaper — 220 grit
- A soft cloth
- Two wall hooks or a wooden dowel and jute twine for hanging
DIY limewash mixture: Mix one part water to four parts hydrated lime powder until the consistency looks milky, or for an easier accessible version, dilute white chalk paint with water at roughly a 1:1 ratio until thin and translucent. The mixture should be much thinner than regular paint, it needs to sink into the wood rather than sit on top of it.
How to make it:
Step 1 — Prepare the wood
Sand the surface of the board lightly with fine sandpaper, just enough to open the grain and remove any splinters. Do not apply primer, the raw, unsealed wood surface is what allows the limewash to absorb unevenly and create its characteristic depth and variation. Wipe away sanding dust with a dry cloth.
Step 2 — Apply the first coat
Dip the brush generously into the limewash mixture and begin applying it to the wood using loose, crosshatch strokes. Create cloud-like shapes by making X strokes that are random rather than straight and even, the paint will do most of the work in creating texture. Do not try to cover the surface evenly. Areas where the wood grain shows through are part of the finished look.
Step 3 — Work quickly and stay wet
Maintain a wet edge at all times to prevent colour overlapping and creating hard lines between sections. If the mixture dries too fast in a particular area before you can blend it, lightly dampen that section with a wet brush before continuing. Work the full board in one session.
Step 4 — Dry and assess
Do not be alarmed if the board looks darker than expected while wet — limewash dries significantly lighter, revealing the clouded, mineral texture as it cures. Leave it flat to dry for at least two hours before assessing. If a second coat is needed for more depth, apply it using the same crosshatch technique, but stop at two coats. The more coats applied, the more opaque the finish becomes, and the board loses the texture and dimension that makes limewash worth doing.
Step 5 — Hang and display
Once fully dry, hang the panel directly on the wall using two hooks, or thread jute twine through two drilled holes at the top and hang it from a raw wooden dowel. Leave the edges of the board unsealed and raw, the contrast between the limewashed face and the natural wood sides is part of what makes this piece feel honest and handmade.
Position it somewhere it catches natural light throughout the day. Limewash changes character as light shifts across it, deeper in shadow, almost luminous in direct sun. That movement is what makes it feel alive on a wall.
If you love homes that feel collected over time rather than perfectly matched, Grandmacore DIY Projects That Make Your Home Look Like It Has a 100-Year Story is filled with nostalgic, handmade ideas that pair beautifully with the Wabi-Sabi appreciation for age, character, and imperfection.
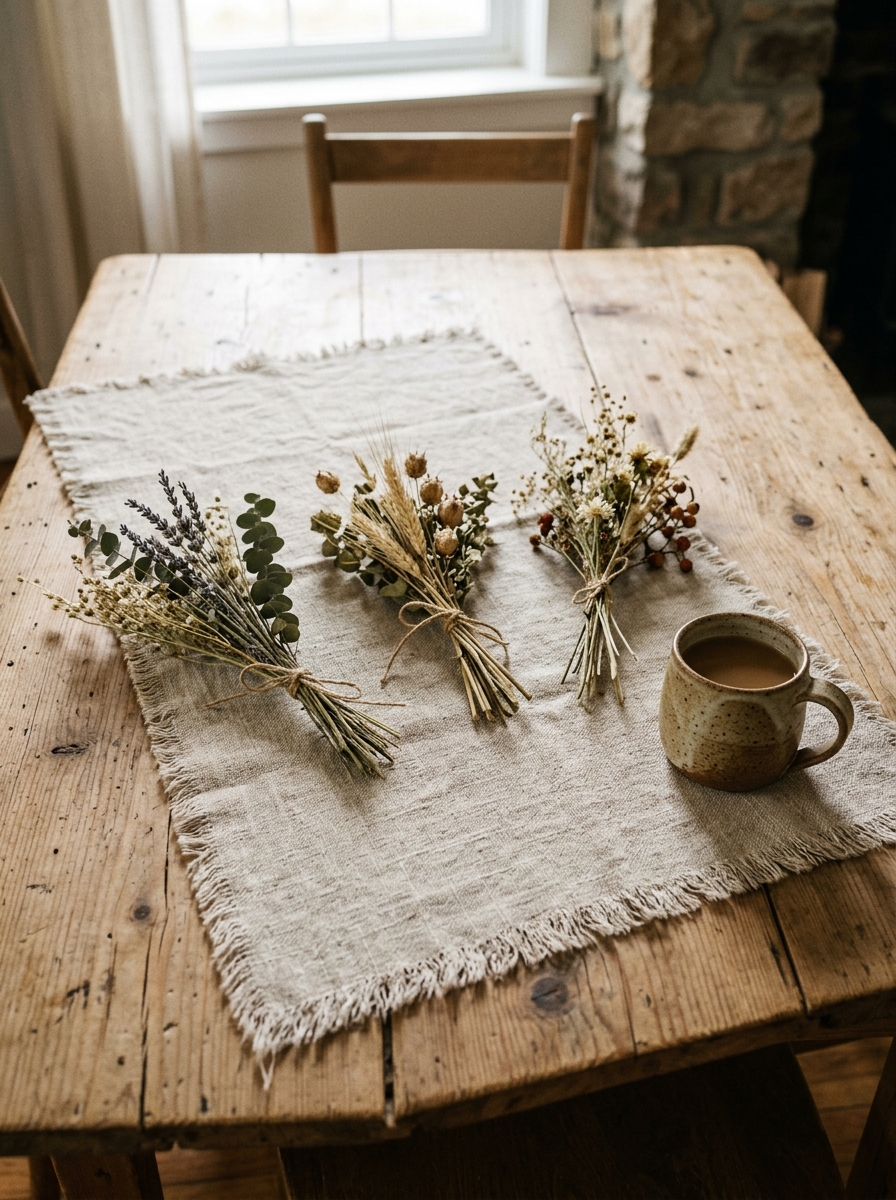
5. Linen and Dried Botanical Table Runner
Your dining table does not need a centrepiece you bought. It needs one you made, and this one takes less than an hour with no sewing machine required.
This is one of the simplest pieces of wabi-sabi DIY home decor you can create, and it transforms a table completely.
Raw linen, frayed edges, dried botanicals laid loosely across the top, it looks like something from a slow, sun-lit home in the Italian countryside. The secret is that you do not finish the edges. The fraying is the whole point.
Why it is wabi-sabi: The slight variations in hand-cut fabric and natural, imperfect textures are exactly what wabi-sabi calls for. A perfectly hemmed, store-bought runner has no story. This one does — right from the first frayed thread.
What you need:
- Raw linen fabric — 40–45cm wide, cut to the length of your table plus 30cm overhang on each side
- Fabric scissors or a rotary cutter
- A seam ripper or large pin
- Dried botanicals, pampas grass, dried eucalyptus, lavender, or seed pods
- Jute twine to loosely tie the botanicals (optional)
How to make it:
Step 1 — Cut your linen
Tear your fabric to size rather than cutting it cleanly, make a small snip at the edge with scissors, then tear across in one firm pull. This gives you a naturally straight edge that follows the weave of the fabric. Do not stress about it being perfectly straight. It should not be.
Step 2 — Fray all four edges
Use a seam ripper or large pin to gently pull threads from the fabric edge, working two to four threads at a time. Pull threads away until the fringe is about 2.5cm all around.
This takes a little patience but no skill, just pull slowly and evenly. The fringe will be slightly uneven from one end to the other. That is correct.
Step 3 — Prewash if you plan to use it regularly
Run your linen through a cool wash before using it. It will soften, wrinkle slightly, and settle into itself, which only makes it look better. Linen that looks lived in is linen that looks wabi-sabi.
Step 4 — Lay your botanicals
Arrange your dried stems loosely and unevenly along the centre of the runner. Do not line them up. Overlap pieces, let some trail off the side, mix textures, something feathery next to something structural. Focus on texture and unique patterns, wicker or sisal, dried flowers, pampas grass, the kind of natural layers that feel gathered rather than arranged.
Step 5 — Leave it imperfect
Resist the urge to straighten everything. Step back and look at the whole table, not just the runner. If it feels a little wild, a little loose, a little like something that happened naturally, you are done.
6. Wabi-Sabi Textured Canvas Wall Art

You do not need to be an artist to hang something beautiful on your wall. You need a canvas, some paste, and the willingness to make marks without knowing exactly what you are making.
This is one of the most searched pieces of wabi-sabi DIY home decor online right now, and for good reason. The result looks like it came from a gallery. The process is entirely forgiving. Every stroke, scrape, and smear adds to it rather than ruining it.
Why it is wabi-sabi: The process is slow, intuitive, and completely open to mistakes, cracks and imperfections in the texture enhance the artwork’s character rather than diminishing it. You are not painting a picture. You are making a surface that feels like weathered stone, aged plaster, or dried earth.
What you need:
- A stretched canvas, any size, but larger reads better on a wall. An old unused canvas works perfectly
- Modelling paste or texture paste
- Fine sand or decorative sand (optional, for extra grit)
- Acrylic paints in muted earth tones — warm white, beige, clay, warm grey, or charcoal
- A palette knife or old credit card
- Wide, stiff brush and a fine brush
- Dried leaves or small flat stones to press into the surface (optional)
How to make it:
Step 1 — Build your texture base
Mix your texture medium, modelling paste or sand, with a small amount of acrylic paint to create a rough base layer. You want it thick enough to hold peaks and ridges.
Roughly spread this mixture across the canvas and distribute it unevenly over the surface. Use a palette knife, an old credit card, or your hands. Do not smooth it, drag it, smear it, press it unevenly. The raised and recessed areas are what will make this piece look three-dimensional once painted.
Step 2 — Let it dry fully
Once you are satisfied with the texture, leave the canvas to air-dry at room temperature for at least one full day. Do not rush this with a hairdryer, fast drying causes cracking, which in this case can actually add character, but uneven fast-drying can cause the paste to lift from the canvas.
Step 3 — Apply your base colour
Apply a thin layer of gesso or your lightest paint colour first, working it into the recessed areas so the raised texture absorbs more colour and creates a timeworn, uneven look. Warm white or natural beige works well here. Let it dry.
Step 4 — Layer your earth tones
Build depth by adding a second and third colour, working thinly. Use muted earth tones, warm grays, ochres, soft greens, and clay, and apply them unevenly so the base layer still shows through in places.
Use a dry brush to drag colour lightly across raised areas. The effect you are after is something that looks like it has aged, not something that looks freshly painted.
Step 5 — Add natural elements and step back
Press small natural elements like dried leaves or flat stones lightly into areas that are still slightly tacky for an added layer of texture and story. Then step back and look. If you feel the urge to add more, wait. Wabi-sabi art knows when to stop. The restraint is part of the beauty.
7. Pebble and Stone Soap Dish
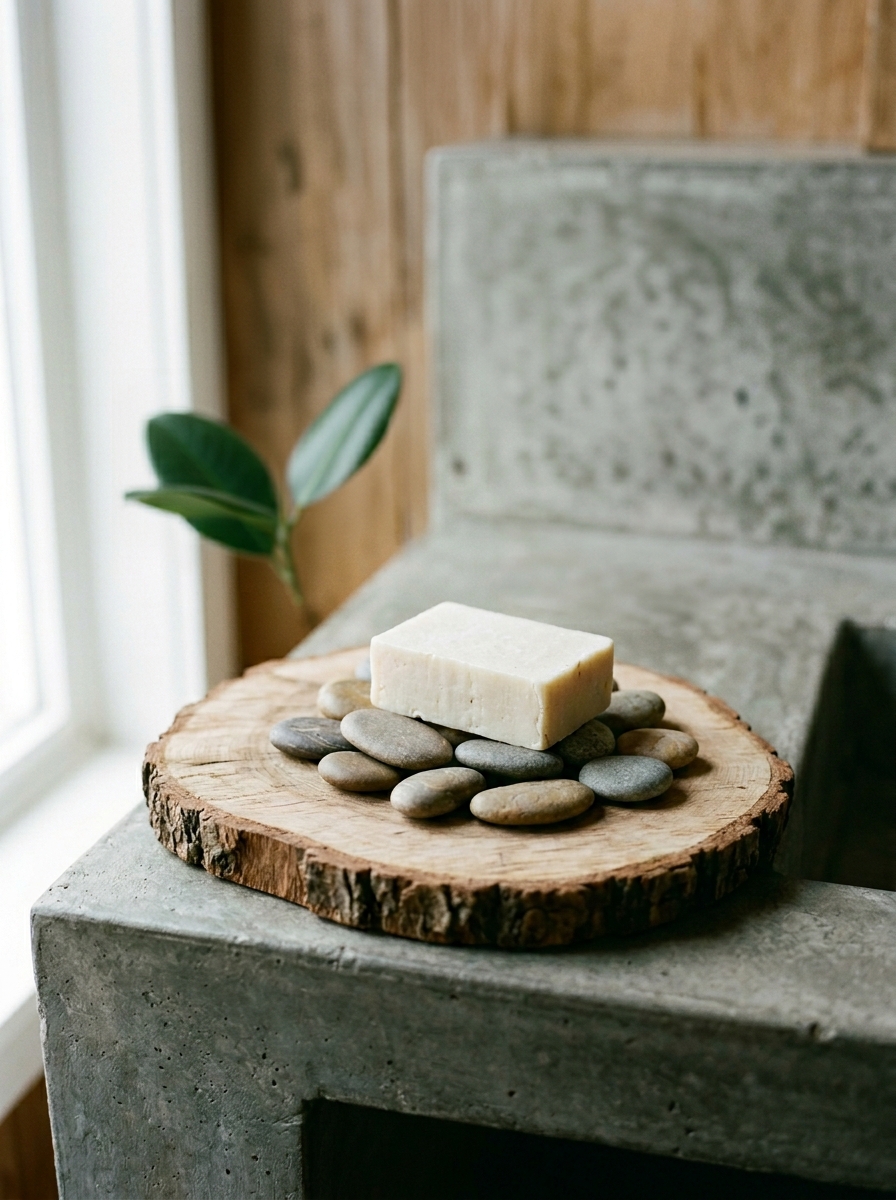
Most bathrooms are where wabi-sabi goes to be ignored. Plastic soap dispensers, synthetic materials, nothing that connects to the natural world in any way. This project changes that with materials you can collect on a walk.
A single smooth stone as a soap dish, a bamboo bath mat, a handmade pottery cup for toothbrushes, these small, honest accents are what bring wabi-sabi into a room without an overhaul.
This is wabi-sabi DIY home decor at its most elemental, you are not building anything complicated. You are placing natural things together with intention.
Why it is wabi-sabi: River pebbles are already shaped by time and water. No two are identical. Placing them on a raw wood slice keeps that natural honesty intact, nothing painted, nothing polished, nothing pretending to be something it is not.
What you need:
- A raw wood slice, 15 to 20cm diameter, at least 2cm thick
- Flat river pebbles or smooth stones, collected or purchased from a garden centre
- Waterproof craft glue or strong waterproof adhesive
- Fine sandpaper
- Linseed oil or natural wood wax for the base (optional but recommended)
- A soft cloth
How to make it:
Step 1 — Prepare your wood slice
Sand the top surface lightly with fine sandpaper, just enough to remove any splinters or loose bark from the edges. Leave the natural surface character intact, knots, grain variation, and organic edges are exactly what you want showing. Do not varnish or seal the top where the stones will sit.
Step 2 — Oil the underside
Apply a thin coat of linseed oil or natural wood wax to the underside and sides of the wood slice with a cloth. This protects it from moisture without making it look synthetic. Let it absorb fully before flipping it over.
Step 3 — Arrange your pebbles first
Before gluing anything, lay your pebbles across the top surface and find an arrangement you like. You can pick up pebbles yourself, it is cheaper and more intentional than buying them, and the act of selecting each stone is part of the wabi-sabi process. Choose flat stones that sit stably and leave a slight gap between each one, this allows water to drain away from the soap rather than pooling underneath it.
Step 4 — Glue and press
Apply waterproof craft glue to the base of each pebble and press firmly onto the wood. Hold each one for 30 seconds before moving to the next. Work from the outside edge inward. Leave the centre slightly lower so the soap rests securely without rolling.
Step 5 — Cure and use
Leave the dish untouched for at least 24 hours before placing anything on it. Once cured, set it in your bathroom or beside the kitchen sink. Over time the wood will develop a natural patina from moisture and use. Do not try to restore it to how it looked when new, let it age gracefully. That patina is the point.
8. Woven Jute Wall Circle
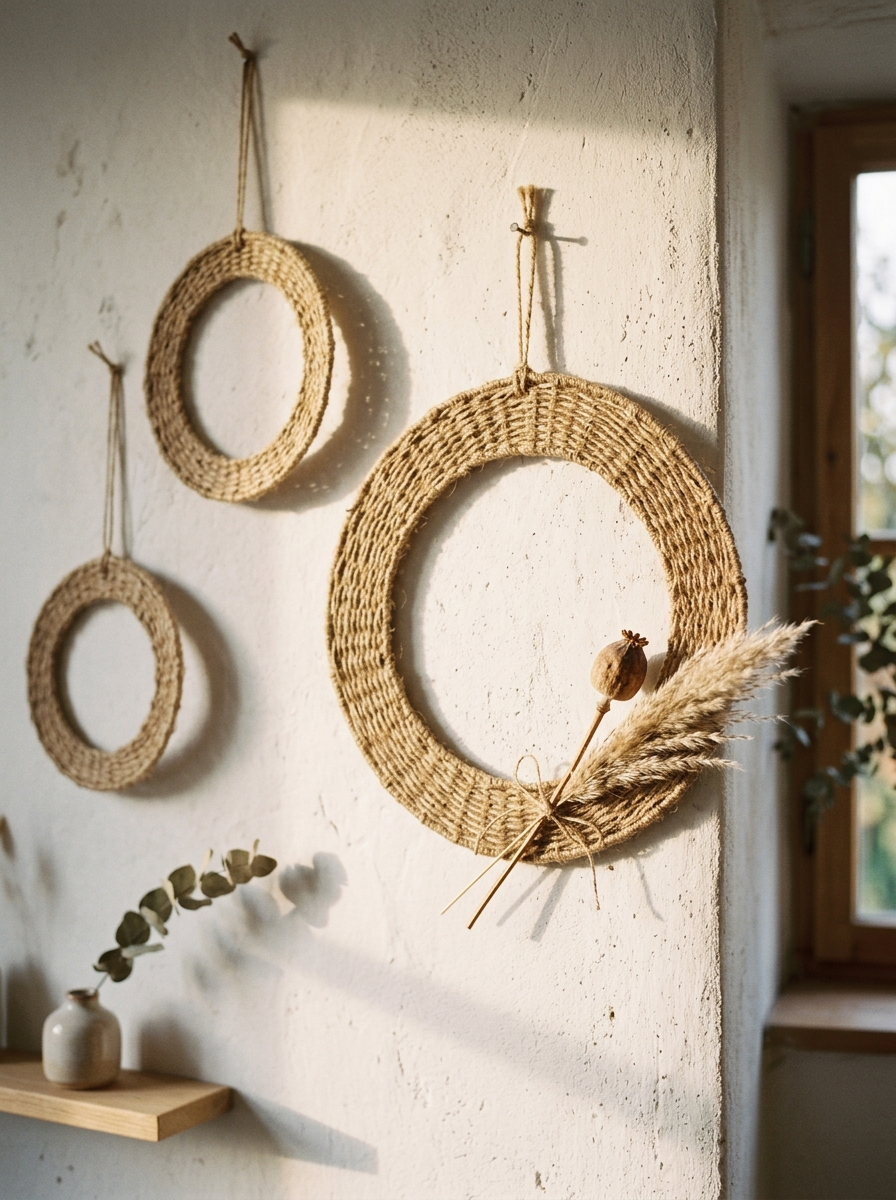
Wall art does not always need to be painted or framed. Some of the most striking pieces in a wabi-sabi home are simply woven, rough-textured, circular, and made entirely from natural fibre.
A flat jute wall circle hung on its own or in a loose cluster of two or three reads as intentional, organic wall art.
Natural fibre pieces like wicker and woven jute work well in any room of the home, bedroom, bathroom, or living space, adding warmth and texture without adding visual noise. This project requires no advanced weaving skill, just an embroidery hoop, jute rope, and patience.
Why it is wabi-sabi: Jute is a raw, unprocessed natural fibre with visible texture and irregularity baked into every strand. The weave will not be perfectly uniform, and that is exactly what makes it beautiful on a wall.
What you need:
- A wooden or metal embroidery hoop — 25 to 35cm diameter
- Jute rope or thick jute twine — 3mm to 5mm thickness
- A blunt tapestry needle or large eye needle
- Scissors
- Hot glue gun or strong craft glue for finishing ends
- Optional: a few dried botanical stems to weave in
How to make it:
Step 1 — Set up your warp threads
Cut several lengths of jute rope slightly longer than the diameter of your hoop. These are your warp threads, the straight lines that run across the hoop and form the foundation of the weave. Basket and hoop weaving begins with a foundation of straight supporting pieces, around which the actual weaving is built. Tie each warp thread across the hoop from one side to the other, spacing them roughly 1 to 2cm apart. Knot each end tightly around the hoop frame.
Step 2 — Begin weaving.
Thread a long length of jute through your tapestry needle. Starting from one side of the hoop, weave the needle over and under each warp thread, alternating with each new row. The basic over-under weaving stitch is the foundation of all woven work, once the pattern is established, it becomes a rhythmic, meditative process. Push each new row snugly against the previous one as you go.
Step 3 — Work from edge to centre
Rather than weaving the entire hoop from top to bottom in straight rows, consider leaving some warp threads exposed toward the centre, this creates a more organic, unfinished look that is distinctly wabi-sabi. Not every part of the hoop needs to be filled. Negative space is part of the composition.
Step 4 — Weave in botanicals
As the weave develops, tuck in small dried stems, a sprig of lavender, a dried seed pod, a single pampas grass strand, by threading them through the warp threads as if they were part of the weave itself. Do not glue them. Let them sit naturally within the structure.
Step 5 — Finish and hang
When satisfied, trim all loose jute ends and secure them with a small dot of hot glue pressed flat against the hoop frame. Cut a short length of jute and tie it around the top of the hoop to create a hanging loop.
Finish the edges by folding any loose fibres back into the weave, or mount the piece onto a natural wooden dowel for an elongated display format. Hang directly on a nail or hook, no frame needed.
Many Wabi-Sabi projects focus on adding warmth, character, and personality rather than chasing perfection. DIY Room Decor Ideas on a Budget That Make Your Space Feel Warm and Lived-In shares affordable ways to create a home that feels comfortable, authentic, and uniquely yours.
9. Plaster of Paris and Gold Leaf Wall Art
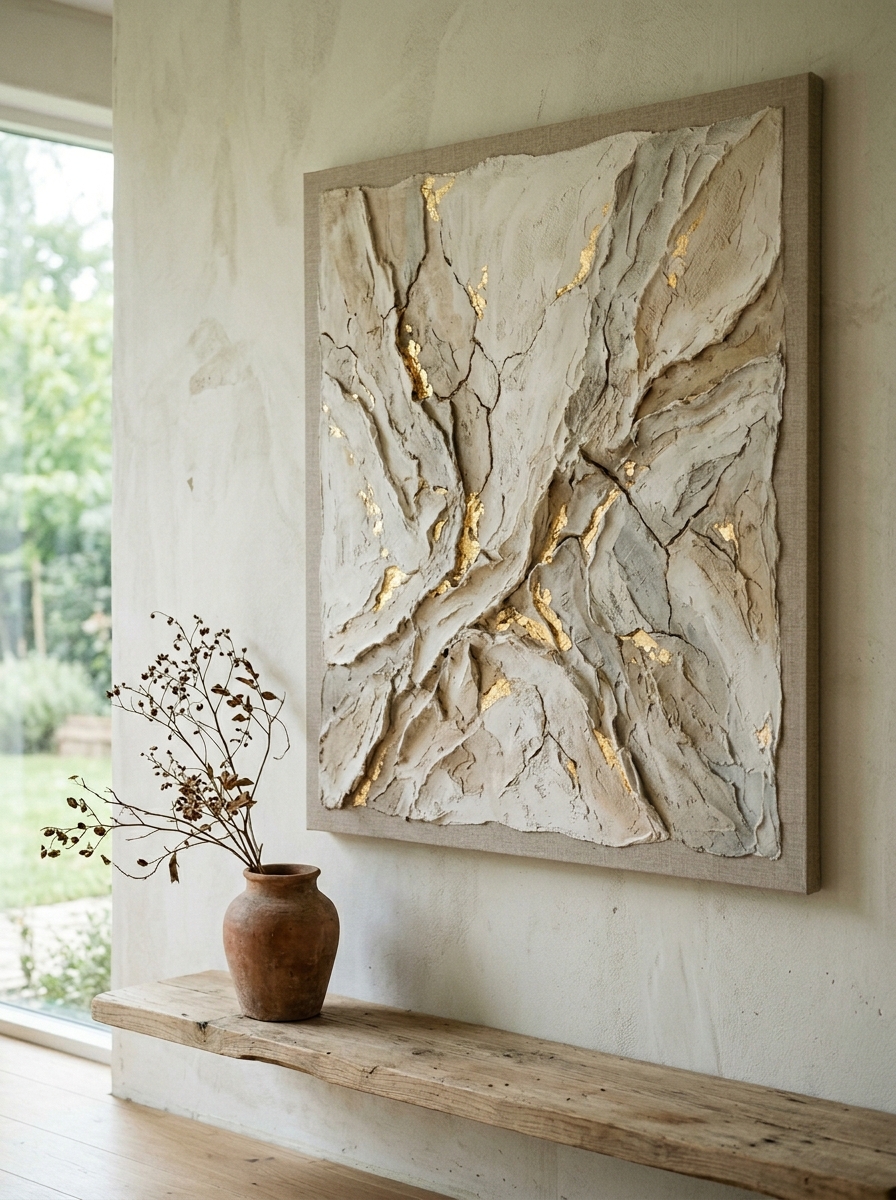
There is a version of this project selling in home décor stores for hundreds of dollars. The materials to make it at home cost a fraction of that, and the handmade version carries something the store-bought one never will: the visible marks of the person who made it.
Wabi-sabi wall art made with plaster of paris and gold leaf creates an intentionally textured, gilded surface that celebrates imperfection as design, raised peaks that catch light differently throughout the day, recessed shadows that deepen with each layer of paint, and gold that appears not as decoration but as a quiet accent within the surface.
This is one of the most impactful projects in this entire list.
Why it is wabi-sabi: Plaster of paris art is not about precision, it is about letting the material behave naturally, developing its own cracks, ridges, and surface character as it dries and sets. The gold leaf does not cover the imperfections. It draws the eye toward them.
What you need:
- A stretched canvas — medium to large size reads best on a wall
- Plaster of paris
- Water
- Wide palette knife or old credit card
- Mod podge or PVA glue (for adhering gold leaf)
- Gold leaf sheets — imitation gold leaf is affordable and works well
- A soft, dry brush for applying gold leaf
- Muted acrylic paint — warm white, stone, or raw umber
- Mixing bowl and protective gloves
How to make it:
Step 1 — Mix the plaster
Mix roughly two parts plaster of paris to one part water, stirring until the consistency is smooth and creamy, thick enough to hold texture when applied but not so stiff it cannot be spread. Work quickly once mixed as plaster begins setting within minutes. Only mix what can be used in one application.
Step 2 — Apply to canvas
Using a palette knife or old credit card, spread the plaster mixture across the canvas in uneven, expressive strokes. Do not smooth it out. Drag, press, and smear the plaster to create raised ridges, soft peaks, and recessed areas across the surface, these will become the texture that defines the finished piece. Work with intention but without overthinking. The unpredictability of plaster is part of its appeal.
Step 3 — Leave to cure full
Do not rush this step. Allow the plaster to cure at room temperature, at least 24 hours for a full canvas. Preventing cracking during the drying process is important: keep the canvas away from direct sunlight or heat sources, which cause the surface to dry unevenly and lift. Slight natural cracking as it dries adds character rather than ruining the piece.
Step 4 — Paint your base
Once fully dry, apply a thin wash of muted acrylic paint, warm white or stone, across the entire surface. Work the paint into the recessed areas with a brush, then drag lightly across the raised peaks with a dry brush so the high points catch more colour. This creates the aged, dimensional quality the piece needs before the gold goes on.
Step 5 — Apply gold leaf
Using a soft brush, apply a thin layer of mod podge or PVA glue to select areas only, a raised ridge here, a crack there, a curved peak in the corner. Less is more.
Press gold leaf sheets gently onto the glued areas and use a dry soft brush to sweep away the excess, leaving behind irregular patches of gold that sit within the texture rather than on top of it. Step back and assess before adding more. The restraint in how the gold is applied is what separates this from something that looks overdone.
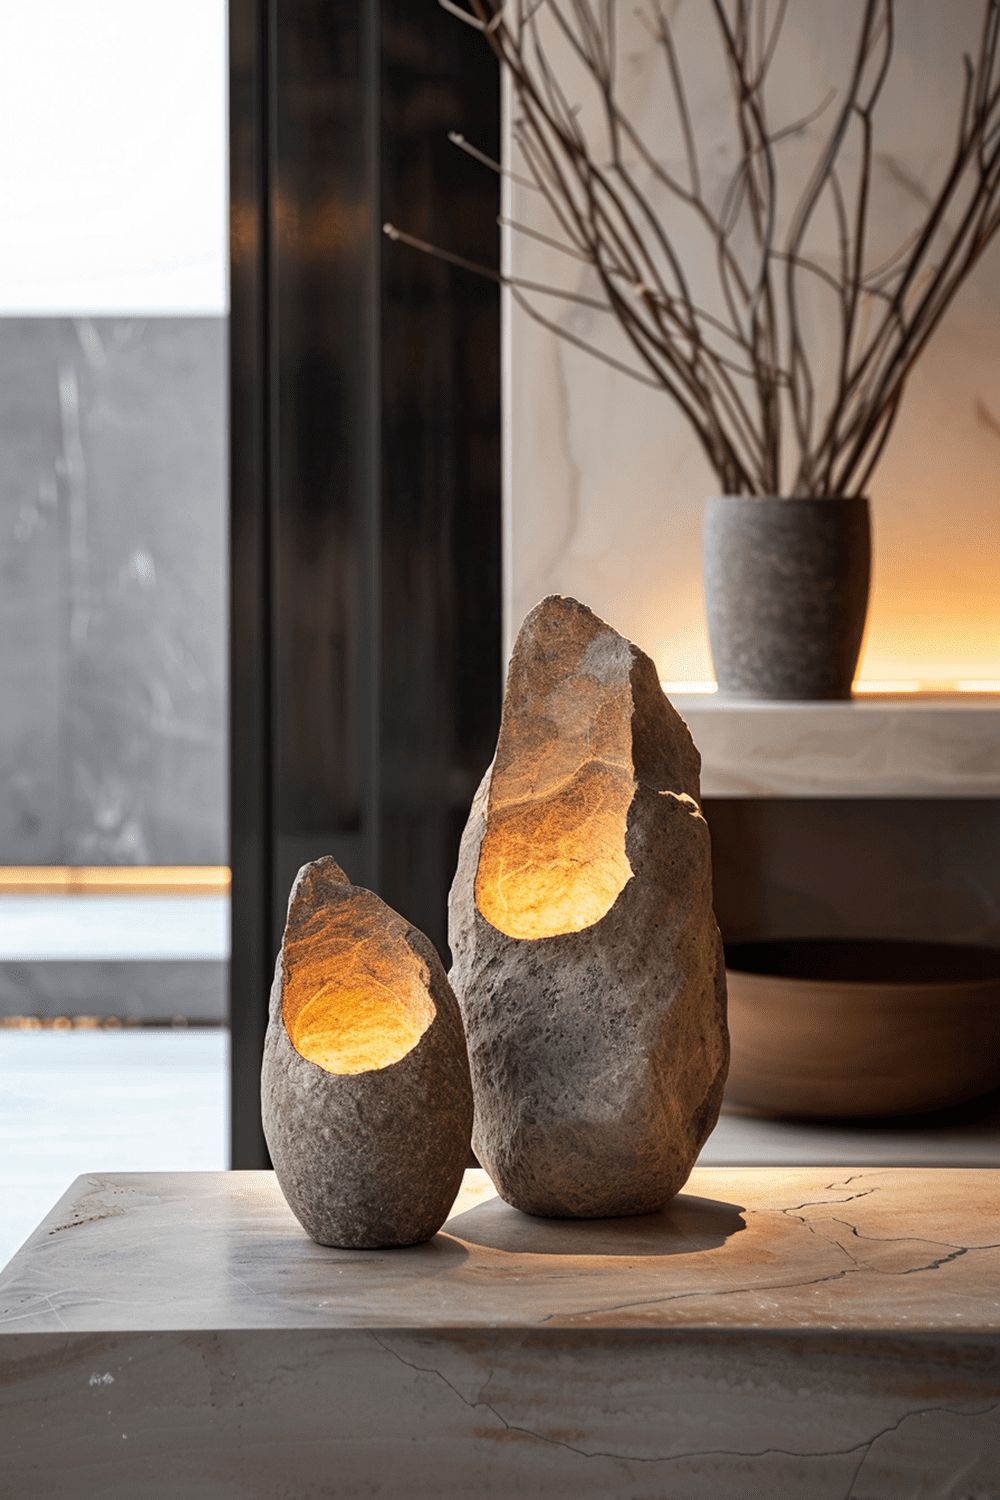
10. Raw Wood Slice Candle Holders
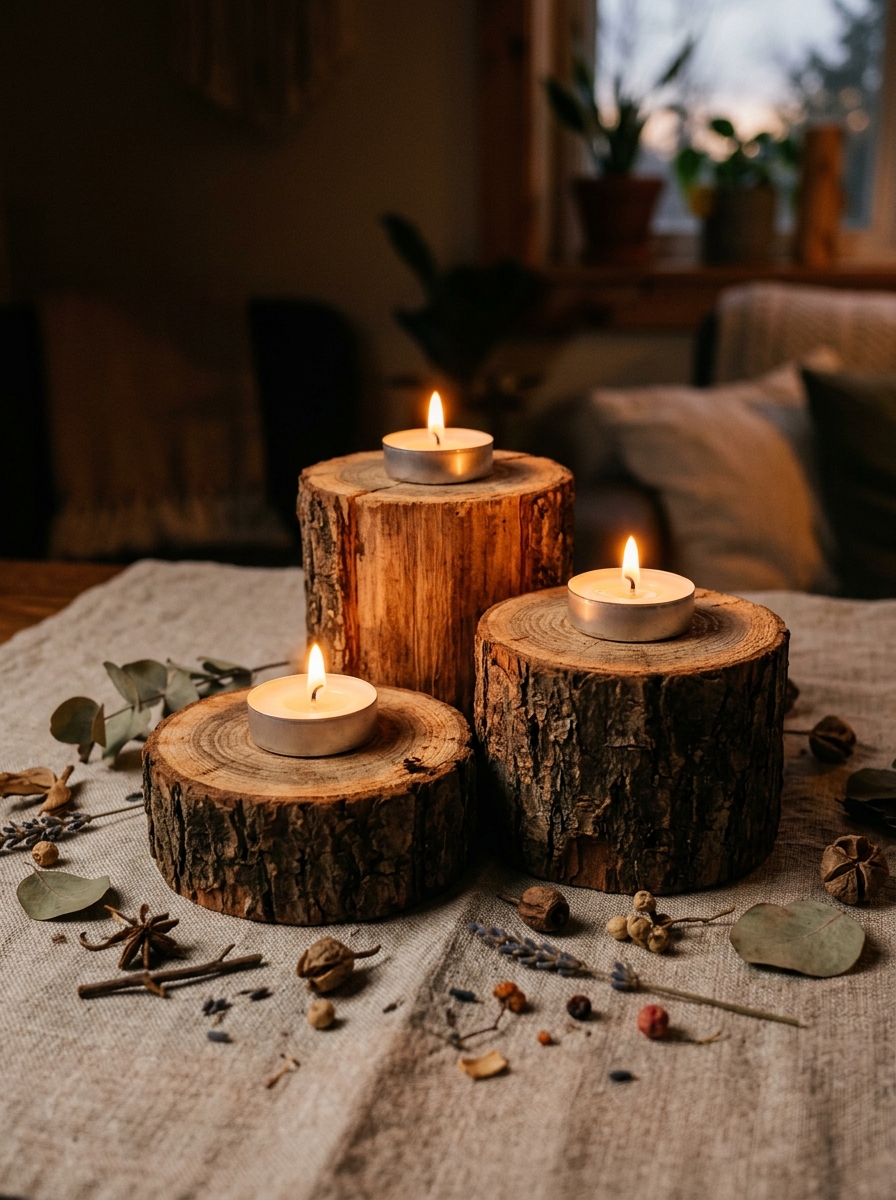
Candlelight changes a room. It slows everything down, softens edges, and creates the kind of atmosphere that no overhead light can replicate.
When the holder itself is made from raw, unfinished wood, knots, grain, and all, the effect is one of the most grounding expressions of wabi-sabi DIY home decor a space can hold.
Raw wood slice candle holders require no special skill, minimal tools, and cost almost nothing to make.
The knots in the wood, the visible grain, and the organic feel of unfinished natural materials are exactly the kind of imperfection wabi-sabi values.
Nothing about this project should look perfectly finished, and that is precisely the point.
Why it is wabi-sabi: A sealed, lacquered, store-bought candle holder is predictable. A raw wood slice with its natural edge, its visible rings of growth, its small imperfections from years in a tree — that carries history.
The rustic style is all about connecting with nature and embracing organic textures through unrefined materials, natural wood grain, and simple sturdy construction.
What you need:
- Raw wood slice — 10 to 20cm diameter, at least 5cm thick
- Electric drill with a spade bit — sized to fit a standard tea light (typically 38mm)
- Fine-grit sandpaper — 220 grit
- Natural finishing oil — linseed oil, tung oil, or mineral oil
- A soft cloth
- Tea light candles — always in metal cups, never bare wax directly in wood
Safety note before starting: Wood is naturally flammable. Always use tea lights or votives that are already set inside a metal or glass cup, never place bare wax directly into the drilled hole. Never leave burning candles unattended.
How to make it:
Step 1 — Choose your wood slice
Look for a slice with visible character, natural edge, visible grain rings, perhaps a small crack or knot. These are not flaws to avoid. They are the features that make this piece worth displaying. The slice should be dry and free of soft or rotting spots.
Step 2 — Mark and drill
Using a ruler or tape measure, find the centre of the wood slice and mark it clearly. Secure the wood in a clamp or vice before drilling, this prevents it from spinning during the process. Using a spade bit sized to your tea light, drill slowly into the marked centre. Test the fit of the tea light periodically as you drill, repeating until the candle sits snugly inside the hole.
Step 3 — Sand the edges
After drilling, use fine-grit sandpaper to smooth any rough or splintered edges around the hole and along the outer rim of the slice. Do not sand the whole surface flat — leave the natural texture of the wood intact. The goal is to remove hazards, not character.
Step 4 — Finish with natural oil
Apply a natural oil such as tung oil or mineral oil to bring out the wood grain. Work it in with a soft cloth using circular motions, let it absorb for 20 minutes, then wipe away any excess. This deepens the colour of the grain naturally, without making the wood look coated or synthetic. Leave the raw edges unsealed where possible.
Step 5 — Style and display.
Place tea lights inside the drilled holes and arrange the holders in an odd-numbered grouping, three or five together reads more naturally than pairs. Pair with fresh greenery, moss, pinecones, or other natural elements for a grounded, organic display that can shift with the seasons.
Let wax drips settle and age on the surface over time. That residue is not something to clean off, it is the candle holder beginning to tell its story.
11. Hand-Dyed Linen Cushion Cover
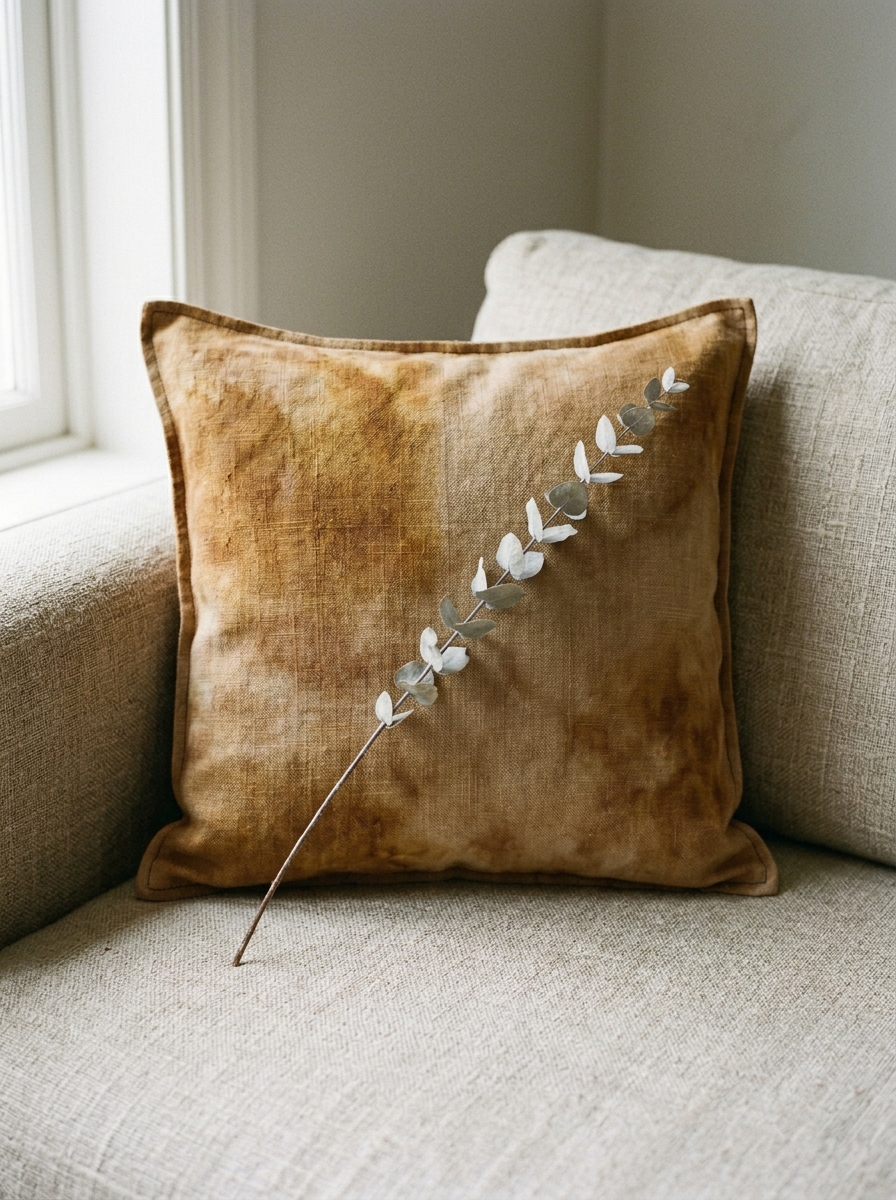
The final project on this wabi-sabi DIY home decor list is also the most quietly transformative. A single cushion cover, hand-dyed in earthy tones using ingredients from a kitchen, turmeric, onion skins, or avocado pits, can shift the entire mood of a room.
Not because it shouts, but because it whispers something true: this was made by hand, coloured by nature, and no two will ever look exactly alike.
The slight variations in hand-dyed fabrics, the uneven colour distribution, the deeper patches where the dye pooled, the lighter areas where it barely reached, are exactly what wabi-sabi appreciates. Those variations are not inconsistencies.
They are the signature of a living material meeting a natural process.
Why it is wabi-sabi: Natural dyes have been colouring fabrics for thousands of years, long before synthetic dyes existed. Reaching for turmeric or onion skins instead of a bottle of chemical dye is a return to that older, slower way of making, one that wabi-sabi philosophy sits entirely at home within.
What you need:
- Raw linen fabric — enough to cut and sew a cushion cover to fit an existing insert
- Natural dye source — choose one:
- Turmeric powder → warm, vibrant yellow
- Yellow onion skins (skins of 4 to 6 onions) → rich warm brown
- Avocado pits and skins → soft blush pink
- A large pot dedicated to dyeing — not used for food afterward
- Salt or white vinegar as a natural mordant fixative
- Rubber gloves
- Fabric scissors and needle and thread or sewing machine
Natural dye colour guide before starting: Yellow onion skins produce a light warm brown. Fresh turmeric produces a light to deep yellow depending on how long the fabric soaks. Avocado pits and skins give a blush pink. Choose based on the tones already in the room where the cushion will sit.
How to make it:
Step 1 — Pre-soak the fabric
Cut linen to size and soak it in cold water for at least 30 minutes before dyeing. Pre-soaking in water helps the even distribution of dye once the fabric is added to the dye bath. Wet fabric accepts natural dye far more evenly than dry fabric.
Step 2 — Prepare the dye bath
Place the dye material, onion skins, chopped avocado pits, or turmeric, in a large pot filled generously with water. Heat gently for about an hour to an hour and a half, avoiding a vigorous boil which can damage delicate natural pigments. The water will deepen in colour as it simmers. For turmeric, mix a few tablespoons of turmeric powder into the pot and bring to a gentle simmer.
Step 3 — Add a mordant
Before adding the fabric, stir in a fixative to help the colour bond to the fibre. Salt and white vinegar both work as natural fixatives for plant-based dyes on linen and cotton. Add roughly half a cup of white vinegar or two tablespoons of salt to the dye bath and stir well.
Step 4 — Dye the fabric
Add the pre-soaked linen to the dye bath. Allow it to soak for anywhere between 20 seconds and several minutes depending on the depth of colour desired, the longer it soaks, the deeper the result. Stir occasionally but do not stir constantly, uneven colour is the goal. Areas that receive less dye will be lighter, creating the natural variation that makes this project distinctly wabi-sabi.
Step 5 — Rinse, dry and sew.
Remove the fabric, wring gently, and rinse in cool water until the water runs clear. Lay flat to dry rather than hanging, any creases formed during drying can show permanently in the dye.
Once dry, cut to size and sew into a simple envelope-back cushion cover. Place it on a sofa, a reading chair, or a bed, and resist the urge to make a matching pair. One is enough. One is wabi-sabi.
Nature plays a central role in Wabi-Sabi design. 11 Bathroom Plants That Thrive in Humidity and Help Reduce Dampness Where Mold Grows—Even in Low Light offers practical ways to bring living greenery indoors while creating a calmer, more organic atmosphere.
The Wabi-Sabi Mindset at Home
The most important thing to understand about wabi-sabi DIY home decor is this: none of these 11 projects are about acquiring something new. The goal is not to make a wabi-sabi object, it is to practice wabi-sabi.
Look around the room right now. The cracked mug on the windowsill, weathered table that has hosted a hundred meals, the frayed cushion that has been sat on, leaned on, lived against. These things do not need replacing. They need seeing differently.
That is the shift wabi-sabi asks for, from acquisition to appreciation. From chasing a finished home to recognising that a home is never finished, and that this is exactly what makes it beautiful.
So, pick one project from this list. Start there. Then look at what already surrounds you with the same unhurried eyes.