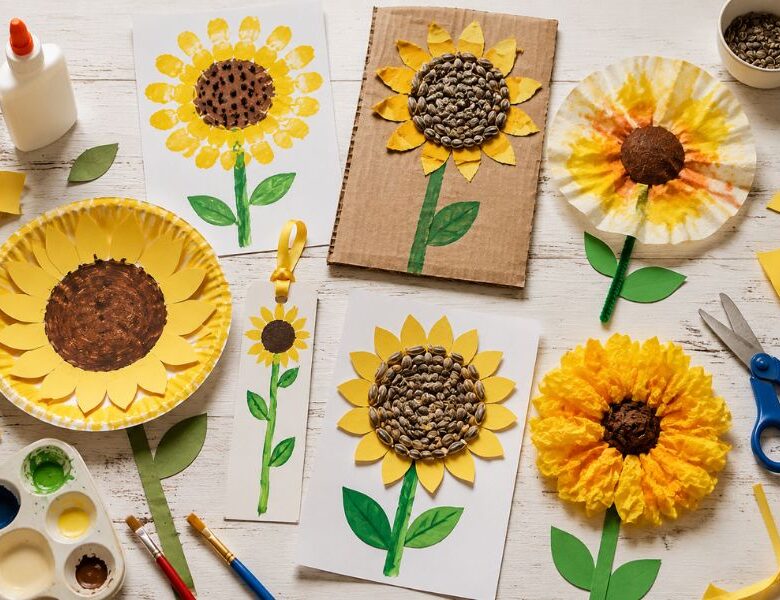
Most sunflower crafts get made once and forgotten, these 15 easy, budget-friendly ideas kids will want to remake all summer.
Young sunflowers do something most kids never get to see up close: they turn to follow the sun as it moves across the sky.
It’s called heliotropism, and it happens because one side of the stem grows just a little faster than the other, tilting the flower toward the light hour by hour. By the time the sunflower is fully grown, it settles facing one direction and stays there for good.
That one detail is what makes sunflowers such a good subject for a kids’ craft afternoon. The shape is simple enough for small hands to manage, but there’s a real story behind it, one you can talk through while you cut petals or press seeds into glue. It gives the craft a little more to it than just a pretty flower on the fridge.
Most of these ideas use things already sitting in a kitchen drawer: paper plates, construction paper, a coffee filter, a handful of seeds.
A few take fifteen minutes, a couple, like the suncatcher near the end, take a bit more patience but pay off the moment you hold it up to the window. Pick one that matches the ages at your table, and go from there.
Give old crayons a colorful new purpose with Melted Crayon Art for Kids: What to Do With Broken Crayon Pieces, a fun recycled craft that transforms leftover crayons into vibrant works of art.
The Pinch That’s Secretly Good for Little Hands
Every time a kid pinches a sunflower seed between thumb and finger to press it into glue, they’re using the same grip they’ll later use to hold a pencil.
That small pinch, thumb and first finger working together, is one of the last hand skills to develop, and it’s hard to practice on purpose. A craft gets it done without anyone making a big deal out of it.
The rest of the project works other small muscles too. Cutting curved petals with kid-safe scissors takes different control than cutting a straight line.
Dabbing paint with a fork means learning how much pressure makes a clean print instead of a smudge. Arranging petals in a ring so it actually looks like a flower takes a bit of planning, figuring out where each piece goes before the glue sets. None of it feels like practice. It just feels like making a sunflower.
And at the end of fifteen or twenty minutes, there’s something real to show for it, a paper plate or a sheet of construction paper, taped to the fridge or pinned up in a classroom. Small win, but a real one, on a long afternoon.
Bring Bible lessons to life with Daniel and the Lion’s Den Craft: A Sunday School Activity for Kids That Teaches Courage and Faith, featuring hands-on projects that help children remember Daniel’s inspiring story.
Sunflower Crafts for Kids
1. Fingerprint Sunflower
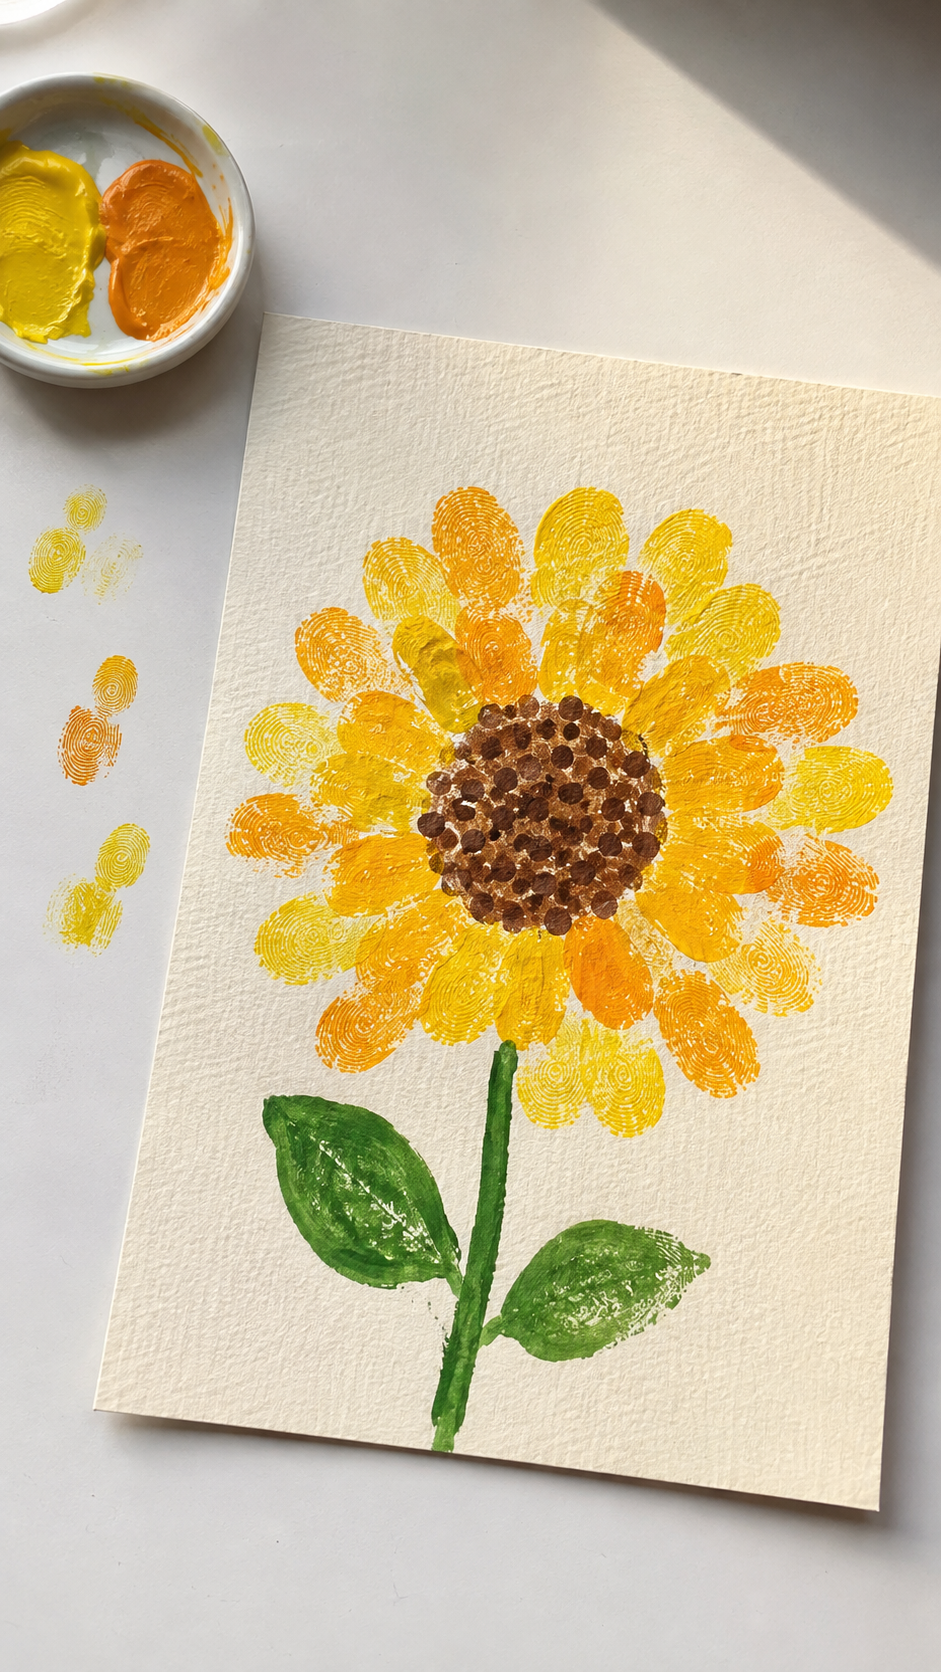
This craft turns a ring of fingerprints into a full sunflower, each pressed fingertip becomes one petal, built around a hand-drawn center.
It’s a good starting point because the whole flower comes together through repetition of one simple motion, which makes it easy for a toddler to follow start to finish.
What you’ll need:
- Yellow, orange, or red paint (a shallow dish or paper plate works as a palette)
- White cardstock or heavy paper
- A brown or black marker
- A green marker or crayon
How to make it:
- Draw a small circle in the center of the page, this becomes the sunflower’s seed head. Brown keeps it closest to how a real sunflower center looks.
- Dip a fingertip in paint and press it around the circle, radiating outward like petals. The slightly uneven, overlapping prints are actually what make it read as real petals rather than a stiff diagram, there’s no wrong way to place them.
- Let the paint dry for a few minutes, then add a stem and a couple of leaves below the flower with the marker.
- Once dry, dot a bit of brown or black paint inside the center circle with a fingertip too, echoing the tightly packed seeds in a real sunflower’s head.
2. Handprint Sunflower
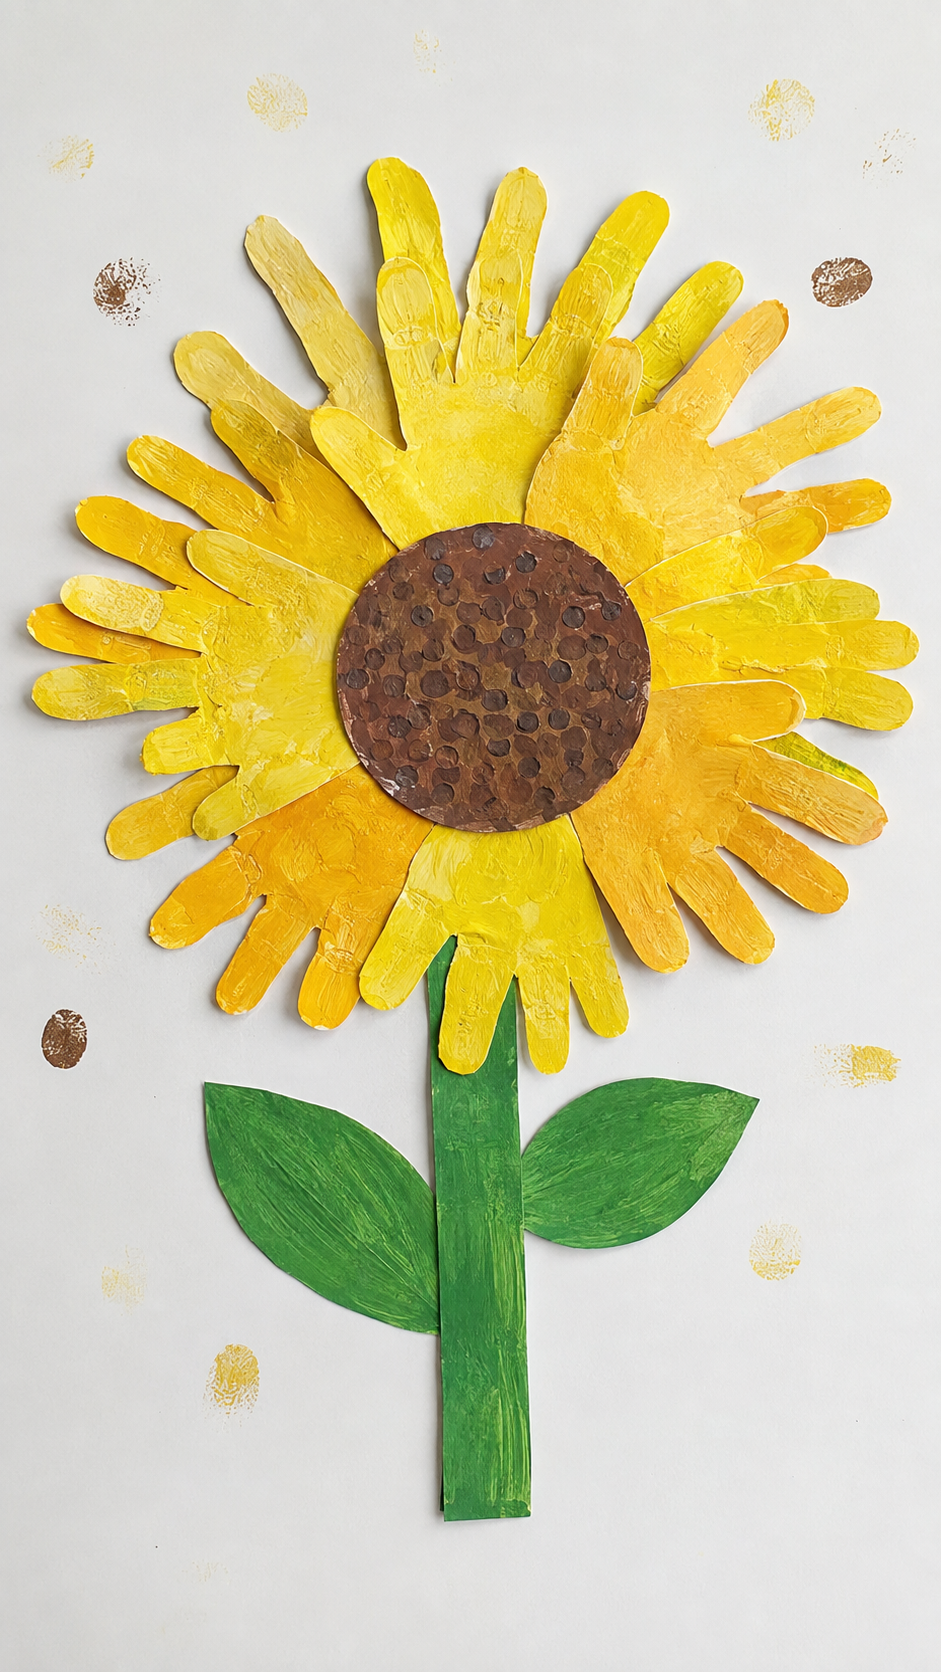
A traced or painted hand becomes the petal here, no cutting or shaping required, just a hand pressed down and fanned around a center circle.
It’s one of the simplest sunflower crafts for kids on the list, since the shape comes from the hand itself rather than anything drawn or cut.
What you’ll need:
- Yellow, orange, or red paint
- White cardstock or heavy paper
- A brown marker or paper circle for the center
- A green marker or paper strip for the stem
How to make it:
- Draw or glue down a circle in the middle of the page for the sunflower’s center.
- Paint one hand (or trace it and color it in) and press it down around the circle, fingers spread out like petals, rotating the page slightly each time so the hands fan out evenly.
- Repeat with 4–6 handprints until the circle is ringed with “petals.”
- Once dry, add a stem and a couple of leaves below.
Each handprint comes out a slightly different size depending on the child, which makes this one a natural group project, a few kids can each add their prints to one shared sunflower instead of making separate ones.
Encourage hands-on learning through 15 Sensory DIY Craft Ideas for Kids With Special Needs That Support Learning Through Play, using simple materials to build important developmental skills.
3. Paper Plate Sunflower
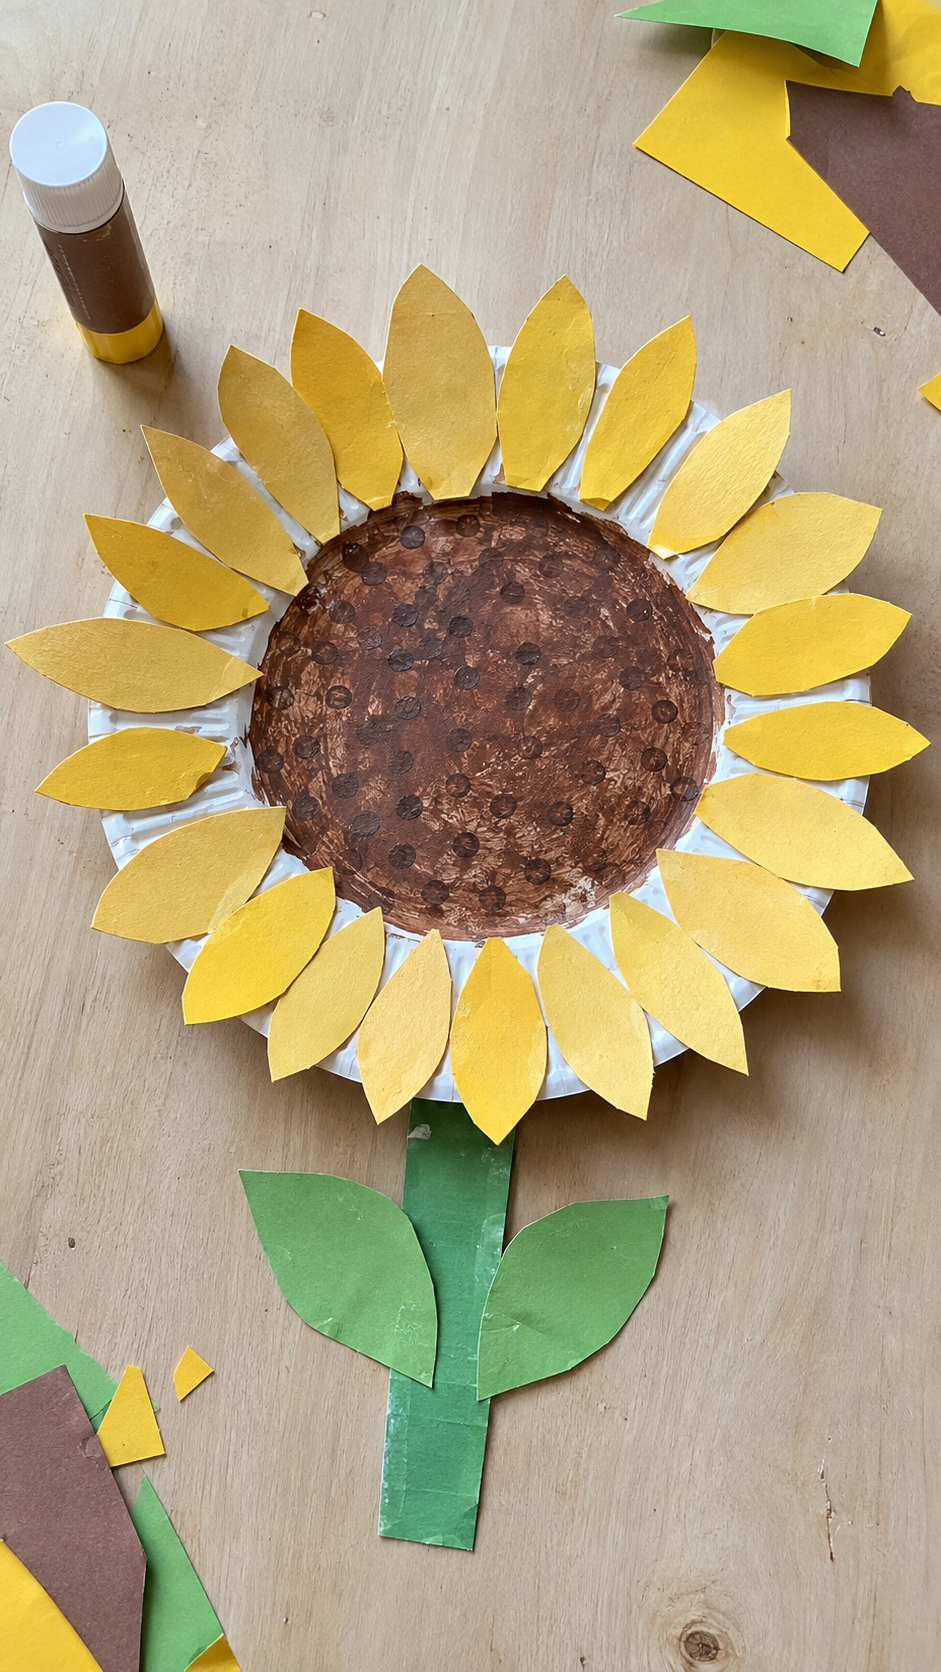
A paper plate gives this one a sturdier base than most sunflower crafts for kids on the list, it holds up to being handled, hung on a wall, or carried around after it’s done.
What you’ll need:
- A paper plate
- Yellow and green construction paper (or yellow paint)
- Brown paint or brown paper
- Scissors and glue
- A pencil
How to make it:
- Paint the center of the paper plate brown, or glue down a brown paper circle, and let it dry.
- Cut petal shapes out of yellow construction paper — simple oval or teardrop shapes work fine, and they don’t need to be identical.
- Glue the petals around the edge of the plate, overlapping slightly, until the whole rim is covered.
- Cut a stem and a couple of leaves from green paper and glue them to the back of the plate so they show below it.
- Optional: press a fingertip dipped in brown paint into the center circle a few times to mimic sunflower seeds.
The flat plate base pairs well with the sunflower life cycle craft later in the list, the same shape can double as a “seed to bloom” diagram if you want to combine the two ideas.
4. Fork-Painted Sunflower
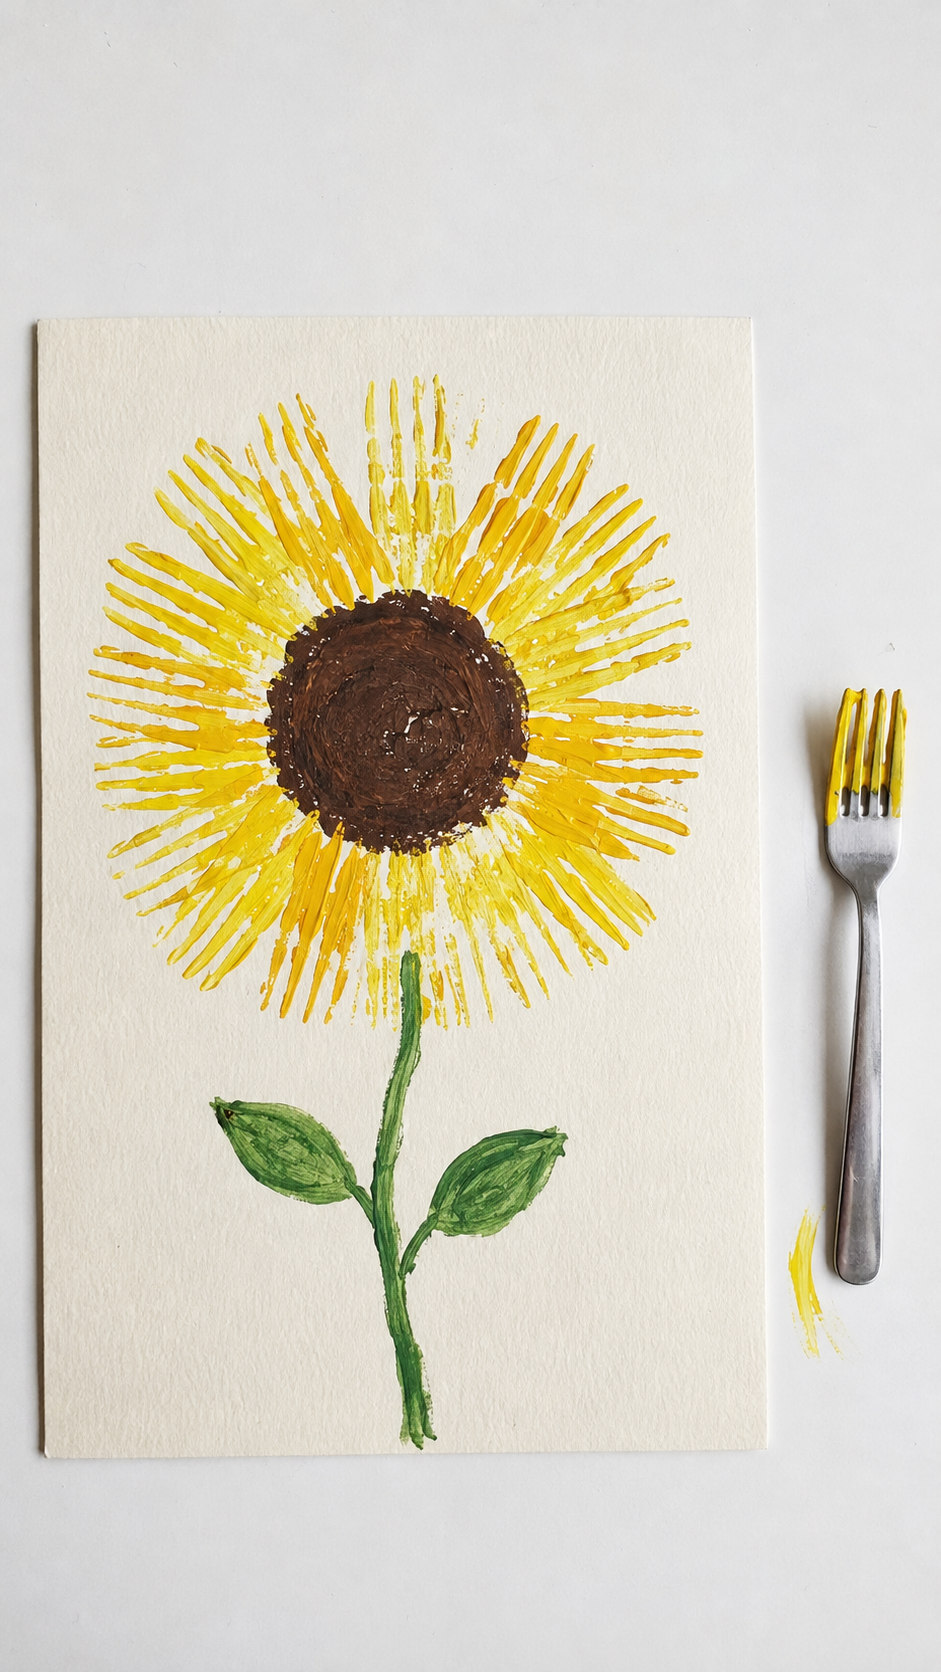
A regular dinner fork, dragged through paint, makes a surprisingly convincing petal shape in one stroke, the tines create thin ridges of color that fan out just like a real petal’s veins.
It solves a problem the fingerprint and handprint versions don’t: getting a petal shape that looks intentional rather than just a blob of color, without needing scissors or steady cutting control.
What you’ll need:
- Yellow or orange paint, poured onto a plate or shallow dish
- A regular table fork
- White paper or cardstock
- A brown marker or paint for the center
How to make it:
- Draw or paint a circle in the middle of the page for the center.
- Dip the back or side of a fork into the paint, then drag it outward from the center circle in one motion, tines first.
- Repeat around the circle, rinsing the fork between colors if switching shades.
- Once dry, add a stem and leaves.
The technique itself is worth pointing out to older kids as they work — pressing harder makes thicker, bolder petal lines, while a lighter touch gives thinner, more delicate ones.
That’s a small, concrete lesson in how pressure changes a mark, which comes up again in drawing and handwriting.
Make alphabet practice exciting with Train Craft Ideas for Kids That Make Learning the Alphabet Fun With Things You Already Have, combining early literacy with creative play.
5. Construction Paper Sunflower
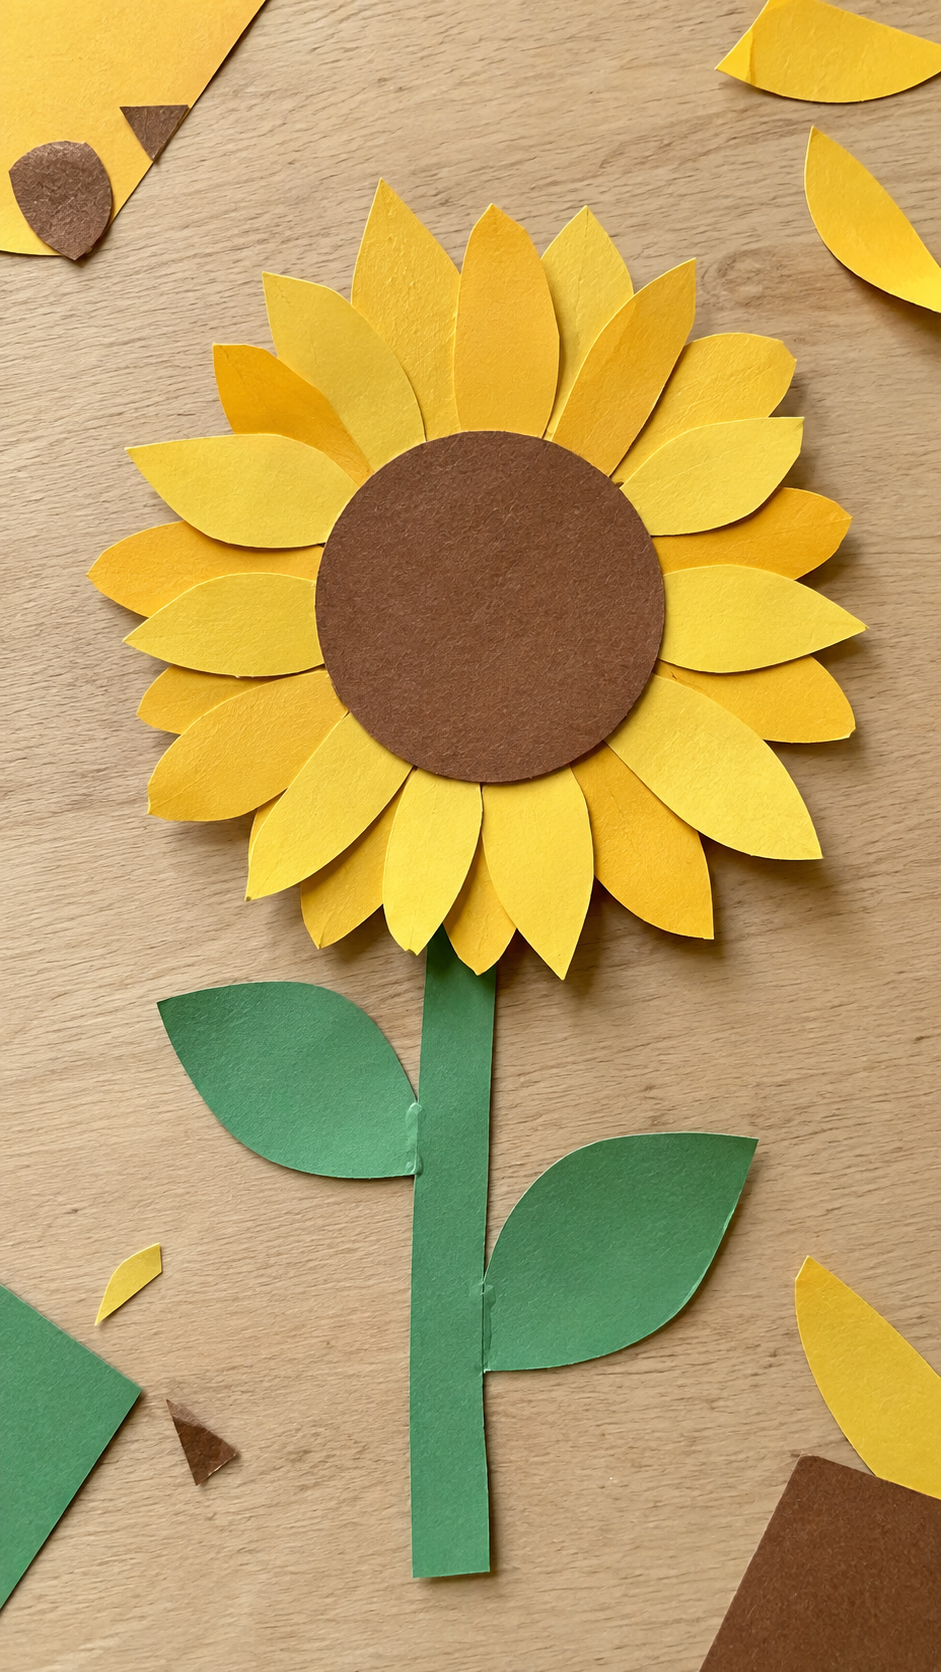
This is the version to reach for when the goal is a clean, uniform-looking sunflower rather than a textured one, cut paper petals lie flat and even in a way paint never quite does, which makes it a good choice for a classroom display or anything going in a frame.
What you’ll need:
- Yellow, brown, and green construction paper
- Scissors
- Glue
- A pencil for tracing (optional)
How to make it:
- Cut a large circle from brown paper for the center.
- Cut 10–12 petal shapes from yellow paper, an oval tapered to a point at one end works well, and drawing one template petal first to trace around keeps them consistent in size.
- Glue petals around the back edge of the brown circle, slightly overlapping, working in a full ring.
- Cut a stem and leaf shapes from green paper and glue them on below.
For younger kids struggling with scissors, pre-cutting the petal shapes ahead of time and letting them focus only on placement and gluing keeps the frustration low while still leaving the creative decisions, how many petals, how they overlap, in their hands.
6. Tissue Paper Sunflower
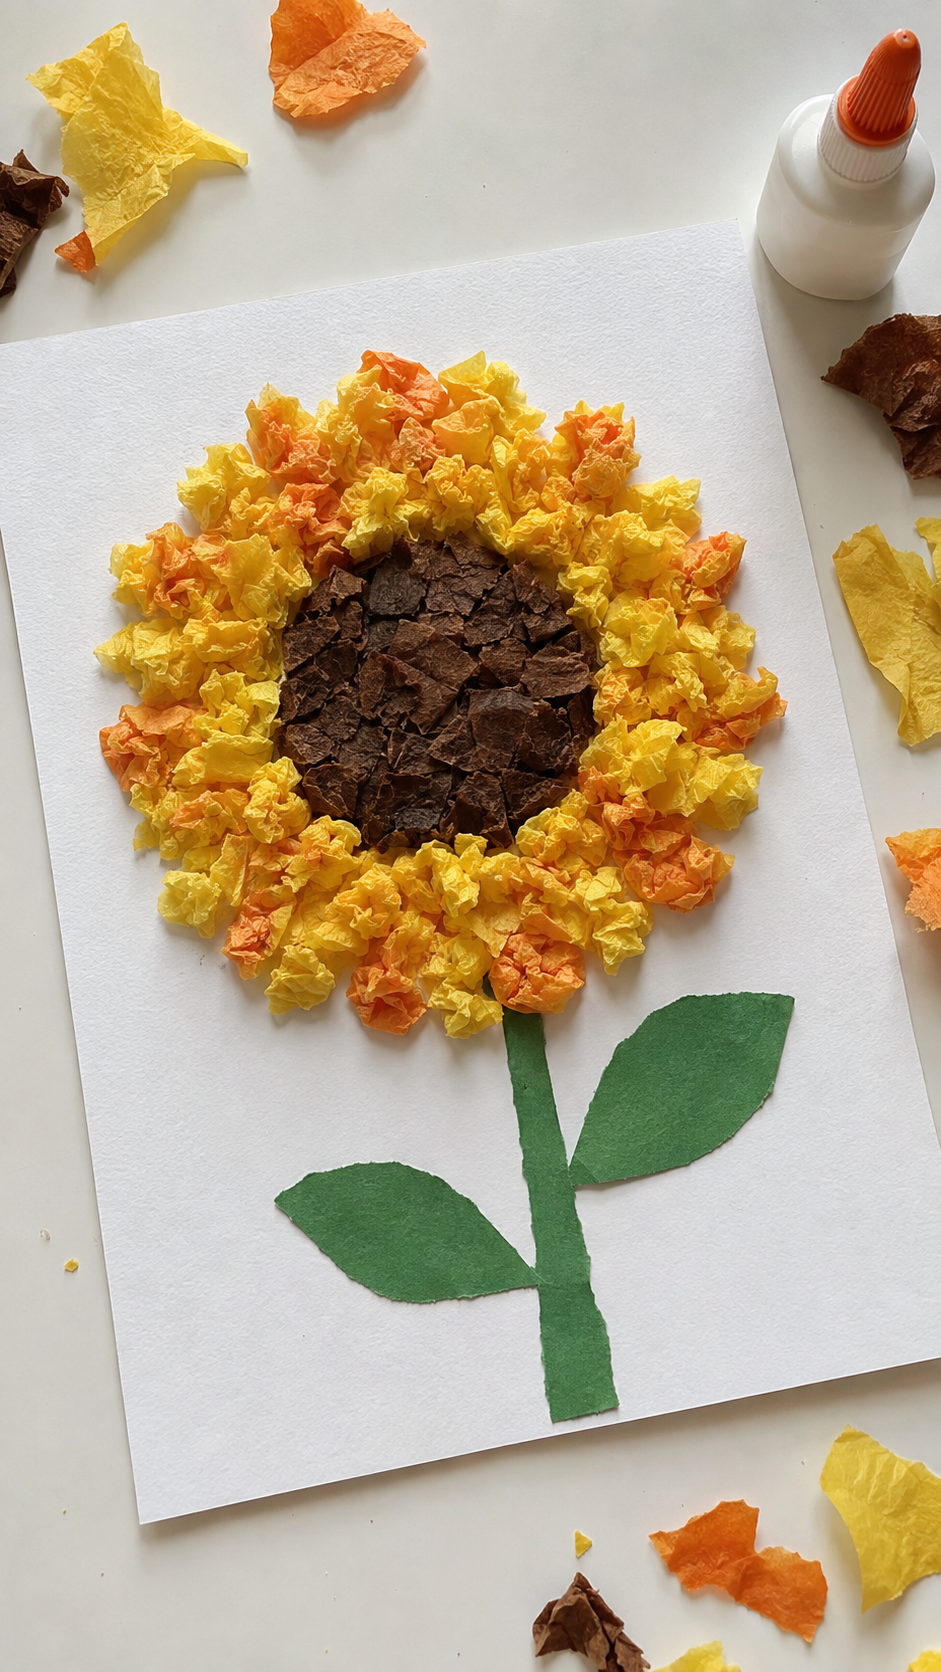
Scrunched tissue paper gives a sunflower texture and depth flat paper can’t, since each small scrunched piece catches light slightly differently once glued down, closer to how real petals aren’t perfectly flat either.
What you’ll need:
- Yellow and orange tissue paper, cut or torn into small squares
- Brown paper or paint for the center
- Glue
- White paper or cardstock as the base
How to make it:
- Draw or glue a brown circle in the center of the page.
- Scrunch each tissue paper square loosely around a fingertip or pencil eraser into a small ball, without pressing too tight.
- Dab a bit of glue on the page just outside the center circle and press a scrunched piece into place; repeat in a ring, then build a second layer of petals slightly further out for fullness.
- Add a stem and leaves once the glue sets.
This one solves a specific problem for kids who find cutting or precise gluing frustrating, scrunching is a rougher, more forgiving motion, so there’s no way to “mess it up,” which makes it a good pick for a first-time crafter or a group with a wide age range at the table.
Add fun textures to art time with Bubble Wrap Painting: The Easy Texture Trick That Turns Bored Kids Into Little Artists, an easy painting activity children will want to repeat.
7. Coffee Filter Sunflower
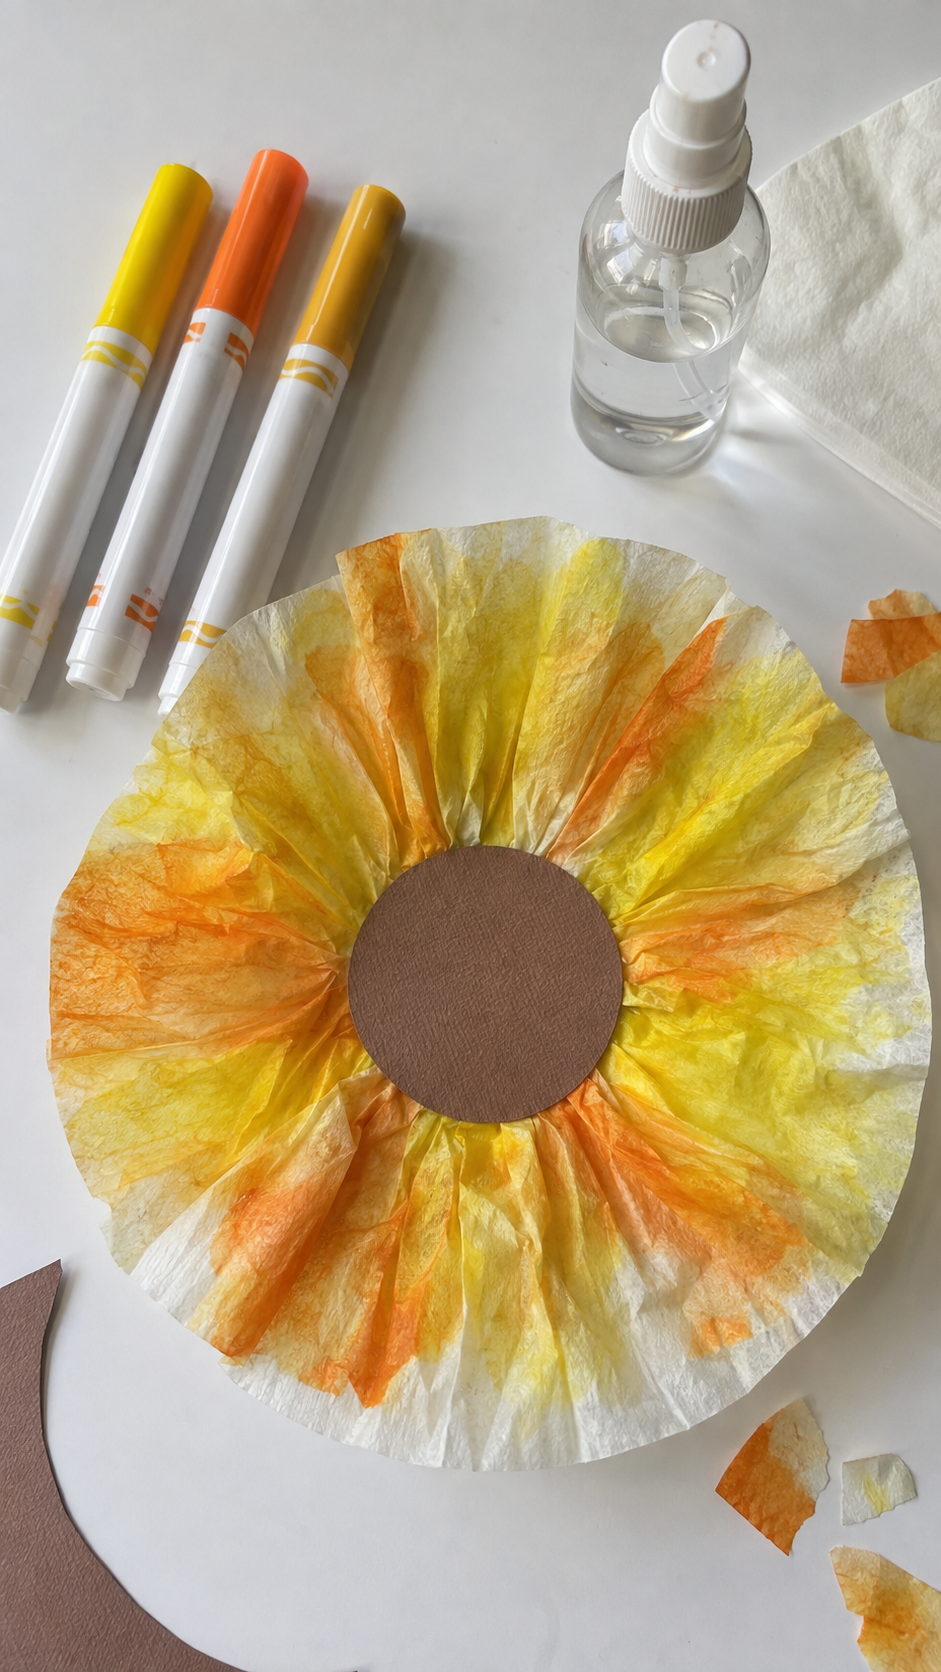
This one is a good pick when you want a sunflower craft for kids that doubles as a small science lesson, since it uses a real chemistry technique, capillary action, to build the color instead of just applying paint.
What you’ll need:
- Round coffee filters
- Washable markers (yellow, orange, a touch of brown)
- A spray bottle with water or an eyedropper
- Brown paper or paint for the center
- Green paper for the stem
How to make it:
- Flatten a coffee filter and color it heavily with marker, working in bands from the edge inward — yellow and orange near the outer rim, a bit of brown toward the middle.
- Lightly mist the filter with water from a spray bottle, or drip water on with an eyedropper, and watch the colors bleed and blend into each other.
- Let it dry flat, then gently pinch and gather the center to create ruffled, petal-like folds, securing with a small twist tie or dab of glue.
- Glue a brown paper circle over the gathered center and attach a green paper stem below.
While the colors bleed, it’s worth explaining what’s actually happening: water travels up through the tiny fibers of the paper, carrying the marker ink along with it, the same basic process that moves water up from a plant’s roots to its leaves and petals.
Create adorable animals, decorations, and imaginative creations with 13 Popsicle Stick Crafts for Kids, an easy collection of budget-friendly crafts perfect for home, school, or daycare.
8. Popsicle Stick Sunflower
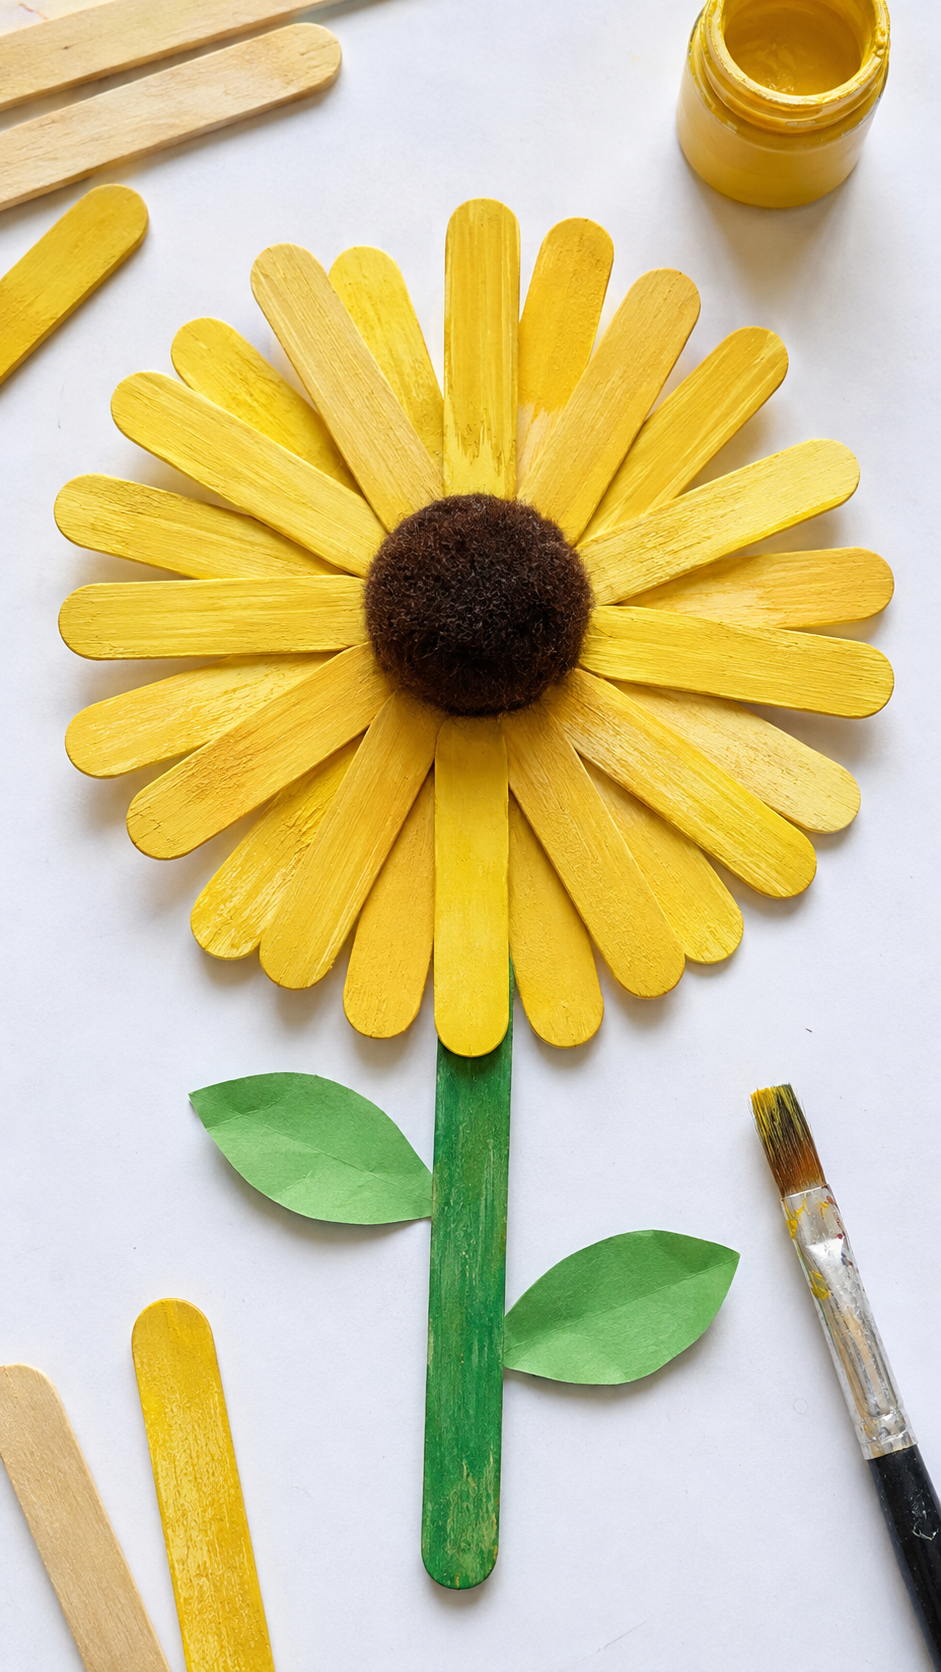
Popsicle sticks give this sunflower craft for kids a rigid frame to build on, which makes it a useful choice for teaching sequence and structure, there’s a clear order of steps that has to happen before the next one can, unlike a flat glued craft where petals can go on in any order.
What you’ll need:
- Popsicle sticks or craft sticks
- Yellow, brown, and green paint
- A paper circle or pom-pom for the center
- Glue
How to make it:
- Paint 6–8 popsicle sticks yellow (or leave a couple natural for contrast) and let them dry completely.
- Arrange the sticks in a sunburst pattern, fanning out from a central point, and glue them together where they overlap in the middle.
- Once set, glue a brown paper circle or pom-pom over the center point to cover the overlapping ends.
- Attach a full stick or two below as the stem, with small paper leaves glued on.
Because the sticks have to dry before assembly, and assembly has to finish before the center goes on, this craft is a natural way to introduce the idea of following steps in order, something that carries over directly into following a recipe or building instructions later on.
Turn everyday recyclables into creative masterpieces with Toilet Paper Roll Crafts for Kids That Turn Everyday Waste into Fun, using simple supplies already found at home.
9. Toilet Paper Roll Stamped Sunflower
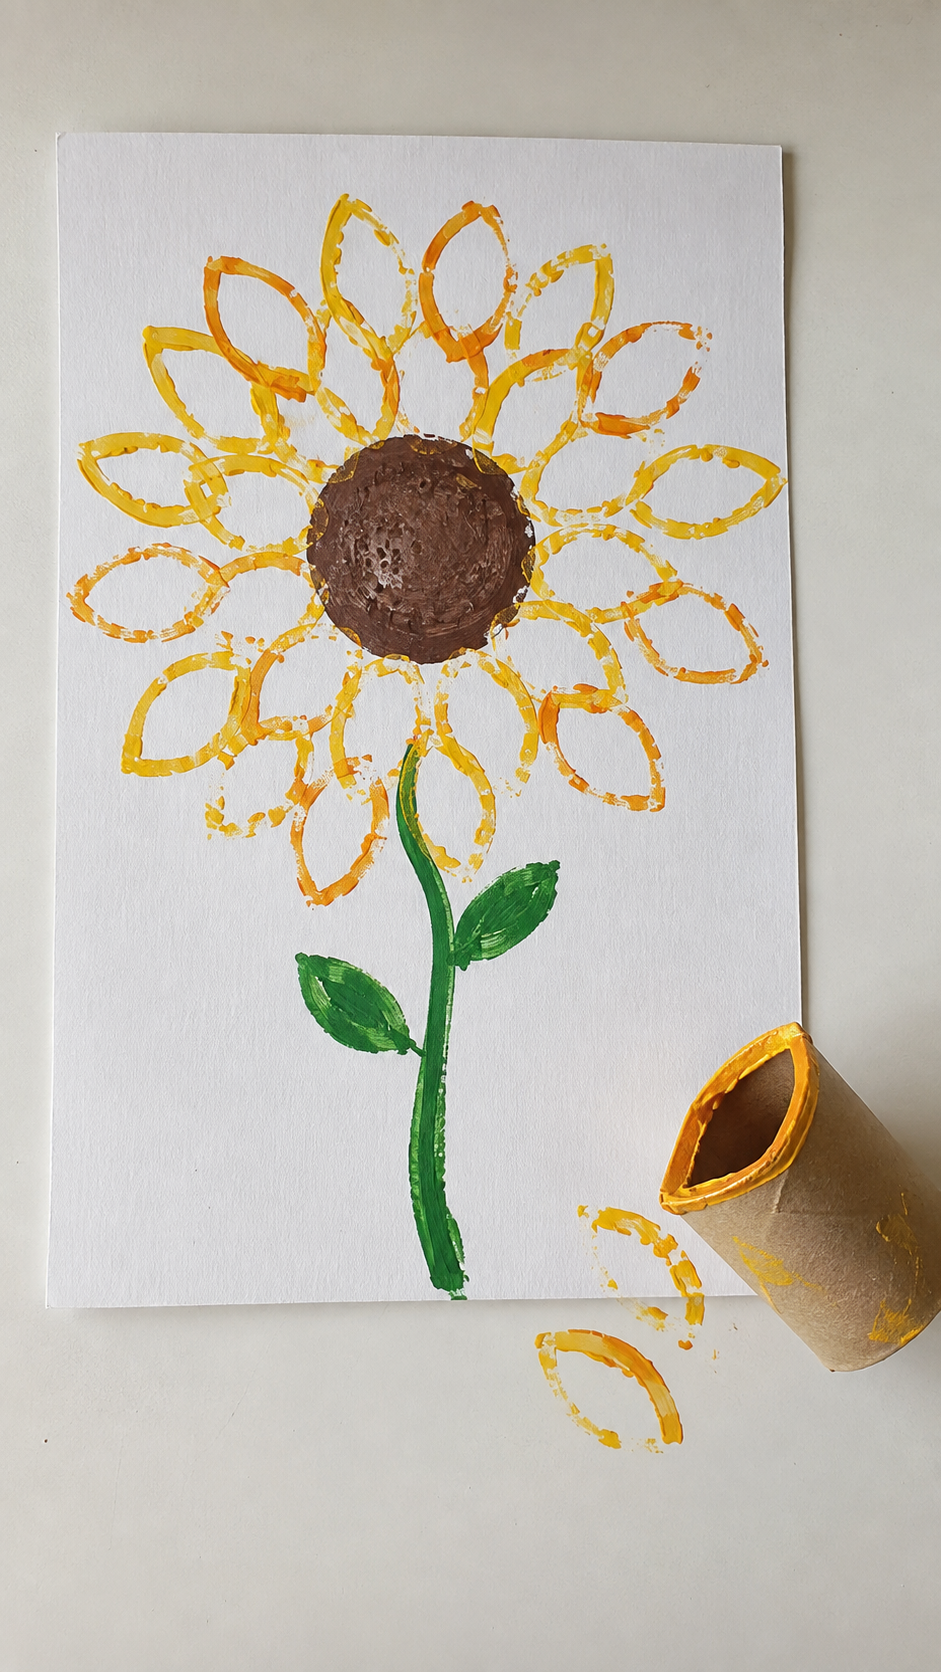
This sunflower craft for kids turns an empty toilet paper roll into a stamp, which teaches a different concept than most crafts on this list: that a simple tool, shaped the right way, can repeat a pattern faster and more evenly than doing it by hand.
What you’ll need:
- An empty toilet paper roll
- Yellow and orange paint
- Scissors
- White paper or cardstock
- Brown marker or paint for the center
How to make it:
- Pinch one end of the toilet paper roll into a petal or teardrop shape and hold it flattened for a moment to set the crease.
- Dip the shaped end into paint and stamp it onto the paper, arranging stamps in a ring around a center point.
- Repeat around the circle, re-dipping in paint as needed, alternating yellow and orange if using both.
- Once dry, draw or paint a brown center circle and add a stem and leaves.
This is a good moment to point out that the roll is basically a repeatable stencil, every stamp comes out close to the same size and shape, which is a useful, concrete example for kids of how tools can make repetitive work faster and more consistent than freehand drawing.
10. Sunflower Seed Art
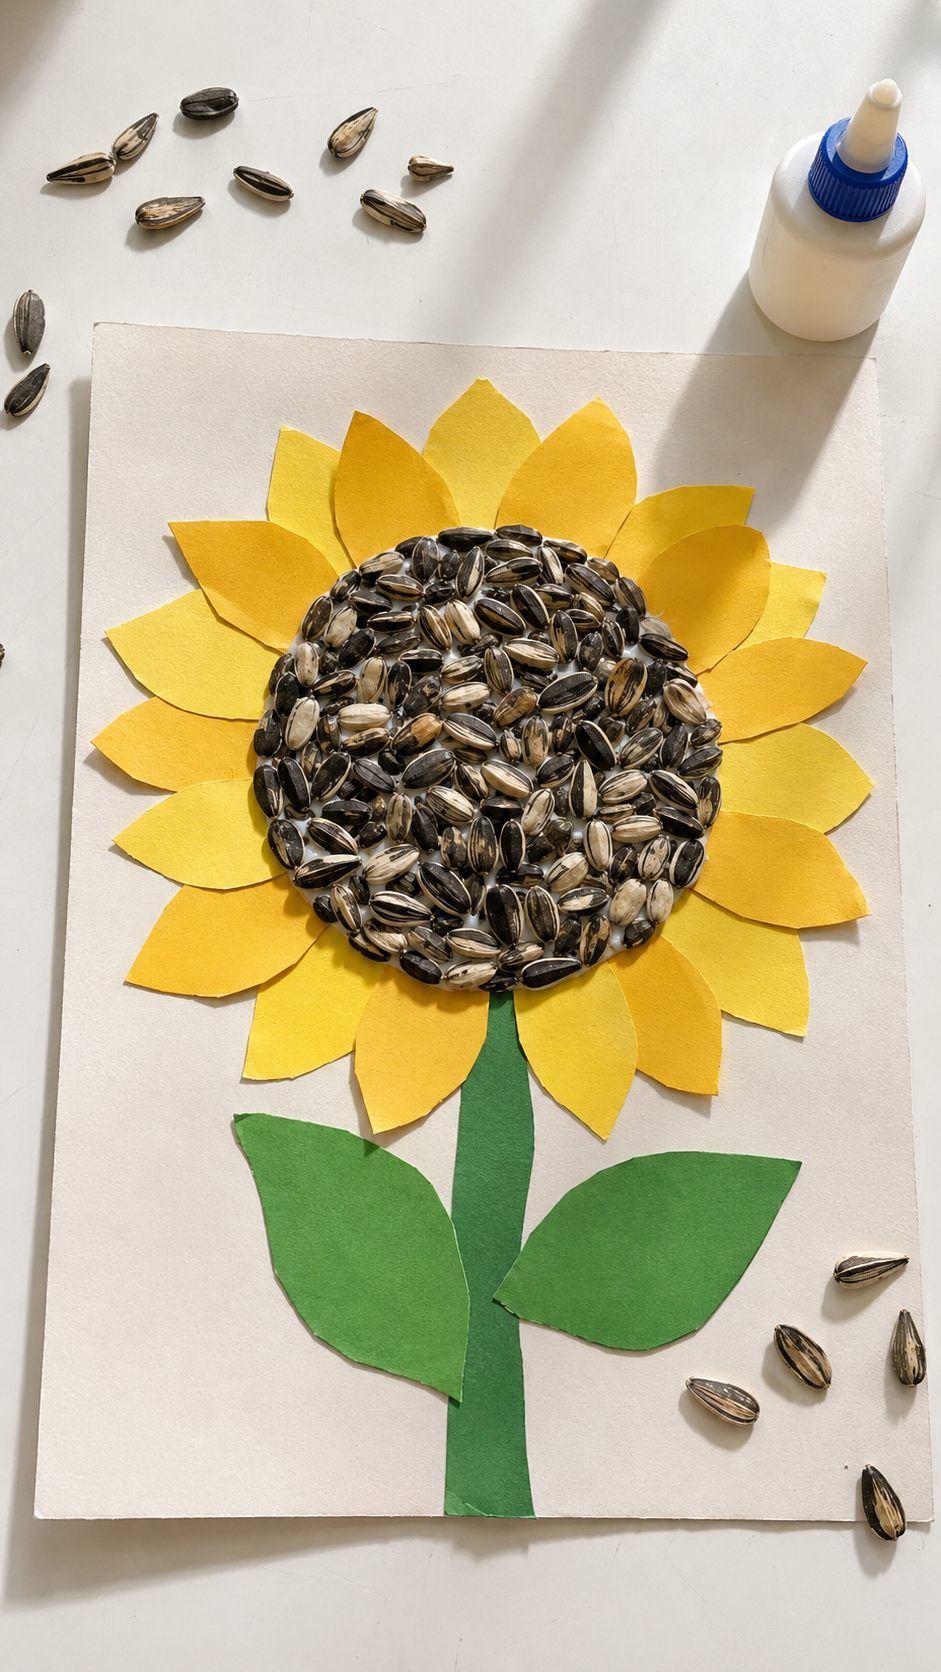
Real sunflower seeds, glued directly onto paper, give kids a chance to handle the actual seed rather than a drawn or painted stand-in, and that’s worth pointing out, since the seeds arranged around a center are literally what a sunflower’s head is made of, just scaled down to fit one page.
What you’ll need:
- Raw, unshelled sunflower seeds (the striped kind found at grocery stores)
- Brown paper or cardstock for the base
- Glue
- Yellow paper for petals
How to make it:
- Cut a circle from brown paper for the flower’s center.
- Spread glue over the circle and press seeds onto it, packed close together, in rings from the outer edge inward.
- Once the seeds are set, glue yellow petal shapes around the outside of the seeded circle.
- Add a stem and leaves below.
A single sunflower head can hold anywhere from 1,000 to 2,000 seeds — a fact worth sharing while a child is pressing on their tenth or eleventh seed and starting to feel the scale of that number for themselves. This one calls for supervision with younger children, since loose seeds are a choking risk if left unattended.
Combine crafting with nature in How to Make Seed Paper with Kids: A Fun Nature Craft That Actually Grows, an eco-friendly project children can plant and watch bloom.
11. Leaf Sunflower
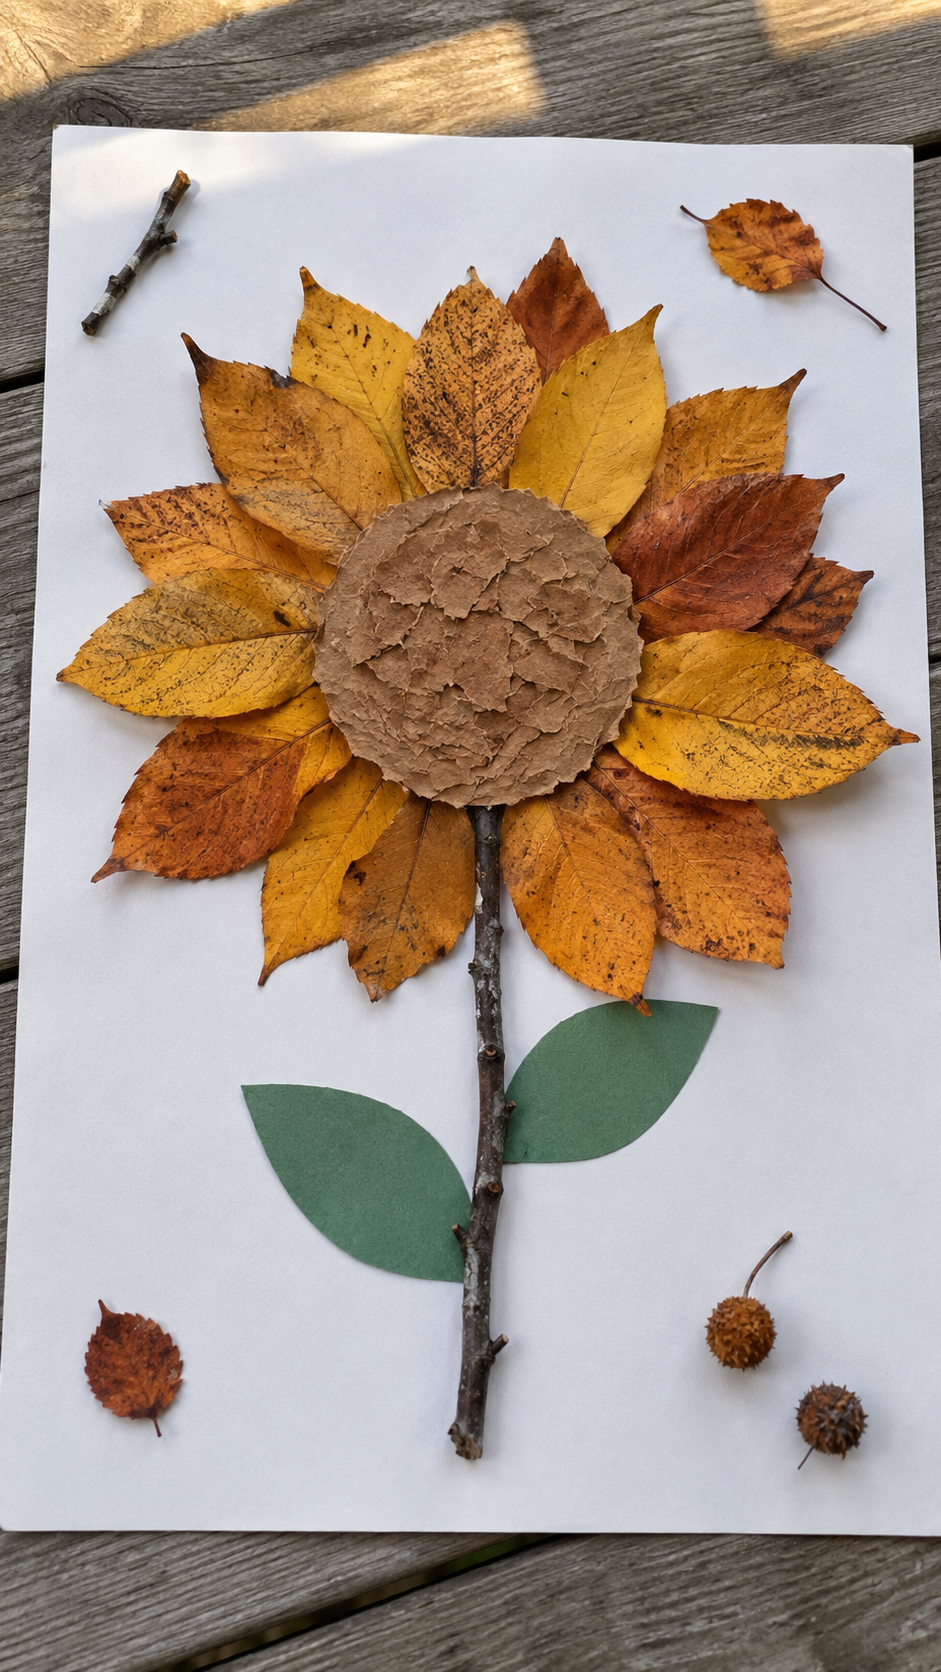
Collecting leaves outside first turns this craft into two activities in one: a short walk to gather materials, then the building itself, which gives kids a reason to look closely at what’s growing around them before they even pick up glue.
What you’ll need:
- Leaves gathered outdoors (a mix of shapes and sizes works well)
- Brown paper or paint for the center
- Glue
- Paper or cardstock as the base
How to make it:
- Head outside and collect a handful of leaves, pointed, oval, and jagged-edged shapes all work.
- Back at the table, glue or draw a circle in the middle of the page for the center.
- Arrange leaves around the circle like petals, overlapping slightly, and press them flat as they’re glued down.
- Add a stem underneath using a stick or a strip of brown paper.
Since leaves come in different shades of green, yellow, or brown depending on the season, this project naturally looks a little different every time — which is a good opening to talk about why leaves change color, or to ask a child to describe what they noticed on their walk before sitting down to build.
12. Sunflower Bookmark
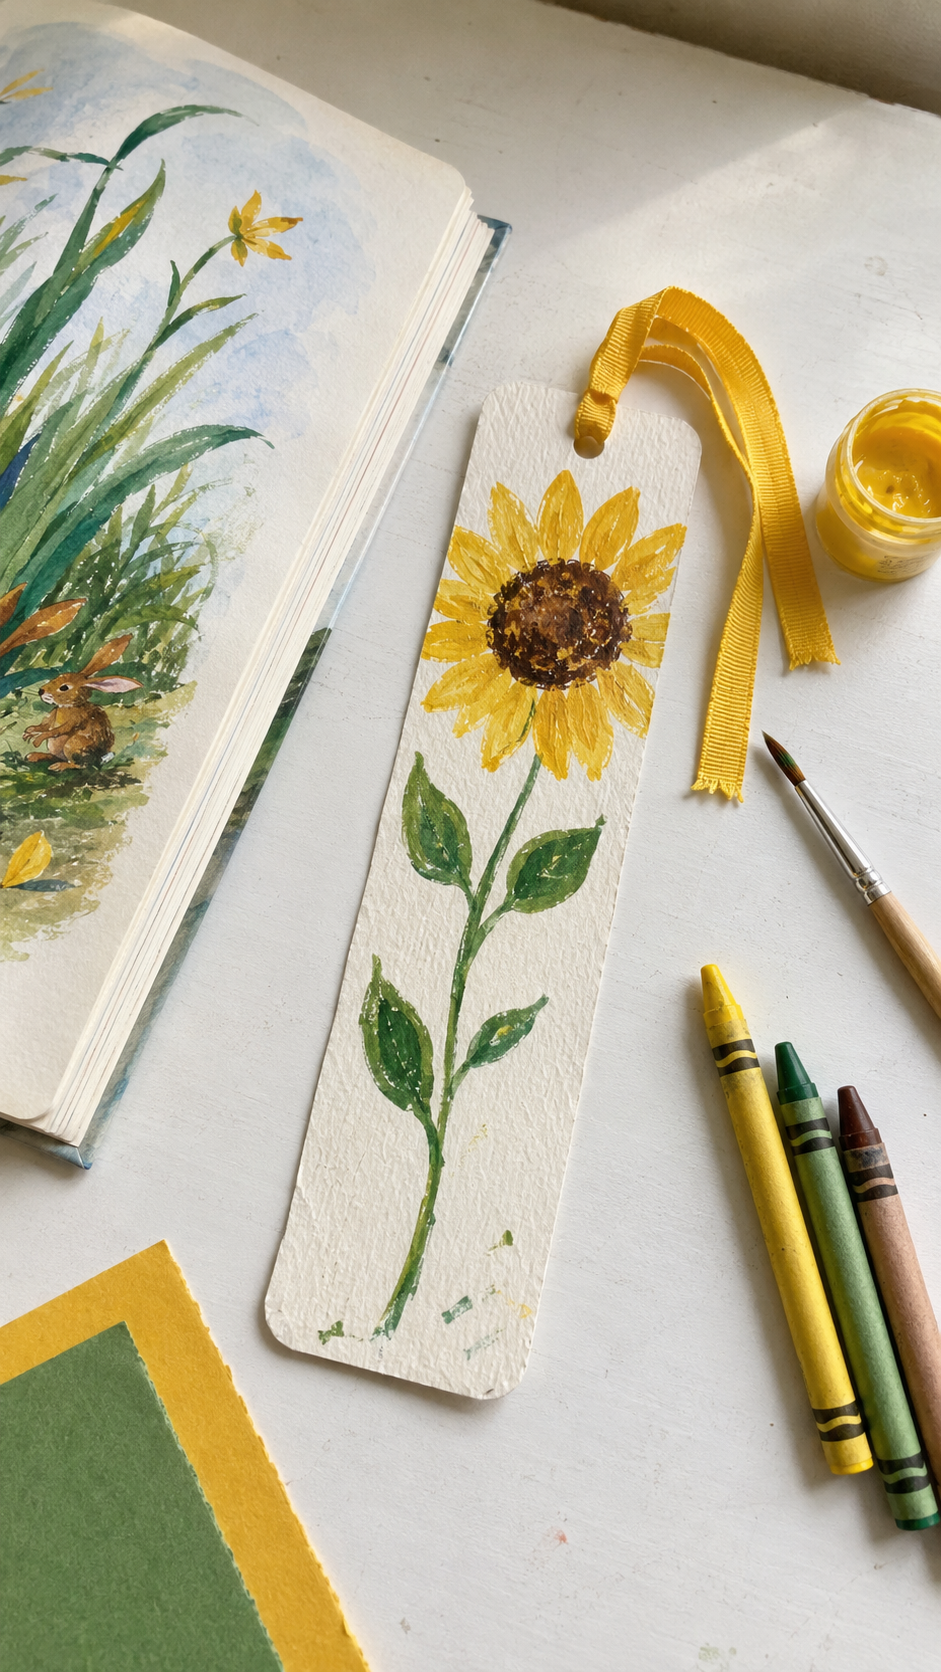
Turning the flower into a bookmark gives the craft an actual use afterward instead of ending up folded in a drawer, which is a small but real difference from most of the projects on this list.
What you’ll need:
- Cardstock (sturdier than regular paper, so it holds up to handling)
- Yellow and green paper or paint
- Scissors
- Ribbon or string (optional)
- A hole punch (optional)
How to make it:
- Cut a long rectangle strip from cardstock, roughly 2 inches wide and 6–7 inches tall.
- Glue or paint a sunflower, petals, center, and a short stem, near the top of the strip, leaving the rest blank.
- Add a green stem running down the length of the strip, with a leaf or two along the way.
- Optional: punch a hole at the top and tie on a short piece of ribbon or string.
Because it’s meant to be handled repeatedly, this is a good candidate to laminate or cover in clear contact paper if there’s one on hand, a practical step that extends how long the craft actually lasts, rather than just for that afternoon.
13. Sunflower Life Cycle Craft
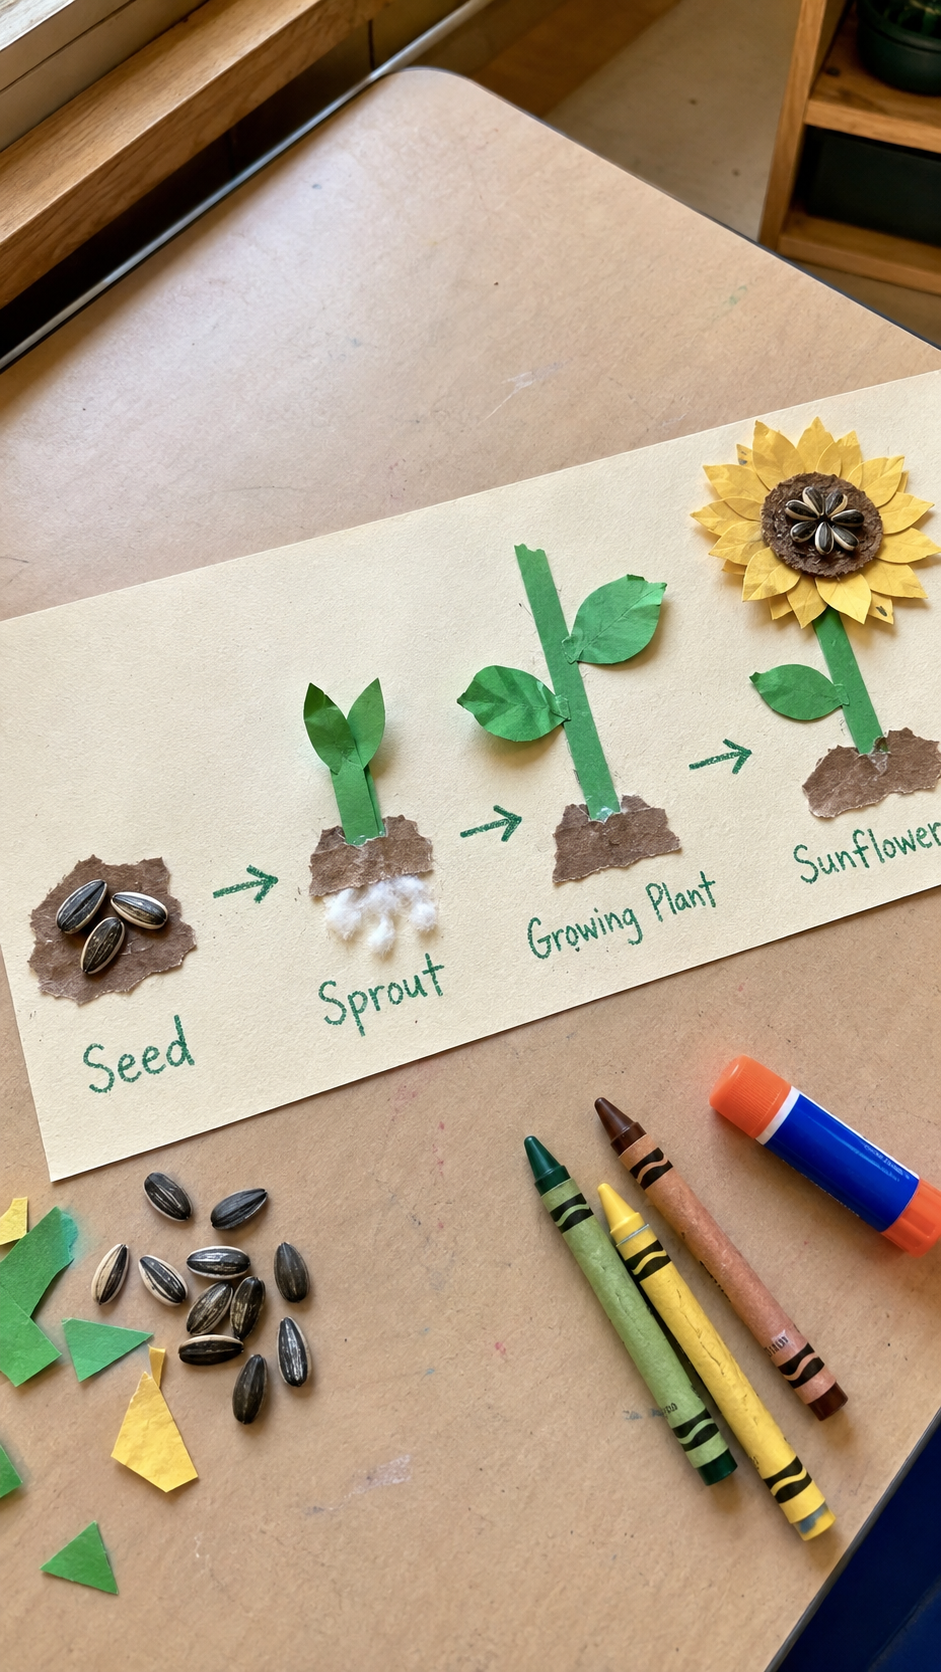
This sunflower craft for kids works as a hands-on science lesson, since it lays out the plant’s full life cycle in order, seed, sprout, stem, bloom, rather than showing just the finished flower.
What you’ll need:
- A paper plate or long strip of paper, divided into 4 sections
- Brown, green, and yellow paper or paint
- Glue
- Cotton balls or small seeds (optional, for texture)
How to make it:
- Divide the base into four labeled sections: seed, sprout, growing plant, full bloom.
- In the first section, glue a real or paper sunflower seed onto brown paper.
- In the second, draw or glue a small green sprout pushing up from the soil.
- In the third, add a taller green stem with a few leaves and a closed bud.
- In the last section, glue a full yellow sunflower with an open center.
While building each stage, it’s worth walking through what’s actually happening at that point, a seed takes root and sends up a sprout within about a week or two, the stem then grows quickly over the following months, and the plant flowers and stays in bloom for roughly three weeks before the cycle starts again with new seeds.
Framing the craft around that timeline turns four separate pictures into one connected story.
Explore color mixing with Coffee Filter Butterfly Craft for Kids (Easy Stained Glass Effect Craft Idea), a beautiful project that also strengthens fine motor skills.
14. Sunflower Card
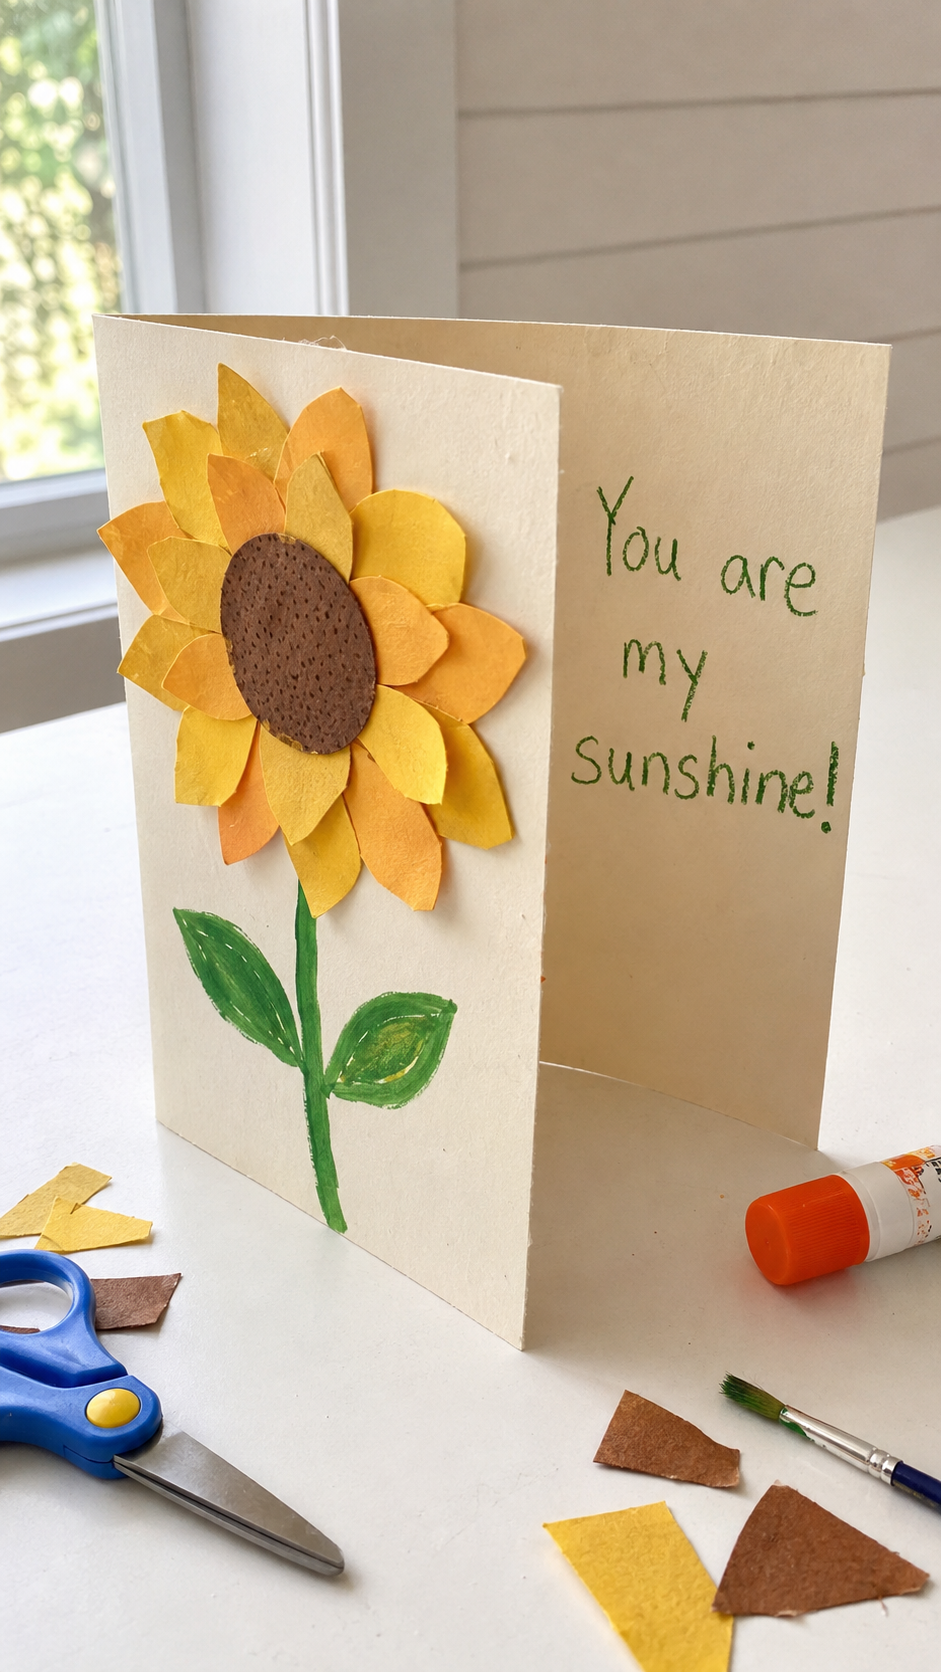
A sunflower card gives the craft a clear purpose beyond decoration, it’s made to be given to someone, which shifts the project from “art for its own sake” to something with a recipient in mind, whether that’s a grandparent, a teacher, or a parent.
What you’ll need:
- Cardstock, folded in half
- Yellow, brown, and green paper or paint
- Scissors and glue
- A marker for writing a message
How to make it:
- Fold the cardstock in half to form the card base.
- Build a sunflower on the front using any petal method already covered, cut paper, painted fork petals, or scrunched tissue, whichever the child prefers by this point in the list.
- Add a stem and a leaf or two below the flower.
- Write a short message inside, or leave space for the child to add their own.
Letting a child choose the technique for this one is intentional, by the fourteenth project, they’ll usually have a favorite method already, and picking it themselves makes the card feel more like their own work and less like a repeat of an earlier step.
15. Sunflower Suncatcher
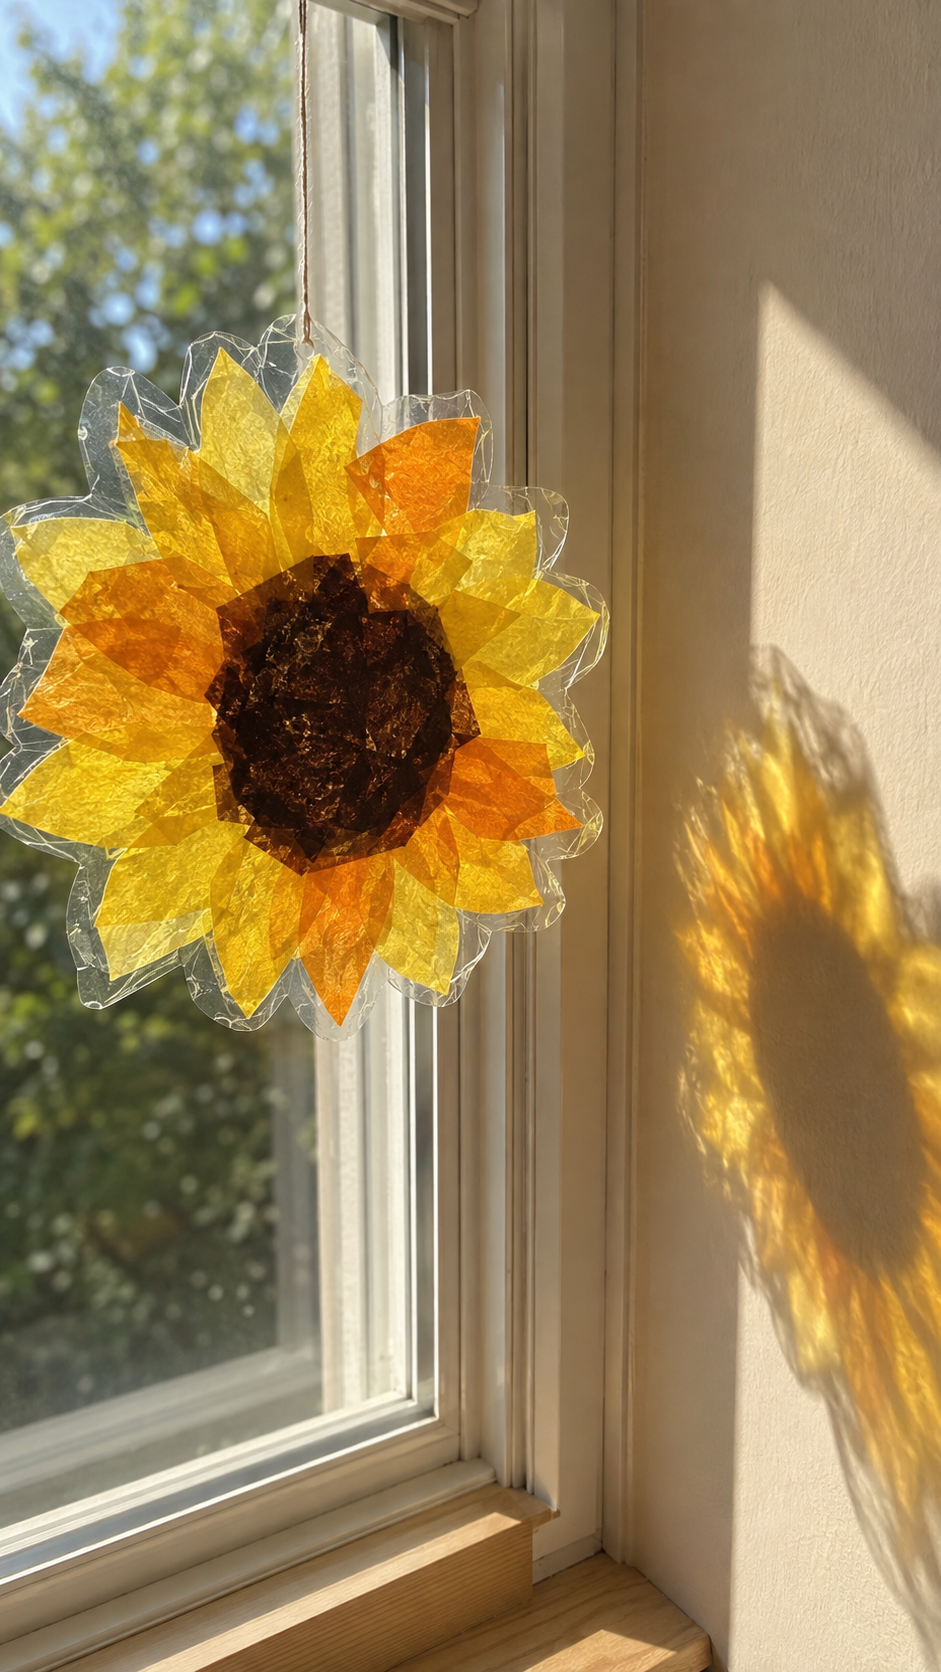
Torn pieces of yellow, orange, and red tissue paper, pressed between two layers of contact paper, hold their color the way stained glass does, so once it’s taped to a window, sunlight passes straight through and lights the whole thing up from behind.
What you’ll need:
- Contact paper (two sheets) or wax paper and an iron
- Yellow, orange, and a little brown or red tissue paper, torn into small pieces
- Black construction paper, for a frame (optional)
- Scissors
- A hole punch and string, for hanging
How to make it:
- Cut a large circle from one sheet of contact paper, sticky side facing up.
- Tear tissue paper into rough pieces, no need for clean edges, and press them onto the sticky surface, building a dark cluster in the middle and layering yellow and orange outward like petals.
- Cover with a second sheet of contact paper, sticky side down, pressing from the center outward to push out air bubbles. (With wax paper instead, sandwich the tissue between two sheets and iron it on low heat, between two pieces of parchment paper, for a few seconds until sealed.)
- Trim the edges into a circle, or cut a scalloped petal outline for more shape.
- Add a thin black paper ring around the edge for contrast, then punch a hole at the top and tie on string for hanging.
Tape it to a window at any time of day and the color shifts with the light, brighter and more saturated at midday, warmer and more orange-toned as the sun lowers in the afternoon.
That changing light is the same basic mechanism from the very start of this list: a sunflower’s relationship with the sun, just visible now in a different form.
Encourage children to spend more time outdoors with Milk Carton Bird Feeder Craft to Get Preschoolers Outside and Off Screens, a simple recycled craft that attracts backyard birds while inspiring curiosity about nature.
A Quick Safety Note
A few of these sunflower crafts for kids involve materials worth a second look before handing them to younger children.
Raw sunflower seeds, used in the seed art project, are a choking hazard for toddlers and young preschoolers if left unattended, supervise closely, or swap in paper or painted “seeds” for that age group instead.
Kid-safe scissors are recommended throughout for anyone still building cutting control, and craft glue rather than a hot glue gun keeps hands safe on projects like the popsicle stick sunflower.
For the suncatcher, an adult should handle the ironing step if using the wax paper method, since it involves direct heat.
None of this should slow the fun down much, it’s mostly a matter of picking the right project for the age at the table and keeping an eye on the smaller pieces.
Introduce children to new cultures through 12 African Art Projects for Kids That Teach Culture, Not Just Craft, where creativity meets meaningful learning.
Conclusion
Here’s something worth knowing: a sunflower isn’t one flower. It’s hundreds of them, growing together as a team.
The yellow petals around the edge are called ray florets, and they don’t make seeds at all, their job is just to attract bees.
The real work happens in the center, where hundreds of tiny disc florets each grow into a single seed after being pollinated. A large sunflower head can hold up to 2,000 of these little flowers, all packed into one round center. That’s why it looks so busy and textured up close, because it actually is hundreds of flowers, not one.
Next time you glue seeds onto a paper sunflower with your kids, that’s a fact worth sharing. It turns a simple craft into something they’ll actually remember.
These sunflower crafts for kids are simple to start, paper, glue, paint, a little time. Pick one from this list and make it with your child today.
Frequently Asked Questions
-
What’s the easiest sunflower craft for a 2-year-old to start with?
The fingerprint or handprint version works best at that age, since it’s just pressing paint down rather than cutting or precise gluing.
-
Can real sunflower petals be used instead of paper ones?
Yes, if petals are gathered from an already-wilting flower rather than picked fresh, they’ll dry flat between sheets of paper under a heavy book for a few days, then glue down like any other craft material. Fresh, moist petals tend to mold or discolor once sealed under glue.
-
Why does my paper sunflower keep curling at the edges?
This usually comes from too much wet glue or paint soaking into the paper. Using a glue stick instead of liquid glue, or letting each layer dry flat under a light weight, keeps petals from warping as they dry.
-
Are the sunflower seeds safe to eat after they’ve been used in a craft?
No, once seeds have been glued down or handled during a project, they shouldn’t be eaten, since craft glue isn’t food-safe. Keep a separate, untouched batch on hand if snacking on seeds is part of the plan too.
-
What’s the best way to get dried glue and paint off kids’ hands afterward?
Warm water with a bit of dish soap breaks down most craft glue and washable paint within a minute of rubbing. For paint that’s fully dried and stuck, a little vegetable oil rubbed in before washing loosens it without irritating skin.