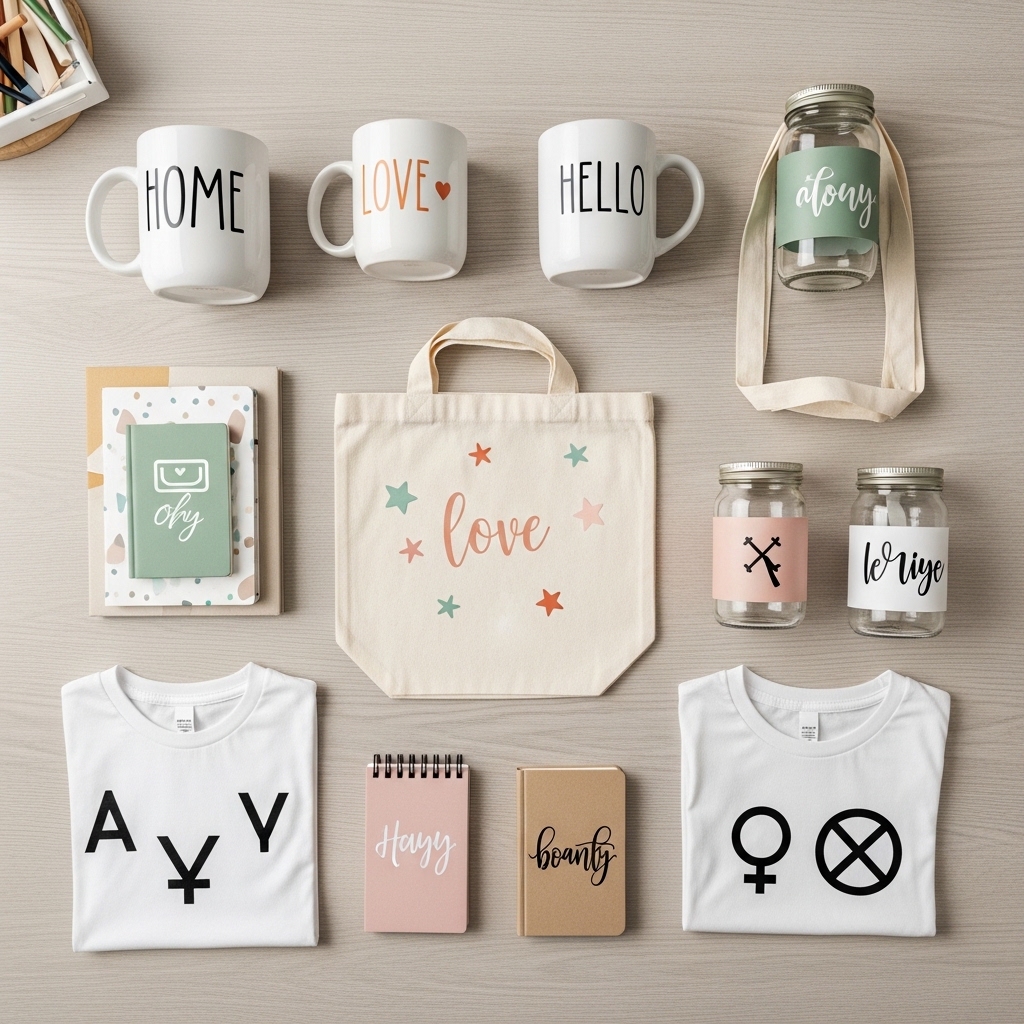
Learn 10 easy vinyl crafts to make and sell at home without a Cricut. Perfect for beginners with no experience who want to start a small creative business.
Let me say this first, because you’ve probably heard the opposite a hundred times already,
you do not need a Cricut to start making vinyl crafts.
I know how it feels when you’re excited to try something new, then every video or blog you open starts with expensive machines, complicated software, and tools you don’t even understand yet.
It quickly turns something simple into something overwhelming. Before you know it, you’re thinking, “Maybe this isn’t for me… maybe I’m not creative enough.”
But that’s not the truth.
Vinyl crafting, at its core, is actually very simple. Long before cutting machines became popular, people were creating beautiful designs by hand, with nothing more than patience, a steady hand, and basic tools. And even now, you can still do the same.
If you have scissors or a small craft knife, you already have what you need to start.
This post isn’t about fancy setups or perfect, machine-cut designs.
It’s about showing you real, beginner-friendly vinyl crafts you can make at home, at your own pace, without feeling overwhelmed or under-equipped. The kind of crafts that are simple enough to try today, but good enough to actually sell.
You don’t need to wait until you can afford a machine.
You don’t need to master any software.
And you definitely don’t need to be “naturally creative” to begin.
You just need a starting point, and that’s exactly what you’re about to get.
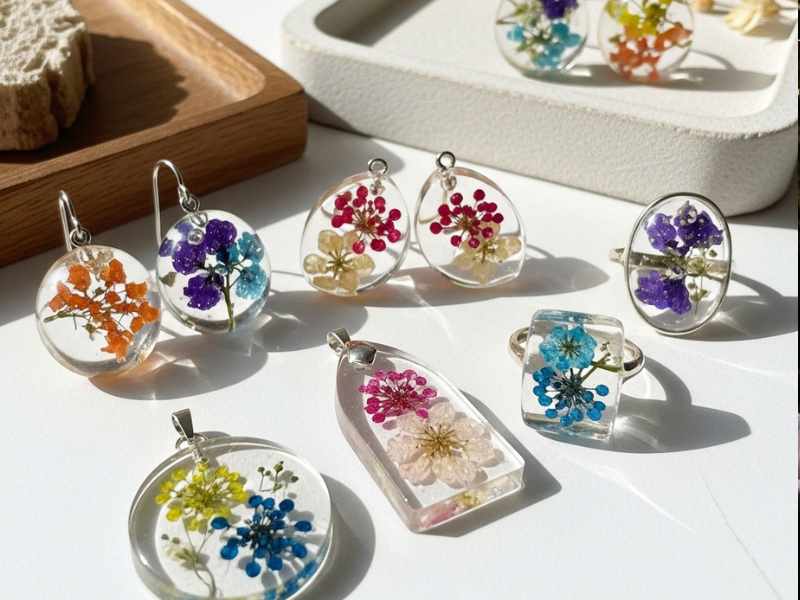
If you’re interested in creating visually stunning handmade pieces, explore How to Make Resin Jewelry with Real Flowers That Looks Professional at Home, where you’ll learn how to turn simple dried flowers into elegant, sellable jewelry.
What Are Vinyl Crafts?
Vinyl crafts are handmade items created using thin adhesive or heat-activated material called vinyl. This material is cut into shapes, letters, or designs and applied to surfaces like mugs, shirts, jars, and home decor items.
It’s a popular way to create custom, sellable products at home without expensive equipment.
Struggling with cutting machine projects? Check 10 Cricut Crafts Beginners Always Struggle With – And How to Make and Sell Them, a practical guide that breaks down common mistakes and how to turn them into profitable ideas.
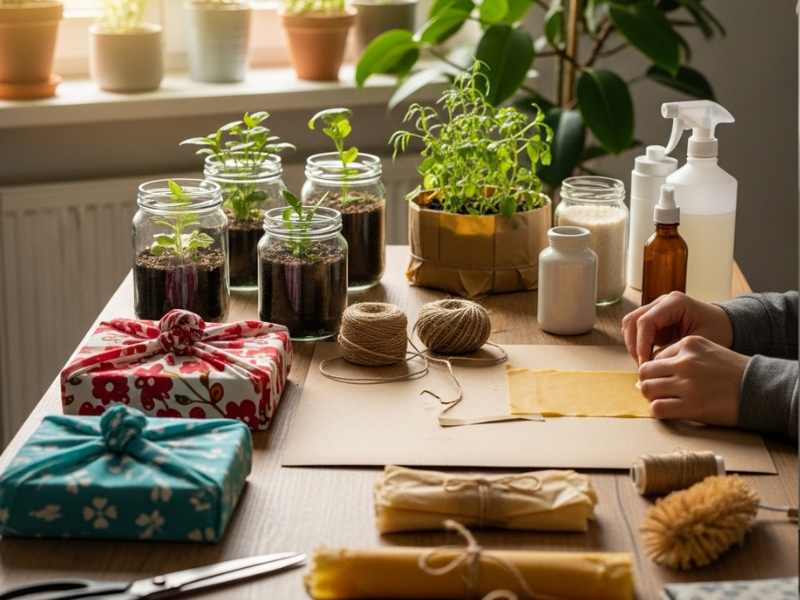
What You Actually Need to Start Vinyl Crafts to Make and Sell (No Cricut)
Before you make anything, it helps to understand something simple but important: vinyl crafts to make and sell don’t begin with expensive machines, they begin with the right basic tools and a clear understanding of your materials.
Once you get this part right, everything else becomes much easier and less intimidating.
They are:
Basic Tools
a. Craft Knife or Scissors
This is your main cutting tool. A craft knife (also called a precision knife or hobby knife) gives you cleaner, more controlled cuts, especially for small details. Good scissors also work for simple shapes. The key here is sharpness, dull blades will tear the vinyl instead of giving you smooth edges.
b. Cutting Mat
A cutting mat is a thick, self-healing surface you place under your vinyl when cutting. Its job is simple: it protects your table or workspace and helps your blade glide smoothly without slipping. It also gives you better control, so your cuts stay neat and accurate.
c. Ruler
A ruler helps you keep things straight, especially for words, borders, and labels. If you’re making clean designs like names or tags in vinyl crafts to make and sell, a ruler keeps everything aligned so your work looks professional instead of uneven.
d. Pencil
A pencil is used for lightly sketching or tracing your design onto the vinyl before cutting. It gives you a guide so you don’t guess while cutting. You can erase or ignore light pencil marks after, so it’s a safe way to plan your design first.
If you often forget essential tools, check 15 Must-Have Crafting Tools Beginners Often Forget – That Make DIY Projects Easier, which helps you set up properly for smoother crafting.
Types of Vinyl (This Is Where You Can Get Confused)
Understanding vinyl types is very important because they behave differently.
a. Adhesive Vinyl
This is the most common type. It has a sticky back and attaches directly to surfaces like mugs, jars, glass, plastic, wood, or walls. Once you peel and stick it, it stays in place. That’s why it’s widely used for decals, labels, and home decor items.
Simple way to remember:
Adhesive vinyl = stick it directly
b. Heat Transfer Vinyl (HTV)
HTV is used for fabric items like t-shirts, tote bags, or pillow covers. Unlike adhesive vinyl, it does not stick on its own. It needs heat to bond with fabric. You can use a regular household iron to activate it.
Simple way to remember:
HTV = needs heat (iron works) to stick to fabric
Optional but Helpful Tools
a. Transfer tape
Transfer tape is a clear, sticky sheet used to move your vinyl design from its backing to your final surface. It helps you place your design neatly without stretching or misaligning it. Think of it as a “bridge” that keeps your design in one piece during application.
b. Printer
A printer is optional, but very useful if you want to create printed designs for stickers. You can print your artwork on sticker paper or printable vinyl, then cut it manually. This is especially helpful for colorful or detailed vinyl crafts to make and sell that are hard to draw by hand.
To turn creativity into income, explore Low-Cost Craft Business Ideas for Beginners That Require No Expensive Tools or Skills, focused on starting small without pressure or heavy investment.
Beginner-Friendly Vinyl Crafts to Make and Sell (No Cricut)
1. Vinyl Stickers
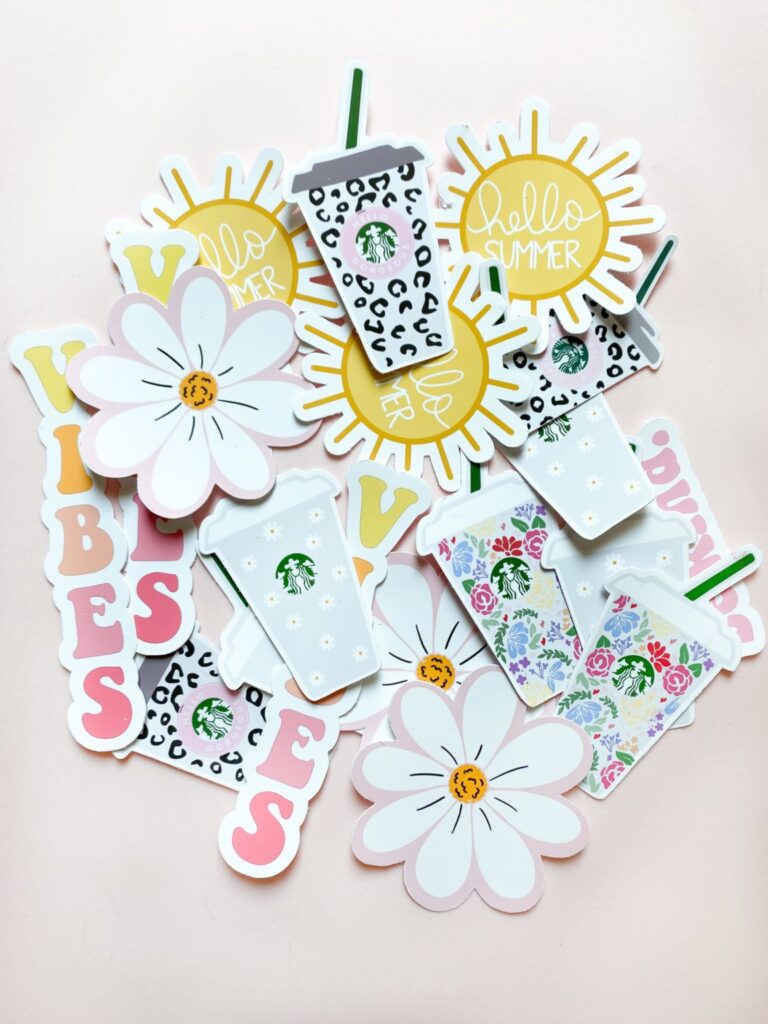
Vinyl stickers are simple decorative designs made from adhesive vinyl that can be applied to surfaces like laptops, bottles, notebooks, jars, or packaging.
They are one of the easiest ways to start vinyl crafts to make and sell because they don’t require heat, machines, or advanced skills, just patience and neat cutting.
Why It Sells:
- Low cost to produce, even for beginners
- High demand for personalization (names, quotes, aesthetic designs)
- Popular among students, small business owners, and gift buyers
- Easy to package, brand, and resell locally or online
How To Make It
Step 1 — Choose A Simple And Clear Design
Start with something easy to cut and easy to understand visually. This could be a word like “Hope,” a heart shape, a star, or a simple outline. At this stage, avoid very detailed drawings because hand cutting small details can be difficult for beginners. The goal is clarity, not complexity.
Step 2 — Transfer Your Design Onto The Vinyl
Place your vinyl sheet on a flat surface with the backing paper facing up. Lightly draw your chosen design on the backing paper using a pencil. This step acts as your guide. It helps you stay accurate while cutting and reduces mistakes, especially when you are just learning.
Step 3 — Carefully Cut Out The Design
Using a sharp craft knife or scissors, slowly follow the pencil outline. Move steadily instead of rushing. For curves, turn the vinyl instead of forcing your hand. Clean cutting is what makes your finished sticker look professional, even as a beginner.
Step 4 — Remove The Unwanted Vinyl (Weeding)
After cutting, gently peel away the extra vinyl that is not part of your design. What remains is your actual sticker. This step requires patience because pulling too fast can lift parts you need. Take your time and check each section carefully.
Step 5 — Apply Transfer Tape To Hold The Design
Place a piece of transfer tape over your finished design and press it down firmly. This helps hold all the cut pieces together so you can move the sticker as one complete design without breaking it apart.
Step 6 — Stick Your Design Onto The Final Surface
Position your sticker on the surface you want, such as a bottle, mug, laptop, or jar. Press it down evenly using your fingers or a flat tool. Then slowly peel off the transfer tape, leaving your vinyl design neatly attached.
Tip:
Start with bold, simple shapes or short words. Tiny details will frustrate you at the beginning and can make your cuts messy. Clean, simple designs actually sell better anyway because they look more professional.
For budget-friendly creativity, read Low Budget Craft Ideas That Don’t Look Cheap for Events, Gift-Giving, and Home Decor, which shows how to make simple materials look intentionally styled and high-end.
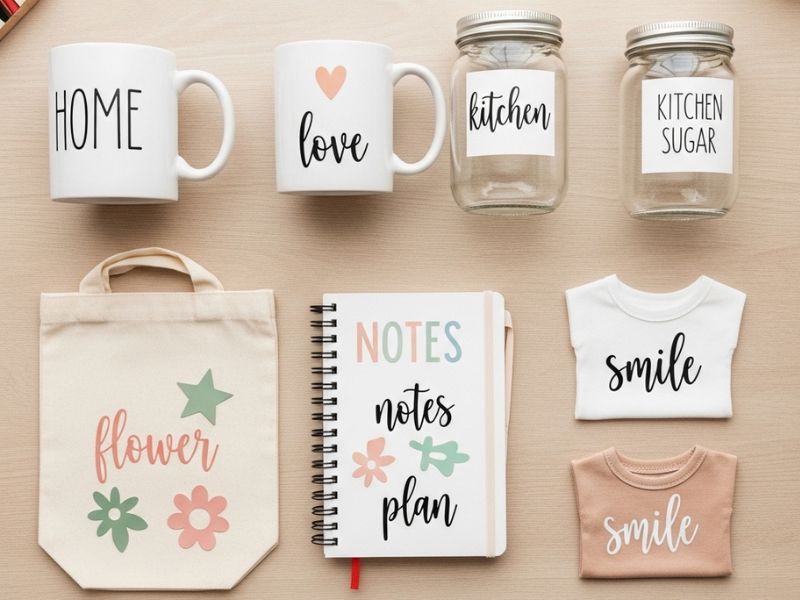
2: Personalized Vinyl Mugs
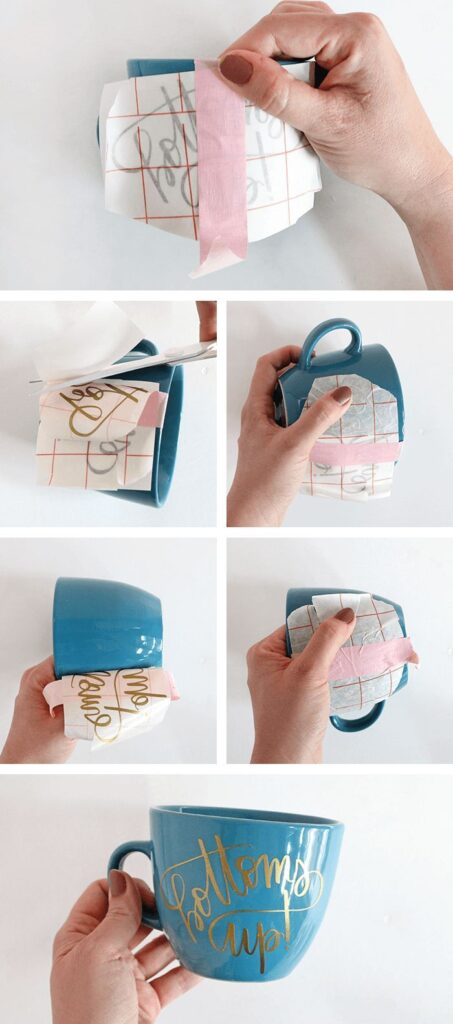
Personalized mugs are ordinary cups turned into custom designs using adhesive vinyl. You can add names, short quotes, initials, or simple graphics to make each mug unique.
This is one of the most popular vinyl crafts to make and sell because people love buying personalized items for gifts, birthdays, and small business branding.
Why It Sells:
- Strong demand for gift items (birthdays, weddings, anniversaries)
- Very affordable materials, high perceived value
- Easy to customize for different customers
- Works well for small business branding (logos on mugs).
How To Make It :
Step 1 — Choose A Clean Mug Surface
Start with a smooth ceramic mug. Make sure it is clean and completely dry. Any dust, oil, or moisture can stop the vinyl from sticking properly, so wipe it with a clean cloth before you begin.
Step 2 — Pick And Prepare Your Design
Choose something simple like a name, short quote, or initials. Keep the design bold and readable because curved surfaces like mugs do not support very detailed artwork well. Lightly sketch your design on paper first if needed, then transfer it onto the vinyl backing using a pencil.
Step 3 — Cut The Vinyl Design Carefully
Use a sharp craft knife or scissors to cut out your design. Since mugs are curved, straight and bold designs are easier to apply than complex shapes. Take your time and focus on smooth, clean edges.
Step 4 — Weed The Extra Vinyl
Remove all the unwanted parts around your design. This is called weeding. Only your final design should remain on the backing sheet. Go slowly so you don’t accidentally lift the parts you need.
Step 5 — Apply Transfer Tape
Place transfer tape over your finished vinyl design and press it down firmly. This keeps all the pieces in place so you can move the design onto the mug without it falling apart or shifting.
Step 6 — Position And Stick Onto The Mug
Carefully place your design on the mug. Press it down starting from the center and smoothing outward to remove air bubbles. Once it is secure, slowly peel off the transfer tape, leaving the vinyl neatly attached.
Step 7 — Press And Let It Set
After applying, press the design again with your fingers to make sure it sticks well. Let the mug sit for a few hours before use so the adhesive bonds properly.
Tip:
Keep your first designs simple, names, initials, or short words work best. Avoid wrapping designs too far around the mug at the beginning. Flat front placement is much easier and gives a cleaner finish while you’re still learning.
If you want aesthetic handmade gifts, don’t miss 10 Handmade Boho-Inspired Gift Ideas You Can Make and Sell From Home, focused on trendy, sellable crafts with a natural, creative feel.
3: Simple Wall Decals
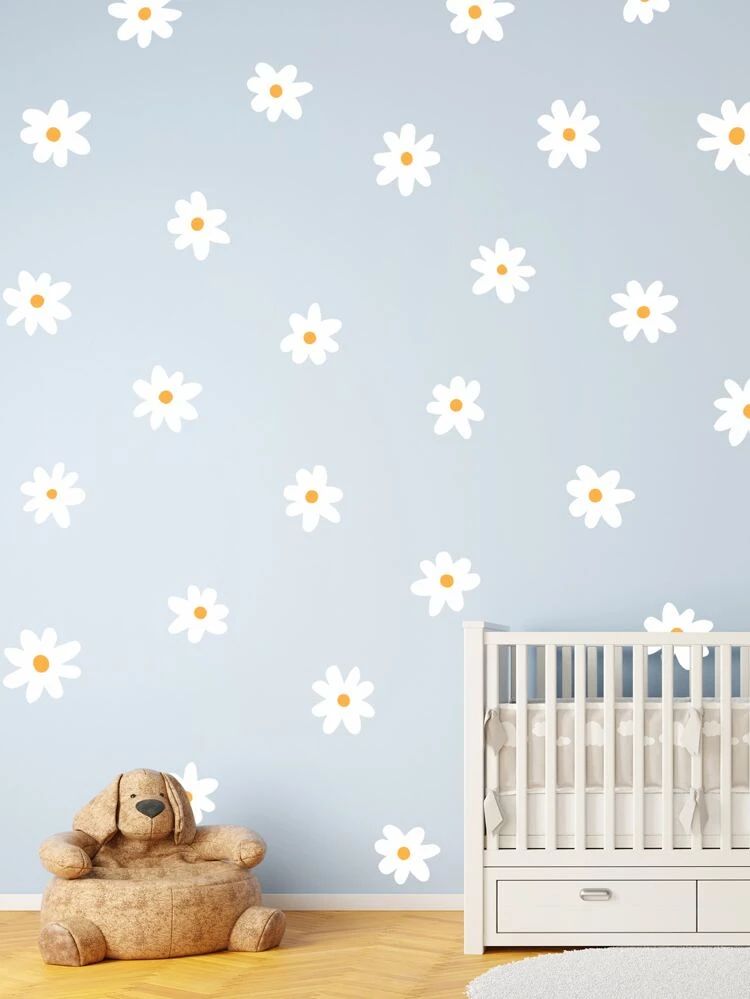
Simple wall decals are decorative designs made from adhesive vinyl that are applied directly onto walls to enhance home or room decor.
They can include quotes, shapes, names, or minimalist patterns. This is one of the most beginner-friendly vinyl crafts to make and sell because it uses basic cutting techniques and works well with simple designs.
Why It Sells:
- High demand for home and room decoration
- Affordable way for people to upgrade spaces without painting
- Popular for bedrooms, nurseries, and rental apartments
- Easy to customize for quotes, names, or aesthetic themes
How To Make It:
Step 1 — Choose A Simple Wall-Friendly Design
Pick a design that is clean and easy to read from a distance. This could be a short quote, a word like “Love” or “Home,” or simple shapes like leaves or stars. Wall decals work best when they are bold and not overly detailed.
Step 2 — Transfer The Design Onto Vinyl
Place your adhesive vinyl on a flat surface with the backing paper facing up. Lightly sketch or trace your design using a pencil. This helps you maintain accuracy when cutting and ensures your final design looks balanced.
Step 3 — Cut The Design Carefully
Using a craft knife or scissors, cut along your outline slowly and steadily. Since wall decals are usually larger than stickers, focus on smooth edges and consistent lines rather than speed.
Step 4 — Weed Out The Extra Vinyl
Gently remove the parts of vinyl that are not part of your design. What remains should be your final artwork. Take your time so you don’t accidentally lift important sections like letters or fine lines.
Step 5 — Apply Transfer Tape And Position On Wall
Place transfer tape over your design and press firmly. Then position it carefully on a clean, dry wall. Smooth it out evenly so it sticks properly without bubbles or wrinkles.
Step 6 — Remove Transfer Tape Slowly
Once the design is secure, slowly peel off the transfer tape. The vinyl should remain on the wall cleanly. Press again lightly to ensure full adhesion.
Tip:
Keep your first designs simple and minimal. Wall decals look more professional when they are clean and spaced properly. Avoid overcrowding the design, less is always more for beginners.
If you want to start stitching, read How to Start Embroidery as a Beginner – Step-by-Step Guide for Complete Beginners, designed to help you learn embroidery in a simple, structured way.
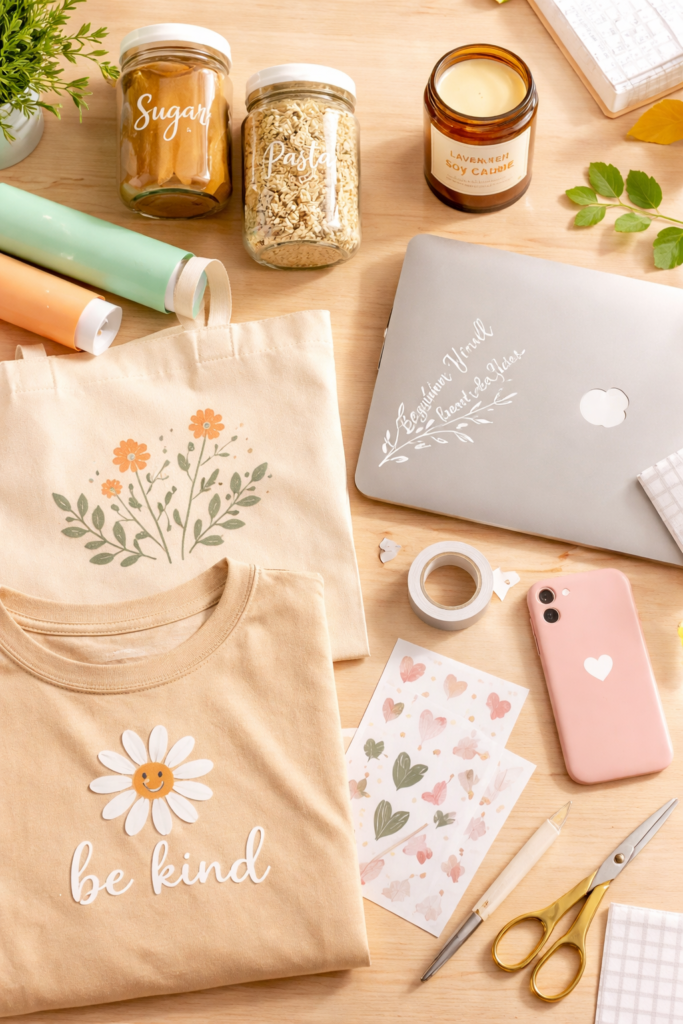
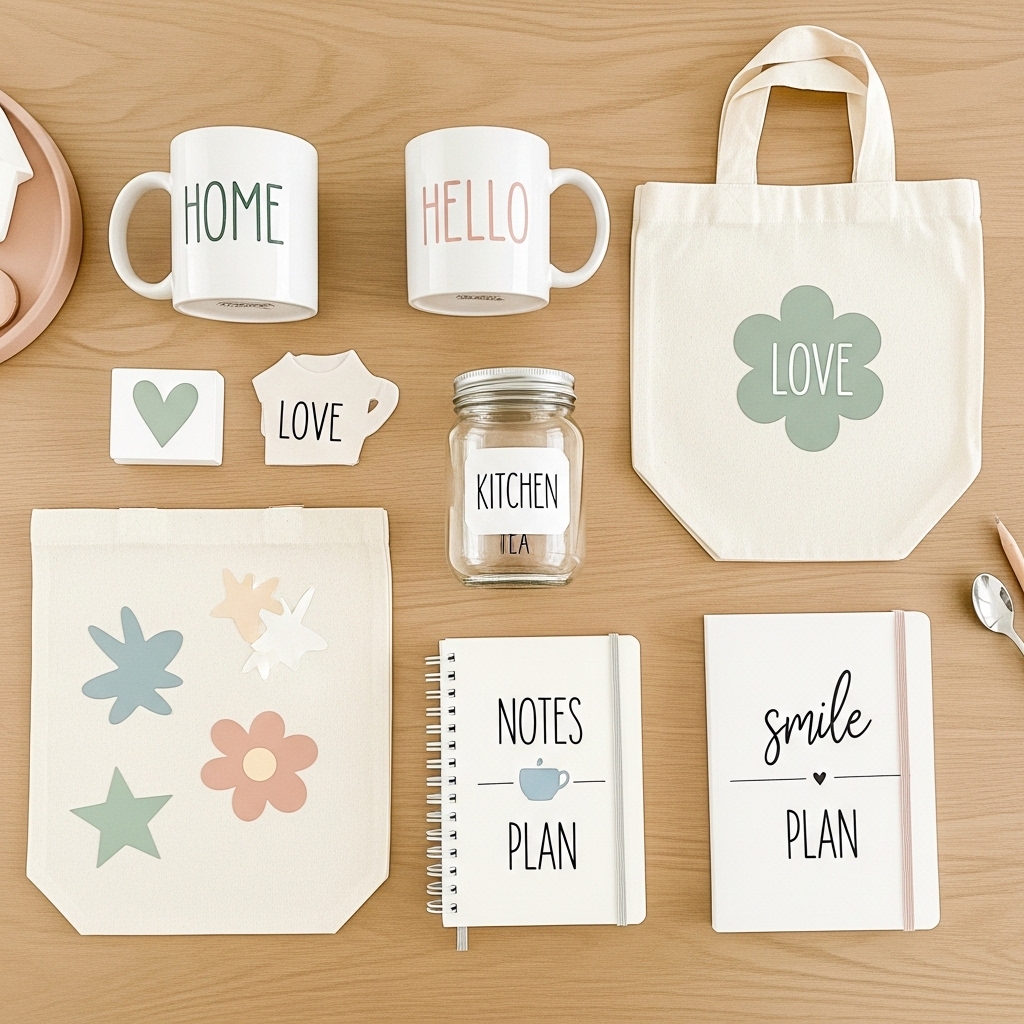
4. Jar Labels
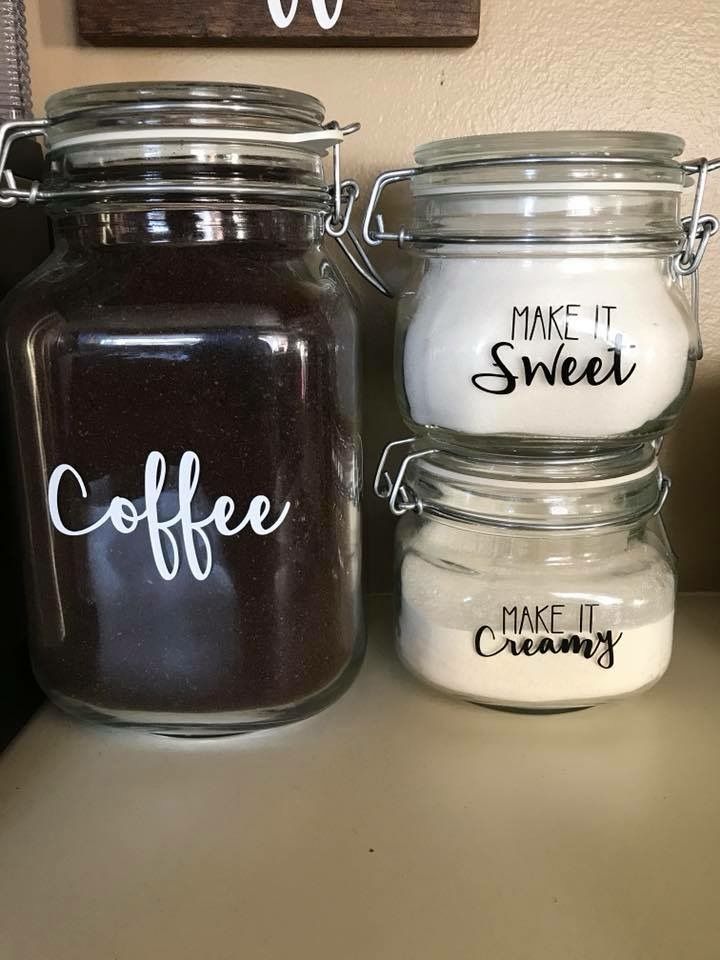
Jar labels are custom vinyl designs used to label storage jars in kitchens, pantries, or small businesses. They are part of practical vinyl crafts to make and sell because they combine both decoration and organization, making everyday spaces look neat and aesthetic.
Why It Sells:
- Very useful for home organization
- Popular in modern kitchen and pantry styling
- Low production cost with high perceived value
- Great for home businesses selling storage or decor bundles
How To Make It:
Step 1 — Select Clean, Readable Text
Choose clear words like “Sugar,” “Rice,” “Pasta,” or custom names. Keep fonts simple so they remain readable on small jar surfaces. Avoid overly decorative fonts at the beginner stage.
Step 2 — Transfer Design Onto Vinyl
Lay your vinyl flat and trace your chosen text or design onto the backing paper using a pencil. This ensures your spacing and alignment stay neat before cutting.
Step 3 — Cut Out The Design Carefully
Use a craft knife or scissors to follow your outline. For letters, cut slowly to avoid breaking thin parts. Clean edges make your labels look more professional.
Step 4 — Weed The Extra Vinyl
Remove all background vinyl, leaving only the letters or design. This step is important for clarity—your label should be clean and easy to read.
Step 5 — Apply Transfer Tape
Place transfer tape over your finished label and press it down firmly. This keeps the letters aligned and makes it easier to transfer onto curved or smooth jar surfaces.
Step 6 — Stick Onto Clean, Dry Jars
Position the label carefully on your jar. Smooth it down evenly, then slowly remove the transfer tape. Press again lightly so the vinyl fully adheres.
Tip:
Start with kitchen essentials like “Sugar,” “Tea,” or “Coffee.” These sell well because they are practical, easy to design, and instantly useful in everyday home organization.
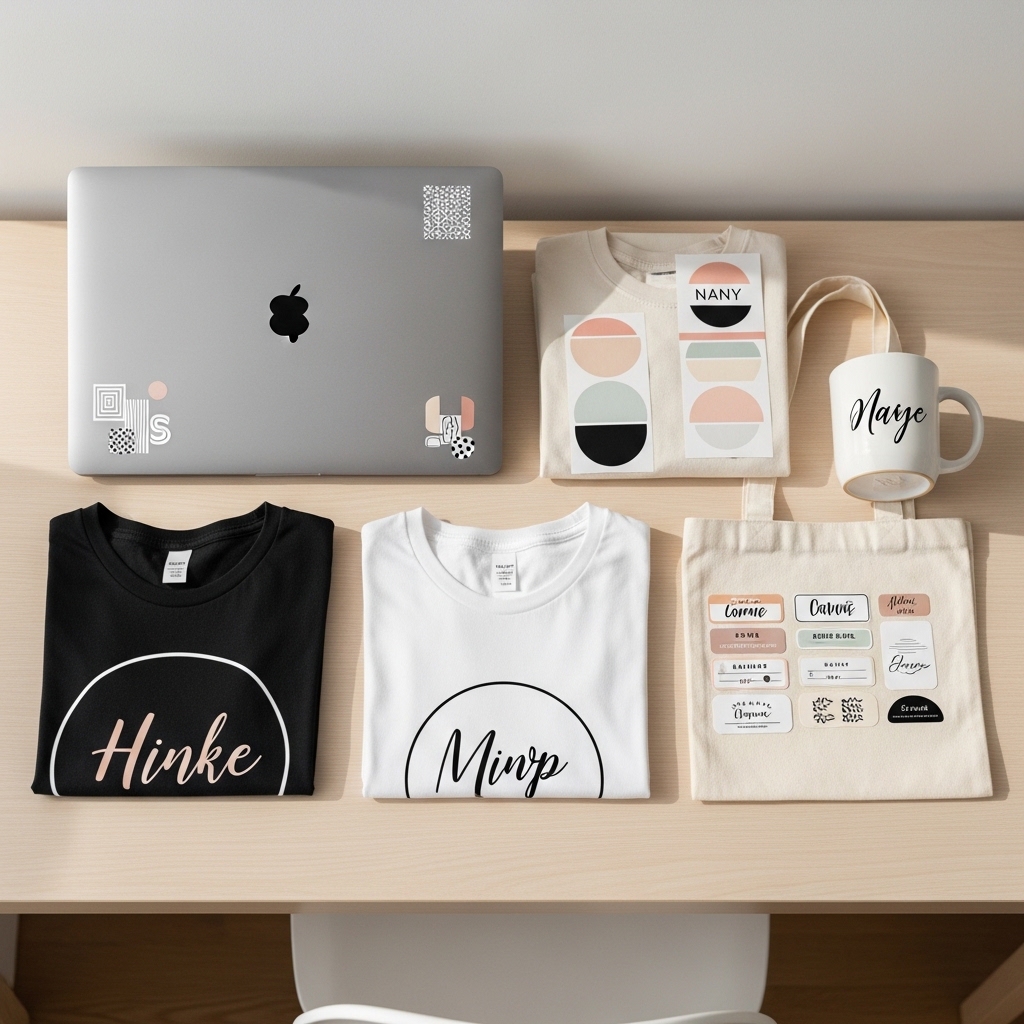
5. Laptop Decals

Photo credit: @ Daisy
Laptop decals are decorative vinyl designs applied to the outer surface of laptops. They can be names, quotes, minimal graphics, or aesthetic patterns used to personalize devices.
They are popular because they allow people to express style without permanently altering their laptop.
Why It Sells:
- High demand among students, freelancers, and creatives
- Easy personalization for gifts or personal use
- Low material cost with good profit potential
- Works well with minimalist and aesthetic trends
How To Make It:
Step 1 — Choose A Simple Design
Select a design that fits well on a flat surface, such as a name, icon, or short quote. Avoid overly detailed artwork because laptop surfaces require clean, readable designs.
Step 2 — Prepare And Trace The Design
Place adhesive vinyl on a flat surface and lightly trace your design on the backing paper using a pencil. This helps you maintain alignment before cutting.
Step 3 — Cut The Vinyl Carefully
Use a sharp craft knife or scissors to follow your outline. Take your time, especially around corners or letters, to ensure smooth edges.
Step 4 — Weed The Excess Vinyl
Remove all unwanted vinyl parts, leaving only your design. This step determines how clean and professional your final decal will look.
Step 5 — Apply Transfer Tape
Place transfer tape over the design and press firmly. This holds everything in place so you can move it without distortion.
Step 6 — Position And Apply To Laptop
Clean the laptop surface first, then carefully place your design. Smooth it out evenly to avoid bubbles, and slowly remove the transfer tape.
Step 7 — Press And Finish
Press the decal gently with your fingers to secure adhesion. Allow it to set properly before handling the laptop.
Tip:
Keep designs minimal. Flat surfaces like laptops highlight imperfections easily, so clean edges and simple shapes always give the best results.
If you feel like you’re not naturally crafty, explore DIY Crafts for People Who Don’t Feel Crafty, which focuses on very simple, confidence-building projects.
6. Phone Case Designs
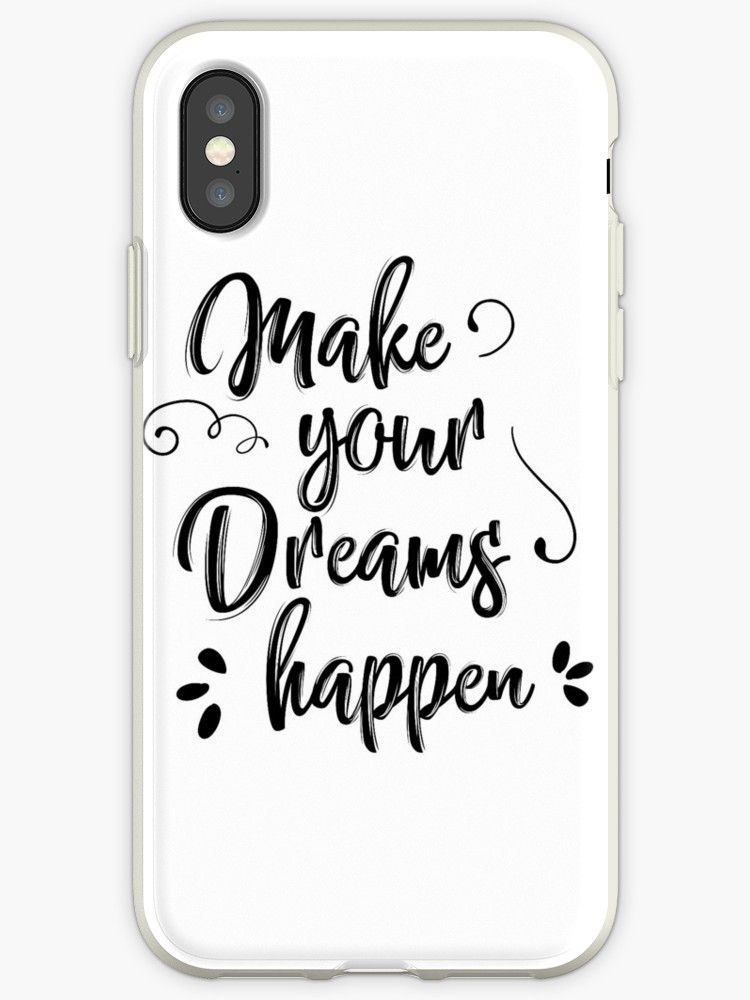
Phone case designs are small vinyl decorations applied to phone cases to personalize them. These can include initials, tiny icons, quotes, or aesthetic patterns. They are especially popular because phone cases are everyday items people love to customize.
Why It Sells:
- Constant demand due to frequent phone use
- Easy way for users to personalize devices
- Great for gifting and impulse buys
- Works well with trendy, minimal aesthetics
How To Make It:
Step 1 — Select A Case-Friendly Design
Choose a design that is small, clear, and balanced. Simple initials, symbols, or short words work best because phone cases have limited space.
Step 2 — Transfer The Design Onto Vinyl
Place vinyl on a flat surface and trace your design on the backing using a pencil. This ensures proper alignment before cutting.
Step 3 — Cut The Design Precisely
Use a craft knife or fine scissors to carefully cut out your design. Since phone case designs are small, precision is very important here.
Step 4 — Weed Out Extra Vinyl
Remove all unwanted parts of the vinyl, leaving only your final design. Be especially careful with small details like letters or thin lines.
Step 5 — Apply Transfer Tape
Place transfer tape over the design and press it down firmly. This keeps the small pieces aligned and prevents tearing during application.
Step 6 — Stick Onto A Clean Phone Case
Clean the phone case surface first. Then position your design carefully and press it down evenly. Remove the transfer tape slowly once it is secured.
Step 7 — Final Press
Press gently over the entire design to ensure strong adhesion. Let it sit for a few hours before use for best durability.
Tip:
Start with simple icons or initials. Phone cases are small, so clarity matters more than detail. Clean, minimal designs always look more professional and sell better.
For easy income ideas, check DIY Crafts You Can Make and Sell from Home, a beginner-focused guide to turning simple crafts into small business opportunities.
7. T-Shirt Designs (HTV + Iron)
Photo credit: @ U
T-shirt designs using Heat Transfer Vinyl (HTV) are custom designs applied onto fabric using heat. Instead of sticking like normal vinyl, HTV bonds to fabric when heat is applied.
This is one of the most profitable vinyl crafts to make and sell because people constantly buy custom shirts for events, small businesses, and personal style.
Why It Sells:
- High demand for custom outfits and event shirts
- Strong profit margin compared to material cost
- Works for birthdays, groups, branding, and gifts
- Easy to scale once you master basic designs
How To Make It:
Step 1 — Choose A Fabric-Friendly Design
Select a simple design like a name, short quote, logo, or bold shape. Keep it clean because fabric does not hold extremely detailed cuts well, especially for beginners.
Step 2 — Place And Trace Your Design On HTV
Lay your Heat Transfer Vinyl (HTV) on a flat surface with the shiny side facing down. Lightly trace your design on the matte side using a pencil or pen. This ensures you cut in the correct direction.
Step 3 — Cut The Design Carefully
Use a craft knife or scissors to cut along your outline. HTV requires precision because every cut will show clearly once transferred onto fabric.
Step 4 — Weed The Excess Vinyl
Remove all unwanted parts of the vinyl carefully. Your final design should remain on the clear backing sheet. Be patient here—small mistakes can distort letters or shapes.
Step 5 — Position On The T-Shirt
Place your design on a clean, dry t-shirt. Make sure it is centered and straight. You can lightly measure or fold the shirt to guide alignment.
Step 6 — Apply Heat Using An Iron
Place a thin cloth over the design to protect it. Then press firmly using a household iron for a few seconds on each section. The heat activates the adhesive and bonds the vinyl to the fabric.
Step 7 — Peel And Finish
Allow it to cool slightly, then gently peel off the backing sheet. Press again lightly with the iron if needed to secure edges.
Tip:
Start with bold text or simple shapes. Complex graphics are harder to cut and transfer cleanly when you’re still learning.
When you have no budget but still want meaningful gifts, read DIY Gift Ideas for Friends When You Have No Money That Still Feel Special, full of thoughtful, low-cost creative ideas.
8. Tote Bag Prints
Tote bag prints are custom designs applied to fabric tote bags using Heat Transfer Vinyl (HTV).
These bags are reusable, stylish, and widely used for shopping, branding, and everyday carry. This makes them a strong entry point into vinyl crafts to make and sell because they are practical and trendy.
Why It Sells:
- Eco-friendly product demand is growing
- Popular for branding, gifts, and fashion
- Lightweight and easy to ship or sell locally
- Works well with aesthetic or minimalist designs.
How To Make It:
Step 1 — Choose A Simple Bag-Friendly Design
Pick something minimal like quotes, icons, initials, or small illustrations. Tote bags look best when the design is clean and centered rather than overcrowded.
Step 2 — Trace The Design Onto HTV
Place the HTV with the shiny side down and carefully trace your design on the matte side. This ensures correct cutting orientation before applying heat.
Step 3 — Cut Out The Design
Use scissors or a craft knife to cut your design carefully. Smooth edges are important because fabric shows imperfections more clearly than flat surfaces.
Step 4 — Weed The Vinyl
Remove all extra vinyl pieces around your design. This leaves only the part you want to transfer onto the tote bag.
Step 5 — Position On The Tote Bag
Lay your tote bag flat and place the design where you want it. Center placement usually looks the most balanced and professional.
Step 6 — Apply Heat With An Iron
Cover the design with a thin cloth. Press firmly with a household iron for several seconds on each section to activate the adhesive and bond it to the fabric.
Step 7 — Peel And Secure
Let it cool slightly, then peel off the backing sheet slowly. Press again lightly with heat if any edges need extra bonding.
Tip:
Stick to simple typography or small graphics first. Tote bags are very visible products, so clean execution matters more than complexity.
For step-by-step home crafting, check How to Make Scented Candles at Home That Look and Smell Professional – Step-by-Step Guide, which teaches clean and polished candle making from scratch.
9. Candle Labels
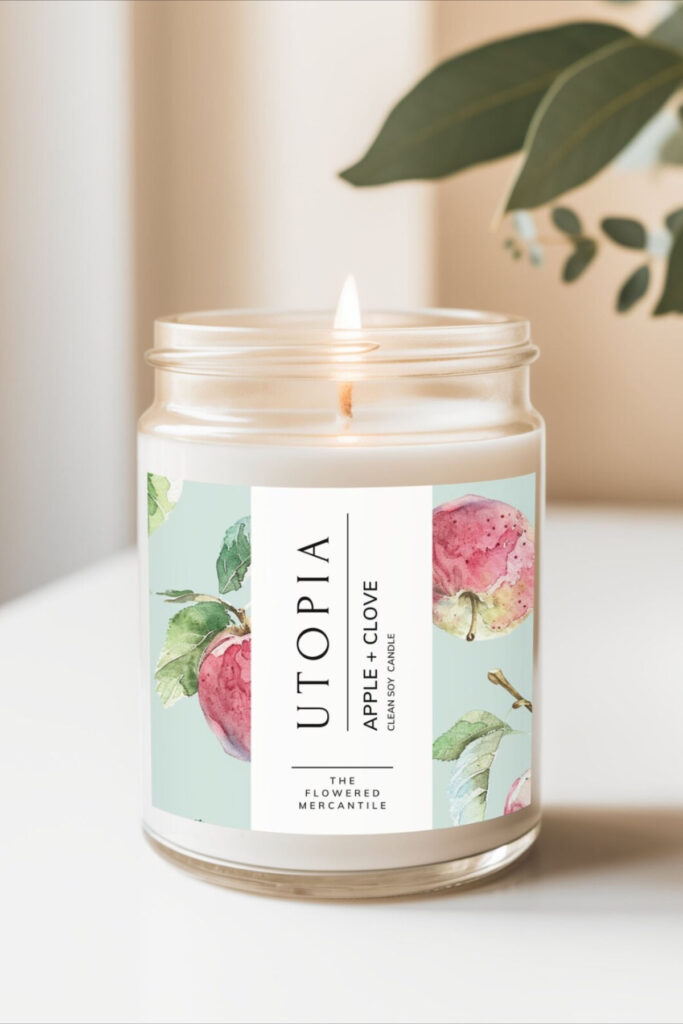
Candle labels are custom adhesive vinyl designs placed on candle jars or containers to give them a branded or decorative look. They are commonly used for home decor candles, gift candles, and small business packaging.
These labels help turn simple candles into polished, market-ready products.
Why It Sells:
- Strong demand in gift and home décor markets
- Helps small candle brands look professional
- Low material cost with high visual value
- Easy to customize for different scents or themes
How To Make It:
Step 1 — Choose A Clear Label Design
Pick a simple layout such as the candle name, scent, or brand name. Keep fonts readable because candle jars are usually small and curved.
Step 2 — Transfer Design Onto Vinyl
Lay adhesive vinyl flat and lightly draw or trace your design on the backing paper. This helps guide accurate cutting and keeps proportions balanced.
Step 3 — Cut The Design Carefully
Use a craft knife or scissors to cut along your outline. Focus on smooth edges, especially for letters, since uneven cuts will show clearly on jars.
Step 4 — Weed The Extra Vinyl
Remove all unwanted vinyl parts, leaving only your label design. Take your time to avoid lifting small letters or details.
Step 5 — Apply Transfer Tape
Place transfer tape over the design and press firmly. This keeps the label intact and makes it easier to apply onto curved surfaces.
Step 6 — Stick Onto The Candle Jar
Clean the jar surface first, then position your label carefully. Smooth it down evenly to remove air bubbles, then slowly peel off the transfer tape.
Step 7 — Final Press
Press gently over the entire label to ensure full adhesion. Let it sit for a few hours before handling or packaging.
Tip:
Start with minimal designs like scent names or simple brand text. Clean, simple labels look more premium than overly decorated ones.
10. Custom Name Tags
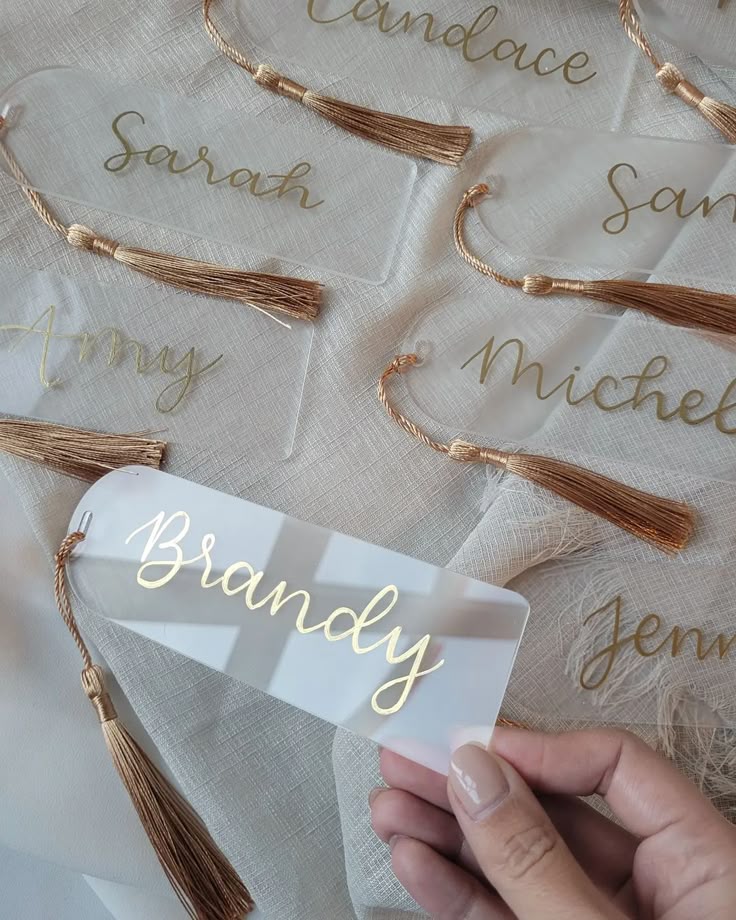
Photo credit: @ U
Custom name tags are small vinyl designs used to label items with names or identifiers. They are commonly used on gifts, storage items, school supplies, office items, and packaging. They are one of the simplest and most practical beginner projects.
Why It Sells:
- Constant demand for personalization
- Useful for both personal and business use
- Very fast and easy to produce
- Ideal for bulk orders (events, schools, small brands)
How To Make It:
Step 1 — Choose A Simple Name Layout
Pick a clear name or short text. Avoid decorative overload. readability is the priority. Simple fonts work best for clean results.
Step 2 — Transfer The Design Onto Vinyl
Place vinyl flat and trace your name design on the backing paper. This step helps you maintain spacing and alignment before cutting.
Step 3 — Cut The Design Precisely
Use a craft knife or scissors to carefully cut the letters or shape. Move slowly to keep edges smooth and even.
Step 4 — Weed The Extra Vinyl
Remove all unwanted vinyl around the design, leaving only the name or label. Be careful with small letters or thin parts.
Step 5 — Apply Transfer Tape
Cover the design with transfer tape and press it down firmly. This keeps everything aligned for easy transfer.
Step 6 — Place On Final Surface
Stick the name tag onto the intended item such as jars, gifts, boxes, or packaging. Smooth it out evenly, then peel off the transfer tape slowly.
Step 7 — Final Secure Press
Press lightly over the entire design to ensure it bonds properly and stays durable.
Tip:
Stick to bold, simple text. Name tags are meant to be functional first, so clarity always matters more than decoration.
For culturally inspired creativity, read Crafting Across Cultures: Meaningful Gift Ideas Inspired by Traditions Around the World, exploring handmade ideas rooted in tradition and meaning.
How People Actually Do It Without a Cricut
If you don’t have a Cricut,its fine, you just have to keep things simple and realistic. A lot of people are already making and even selling vinyl crafts without one, just using basic tools at home.
1. Hand-Cut Adhesive Vinyl
This is the most common way people start.
You can use adhesive or printable vinyl sheets, draw or print your design, and then cut it out yourself with scissors or a craft knife. It’s not as fast as a machine, but it works well when your designs are simple.
It’s perfect for things like:
- Simple shapes
- Basic lettering
- Stickers and decals
Just don’t stress yourself trying to cut tiny details or fancy fonts—it can get frustrating really fast.
2. Printable Vinyl + Regular Printer
This one makes things a bit easier.
Instead of cutting shapes out of plain vinyl, you print your design directly onto printable vinyl using a normal home printer. After that, you just cut around the design.
If you want it to last longer, you can seal it with laminate or a clear spray.
This works really well for:
- Stickers
- Labels
- Small products you can sell
3. Pre-Made Vinyl Letters or Shapes
If you don’t feel like cutting anything at all, this is the easiest option.
You can buy ready-made vinyl letters or shapes and just arrange them on your surface. No cutting, no stress—just placement.
People use this a lot for:
- Personalized mugs
- Name tags
- Simple branding
4. Transfer Paper Method (Manual Layering)
This is what helps your work look cleaner and more put-together.
After cutting your design, you can use transfer tape to place it neatly without messing up the alignment. It makes a big difference in how “finished” your final piece looks.
What You CAN and CAN’T Do Without a Cricut
When you’re learning vinyl crafts to make and sell, it’s important to be honest about what you can achieve by hand.
A Cricut machine makes things faster, but it is not the only way to create clean, sellable vinyl work. What matters more at the beginning is understanding your limits and working within them properly.
✅ What You CAN Do Without a Cricut:
1. Simple Shapes, Text, and Decals
You can absolutely create clean designs like words, names, hearts, stars, and basic icons. These are actually the most popular items people buy because they are minimal and versatile.
2. Stickers, Labels, and Basic Designs
You can make stickers for laptops, bottles, jars, and packaging using adhesive vinyl. Labels for home organization or small businesses are also very achievable by hand and often sell well because they are practical.
3. Clean Results With Patience
Even without a machine, you can still get professional-looking results. The key is not speed, it’s patience. Careful cutting, steady hands, and simple designs make a huge difference in the final outcome.
✅ What You CAN’T Easily Do Without a Cricut:
1. Super Tiny Detailed Designs
Very fine details, thin fonts, or complex illustrations are difficult to cut cleanly by hand. They often tear or lose shape during cutting or weeding.
2. Fast Mass Production
Hand-cutting takes time. If you’re trying to produce large quantities quickly, it becomes unrealistic without a cutting machine.
3. Perfect Symmetry Every Time
Machines are consistent, but hand cutting can vary slightly. You can still get good results, but perfect uniformity every single time is not realistic for beginners.
As a beginners should start with simple designs because manual cutting works best with less detail.
Clean, bold shapes not only reduce mistakes but also make your finished products look more professional. In fact, many best-selling handmade items are simple by design, not too complex.
For sustainable creativity, explore Eco-Friendly DIY Projects for Sustainable Living at Home That Save Money and Time, focused on reducing waste while still creating useful crafts.
Before You Start — 3 Beginner Mistakes to Avoid
When learning vinyl crafts to make and sell, most beginners don’t struggle because the craft is hard, they struggle because of small mistakes that can easily be avoided.
Getting these basics right early will save you time, money, and frustration, and help your finished work look more professional.
Mistake 1: Using the Wrong Vinyl
One of the most common errors is not matching the vinyl type to the surface.
For example, using heat transfer vinyl (HTV) on glass or mugs will not work because HTV is designed to bond with fabric using heat, not smooth hard surfaces. On the other hand, adhesive vinyl is what you need for items like jars, bottles, and decor pieces.
Simple rule:
Adhesive vinyl = hard surfaces (glass, plastic, wood)
HTV = fabric (t-shirts, tote bags)
Mistake 2: Not Practicing First
Many beginners jump straight into their final material without testing their hand control.
Before working on your actual project, always practice on scrap vinyl first. This helps you understand how the knife moves, how much pressure to apply, and how your cuts look on different shapes.
Even 10 minutes of practice can improve your accuracy a lot.
Mistake 3: Cutting Too Fast
Speed is one of the biggest reasons beginner projects look messy.
When you rush, edges become uneven and small details get ruined. Vinyl cutting requires steady hands and patience. Slow, controlled movements always give cleaner results than fast cutting.
Think of it this way: precision first, speed later.
Conclusion
As earlier state, starting out with vinyl crafts to make and sell doesn’t require expensive machines or a perfect setup.
What actually matters more is your willingness to begin with what you already have and improve along the way.
You don’t need fancy tools to get started. Many people stay stuck thinking they need everything figured out first, but in reality, skill grows through practice, not equipment.
What will take you further is not what you own, but how consistently you practice. Skill will always matter more than equipment.
Start small. Make simple designs. Learn from each piece you create, and improve step by step instead of trying to be perfect from day one.
Most beginners delay starting because they feel unprepared or think they need a machine like a Cricut first. Know that you can begin today with basic tools, patience, and simple ideas.
If you’ve been waiting for the “right time,” this is your sign to start now.
Save this post for later so you can come back whenever you’re ready to start your vinyl journey.
This post taled on: 10 Beginner Vinyl Crafts to Make and Sell Without a Cricut at Home (No Experience Needed).