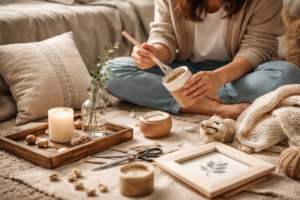
African art projects for kids that actually teach something. 12 culturally rich, accurately researched activities for home and classroom.
Most people teach kids that art is something you make and hang on a wall. African art was never that, and once your child understands why, they’ll never look at a painted mask or woven cloth the same way again.
Traditional African art was created by Africans for Africans, and it played a central role in the life of every community it came from. African art historian Robert Farris Thompson put it simply: art in Africa was used to make things happen. A carved mask wasn’t decoration, it performed a specific role in community rituals, ancestor veneration, or royal authority. A woven cloth wasn’t just fabric. It was a message, a rank, a family’s story told in colour and pattern.
Art showed up at every major moment in African life, the birth of a child, a young person’s coming of age, initiation into social groups, and the funeral of a respected elder.
Children were not just spectators of this art. They grew up inside it, surrounded by it, learning from it. It was how culture was passed down, not just through textbooks, but through making.
That’s what these 12 projects give your kids. Not just something to create, something real to connect with, think about, and carry with them.
If this project sparks your child’s curiosity about global traditions, Crafting Across Cultures: Meaningful Gift Ideas Inspired by Traditions Around the World explores how handmade creations can celebrate heritage and cultural storytelling.
What Makes African Art Different
Before you set out the paint and paper, there is one thing worth knowing, and it changes everything. Most African art served religious, ceremonial, or political purposes. A sculpture wasn’t made to be admired in isolation but to perform a specific role, in community rituals, ancestor veneration, or royal authority.
Many tribes believed that when masks were worn in ceremony, the wearer could communicate with the dead, with gods, or with other supernatural forces. This was not primitive thinking. This was a sophisticated visual language developed over thousands of years across 54 countries and thousands of distinct cultures.
So as you work through these projects with your children or students, you’ll notice that every single one comes with its real cultural context built in, where it comes from, who made it, and what it actually meant to the people who created it.
That context is not a footnote. That is the whole point.
To expand the cultural learning experience beyond art projects, Cultural Fashion: 10 Stunning Traditional Attire from Around the World You Need to See for Style Inspiration showcases beautiful garments that reflect the history and identity of different communities.
African Art Projects for Kids
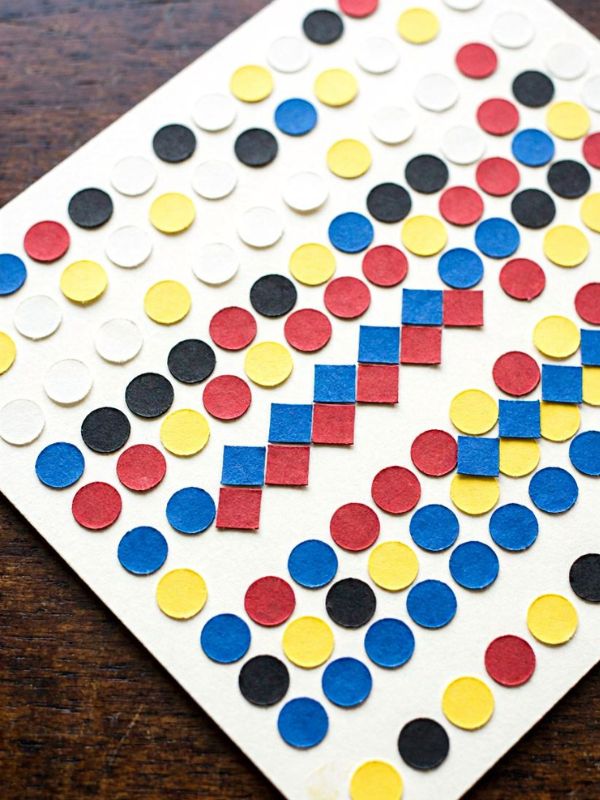
1. Adinkra Symbol Stamping
Where it comes from: Ghana | Akan/Ashanti people
Ages: 5+
Adinkra symbols were originally created by the Gyaman people of what is now Côte d’Ivoire. The word “Adinkra” in the Twi language literally means “saying goodbye”, which is why the cloth was originally worn at funerals, as a way to bid farewell to the dead.
The Asante king later defeated the Gyaman king in battle and adopted the symbols into Asante culture, where they became part of ceremonies, festivals, and everyday expression. Today Adinkra symbols appear on fabric, jewellery, architecture, and logos across Ghana and beyond.
What you need
- Potatoes or foam craft sheets
- Thick poster or acrylic paint
- White or cream paper
- A butter knife or pencil for carving
- A flat plate or tray for the paint
How to make it
- Cut a potato in half or cut a square from a foam sheet
- Draw a simple Adinkra symbol onto the flat surface, start with a circle inside a circle (Adinkrahene, meaning greatness and leadership) or a cross shape
- Carefully carve or press around the symbol so it raises slightly above the surface
- Dip the stamp into paint on a flat tray and press firmly onto paper
- Repeat in a grid pattern, traditional Adinkra cloth is always stamped in rows
- Allow to dry, then write the symbol name and its meaning underneath
Why this is worth doing
Before children stamp a single print, they choose a symbol that means something to them. Just like the Gyaman and Asante people before them, they are making a decision, what idea is important enough to carry?
That question turns a simple stamping activity into a genuine conversation about values, identity, and the power of visual language. The finished piece is a patterned artwork made the same way traditional Adinkra cloth has been made for centuries, by hand, with intention, one stamp at a time.
Cultural fact to share while doing it
Gye Nyame, meaning “Except God,” is perhaps the most famous Adinkra symbol, representing the omnipotence of God and the idea that nothing in the universe is greater.
Ask your child: if you had to draw one idea that mattered most to you, what would it look like? That is exactly how Adinkra symbols were born.
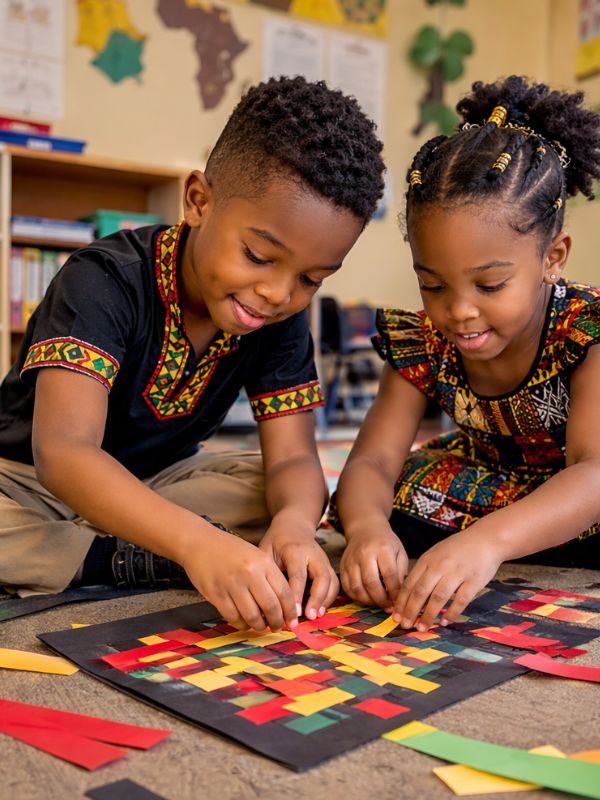
2. Kente Cloth Paper Weaving
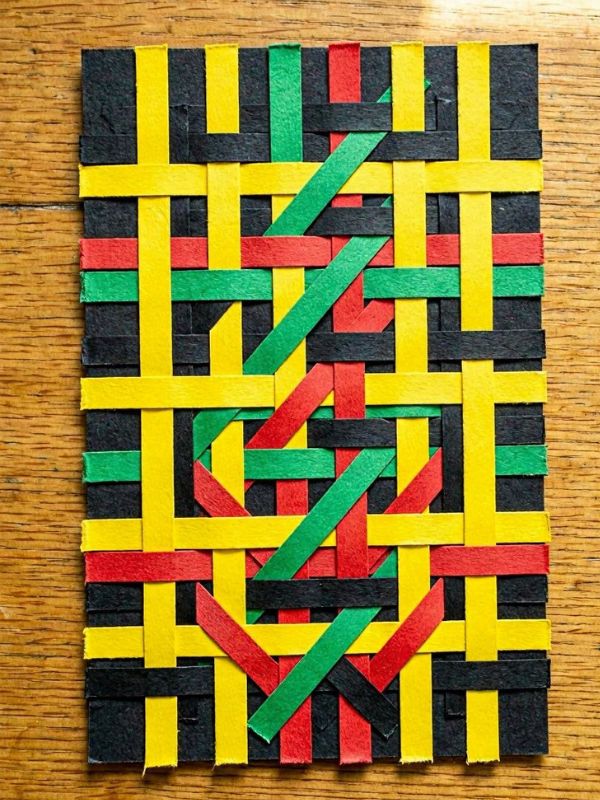
Where it comes from: Ghana | Ashanti and Ewe peoples
Ages: 6+
One of the most recognised African art projects for kids to explore is Kente weaving, and for good reason. Kente cloth originates from the Ashanti and Ewe peoples of Ghana.
It is a vibrant hand-woven fabric known for its bold geometric patterns and symbolic colours, traditionally worn by royalty and for special occasions, with each pattern and colour combination carrying a specific meaning.
Kente was never mass produced. Every strip was woven by hand on a narrow loom, then sewn together into a larger cloth. To wear Kente was to make a statement about who you were and where you stood in your community.
What you need
- One sheet of black or dark card as the base
- Strips of coloured paper in yellow, green, red, black and white
- Scissors
- Glue or tape
- A ruler and pencil
How to make it
- Take the base sheet and fold it in half lengthwise
- Cut straight lines across the folded edge, stopping about 2cm from the open edge, these are the “loom slits”
- Unfold the base sheet carefully
- Weave coloured paper strips over and under through the slits, alternating colours with each new row
- Push each strip down firmly so the weave sits tight
- Glue or tape the ends of each strip to secure
- Trim any excess paper at the edges
Why this is worth doing
This is one of those African art projects for kids that teaches far more than weaving.
As children work over and under, they are building patience, pattern recognition, and fine motor skills, but they are also making the same creative decision a Kente weaver makes: which colours to place next to each other and why.
When children understand that every colour choice carries meaning, the activity shifts from craft to genuine cultural thinking.
Cultural fact to share while doing it
In Kente cloth, each colour combination carries a specific meaning. Gold represents royalty and wealth. Green represents growth and renewal. Red represents passion and sacrifice. Black represents maturity and spiritual energy.
White represents purity. As your child weaves, ask them: what story does your colour combination tell? What would your Kente say about you?
3. Ndebele Geometric House Painting
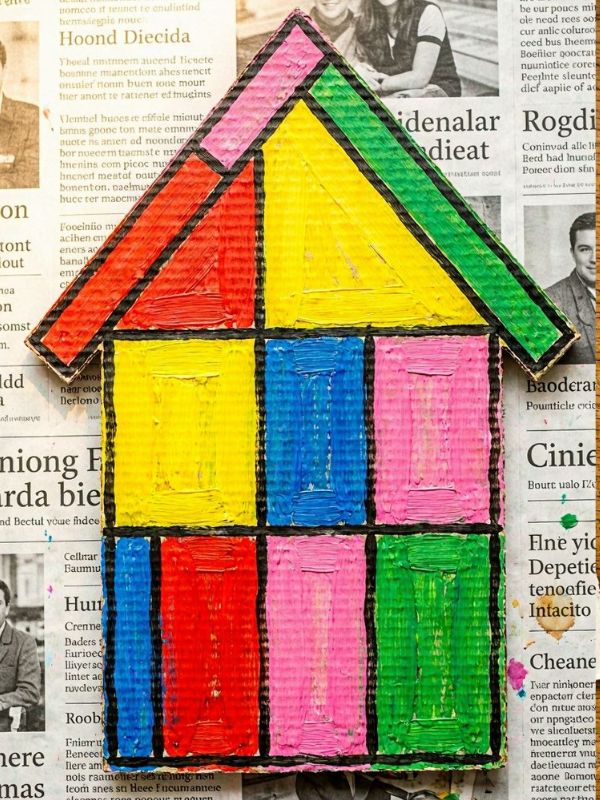
Where it comes from: South Africa and Zimbabwe | Southern Ndebele people
Ages: 6+
In 1883 a territorial dispute with encroaching Boer farmers left Ndebele families dispersed as indentured labourers across South Africa. As this forced migration grew, Ndebele women responded by painting their homesteads with bold geometric patterns, a quiet, powerful act of cultural resistance that Boer farmers dismissed as harmless decoration.
What the farmers did not know was that these wall paintings were a secret visual code, expressing personal prayers, self-identification, values, and emotions, disguised to anyone outside the Ndebele community.
This tradition and style was passed down from generation to generation by mothers to daughters. A well-painted home indicated that the woman of the household was a good wife and mother.
Today artist Esther Mahlangu has taken this tradition to the world stage, painting a BMW car and a British Airways plane in the same geometric style she learned as a child.
What you need
- Cardboard cut into a simple house shape
- Ruler and pencil
- Acrylic or poster paint in red, yellow, blue, green, pink and black
- Thin and medium paintbrushes
How to make it
- Cut cardboard into a simple house outline, a rectangle with a triangle roof
- Use a ruler and pencil to divide the house into sections and panels
- Draw geometric shapes inside each panel, triangles, rectangles, chevrons, and stepped patterns
- Paint each section in a bold, flat colour, no two neighbouring sections the same colour
- Outline each section with a thick black line once the paint is dry
- No stencils, no printed guides, traditional Ndebele women painted entirely freehand, which is part of what makes each home unique.
Why this is worth doing
This project gives children a direct connection to one of the most powerful stories in African art, that creativity can be an act of survival.
When children learn that these patterns were a coded language of resistance, the geometric shapes they are painting take on an entirely different weight. They are not just making a pretty house. They are continuing a tradition that kept a culture alive.
Cultural fact to share while doing it
Show children a photo of Esther Mahlangu’s work, including the BMW Art Car she painted in 1991. Ask them: if you could paint a building or a car in your own pattern language, what would your code say?
4.Tingatinga Animal Painting
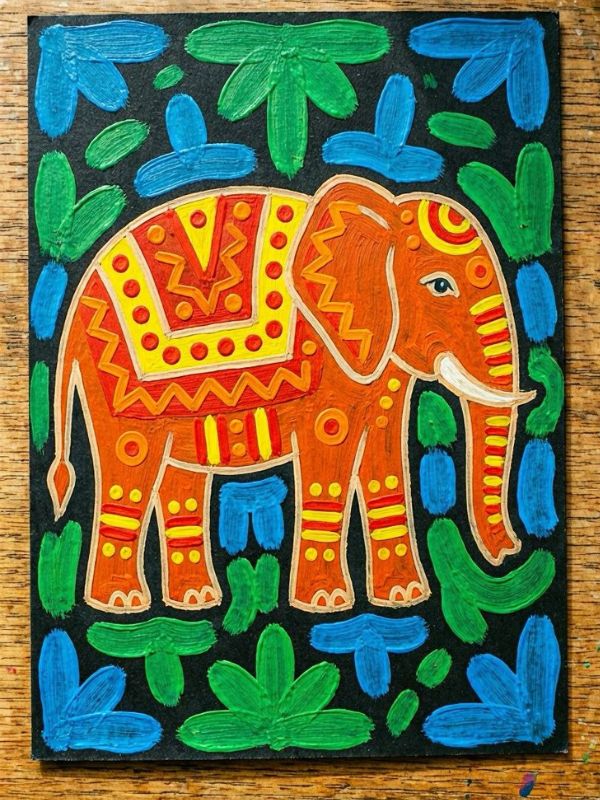
Where it comes from: Tanzania | Created by Edward Saidi Tingatinga
Ages: 5+
Unlike most traditional African art forms that stretch back centuries, Tingatinga is refreshingly modern, and that is part of what makes it so important to teach. Edward Saidi Tingatinga was a self-taught artist from the Makua people who moved to Dar es Salaam, Tanzania in the 1960s.
He began painting small, bold, colourful images of African wildlife on hardboard using bicycle enamel paint, bright, flat, and full of life.
His work sold quickly to tourists and locals alike. Tragically he died in 1972, but the style he created grew into a full artistic movement. Today the Tingatinga Arts Cooperative Society in Tanzania trains and supports hundreds of artists working in his tradition.
What you need
- Black card or black painted paper
- Bright acrylic paints, yellow, red, blue, green, orange, white
- Small and medium paintbrushes
- A pencil for sketching outlines first
How to make it
- Start with a black background, this is the signature base of Tingatinga painting
- Lightly sketch a simple African animal in pencil, lion, elephant, giraffe, zebra, or fish eagle
- Paint the animal in flat, bright colour, no shading, no blending, just bold solid fills
- Add simple pattern details on top, dots, stripes, spots, and zigzags in contrasting colours
- Paint simple plants, trees or patterns around the animal to fill the background
- Outline the animal with a thin line of white or black paint to make it pop
Why this is worth doing
Tingatinga teaches children something quietly radical, that you do not need formal training or expensive materials to create art that matters. Edward Tingatinga painted on hardboard with bicycle paint.
What children make here is directly connected to a living, breathing artistic movement that still supports artists in Tanzania today. That is a remarkable thing for a child to hold.
Cultural fact to share while doing it
Show children where Tanzania sits on a map of Africa. Discuss the wildlife native to East Africa, many of which appear in Tingatinga paintings.
Ask each child to choose one animal and find out one fact about it before they paint it. The research and the painting become one connected act of learning.
5. Bogolan Mud Cloth Pattern Making
Where it comes from: Mali | Bambara people
Ages: 8+
When parents and teachers look for meaningful African art projects for kids, Bogolan, commonly known as mud cloth, is one that consistently delivers real cultural depth.
Bogolan is made by painting fermented mud onto handwoven cotton, a process that has been practised for centuries across Mali and the wider West African region.
But what makes it truly remarkable is what the patterns mean. Bogolan patterns are not decorative, they mark life events, communicate identity, and are specific to regions, families, and individuals.
A young woman traditionally received a Bogolan cloth at key moments in her life, after her first harvest, after childbirth, after initiation. The cloth was hers. The pattern told her story.
What you need
- Cream or tan paper or fabric as the base
- Brown, dark brown and black paint
- Thin brushes or sticks for applying paint
- Pencil for sketching patterns first
How to make it
- Start with a cream or tan base, this represents the undyed cotton of traditional Bogolan
- Use pencil to lightly sketch a grid of geometric shapes across the surface, rectangles, diamonds, zigzags and crosses
- Paint the background areas around the shapes in dark brown or black, leaving the shapes themselves unpainted
- This is the key technique: in Bogolan, the pattern emerges from what is not painted, not what is
- Add a second layer of darker paint once the first is dry to deepen the contrast
- Leave narrow cream borders between sections to mirror the structure of traditional cloth
Why this is worth doing
This is one of those African art projects for kids that flips a common assumption, that art is about what you add. Bogolan teaches children that negative space carries just as much meaning as the painted areas.
When children understand that the unpainted shapes are the pattern, they begin to think about art, and communication, in an entirely different way.
Cultural fact to share while doing it
In Mali, Bogolan cloth was also worn by hunters as camouflage, the earthy tones of brown and black blending into the landscape. It was believed the cloth also offered spiritual protection during the hunt. Ask your child: if your cloth told the story of your life so far, what shapes and symbols would you put in it?
6. Zulu Beadwork Colour Message
Where it comes from: South Africa | Zulu people
Ages: 6+
Among the most visually striking African art projects for kids to recreate is Zulu beadwork, a tradition that is far more than decoration.
In Zulu culture, beadwork is a sophisticated visual language. Every colour in a beaded piece carries a specific meaning, and the combinations tell a story only those who know the code can read.
Historically, young Zulu women created beaded love letters, intricate panels of beads in specific colour patterns, and sent them to young men as coded messages of affection, intention, or rejection.
The young man would wear the panel close to his body. No words needed. The beads said everything.
What you need
- Coloured paper or card in white, red, blue, yellow, green, black and pink
- A hole punch
- Glue
- A large sheet of card stock as the base
- A pencil for planning the pattern first
How to make it
- Use a hole punch to cut circles from coloured paper, these are the “beads”
- On the card stock base, lightly pencil a grid of rows
- Choose a colour combination and arrange the circles in deliberate rows and geometric patterns
- Glue each circle down carefully, row by row
- Build up a panel of colour, traditionally beadwork panels are rectangular
- Once complete, write the “meaning” of your colour message on the back
Why this is worth doing
This project teaches children that communication does not always need words. In a world saturated with text messages and social media, the idea that a carefully chosen sequence of colours could carry a deeply personal message is both ancient and surprisingly relevant.
Children become both artist and author, designing a message that only someone who knows the code can understand.
Cultural fact to share while doing it
In Zulu beadwork colour language: white means purity and love, red means strong emotion and longing, blue means faithfulness, yellow means wealth, green means jealousy or illness, black means marriage and regeneration, pink means high birth or a promise.
Ask your child to design a message using only colour, then see if someone else in the room can decode it.
Many African art forms feature bold patterns and symbolic textiles. How to Style Cultural Prints in Modern Outfits (Without Looking Old-Fashioned) offers a closer look at how traditional designs continue to influence fashion today.
7. Maasai Shuka Colour Bracelet
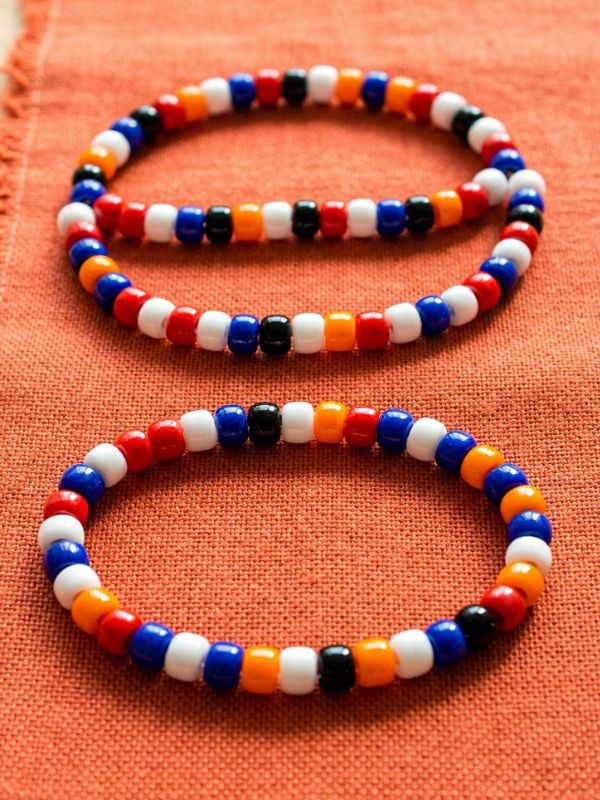
Where it comes from: Kenya and Tanzania | Maasai people
Ages: 5+
The Maasai are a people who live across parts of Kenya and Tanzania, widely recognised by the bold red cloth they wear called a shuka. But there is something important to know before teaching this project honestly. Before the 1960s, the Maasai wore garments made from animal hides, calfskin and sheepskin.
The shift from leather to cotton shuka cloth happened during the colonial period, though the exact reasons remain unclear. Some historians suggest the introduction of the shuka may be linked to Scottish missionaries whose tartan patterns resemble the checked designs of the shuka.
Despite its relatively modern origins, the shuka has become a powerful symbol of Maasai identity, heritage, and tradition, worn by both men and women in daily life and during ceremonies. The colours chosen carry specific meaning. Red symbolises bravery, strength, and unity, qualities highly valued in Maasai society.
It is also believed to deter wild animals, a useful feature for a community living in close proximity to wildlife. Blue represents the sky that showers rain on cattle, while orange stands for friendliness, warmth, and welcome.
What you need
- Coloured beads or cut paper tubes in red, blue, black, white and orange
- String or elastic cord
- Scissors
How to make it
- Cut a length of elastic cord long enough to wrap around the child’s wrist with a little extra
- Choose a colour sequence that tells something about the child, use the Maasai colour meanings as a guide
- Thread the beads one by one in the chosen pattern
- Repeat the pattern consistently all the way around
- Tie off the ends securely
Why this is worth doing
This project teaches children that even everyday items, a bracelet, a cloth, can carry deliberate meaning. The Maasai did not choose red because it looked nice.
They chose it because it said something. Asking children to choose their own colours based on the meanings turns a simple threading activity into a genuine act of personal expression.
Cultural fact to share while doing it
Each colour in Maasai culture carries significance: red represents bravery and protection, while black is worn by young men after their initiation as a symbol of their transition into adulthood. Ask your child: if you had to choose colours that represent who you are right now, which would you pick and why?
8. Egyptian Cartouche Clay Nameplate
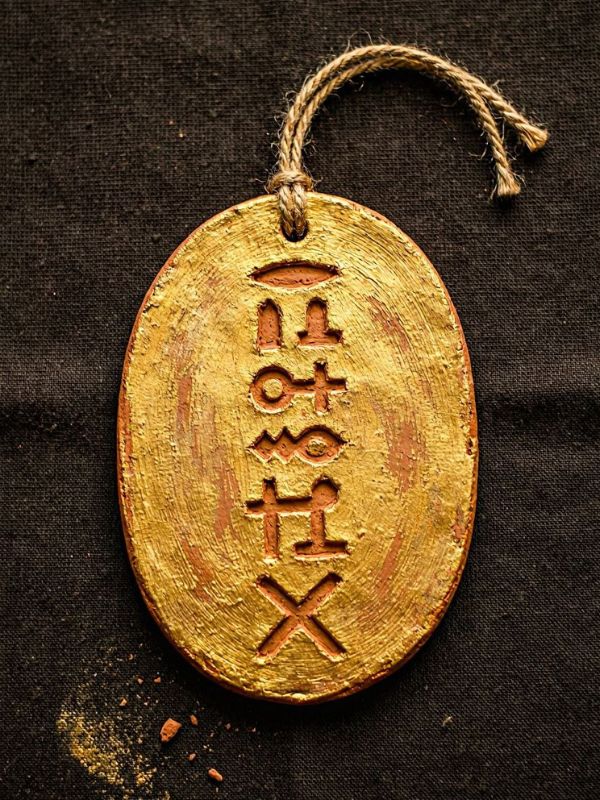
Where it comes from: Egypt, Northeast Africa | Ancient Egyptian civilisation
Ages: 7+
Egypt sits in the northeast corner of Africa, a fact that surprises many children who have never seen it placed on a map of the continent. Hieroglyphics first started to be used around 3,200 BC, making this one of the oldest writing systems in human history, over 5,000 years old. A cartouche was one of the most important uses of hieroglyphic writing.
A cartouche was an oval nameplate with a person’s name written in hieroglyphics in the middle of it. Originally used only for pharaohs and royalty, cartouches were believed to protect the soul from evil spirits and guide it safely to the afterlife.
The word “cartouche” was not an Egyptian word at all, it was the name given to these oval nameplates by Napoleon’s soldiers, who thought the oval shape resembled a gun cartridge. The Egyptians themselves simply called it the shenu, meaning encircled or protected.
What you need
- Air-dry clay flattened into an oval shape
- A toothpick or pencil for carving
- Gold or copper paint
- A printed Egyptian hieroglyph alphabet chart
- String or cord for hanging
How to make it
- Flatten a piece of air-dry clay into a smooth oval about 1cm thick
- Use a toothpick to draw a neat border around the edge of the oval
- Look up each letter of the child’s name on a hieroglyph alphabet chart
- Carefully carve each symbol inside the oval from top to bottom, cartouches were traditionally read vertically
- Press a small loop of string into the top before it dries, for hanging
- Allow to dry fully then paint with gold or copper paint
Why this is worth doing
Children are often taught about Ancient Egypt as something separate from Africa, a floating civilisation with no continental context.
Placing Egypt firmly on the map of Africa before starting this project is one of the most quietly powerful things a teacher or parent can do.
When children carve their name into a cartouche, they are connecting to a writing tradition that is over 5,000 years old and entirely African in origin.
Cultural fact to share while doing it
The cartouche was believed to hold magical protective power, the oval shape represented a rope loop, meant to encircle and shield the royal name from evil forces both in life and in the afterlife.
Ask your child: if you could protect one thing about yourself with a magic symbol, what would it be?
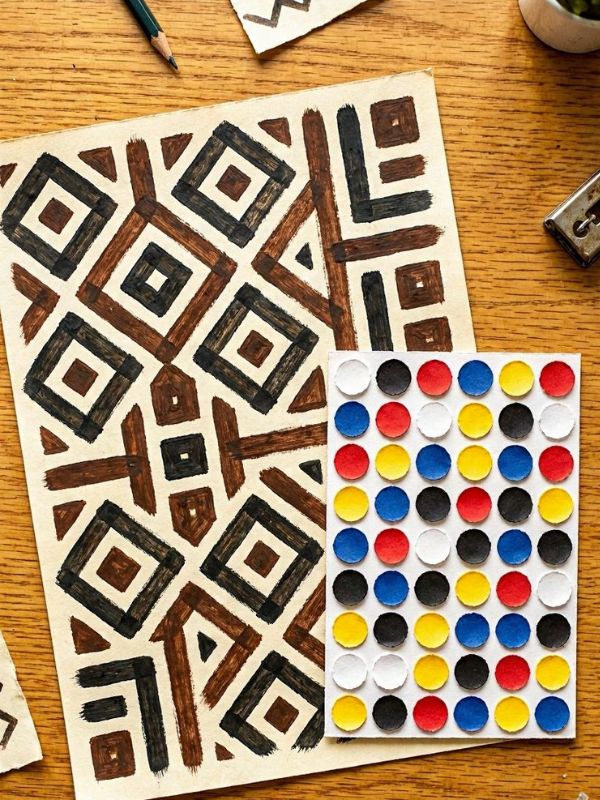
9. Kuba Kingdom Geometric Pattern Design
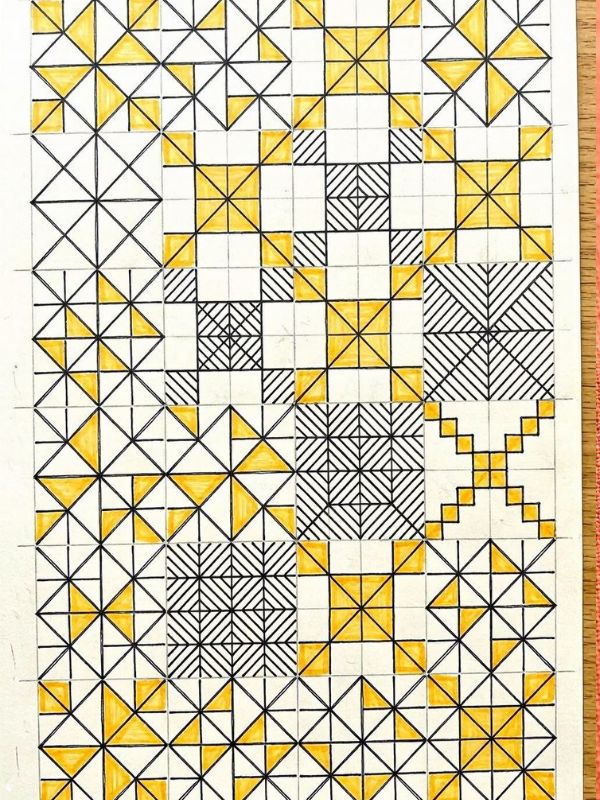
Where it comes from: Democratic Republic of Congo | Kuba Kingdom people
Ages: 7+
When people search for African art projects for kids that go beyond the familiar, the Kuba Kingdom of central Africa is one of the most overlooked and most rewarding places to look.
The Kuba Kingdom flourished between the 17th and 19th centuries in the region bordered by the Sankuru, Lulua, and Kasai rivers in the heart of what is now the Democratic Republic of Congo.
It is claimed the Kuba had an unwritten constitution, separation of powers, elected political offices, taxes, laws, judges, juries, police and an army, a sophisticated civilisation that most children are never taught about. At the centre of Kuba culture was art.
The Kuba developed almost all geometric possibilities for repetitive design variations. Of the seventeen ways a design can be varied on a surface, the Kuba exploited twelve.
Their decorative design tradition comprised a corpus of about 200 distinct patterns, many named after their inventors. The French painter Henri Matisse kept Kuba textiles in his studio, saying he would often stare at them “waiting for something to come to me from the mystery of their instinctive geometry.
What you need
- White or cream paper
- Ruler and pencil
- Black fine-liner or black paint and a thin brush
- Two contrasting colours to fill sections, traditional Kuba cloth uses cream, black and ochre yellow
How to make it
- Use a ruler to divide the paper into a grid of equal squares or rectangles
- Inside each section, draw a repeating geometric unit, interlocking triangles, stepped zigzags, or diagonal lines
- The rule: no two adjacent sections should have the same pattern direction
- Fill alternating sections with one of the two colours, leaving the other sections in the base colour
- The finished design should feel like it moves, Kuba patterns are deliberately optical and dynamic
- No curves, no figurative shapes, pure geometry only
Why this is worth doing
This is one of those African art projects for kids that quietly dismantles a common assumption, that advanced geometric thinking belongs to Western mathematics and art
. The Kuba people were exploring complex symmetry and pattern variation centuries before it appeared in European design schools.
When children sit down and attempt to fill a grid with non-repeating geometric variation, they very quickly discover how difficult and how intelligent this tradition really is.
Cultural fact to share while doing it
The patterns on Kuba textiles represented elements of nature, spiritual life, social hierarchy, and the history of the kingdom.
They spoke of cultivated land, connection with ancestors, wisdom, fertility, and the cycle of life. Ask your child: if your pattern could tell the story of your family, what would you put in it?
10. African Savannah Sunset Silhouette
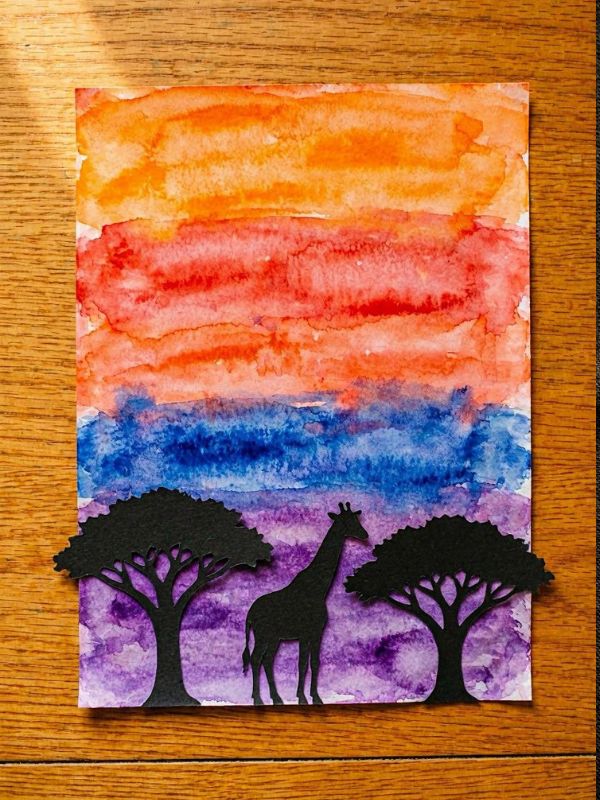
Where it comes from: East and Southern Africa | Cross-geographic
Ages: 5+
The African savannah is one of the most recognisable landscapes on earth, and one of the most misunderstood. It is not one place. The African savannah biome is a vast tropical grassland stretching across more than 20 countries, including Kenya, Tanzania, Uganda, Ethiopia, Zambia, Zimbabwe, Botswana and South Africa.
It is home to the largest land migrations on earth and some of the most iconic wildlife anywhere in the world.
The acacia tree, the flat-topped silhouette shape children instantly recognise, has around 1,300 species worldwide, with the majority found in Africa and Australia.
Its trunk is short and robust, spreading into a large umbrella-shaped crown, with branches that feature sharp thorns designed to defend against grazing animals.
The acacia is not just a pretty shape against a sunset. It is a living, engineered survival system.
What you need
- White A3 paper for the background
- Watercolour paints in orange, red, yellow and purple
- Black card or black painted paper for silhouettes
- Scissors and glue
- A pencil for sketching silhouette outlines first
How to make it
- Paint the white paper with broad horizontal washes of watercolour, start with yellow at the horizon, blend into orange, then red, then deep purple at the top
- Allow to dry completely, this is the sunset sky
- On black card, sketch and cut out silhouette shapes: one or two acacia trees with their distinctive flat umbrella canopy, and two or three animals, elephant, giraffe, zebra, or lion
- Keep silhouettes simple and solid , no internal detail, just clean outlines
- Arrange the silhouettes along the bottom of the sunset background, overlapping slightly to create depth
- Glue into place
Why this is worth doing
This project teaches children something beyond art, it teaches them to look at a landscape and ask questions.
Which country does this scene come from? What animals live here and why? Why does the acacia tree grow that shape? The painting becomes a doorway into geography, ecology, and conservation. Children who make this artwork often want to know more, and that curiosity is the whole point.
Cultural fact to share while doing it
Before starting, show children a map of Africa and point out where the savannah biome sits.
Ask them to name every country it passes through. Then ask: which of these countries have you heard of, and which are new to you? That simple question, asked over a painting, opens the continent up in a way that a textbook rarely does.
11. Yoruba Gelede Mask Headdress
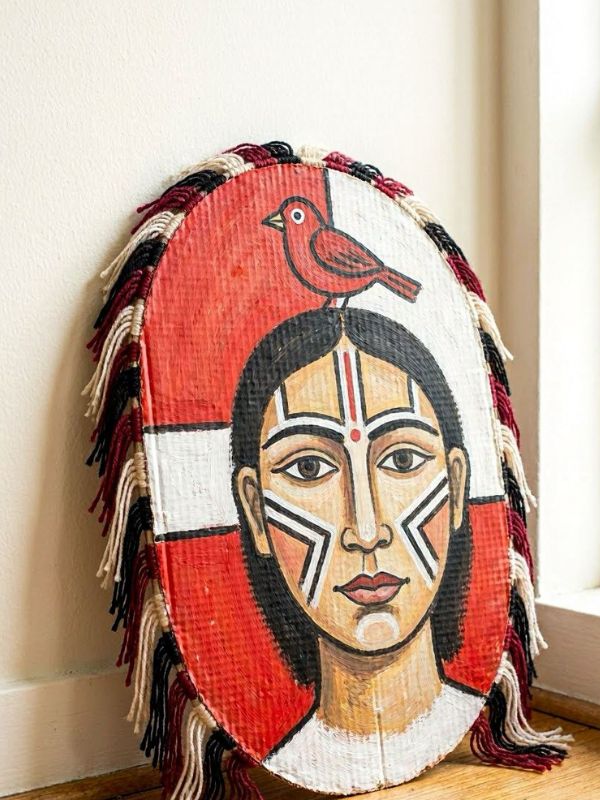
Where it comes from: Nigeria, Benin Republic and Togo | Yoruba-Nago people
Ages: 8+
Most people assume African masks were made to look frightening or powerful. The Gelede mask of the Yoruba people tells a completely different story.
Gelede masquerade is performed by the Yoruba-Nago community spread across Nigeria, Benin Republic and Togo, and has been performed for more than a century as a ceremony to pay tribute to the primordial mother Iyà Nlà, and to honour the role women play in the social organisation and development of Yoruba society.
Also Gelede spectacle represents one of Nigeria’s only three pieces on the United Nations Oral and Intangible Heritages of Humanity list, and is the only such cultural heritage recognised from Benin Republic and Togo.
There is another detail worth teaching honestly: the Gelede headdress was not worn over the face, it rested on top of the performer’s head, with a veil covering the face beneath. It is more accurately described as a headdress than a mask.
The men who performed wore elaborate costumes and masks to represent different aspects of feminine power, celebrating the contributions of women to Yoruba society.
What you need
- A cardboard base cut into an oval or rounded rectangular shape
- Acrylic or poster paint in bold colours, red, black, white, blue, yellow
- A thin paintbrush for detail work
- Scissors
- Optional: fabric strips, raffia, or yarn for decorative fringing
How to make it
- Cut a firm oval or rectangular base from cardboard, this is the headdress face
- Sketch a face onto the base, Gelede headdresses typically feature calm, composed facial expressions, not aggressive ones
- Paint the face in a base skin tone, then add bold geometric facial markings, these represent scarification patterns specific to the performer’s identity
- Paint the forehead area with a decorative scene or figure, traditional Gelede headdresses often featured animals, people, or symbolic scenes carved on the top portion
- Outline all features with clean black lines for definition
- Add fringing of yarn or raffia around the edges to represent the costume fabric that surrounded the headdress in performance
Why this is worth doing
This project challenges one of the most persistent misconceptions children hold about African masks, that they are symbols of war or fear.
When children learn that the Gelede mask exists specifically to honour women and mothers, it opens a genuinely surprising conversation.
A mask made by men, worn by men, performed in front of a community, to celebrate the power of women. That is a detail that stays with children long after the paint dries.
Cultural fact to share while doing it
The Gelede ceremony traditionally takes place after the harvest each year, and also during drought or epidemics, times when the community needed the blessing and intervention of powerful feminine forces.
Ask your child: what would you put on the top of your headdress to represent something or someone important to you?
12. San Rock Art Handprint Panel
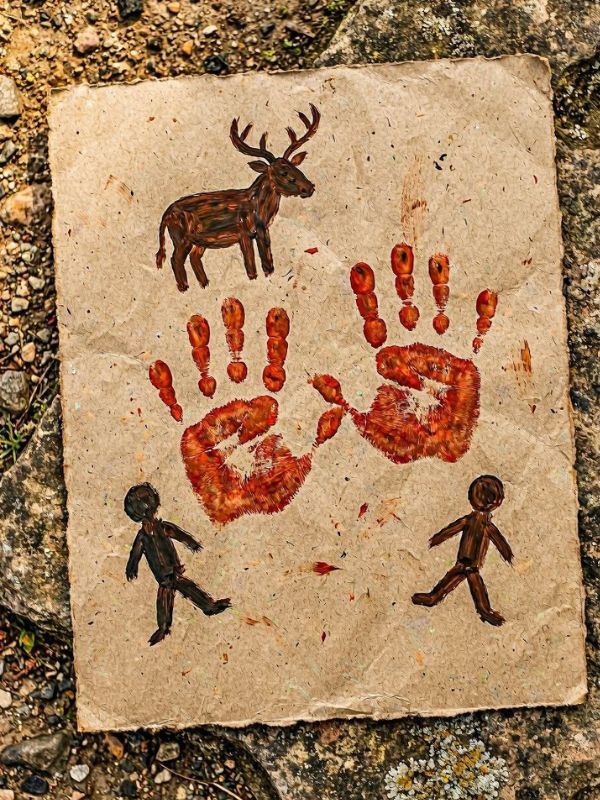
Where it comes from: Southern Africa | San people (also known as Bushmen)
Ages: 4+
This is the project that connects children to the very beginning of human art, and it starts with something as simple and universal as a hand. The San people, also known as the Bushmen, are recognised as the creators of some of the earliest known art in Africa.
Major sites include the Apollo 11 Cave in Namibia, where fragments of painted stones dating back approximately 27,000 years were discovered.
But the San rock art tradition was not about decoration. The central principle of San belief was a ritualized connection between the material world and the spirit world.
Their rock art was deeply spiritual, the rock face itself was believed to be a veil between worlds, and painting on it was an act of crossing into the spirit realm.
Research has shown that the San painted using three primary materials: charcoal, soot, and carbon black, a mixture made from burnt fat, applied directly onto rock surfaces in shelters. These were not casual marks. They were intentional, sacred, and made to last.
What you need
- Large sheet of brown, grey or terracotta paper, to suggest the texture of rock
- Earthy paint colours only: ochre yellow, burnt red, brown, black and white
- A sponge or brush for background texture
- Hands, the child’s own
How to make it
- Scrunch and flatten the paper slightly to give it a rough, uneven texture
- Sponge a light wash of ochre or grey across the surface as the rock background, allow to dry
- Press one hand flat into red or ochre paint and press firmly onto the paper, this is the handprint
- Repeat two or three times in different positions, do not fill the whole sheet
- Around the handprints, use a thin brush to add simple animal figures: an eland (a large antelope), a human figure mid-run, or a simple four-legged animal in silhouette
- Keep figures small, simple and close to the rock surface, San rock art figures are rarely large
- Do not add colour fills, San figures were painted as flat silhouettes or simple line forms
Why this is worth doing
A handprint is the most honest mark a child can make. It says: I was here. I existed. I mattered. That is exactly what the San people said on the rock walls of southern Africa thousands of years ago, and those marks are still visible today.
When a child presses their hand into paint and looks at what they have made, they are participating in the oldest artistic act in human history. That connection, across thousands of years and an entire continent, is what makes this the perfect final project in this series.
Cultural fact to share while doing it
There are approximately 30,000 San paintings in the uKhahlamba Drakensberg Park in South Africa alone, a site so significant it is a UNESCO World Heritage Site. Ask your child: if you could leave one mark on a wall for someone to find in 10,000 years, what would you paint?
Some traditional clothing and textile techniques inspire modern fashion trends. Old Money Outfit Ideas from Thrift Flips That Look Rich (But Cost Almost Nothing) demonstrates how timeless style elements can be reimagined through creativity and craftsmanship.
A Note On Teaching African Art Honestly
When you bring African art projects for kids into your home or classroom, three things matter more than the craft itself.
-
Name the country and the people — always:
The Yoruba of Nigeria. The Kuba of Congo. The San of Southern Africa. “Africa” is a continent of 54 countries and thousands of distinct cultures. Every time we say “African art” without a name, we erase the very people we are trying to celebrate. Teach children to ask: who made this, and where did they live?
-
Treat ceremonial art with respect, not just replication:
A Gelede headdress was made to honour mothers. A Bogolan cloth marked a woman’s life transitions. When children understand what art was for, they stop making a copy and start making a connection. That is the difference between a craft activity and a cultural education.
-
These traditions are alive today — not museum pieces:
Esther Mahlangu still paints Ndebele murals in South Africa. The Tingatinga Arts Cooperative still trains artists in Dar es Salaam. Kente weavers still work at their looms in Ghana.
Wherever possible, show children a living artist alongside the project. It tells children the most important truth of all, that African art did not stop. It never stopped.
Culture is expressed through more than art alone. Seasonal Recipes from Around the World: What Cultures Cook Each Season and Why highlights how food traditions connect families to history, geography, and community throughout the year.
Conclusion
These 12 African art projects for kids are not just activities to fill an afternoon. They are entry points into some of the world’s oldest, richest, and most intentional creative traditions, traditions that have survived colonisation, displacement, and time itself.
Can you pick one project, make it together, and talk about where it comes from.
Which project will you try first? Drop it in the comments, and if you make something, share a photo and tag us. We would love to see what your children create, and your post might just inspire another parent or teacher to try it too.