Make Halloween setup easier with trunk or treat decorating ideas that are fun, affordable, and simple to recreate with everyday supplies.
Somewhere between “trick-or-treat” and “tailgate party,” someone decided the trunk of a car could become a tiny stage.
Trunk-or-treat started in churches and schools in the mid-1990s, born from a simple idea: park a row of cars in a lot, decorate the trunks, and let families walk between them collecting candy in a space that felt safer and warmer than wandering dark streets.
Three decades later, it’s grown into its own small tradition; part parking-lot festival, part costume parade, part neighborhood reunion.
For anyone new to it, this is the picture: no houses, and no doorbells, just a row of decorated cars and the people who love turning them into something memorable.
The eleven themes written in this guide aren’t ranked by how impressive they look in a photo.
Each one is tagged by what it actually costs in time and money to pull off, because a parent squeezing this in after work on a Tuesday needs something different from someone who’s been planning their trunk since August.
Skill level here means how many hours it takes, what it costs, and whether tools or a trip to the craft store are involved. Every theme on this list earns its spot by being genuinely doable, not just genuinely pretty.
Looking for another easy Halloween activity? Check out Halloween Craft Ideas for Adults Who Don’t Want a Big Mess or Anything That Takes All Day for creative projects that are simple to make and won’t leave your home covered in supplies.
Before You Pick a Theme — Know What Matters
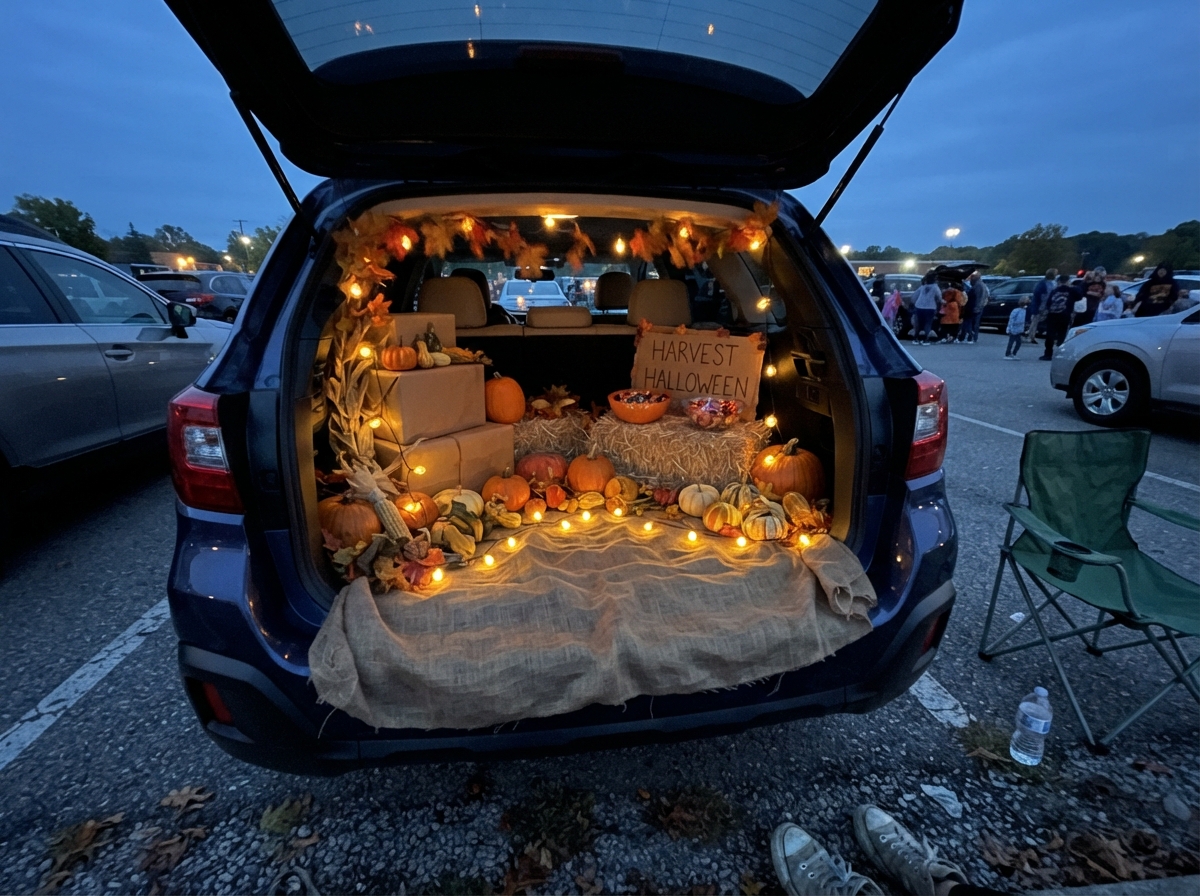
A trunk full of great decorations means nothing if half of them fall off before the first trick-or-treater arrives, or the car ends up with sticky residue that won’t come off in November.
Getting the setup basics right first saves both the paint job and the evening.
Attaching decorations without damaging the car
- Painter’s tape: safe for lightweight paper decorations, banners, and anything temporary going directly on painted surfaces, it releases cleanly without pulling paint or clear coat
- Velcro strips: strong enough for fabric backdrops or hanging curtains, and reusable if the same setup gets used again next year
- Magnetic hooks: ideal for metal surfaces on the trunk lid or doors, holding string lights or small props without a single piece of tape
- Zip ties: the choice for anything heavier, cardboard structures, larger props, looped through existing handles, trim, or a cargo net rather than stuck to paint
Matching the method to the material matters more than picking a favorite. A cardboard tombstone zip-tied to a roof rack will outlast the evening; the same tombstone held up with painter’s tape probably won’t survive the first gust of wind.
Trunk-or-Treat Decorating Ideas
1. The “Nothing New” Trunk
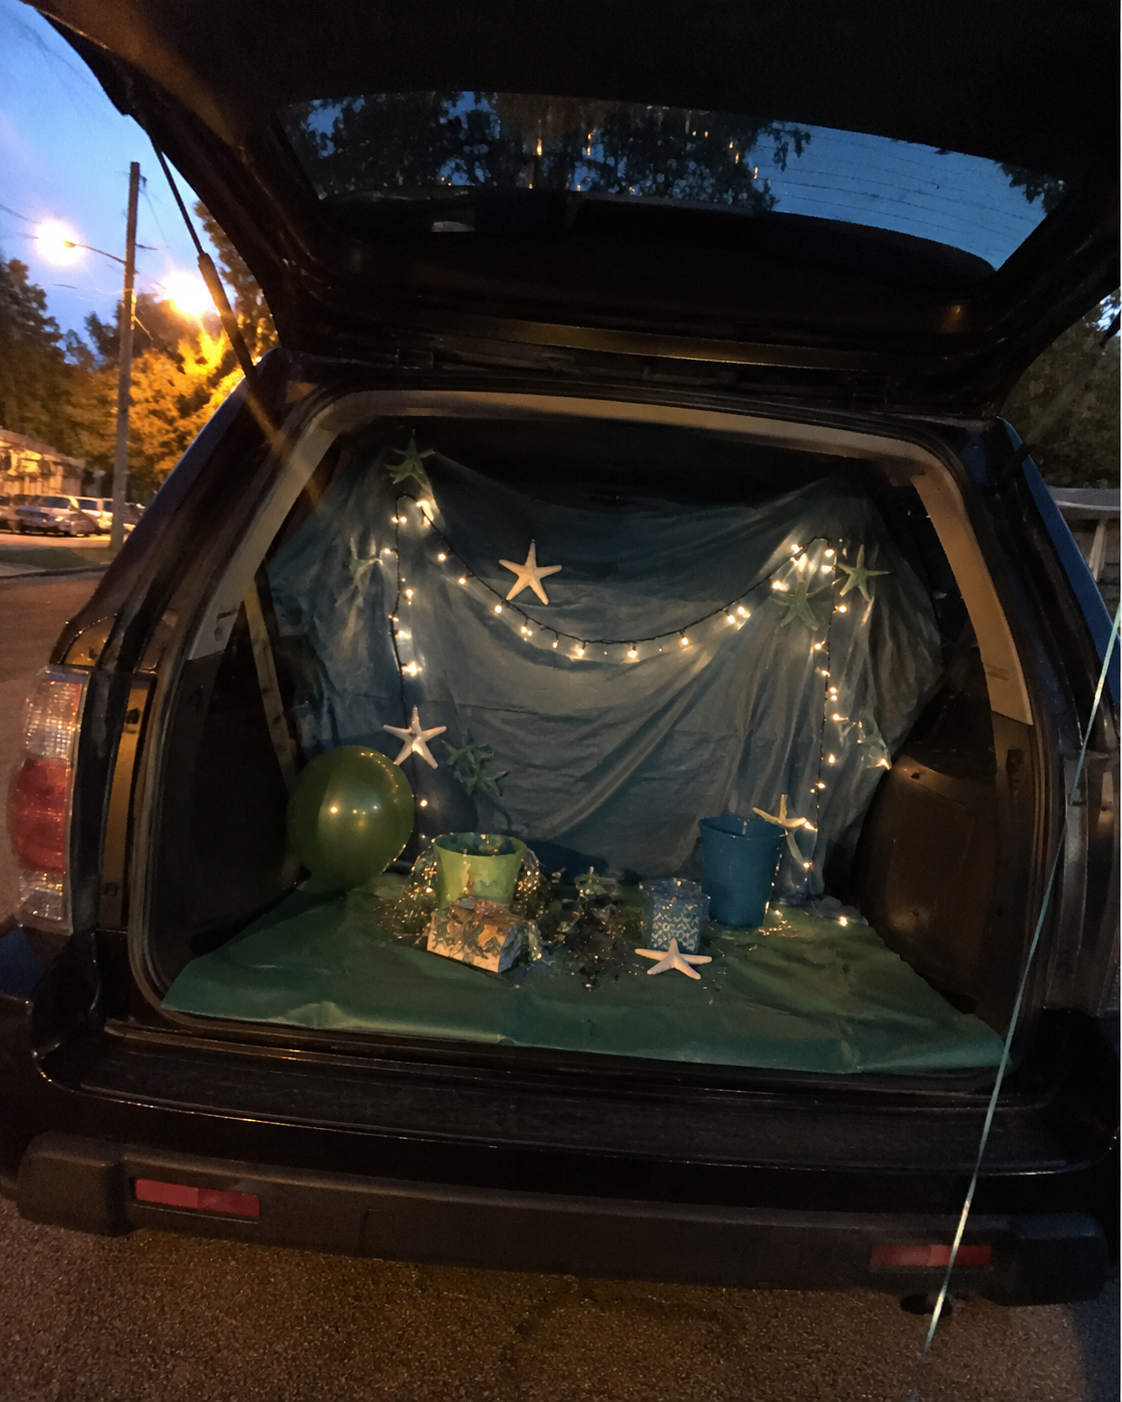
The best-kept secret of trunk-or-treat is that last year’s birthday party or last summer’s costume box is probably still sitting in a closet somewhere, fully capable of a second life. What decides the theme is whatever color shows up most in that box.
How to pull it off:
- Empty one storage box of old party or costume supplies onto a table or the floor, and group everything by color instead of by what it was originally used for. A blue tablecloth from a beach party, a blue balloon from a birthday, and a blue scarf from a costume all belong in the same pile once color is the sorting rule.
- Whichever pile ends up biggest is the theme, because that’s the color there’s enough of to build a real backdrop. Mostly blue and green items point toward an under-the-sea scene. Mostly black and orange points toward a classic Halloween look. Mostly pastels point toward something softer, like a fairy-tale or garden theme.
- Once the color is decided, find a bedsheet or large piece of fabric in that same shade to hang across the open trunk lid as the backdrop, secured at the top corners with velcro strips.
- Layer everything from the winning color pile on top of that backdrop, placing the largest items first and tucking smaller ones into the gaps between them.
- Add one battery-operated light strip along the top edge so the color reads clearly once it gets dark.
2. One Backdrop, One Hero Prop
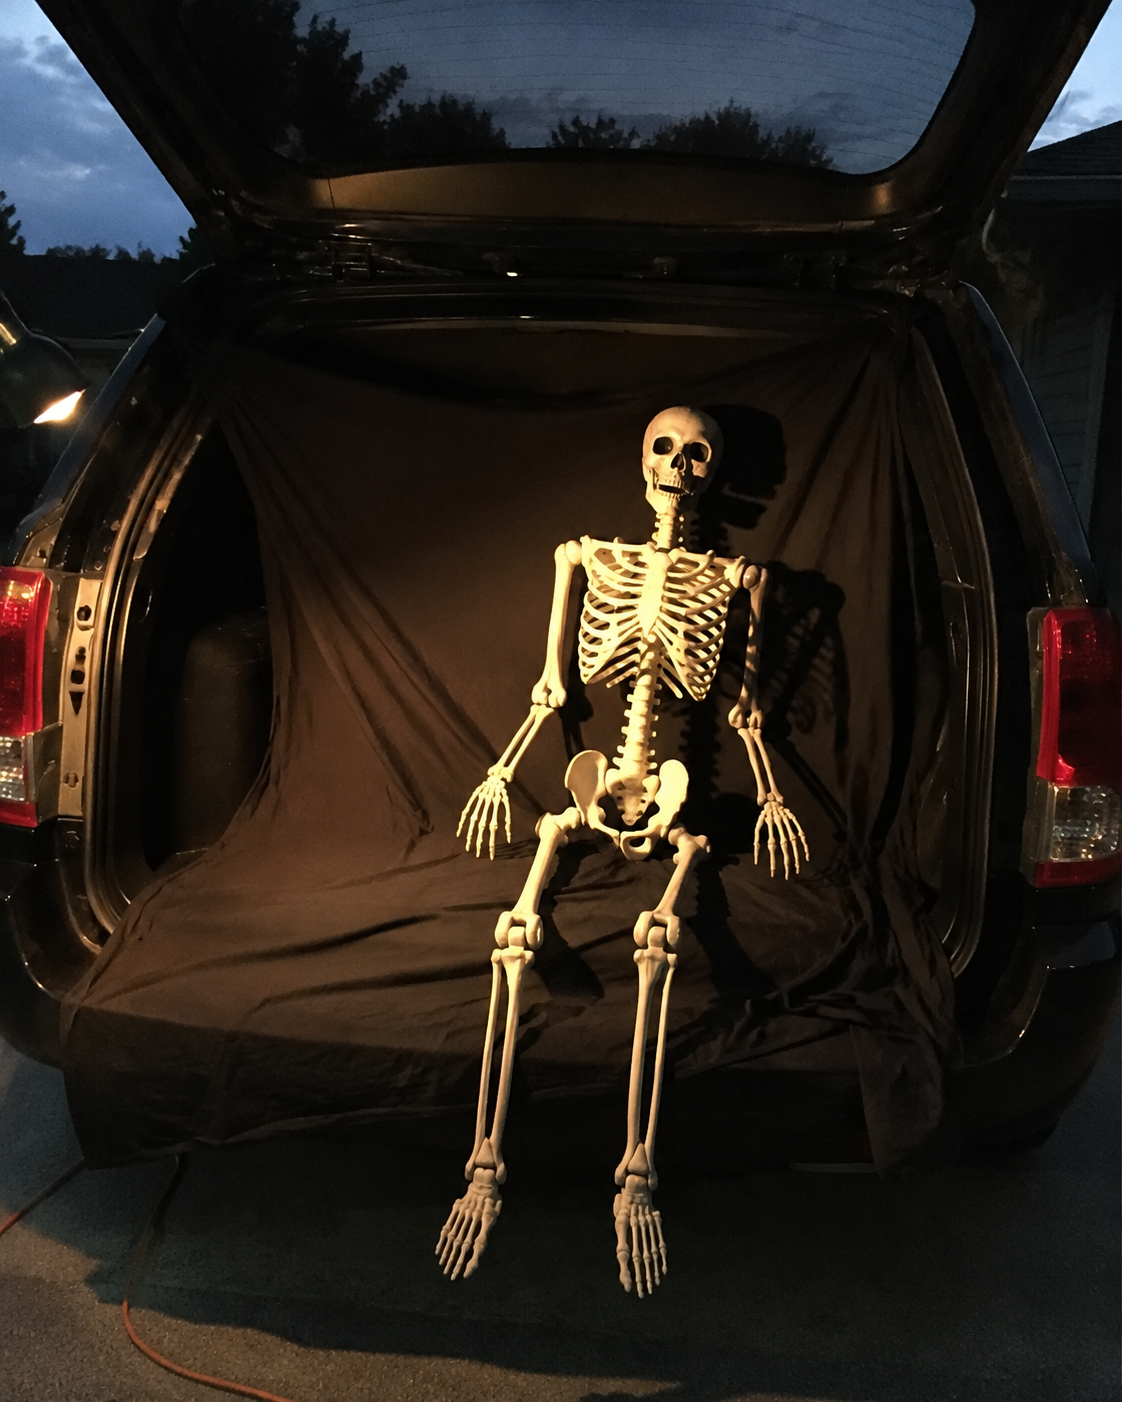
Filling every inch of a trunk takes hours; one striking backdrop paired with a single standout prop can look just as intentional in a fraction of the time.
How to pull it off:
- Choose the backdrop color first, based on the theme: black for a graveyard, teal for an ocean scene, orange or brown for a pumpkin patch
- Hang one large piece of fabric across the open trunk lid using velcro strips at the top corners, letting it fall loosely rather than pulling it taut — a slight drape looks more intentional than a flat, stretched sheet
- Choose one prop that can’t be missed from a distance: a single oversized inflatable, one dramatically uplit skeleton, one large paper flower or pumpkin — and place it dead center, slightly forward of the backdrop so it casts a shadow
- Add battery-operated string lights angled to hit the hero prop directly, rather than lighting the whole trunk evenly — the contrast is what makes it look designed rather than thrown together
- Leave the rest of the trunk empty; the negative space is doing as much work as the prop itself
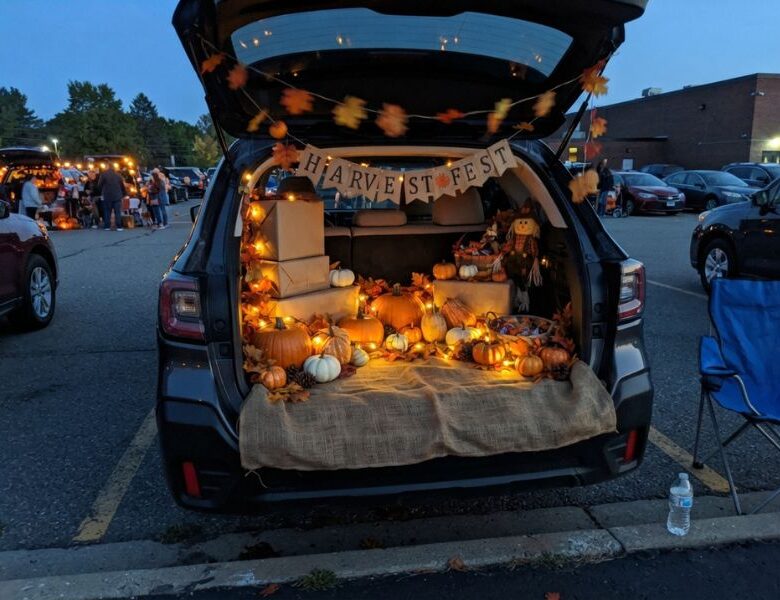
3. The Harvest Patch
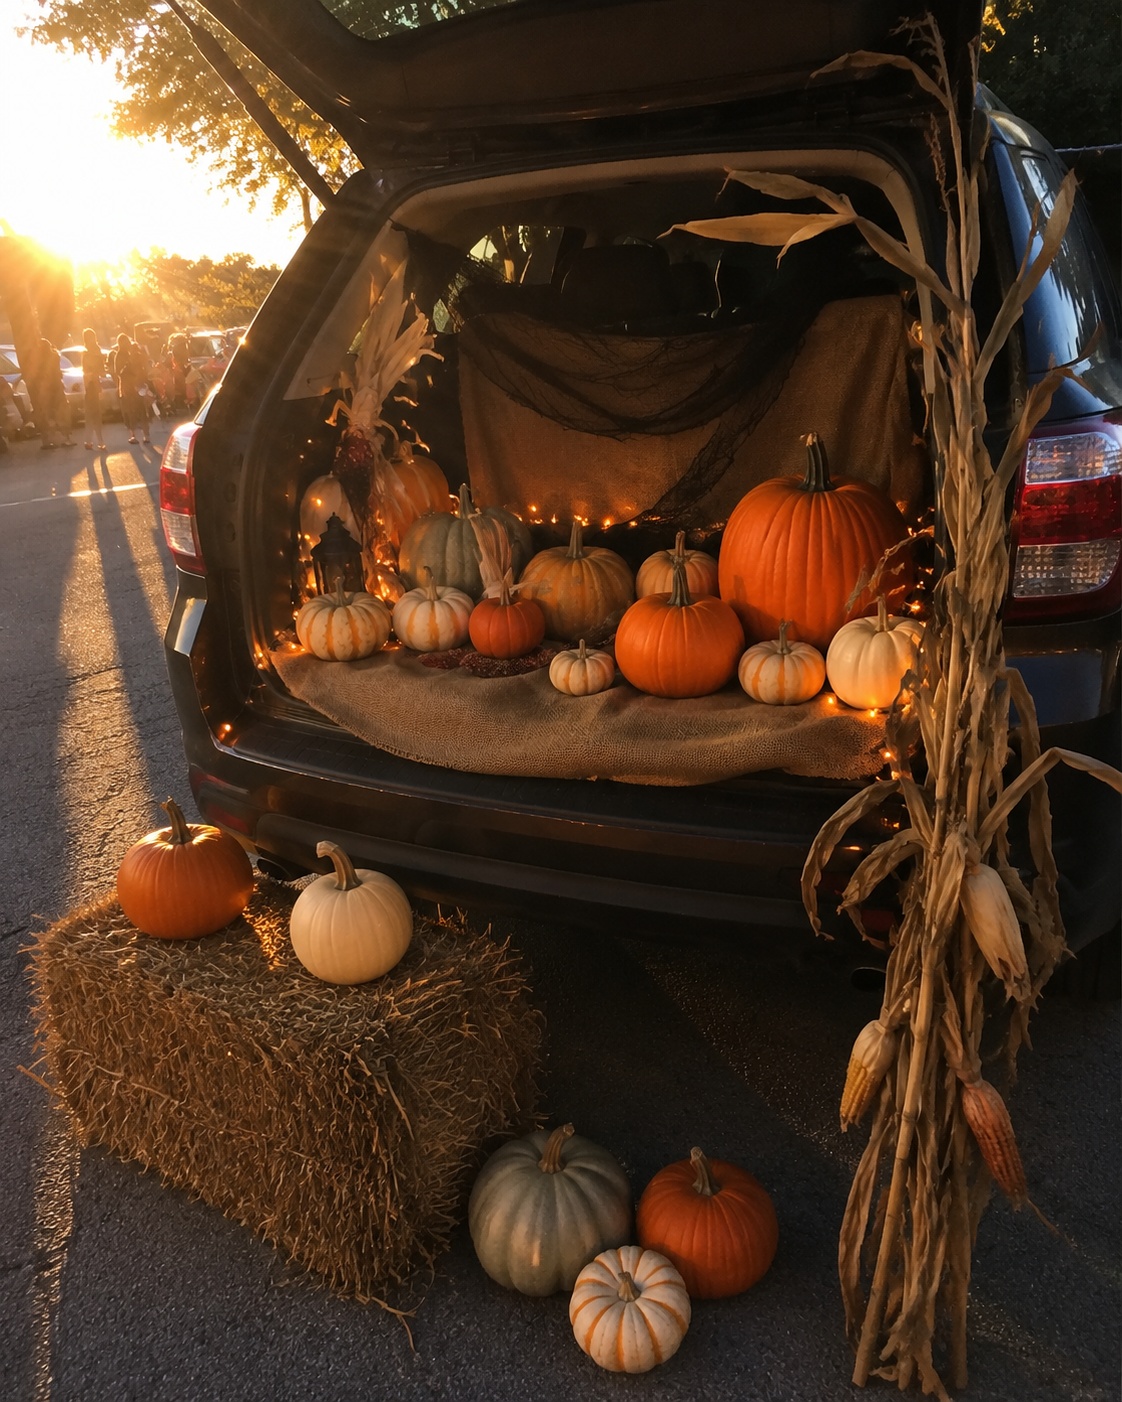
This one has an advantage the spookier themes don’t: it reads as autumn, not specifically Halloween, which makes it the easiest theme on this list to adapt for readers anywhere in the world, car-based event or not.
How to pull it off:
- Line the floor of the trunk and the ground in front of it with a brown or burlap-colored sheet to stand in for soil, then scatter real or artificial pumpkins across it in a few different sizes rather than a uniform row
- Add height with a couple of hay bales or, as a lighter alternative, stacked cardboard boxes wrapped in brown paper to mimic the same texture
- Fill in gaps with dried corn stalks, artificial autumn leaves, or a few sunflowers tucked between the pumpkins
- Hang a simple wooden or painted cardboard sign reading something like “Pumpkin Patch” or “Harvest Days” from the trunk lid using zip ties
- Light the scene with warm-toned battery lights (amber or soft white rather than orange or purple) tucked among the pumpkins at ground level, casting light upward for a warmer, less spooky glow than the classic Halloween palette
4. Woodland Creatures
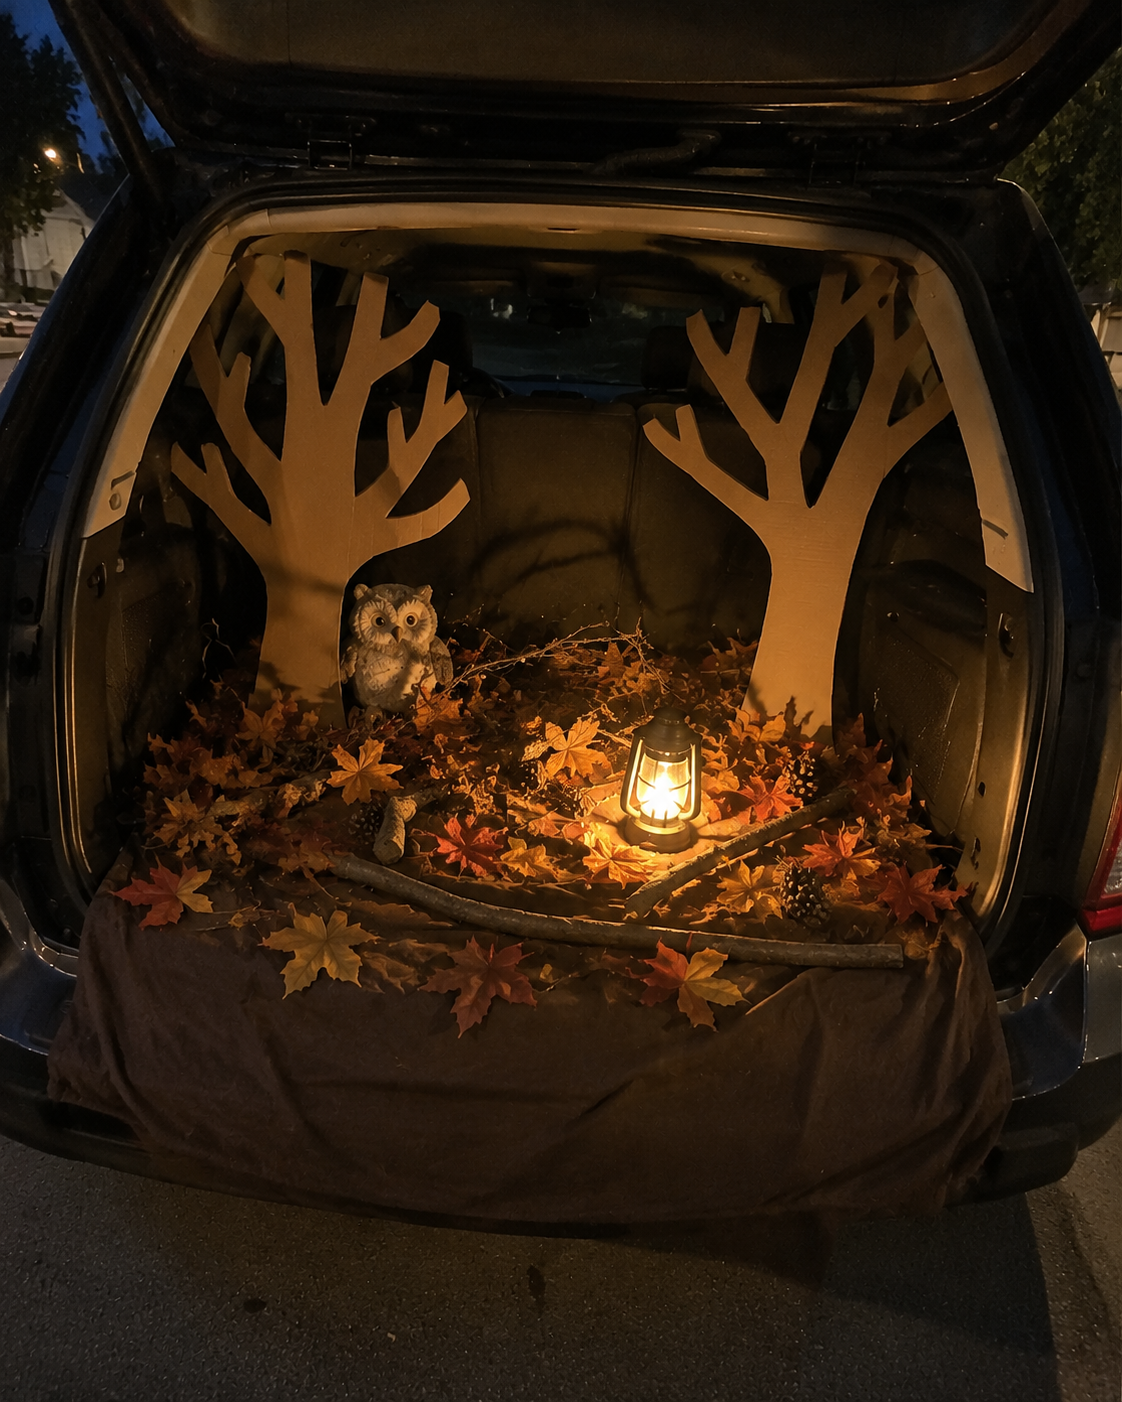
Like the harvest patch, this one leans on nature rather than horror, making it another theme that travels well beyond Halloween-specific audiences and works for any autumn car-based gathering.
How to pull it off:
- Cover the trunk floor with an old brown or green sheet, then scatter faux leaves, twigs, and pinecones across it to build a forest-floor texture
- Cut simple tree silhouettes from large sheets of brown paper or cardboard and prop them upright at the back corners of the trunk using zip ties looped through the trunk’s interior hooks, so they stand rather than lean
- Add two or three stuffed or paper-craft woodland animals (owls, foxes, hedgehogs) tucked among the leaves rather than lined up in a row, so the scene reads as a candid forest moment
- Hang a few paper leaf garlands from the trunk lid opening for extra depth without extra floor space
- Light the whole thing with warm amber battery lights tucked low among the leaves, rather than a bright overhead strip, so shadows fall naturally between the trees
5. The Mini Game Station
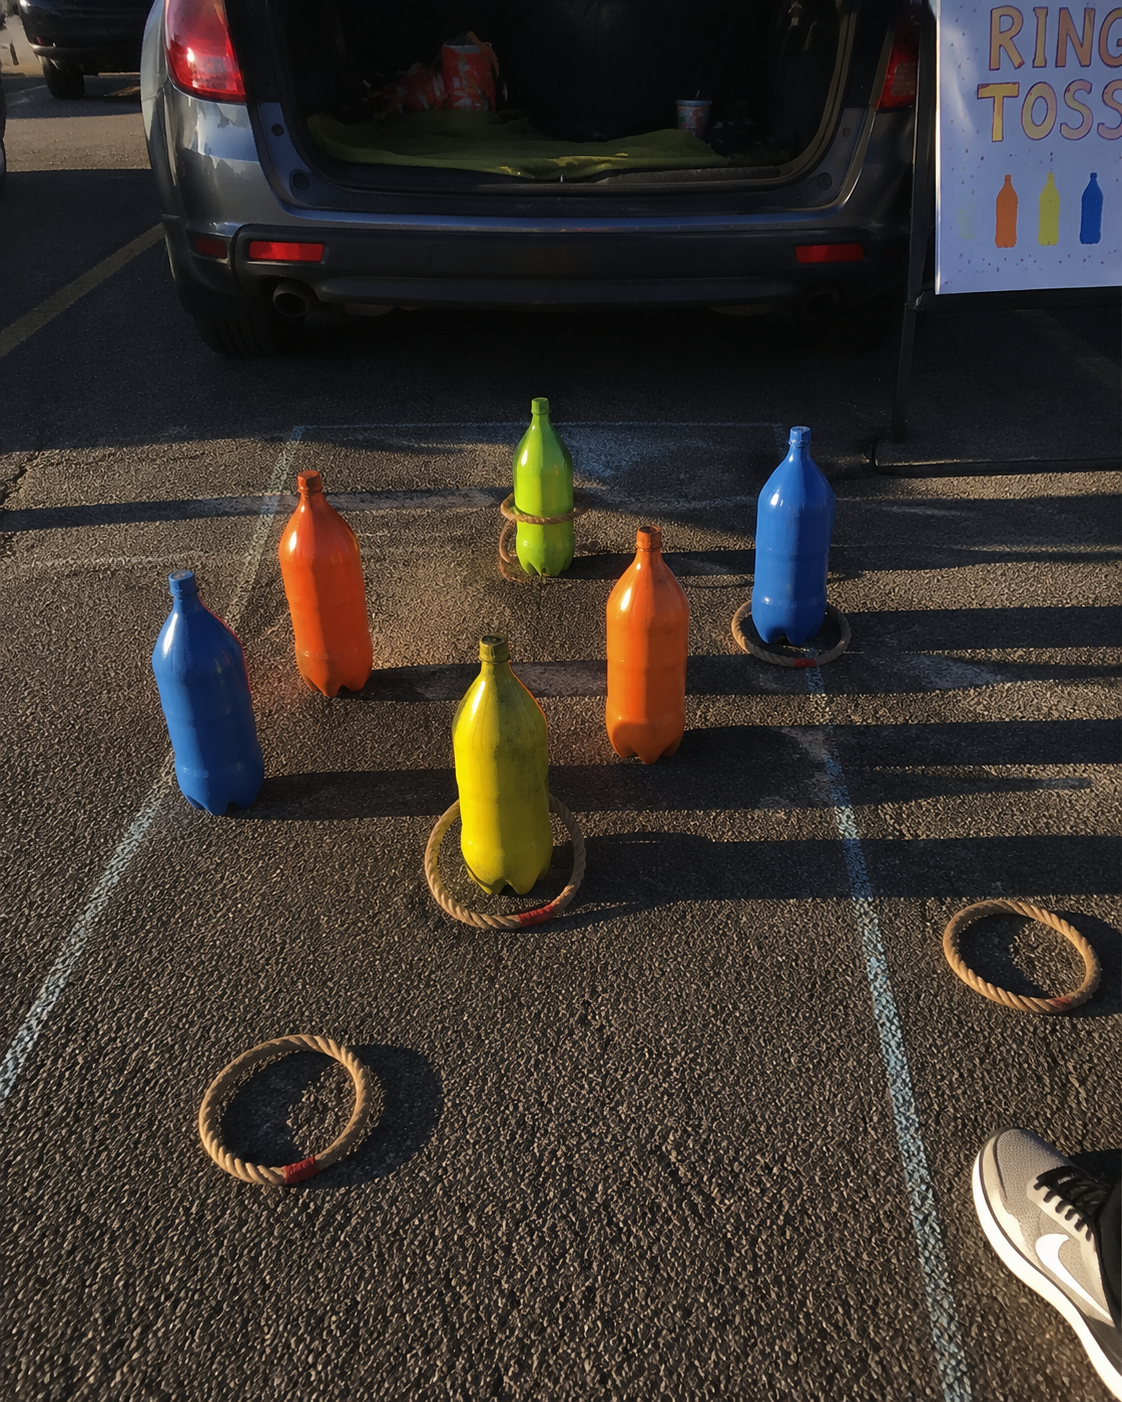
This theme solves for something the previous ones don’t: it gives kids a reason to linger rather than just grab candy and move to the next car. A ring toss, bean bag target, or simple obstacle turns a few seconds of interaction into a few minutes.
How to pull it off:
- Pick one simple mechanic rather than several — ring toss onto cones, bean bags tossed into labeled buckets, or a pumpkin bowling setup using small pumpkins and toilet-paper-roll pins
- Build the target from what’s on hand: painted 2-liter bottles for bowling pins, a cardboard box with cut-out holes for a bean bag toss, or dollar-store rings for a toss game
- Set the game up in front of the trunk rather than inside it, keeping the candy and decorations safely out of the way of any wayward throws
- Offer a small non-candy prize alongside candy for kids who complete the game, since this is also where a non-candy option is easiest to build in naturally
- Recruit one extra person to run the game station while the trunk itself hands out candy, since one person can’t reasonably do both at once
6. The Cardboard Facade
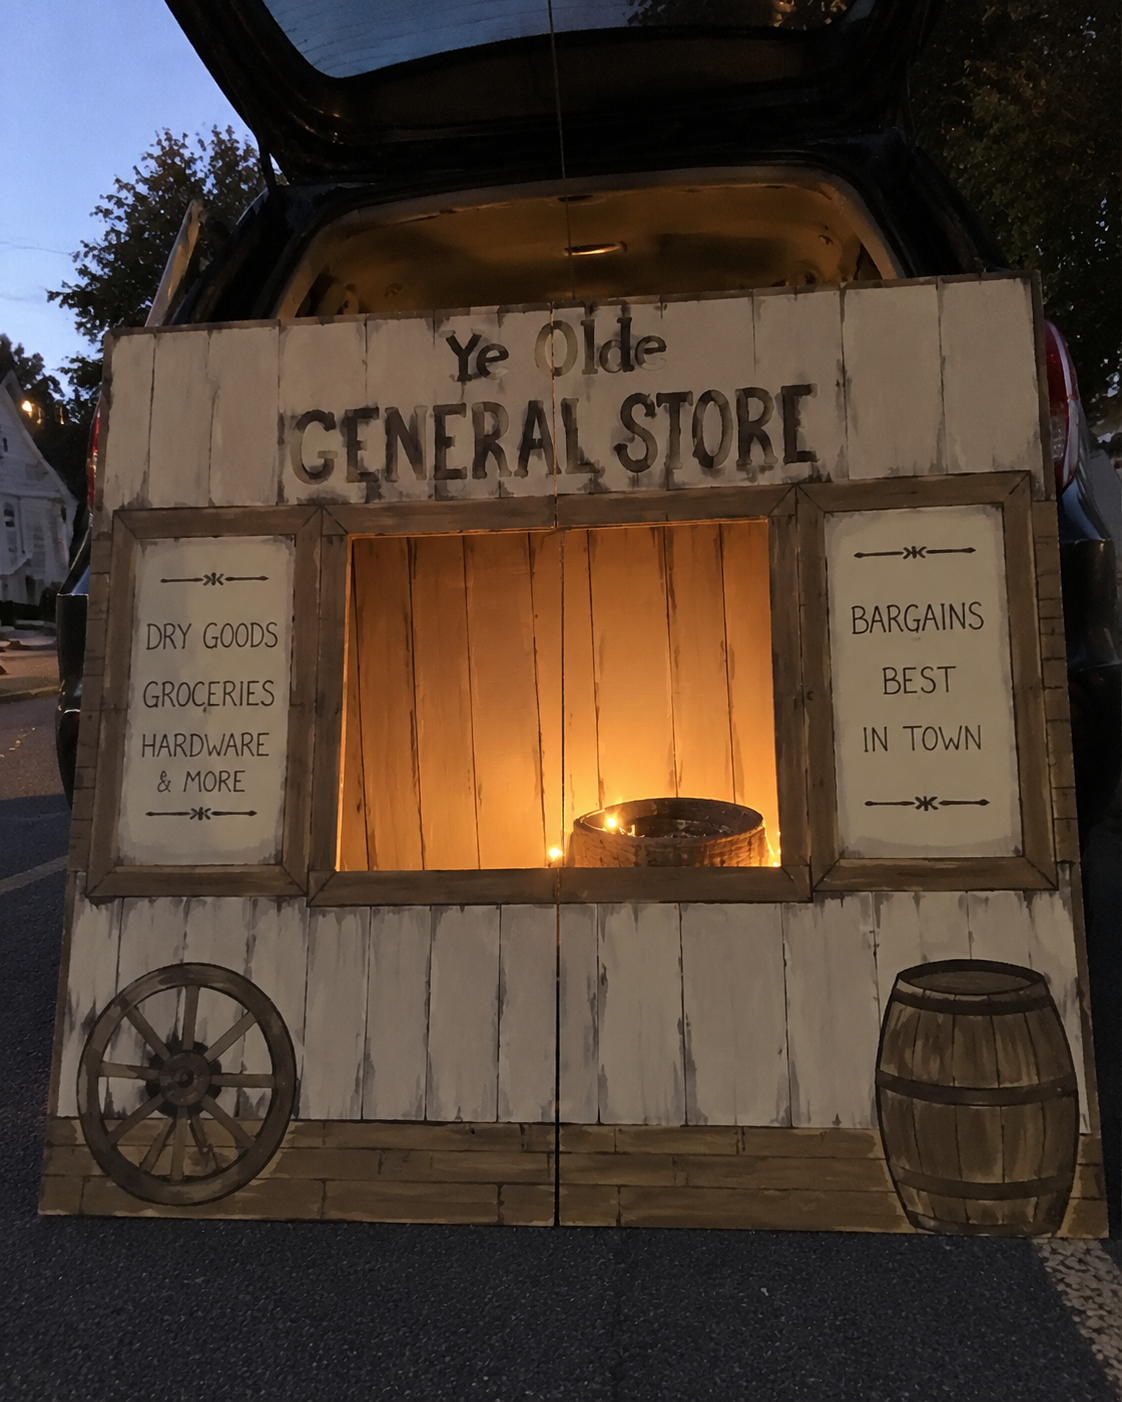
This is the theme that turns a car into a structure rather than a decorated surface, a painted storefront, castle wall, or building front built entirely from flattened cardboard boxes.
How to pull it off:
- Break down several large cardboard boxes and tape them together flat to form one large panel roughly the height and width of the trunk opening
- Sketch the facade in pencil first, a simple rectangular building shape with one large cutout for a door or window is easier to execute cleanly than anything with curves
- Cut the window or door opening with a box cutter on a protected surface, then paint the whole panel in flat base colors before adding detail work like brick lines or signage
- Let the paint dry fully before moving the panel, since cardboard warps if it’s handled while still wet
- Secure the finished panel upright against the open trunk lid using zip ties looped through the trunk’s interior anchor points, reinforced with a few strips of duct tape on the back for extra rigidity
- Finish with battery-operated lights run along the inside edge of the cutout, so the window or doorway glows from within.
Planning to hand out more than candy? Don’t miss Halloween Treat Bags for Neighbors: What to Put Inside for a Thoughtful Halloween Surprise for creative gift ideas that friends and neighbors will genuinely appreciate.
7. The Full Sensory Trunk
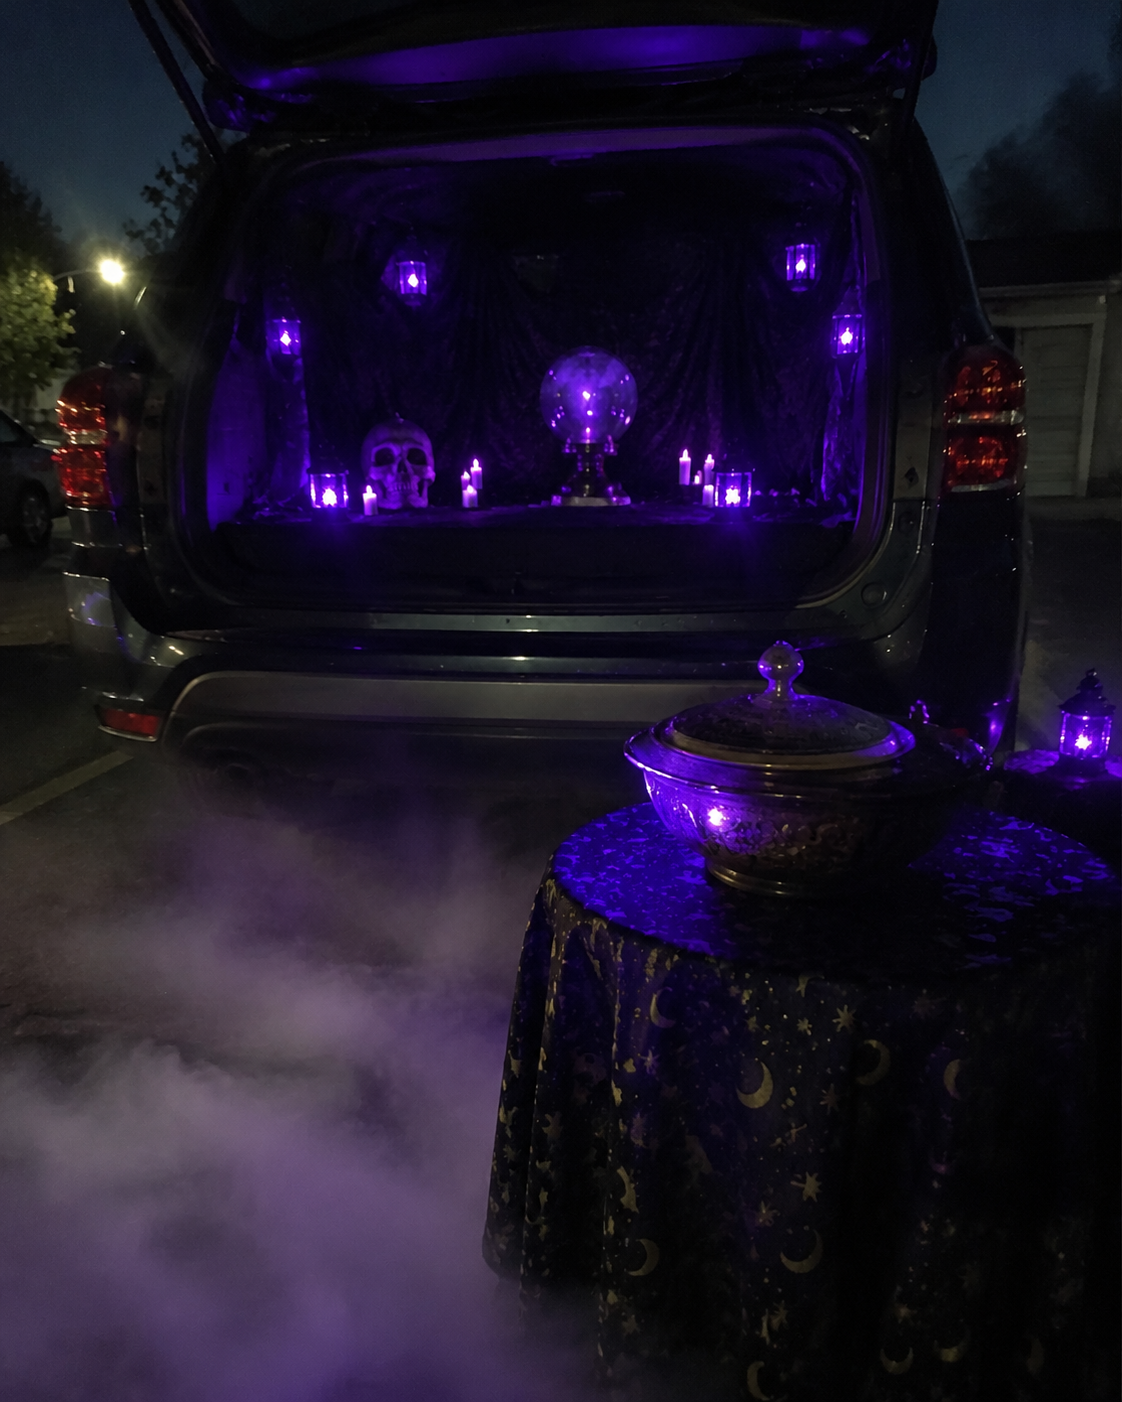
Most trunks rely on sight alone, a backdrop, a few props, some lights. This theme adds sound and texture into the mix, so visitors experience the scene rather than just look at it.
A haunted house corner might combine dim purple lighting, a low fog machine, a speaker playing creaking-door sound effects, and a bowl of “eyeballs” (peeled grapes) for kids brave enough to reach in.
How to pull it off:
- Start with lighting as the foundation, since it sets the mood everything else builds on, battery-operated lights in a single color (purple, green, or deep blue) rather than mixed colors, which tends to look chaotic instead of atmospheric
- Layer in one sound element using a small portable speaker playing a looped ambient track (wind, creaking, distant howls) at a low volume, since sound that’s too loud overwhelms the effect rather than enhancing it
- Add one texture-based element for visitors willing to participate, like a covered bowl with a hand-sized opening filled with cold cooked spaghetti (“worms”) or peeled grapes (“eyeballs”), clearly optional for anyone who’d rather skip it
- Keep a fog machine, if used, aimed low and away from the candy table, since fog near food isn’t appetizing and can obscure the path for smaller children
- Test the full combination, lights, sound, and texture element together — in the driveway before the event, since sensory layers that work individually don’t always work well stacked together
8. The Table Setup
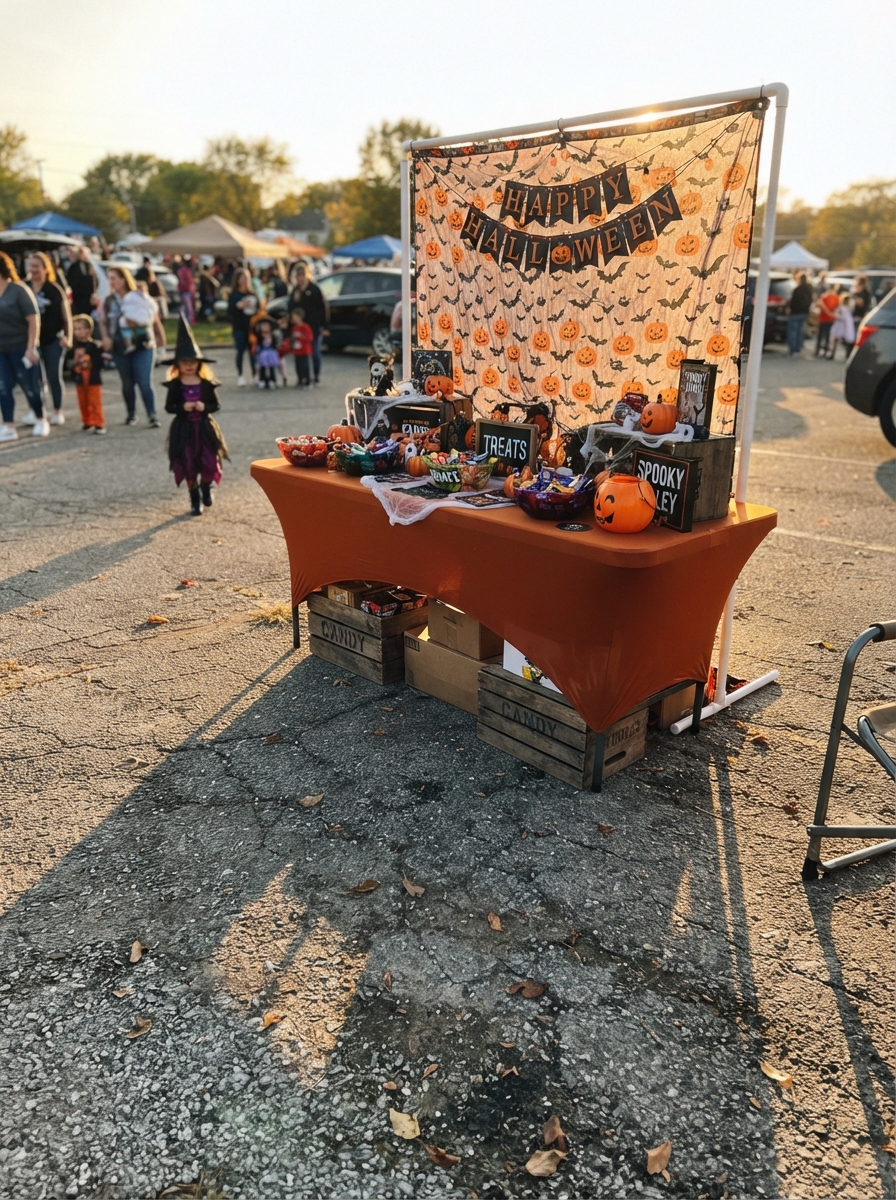
Not every trunk-or-treat is trunk-based. Some community events, especially outside the US where the tradition is newer or takes a different shape, use tables or stalls instead of car trunks.
This theme takes any of the ideas above and adapts them to a flat surface rather than an open trunk lid.
How to pull it off:
- Use a folding table as the base structure instead of a trunk, covered with a fitted tablecloth in the theme’s main color
- Build height the same way a trunk display would, using stacked crates or boxes under the tablecloth to create different levels rather than one flat surface
- Stand a backdrop behind the table using a portable frame, a hung sheet on a freestanding pole, or even a large piece of foam board propped against a wall or fence
- Keep the candy bowl at the front edge of the table, within easy reach, since a table setup doesn’t have the natural “step up to the trunk” framing a car provides
- Anchor lightweight decorations with binder clips or tape along the table edges, since there’s no trunk lid or car body to attach anything to magnetically
9. The Truck Bed Build
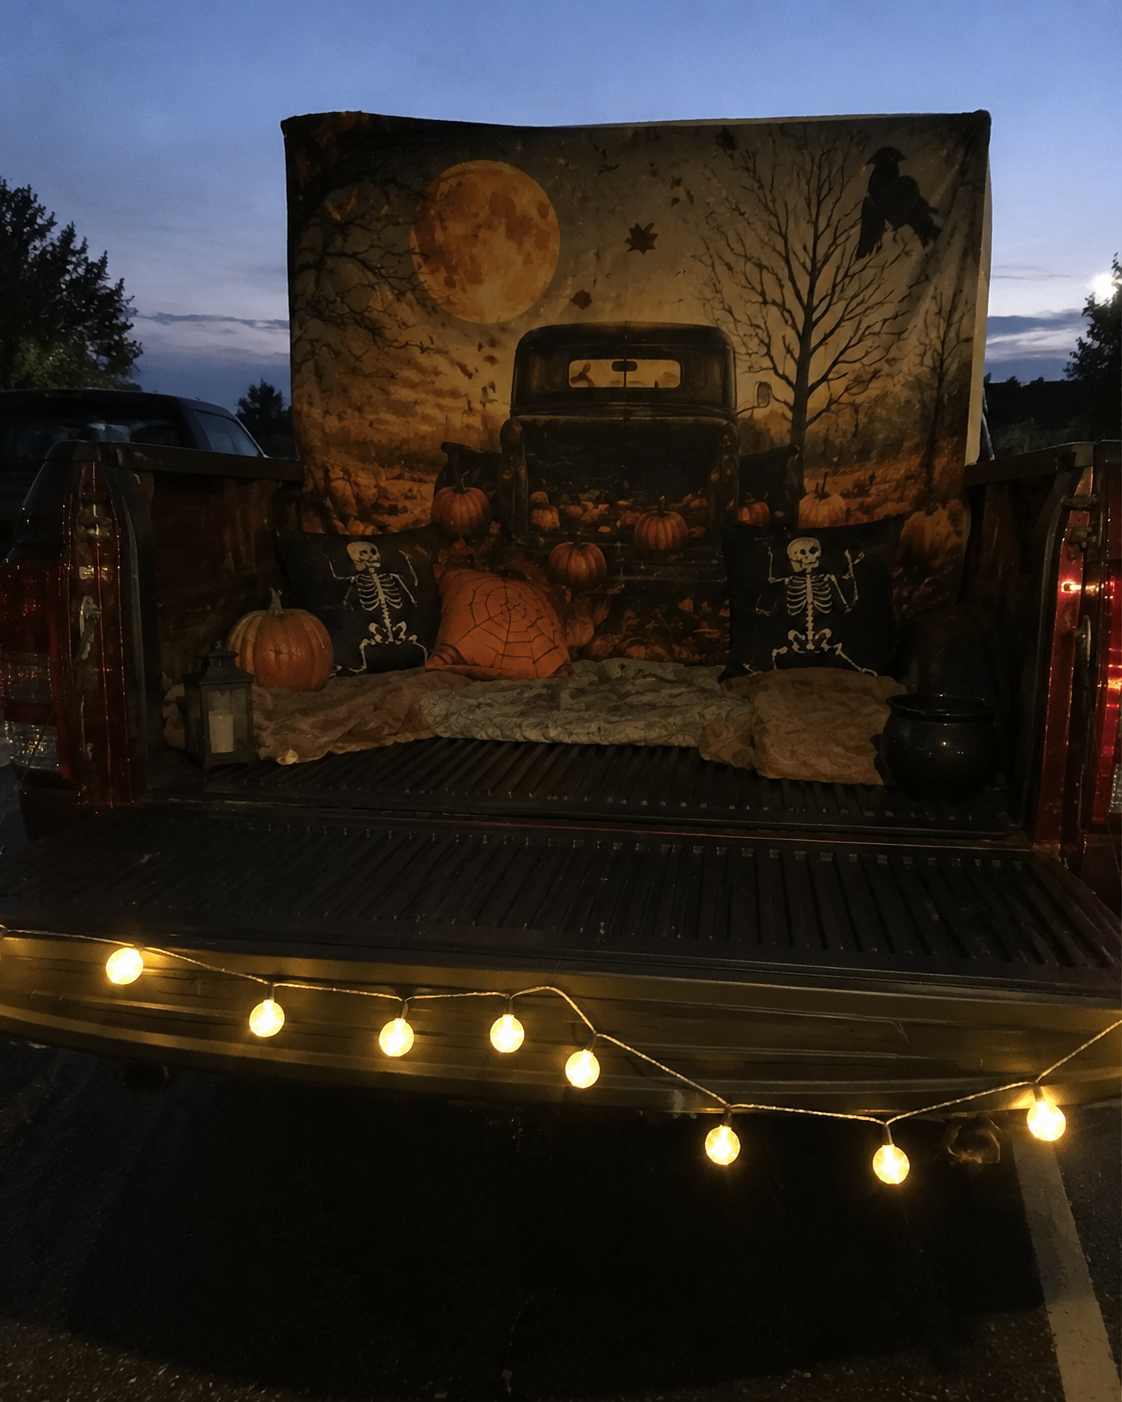
A truck bed offers something a sedan trunk doesn’t: real depth and often a flat floor at a consistent height, which opens up larger builds and better sightlines than a trunk opening usually allows.
How to pull it off:
- Treat the truck bed as a small stage rather than a shelf, building the scene to be viewed from the open tailgate rather than from the side
- Use the vertical walls of the bed to mount a taller backdrop than a trunk lid could support, secured with zip ties through the bed’s tie-down anchors
- Take advantage of any bed-mounted power outlet, where available, for a more elaborate lighting setup than battery power alone could run, while keeping a battery-powered backup in case the outlet isn’t accessible on event night
- Use the tailgate itself as a display shelf for smaller props or the candy bowl, since it sits at a comfortable height for younger trick-or-treaters
- Leave a clear path from the tailgate to the ground, since the extra height that makes a truck bed display look impressive can also make it harder for small children to see or reach without a step
10. The Costume-Coordinated Trunk
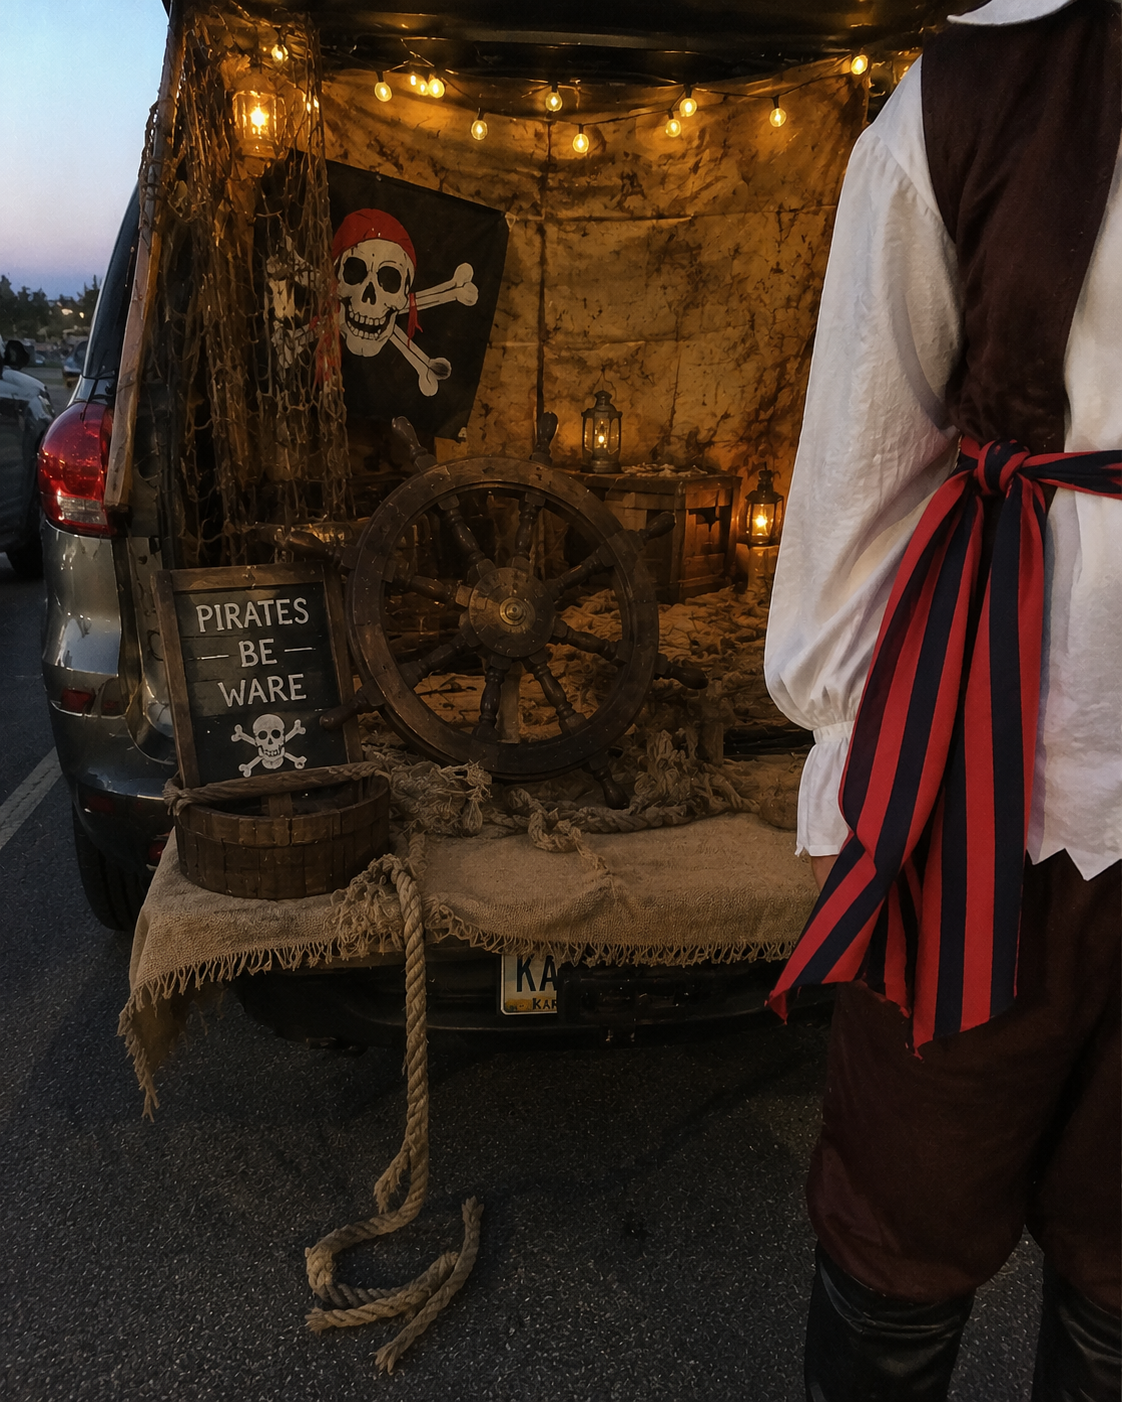
Some of the best trunk or treat decorating ideas start with a costume already planned, rather than a theme dreamed up separately.
If a family or group already has costumes sorted for the night, building the trunk as an extension of that costume means the trunk becomes part of the character, not a matching backdrop next to it.
How to pull it off:
- Start from the costume, not the other way around, a pirate costume points toward a ship’s deck trunk, a superhero costume points toward a city skyline backdrop, a fairy-tale costume points toward a storybook scene
- Pull decoration colors directly from the costume itself, so the trunk and the person standing in front of it read as one connected scene rather than two separate ideas placed side by side
- Build one or two props that make sense as an extension of the costume, a ship’s wheel for a pirate, a “wanted” poster for an outlaw, a spellbook for a witch, rather than trying to recreate an entire world
- Position the person in costume as part of the display itself, standing in front of or beside the trunk rather than off to the side, since the costume is doing a share of the decorating
- Keep the trunk decorations simpler than usual, since the costume is carrying visual interest that would otherwise need to come from props alone
11. The Allergy-Friendly and Non-Candy Trunk
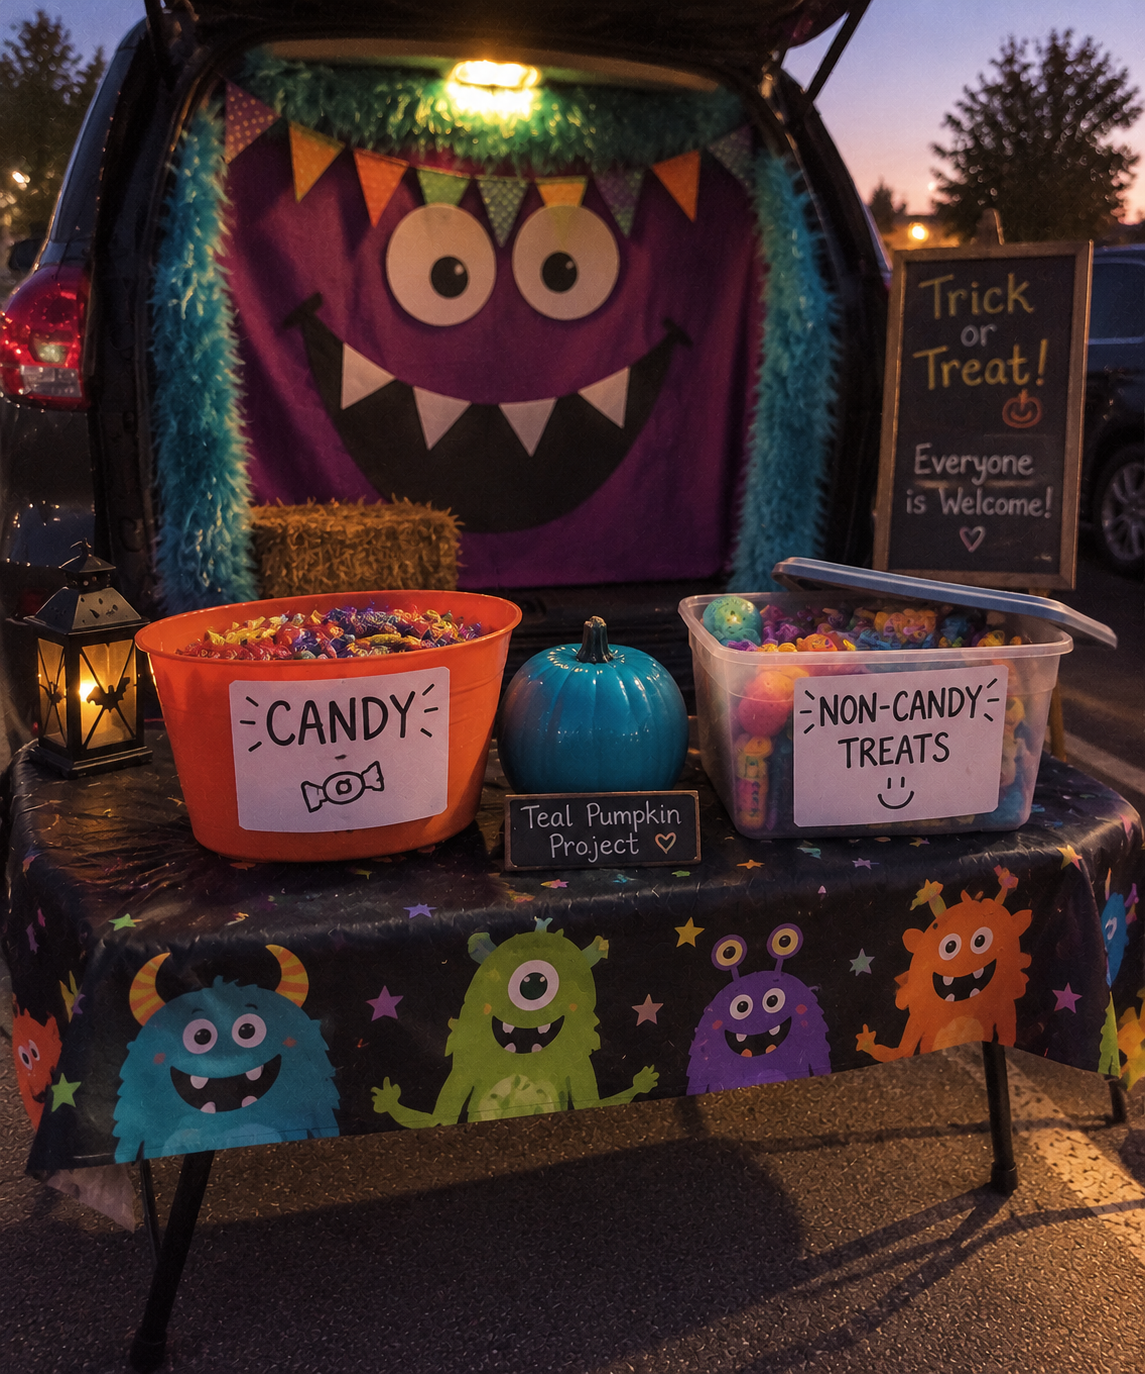
Among all the trunk or treat decorating ideas on this list, this is the one built around a real, recurring concern rather than a visual theme: making sure kids with allergies or dietary restrictions don’t feel left out at the one car in the row that doesn’t have anything for them.
How to pull it off:
- Choose a small, clearly visible marker, a teal-colored pumpkin or teal ribbon on the trunk, since teal has become a widely recognized signal for allergy-friendly treats at Halloween events
- Stock a mix of non-candy items alongside any candy offered: stickers, small toys, glow sticks, or pencils, kept in a separate container from the candy so there’s no risk of cross-contact
- Label both containers clearly, even with a simple handwritten sign, so parents scanning quickly from a distance can see there’s a safe option before their child even asks
- Pick a light decorating theme that doesn’t compete with the practical purpose here, something simple like a friendly monster or rainbow theme works well, since the main draw of this trunk is what’s being handed out, not the backdrop behind it
- Mention the non-candy option again in conversation as kids approach, since not every parent will spot the sign in a busy, dimly lit lot
Getting your family or friends ready for Halloween too? Take a look at Plus-Size Group Halloween Costumes: 11 Costume Ideas That Fit the Group, Not Just the Theme for comfortable and creative costume inspiration everyone can enjoy.
Making It Age-Appropriate and Safe
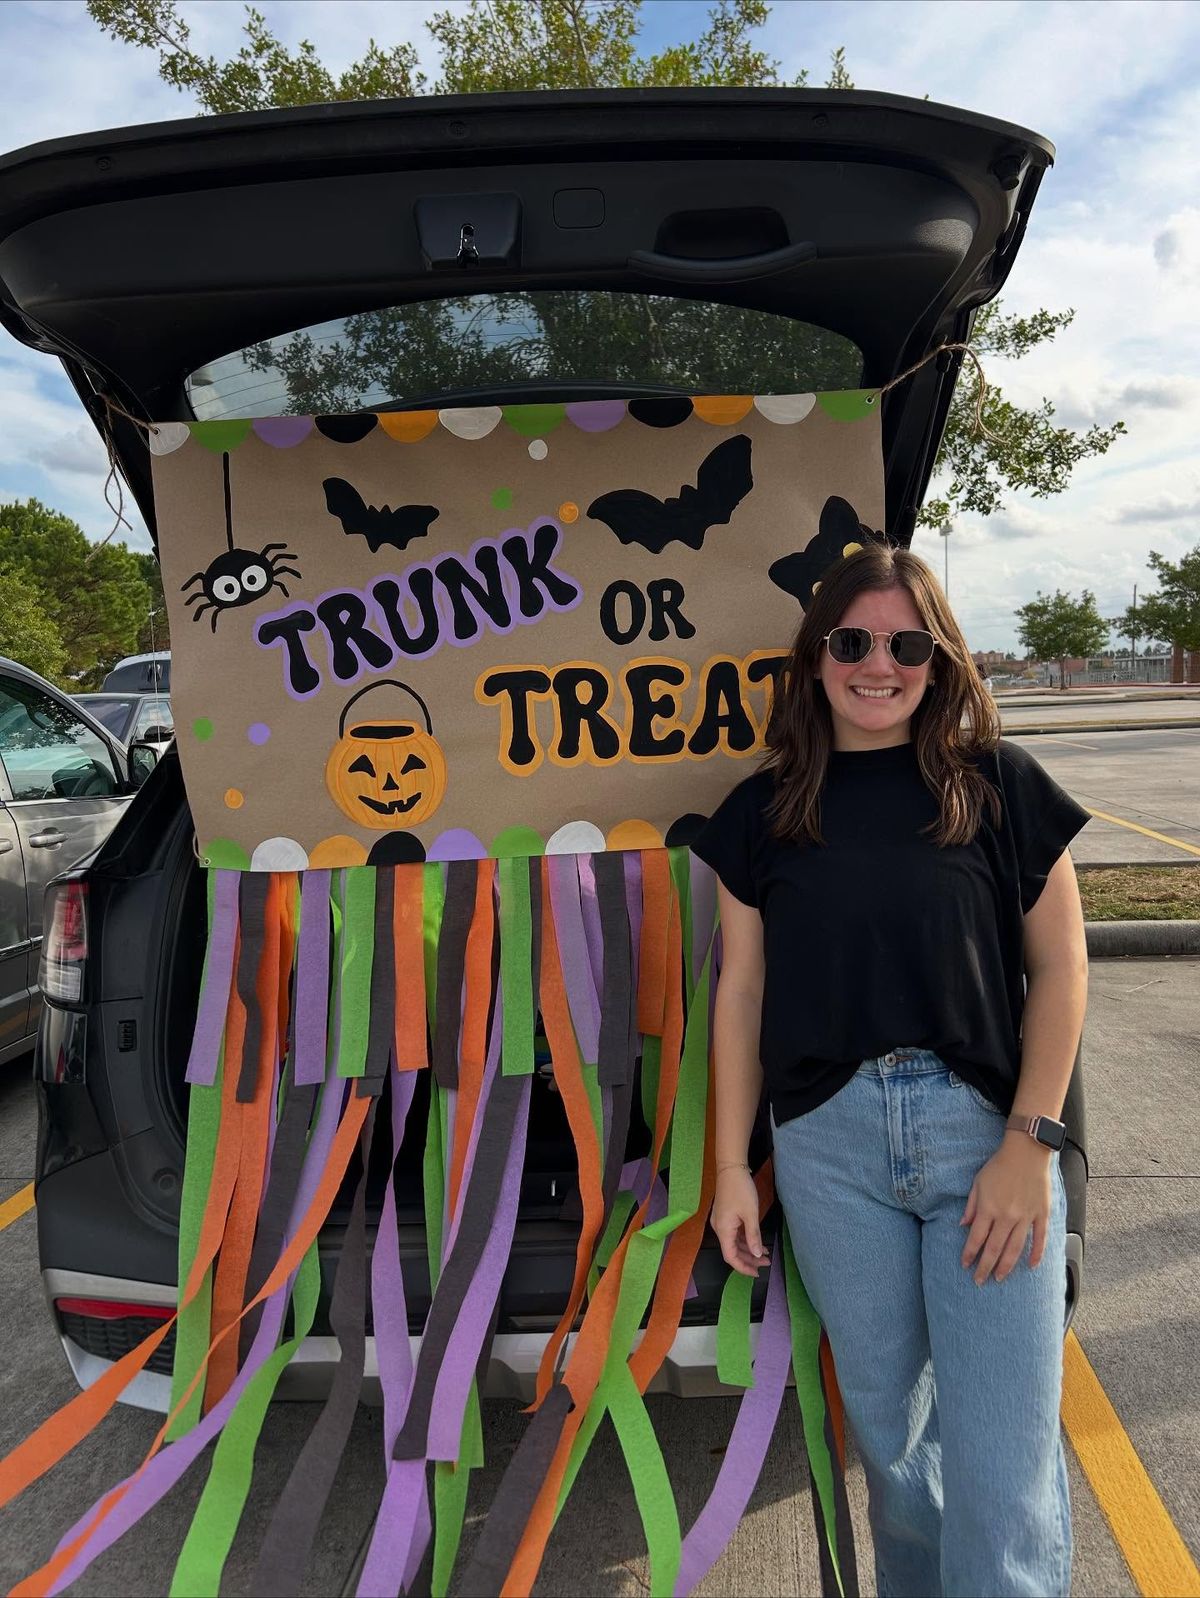
Trunk-or-treat events bring together toddlers still learning to walk and kids old enough to enjoy a good scare, often in the very same parking lot.
A theme that delights a ten-year-old can genuinely frighten a three-year-old standing right next to them.
Choosing a theme means thinking about who’s actually going to walk up to the trunk, not just what looks impressive.
Match the theme to who’s actually attending
- Full sensory setups, haunted facades, and anything involving fog, sudden movement, or jump-scare elements work best at events with a mostly older crowd, or ones clearly separated from the youngest attendees
- Harvest, woodland, and game-based themes tend to suit mixed-age crowds well, since nothing about them is frightening even for a toddler seeing trunk-or-treat for the first time
A quick look at who else is decorating, or a note from event organizers about the expected age range, helps decide how far to push the spookier trunk or treat decorating ideas versus the gentler ones
A short safety checklist before the first visitor arrives
- No open flames anywhere in the display, battery-operated candles and LED lights cover the same visual effect without the fire risk
- All cords and cables taped flat to the ground, not left loose across a walking path
- A clear, obstacle-free path from the trunk to wherever visitors are standing, especially for parents pushing strollers or holding a toddler’s hand
- Nothing blocking the car’s lights, mirrors, or license plate, regardless of how the decorations are arranged
- Any sensory or interactive element, grapes standing in for eyeballs, a fog machine, a game with thrown objects, positioned so it’s optional and clearly not required to receive candy
A theme only works if everyone walking up to it, from the youngest trick-or-treater to the parent trailing behind, can enjoy it without a second thought about safety.
Wondering what to do after Halloween is over? Read What to Do With Leftover Pumpkins After Halloween: 9 Uses Before They Rot for practical ways to reuse your pumpkins before they go to waste.
Conclusion
Not every trunk needs to be the biggest or the busiest one in the lot. A simple setup, done well, holds up just as strongly as an elaborate one.
Before settling on a theme, it helps to ask two questions: how much time is there before the event, and how much of this can be built from things already at home? The answers point straight to the right choice among these trunk or treat decorating ideas, whether that’s a quick backdrop-and-prop setup or a full weekend build.
So, pick one theme from this list, gather the materials, and start decorating.