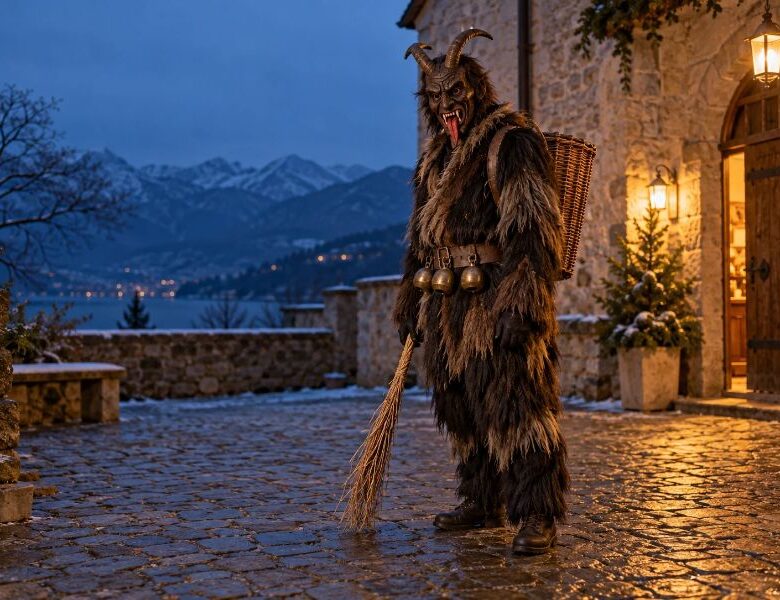
Not sure where to begin with a Krampus costume? These DIY Krampus costume ideas break it into small builds anyone can finish.
In Austria, southern Germany and nearby countries like Slovenia, the Czech Republic and Hungary, Krampus walks beside St Nicholas on the night of December 5. St Nicholas gives treats to the children who were good.
Krampus carries a birch rod and a basket on his back, and his job is to give the others a small fright.
The fright is only one part of it. Towns hold a Krampuslauf, a “Krampus run,” where whole groups walk together with bells ringing at their waists.
Carvers shape the masks by hand from thin pine, and one mask takes many hours. In parts of Tyrol, these figures are seen as protectors against evil, which is a long way from a simple monster.
A traditional Krampus has five parts: a mask with horns, a furry body, bells, a birch rod and a basket. That is good news for anyone making one at home, because a costume built one part at a time stops feeling like a big job.
These DIY Krampus costume ideas go piece by piece, with builds for hot countries, first-time sewers and children. Start with the mask, since it takes the longest to dry and paint.
Finding a comfortable fit matters more than simply sizing up. Plus-Size Oktoberfest Outfits: Dirndls and Lederhosen for Size 20+ That Feel Good to Wear
Plan your build before you buy anything
Three things can spoil a costume after it’s finished: it’s too hot, you can’t see out of the mask, or the bells are too loud.
Think about each one now, before you buy anything. It’s much easier to fix on paper than on a finished costume.
1. How hot will you be?
Traditional Krampus wear goat skin or fur, and the parades in the Alps happen in the cold months. Your December may look different. Maybe it’s 30°C outside, or you’ll be dancing in a packed hall, and a full fur suit would have you looking for the door within the hour.
Pick the build that matches your weather:
- Cold or mild: faux fur strips sewn onto a hoodie or boiler suit.
- Hot or humid: raffia, jute or torn hessian. Air passes through them, and you still get the shaggy Krampus look.
- Somewhere in between: fur on the shoulders and arms only, over a thin cotton layer.
2. How much can you see?
A mask cuts off your side view, and you’ll feel it the moment you try to walk through a door. Even the traditional carved masks are made of thin pine, so the weight is manageable, but you still need to see where your feet are going.
- Cut the eye holes bigger than seems necessary. Trimming them smaller later is easy, and adding material back is not.
- Walk around in the mask for ten minutes, past a doorway and up a couple of steps, before you paint or glue anything final.
- Wear glasses? The sewn fabric hood or face paint with horns leaves room for them.
- Making this for a child? Skip the mask. Face paint and a horn headband let them see everything, and everyone still knows who they are.
3. How loud do you want to be?
Real Krampus wear cowbells at the waist, so people hear them coming. The same bells in a small room can feel much louder than they do outdoors.
- Heavy cowbells need a strong, reinforced belt, because they pull down on your waist as you walk.
- Sleigh bells are lighter and quieter, and they suit children and indoor parties.
- Try the bells in the room where you’ll wear them before you attach the whole set.
You can create the Oktoberfest look without buying a costume. DIY Oktoberfest Costume: 7 Outfits You Can Make From Clothes Already in Your Closet
Masks and horns
Start here, because the mask takes the longest and everything else is built to match it. Ideas 1 to 6 are masks, and 7 and 8 are horns that fit onto any of them.
1. Papier-mâché mask with paper clay

Traditional Krampus masks are carved from thin pine. The carver saws out a rough face, shapes it with a knife and a wooden mallet, fits the eyes, adds horns, and paints it. Carvers say one mask takes many hours, and they work with skill built over years.
This mask is a lighter way to get the same look. Paper strips build the shape, and paper clay stands in for the carving: you press the brow, nose and teeth into it and cut knife-like marks into the surface.
Painted dark, it can pass for old wood. Papier-mâché is not how the tradition makes masks. It is a stand-in that anyone can make at home with cheap materials.
What you’ll need
- Newspaper, torn into strips about 2 to 3 cm wide
- Paste: plain flour mixed with an equal amount of water until smooth, or PVA craft glue thinned with a little water
- Air-dry paper clay
- Cardboard, plus extra newspaper and masking tape for the base
- Acrylic paint in dark brown, a lighter brown or ochre, off-white, deep red and black
- A stiff brush, a soft brush, and fine sandpaper
- Clear varnish or sealer
- Elastic and a small piece of foam for the forehead
- Optional: domed glass gems or painted beads for the eyes
Humid climate? Flour paste can grow mould when drying is slow. Use PVA glue instead, and dry the mask in a room with moving air or near a fan.
How to make it
- Shape the base. Crumple newspaper into a face shape and tape it firmly, or start with a cheap plastic mask. Hold it up to your face and mark where your eyes sit. Cut the eye holes larger than you think you need, since paint and clay will shrink them.
- Add the paper layers. Dip a strip in paste, wipe off the extra, and lay it flat on the base. Cover the whole mask, then add three or four layers in total. Let each layer feel dry before adding the next. Thin paste dries faster and gives a lighter mask.
- Build the features with clay. Press paper clay onto the dry mask for the brow ridge, nose, cheekbones, teeth and tongue. Wet both surfaces slightly where they meet, so the clay sticks. Keep the clay at an even thickness, because thick patches crack as they dry.
- Carve the wood look. While the clay is still soft, use a modelling tool or the edge of a spoon to cut flat, angled marks across the brow and cheeks, like knife cuts. Drag a fork lightly along the forehead and cheeks to make grain lines. Keep the lines running in the same direction, as they do in a real piece of wood.
- Dry and sand. Leave the mask until the clay is dry all the way through. Sand off any rough bumps gently.
- Paint it. Cover it in dark brown first. When dry, brush a lighter brown over the surface with a nearly dry brush, so the colour catches on the raised parts and the carved marks stay dark.
Paint the teeth off-white (pure white looks too clean), the tongue deep red, and the eye holes black around the edges.
Glue in glass gems or beads if you are using them. - Seal and fit. Brush on a coat of varnish. Make a small hole on each side and thread elastic through. Glue a small piece of foam inside the forehead so the mask sits comfortably. Add your horns last (ideas 7 and 8).
Problems you may run into
- The mask feels heavy. Use thinner clay and no more than four paper layers. Heavy clay is the usual cause.
- The clay cracks while drying. Press a little fresh clay into the crack, smooth it with a wet finger, and let it dry again. Next time, keep the layers thinner.
- The paint looks flat and plastic. Add the lighter brown with a dry brush, and keep the darker colour in the carved marks.
- You can’t see well. Cut the eye holes wider with scissors before sealing. It is much harder to fix after varnish.
2. EVA foam mask with vents cut into the cheeks
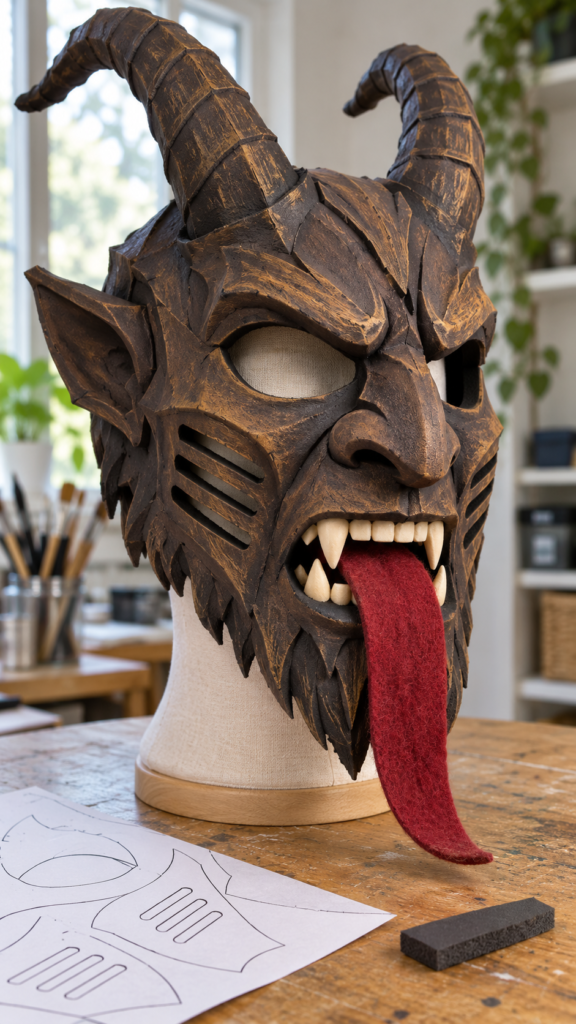
EVA foam is the soft, light foam sold in craft sheets. Foam floor mats are made of the same material, so a mat can stand in when sheets are hard to find.
Costume makers have used it for masks and armour for years because it cuts easily, bends with a little heat and stays light on the head.
Traditional Krampus masks are carved from thin pine, with sharp teeth and a long, hanging tongue.
This foam mask copies that look in a much faster build. The vents are an addition of my own. Real masks don’t have them, and they’re there only to let air in on a hot day.
What you’ll need
- EVA foam sheets, 5 to 6 mm thick for the mask body (thinner foam sags around the vents)
- A sharp craft knife with spare blades, a cutting mat and a ruler
- Thick paper or card for the pattern, a marker and masking tape
- A heat gun for shaping (hold it a hand’s width away and keep it moving)
- Hot glue or contact glue
- Thinned PVA glue as a sealer, or any flexible sealer made for foam
- Acrylic paint in dark brown, a lighter brown or ochre, off-white, deep red and black
- Red felt for the tongue
- Elastic, and a small piece of foam to pad the forehead
- A stiff brush and a soft brush
No heat gun? Skip the heat shaping. Cut small V-shaped wedges (darts) into the foam, pull the edges together and glue them. The foam curves around your face without any heat.
How to make it
- Make a card pattern first. Measure from your brow to your chin and across your cheekbones. Cut the shape from card and tape it to your face. Mark where your eyes sit, and cut the eye holes bigger than you think you need.
Fix the shape in card before you touch any foam. - Cut the foam. Trace the pattern onto the foam and cut it in a few light passes with a sharp blade. A blunt blade tears the foam and leaves rough edges. Cut separate pieces for the brow ridge, the nose and the lower jaw.
- Cut the vents. Mark three or four slanted slits on each cheek, following the line of the cheekbone.
Keep each slit about a finger’s width from the edge so the foam stays strong. Cut each one in a single clean line. - Shape the foam. Warm the foam with the heat gun for a few seconds, bend it over a bowl or round object, and hold it until it cools. Overheating makes the surface bubble, so stop when the foam turns soft.
- Glue the pieces together. Dry-fit everything first. Glue the seams, press them firmly, and add stacked foam strips to build up the brow. Slice the edges of each piece at an angle with your blade so the joins sit flat.
- Add the teeth and tongue. Cut pointed teeth from strips of foam and glue them along the mouth, with a few longer ones at the corners.
Sew or glue a long red felt tongue so it hangs from the mouth, as it does on traditional masks. - Score the “carved” lines. Cut shallow lines across the brow and cheeks with the tip of your blade. Pass the heat gun over them briefly and they open up slightly, like knife marks in wood.
- Seal it. Brush on two coats of thinned PVA, letting each coat dry first. Foam soaks up paint without this step, and the paint cracks when the mask bends.
- Paint it. Start with dark brown. When it’s dry, brush lighter brown over the top with a nearly dry brush so the colour catches on the raised parts.
Paint the teeth off-white, the tongue deep red, and the inside of the vents black so they blend into the design. - Fit it. Make a small hole at each side and thread elastic through. Glue a foam pad inside the forehead, put the mask on, and check that you can see before adding horns (ideas 7 and 8).
Problems you may run into
- The mask is still warm to wear. Foam doesn’t breathe, even with vents. Take short breaks in a cooler spot and drink water. Want something cooler? The fabric hood (idea 4) or the face paint and horns (idea 5) are better in heat.
- The edges lift. Press the seam firmly for a full minute after gluing, and use contact glue in a ventilated room for the strongest hold.
- The paint cracks. The sealer coats probably went on too thin.
Add another coat of thinned PVA, let it dry, then repaint with a flexible acrylic. - Burn marks or bubbles. Hold the heat gun farther away and keep it moving. A slightly scorched patch can be hidden under dark paint.
- The vents sag or tear. The foam is too thin. Use 5 to 6 mm sheets and keep the slits away from the edges.
Take care with the knife and the heat gun, and keep the room open to the air when you use contact glue.
3. Hand-carved Pine Mask
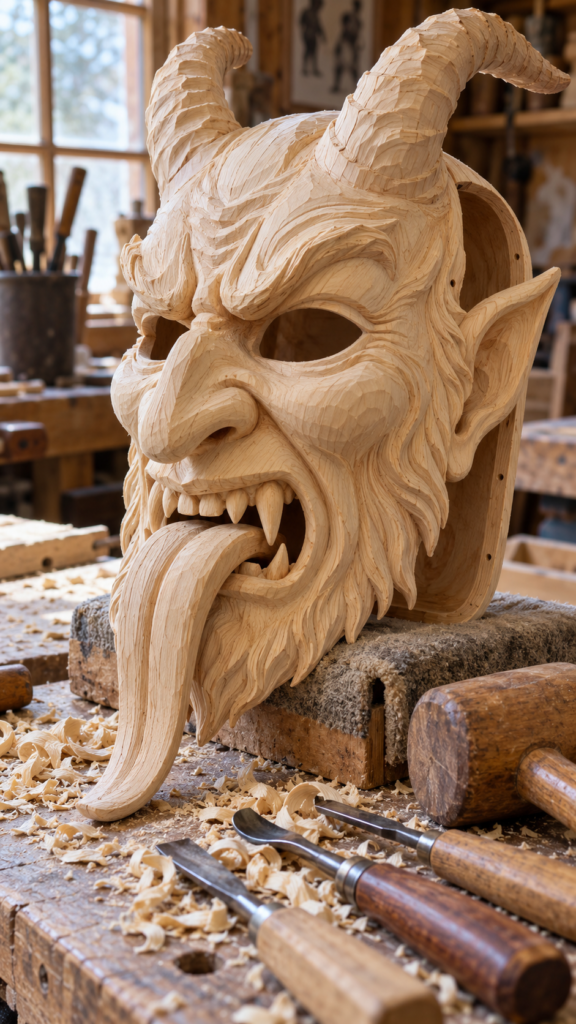
This is how traditional Krampus masks are made. Bernhard Reiter, a carver in Faistenau, Austria, used to run as a Krampus himself and finished his first wooden mask in 2013.
He carves from Swiss stone pine or Weymouth pine, both soft woods. Before he starts, he checks that the block has no cracks and cuts off any dark edge.
A good mask, in his words, takes many hours, and he can’t give a number because every mask is different.
Many Krampus runners start much more simply. Young groups in his region often begin around age 10 with rubber masks and simple costumes. Carving comes later, if the passion stays.
Choose this idea only if you already carve. Everyone else can pick any other mask in this post and still look right.
What you’ll need
- A block of soft, dry, straight-grained wood with no cracks or knots. Reiter uses Swiss stone pine or Weymouth pine, which many readers can’t buy locally. Ask a timber seller for a soft carving wood that grows near you.
- A bench vice or strong clamps
- A saw (a handsaw or bandsaw is fine for rough shaping)
- A carving knife, a few gouges and a wooden mallet
- A pencil and card for templates
- Safety gear: a cut-resistant glove for the hand that holds the wood, safety glasses and a dust mask
- Fine sandpaper
- Glass eyes (domed glass gems or beads work), and horns from idea 7 or 8
- Acrylic paint and a clear sealer
- Foam padding and a bit of mesh, for fitting
How to make it
- Check the wood. Turn the block in the light and look for cracks. Cut away any dark edge. A hidden crack can split the mask halfway through the carving.
- Make a card pattern. Cut a face shape from card, hold it to your face, and mark your eyes, nose and mouth. Cut separate card templates for features that must match on both sides, like the ears and brow. Reiter uses card templates for the ears for this reason.
- Saw the rough shape. Carvers use a chainsaw for this step.
A handsaw or bandsaw does the same job more slowly and with more control. Remove the corners of the block, and leave the brow and nose as thick masses. - Draw the features. Mark the eyes, nose, mouth and brow in pencil. Work from rough to fine, the way carvers do, and draw only the large shapes first.
- Carve. Clamp the block. Use the knife and mallet to cut the coarse shapes first, then the finer ones. Cut away from your body, take shallow cuts, and turn the block often so one side doesn’t get ahead of the other.
- Hollow the back. The mask must be thin and light, so the back is hollowed out to fit your face. The carvers I read describe the front but not this step, so use your own usual method with gouges, working slowly and checking the wall thickness often.
- Cut the eye holes and fit the eyes. Make the holes larger than you think you need and check your view with the mask on.
Fit glass eyes last. - Paint it. Paint the whole mask dark brown, then add a lighter brown over the raised parts with a nearly dry brush.
Keep the red limited to the tongue and the mouth. Reiter says too much blood on a mask has little to do with tradition. - Add the horns and fit it. Glue or screw on the horns. Glue foam padding inside the brow and cheeks.
One mask in the Mask Museum’s collection has padded leather inside, mesh over the eyes and a foam-lined helmet underneath, so padding and a liner are in keeping with how real masks are made. - Wear it before the event. Walk around in it for ten minutes. Check your view, your breathing and the weight on your forehead before the night itself.
Problems you may run into
- A crack appears. Stop and check how far it runs. A small crack can be filled with wood glue and held with a clamp. A long crack means starting again with a better block.
- One side looks different from the other. Hold the card template against both sides after each round of cuts, and fix the difference while the wood is still thick.
- The mask is too heavy. Keep hollowing the back until the walls are thin, and stop before any spot goes see-through.
- You can’t see well. Enlarge the eye holes before painting. Fixing them after paint is much harder.
- The knife slips. The blade is probably blunt. A sharp blade needs less force, and less force means more control.
4. Sewn Stretch-Fabric Hood With Felt Teeth and Tongue
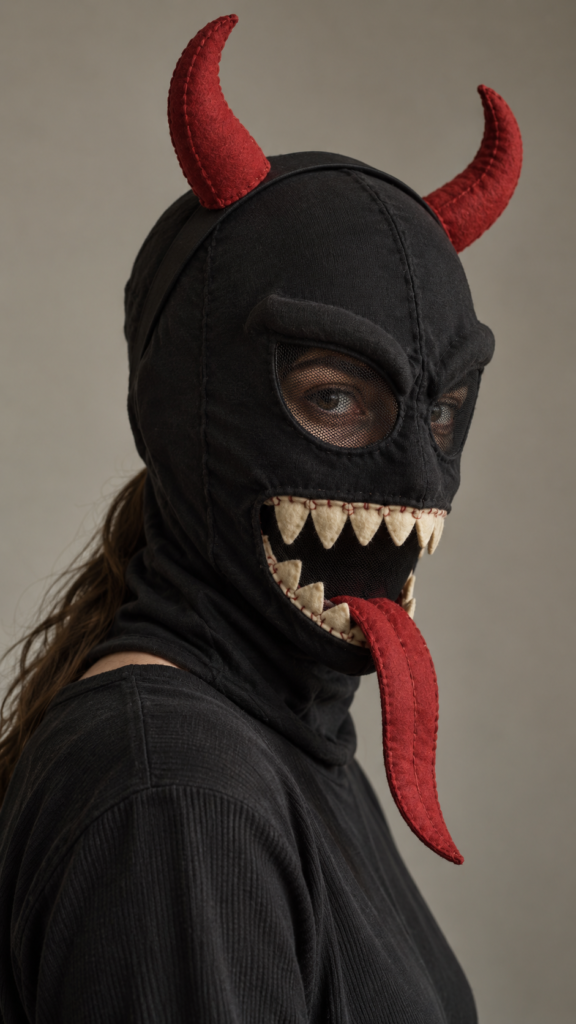
Traditional Krampus masks are hard and carved, with horns, sharp teeth and a long tongue hanging from the mouth.
The Mask Museum describes this look, and one of its masks has mesh over the eyes.
This hood borrows those same features and builds them in soft fabric and felt. It is my own adaptation and not part of the tradition.
The advantages are practical. A fabric hood is light and flexible, it doesn’t need paint to dry, and sewing it takes only a machine or a needle and an evening or two. It also suits anyone who wears glasses, since the eye openings can be cut to fit around them.
What you’ll need
- Black stretch fabric, about a metre or a yard. Cotton jersey with a little stretch is cooler in hot weather than heavy polyester.
- Thread to match, and a stretch or ballpoint needle if you use a machine
- A thrifted balaclava or fitted hood as a pattern (optional, and the easiest way to start)
- Off-white felt for the teeth
- Red felt for the tongue, and a thin strip of stiff interfacing or card to go inside it
- A little polyester filling for the brow
- Black net or sheer mesh for the eye openings
- Fabric glue or a needle and thread for attaching the felt
- A strip of elastic for a chin strap (optional)
- Paper for a pattern, if you start from scratch
How to make it
- Measure your head. Measure around the widest part of your head and from the top of the head down to the base of your neck. Stretch fabric hugs, so the hood can be slightly smaller than your head, but never larger.
- Make the pattern. Lay a balaclava or fitted hat flat and trace around it, adding a small seam allowance.
Starting from scratch? Draw one side of the head as a simple rounded shape and cut two mirror-image pieces. Make a test version from scrap cloth first. - Cut the fabric. Place the stretch across the width of the head, so it gives sideways. Cut two side pieces. Knit fabric doesn’t fray, so the edges need no hem.
- Sew the head. Sew the two pieces together along the top and back with a stretch stitch or a narrow zigzag. A straight stitch snaps when the fabric stretches. Leave the face edge open for now.
- Mark the face. Try the hood on and mark where your eyes and mouth sit.
Wear your glasses over the hood and mark where the lenses are. Cut the eye openings a little larger than the lenses, because it is easy to make them smaller later. - Cover the eyes. Cut two pieces of black net slightly bigger than the openings and sew them behind the fabric. Net hides your eyes from outside and lets you see through it.
- Make the mouth. Cut an opening at your mouth, wide enough to breathe through easily. Sew the edge flat so it doesn’t curl.
- Cut and sew the teeth. Cut pointed triangles from off-white felt in two layers, so each tooth stays stiff.
Sew a row along the upper edge of the mouth, and a smaller row along the lower edge. Make a few teeth longer at the corners. - Make the tongue. Cut two long tongue shapes from red felt. Put the stiff strip between them and sew the edges together.
Stitch the top end inside the lower edge of the mouth, so the tongue hangs down and out, as it does on the traditional masks. - Build the brow. Cut a strip of black felt, sew it across the forehead on three sides, and slip a little filling inside before closing the fourth side. The filling makes the heavy brow ridge.
- Prepare for the horns. Sew two small felt patches on the top of the hood, where the horns will sit. Stitch the horns from idea 8 onto the patches, or attach them to a headband that sits over the hood.
- Wear it before the night. Put the hood on and walk around for ten minutes. Check your view, your breathing and whether the teeth rub your lips.
Problems you may run into
- The seams pop. The stitch is too tight or too straight. Use a stretch stitch, a narrow zigzag, or hand backstitch with a little slack.
- The teeth flop. A single layer of felt is too soft. Double the felt and glue the layers, or slip in thin interfacing before sewing.
- The hood slips. Sew a small elastic strap under the chin, or choose a pattern that is slightly smaller.
- The tongue curls upward. The stiff strip is probably too short. Cut a longer one so it supports the whole length.
- Your view is blurry. The net is too dense or sits too close to your eyes. Use finer mesh and cut the openings larger.
- It’s too warm. Choose a thinner jersey next time, and keep the mouth opening wide for air.
5. Wire-and-Felt Curled Horns on a Detachable Headband
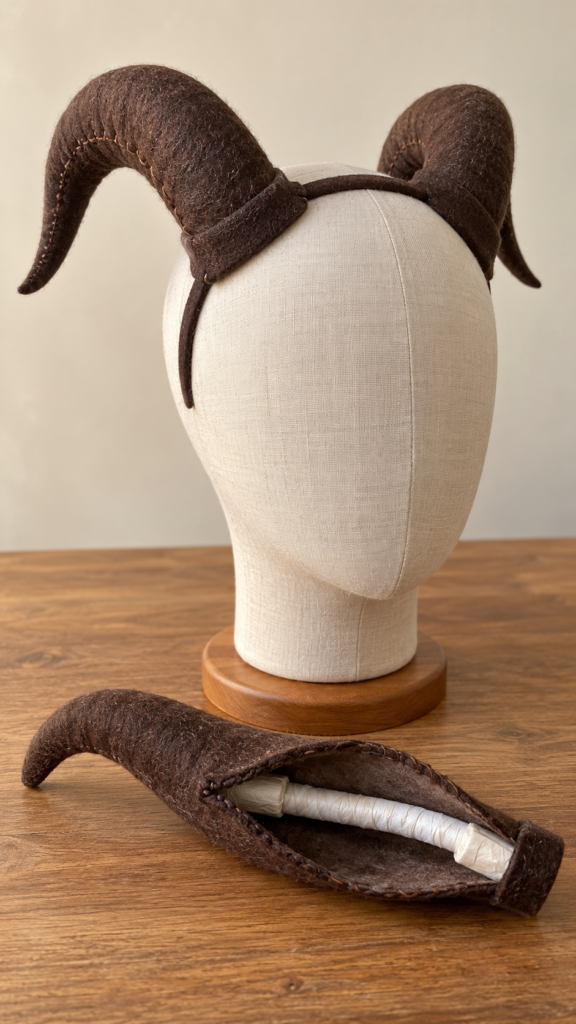
Horns are the first thing people notice on a Krampus. Real masks carry them, and the Mask Museum describes examples with goat and ibex horns, both with a strong backward curve.
These horns copy that curve with a bent wire core, soft padding and a felt cover.
Felt makes them light enough to wear for hours, and the wire lets you adjust the curve with your hands. They sit on a headband, so they come off in a second.
Wear them over the fabric hood, with a painted face, or on their own when a mask feels like too much.
What you’ll need
- Thick craft wire that holds its shape but still bends by hand (the sort sold as armature or floristry wire works well)
- Pliers and wire cutters
- Masking tape
- Polyester filling or wool batting
- Felt in dark brown or grey, about one A4 or letter-size sheet for a pair
- A needle and strong thread, or fabric glue
- A plain, sturdy headband (fabric-covered ones grip hair better than plastic)
- Paper and a pencil for the pattern
- A little extra felt for covering the base
How to make it
- Choose the shape. Look at a picture of a goat or ibex horn: wide at the base, curving backwards, narrowing to a point.
Draw that curve on paper, about 20 to 25 cm long for an adult head, shorter for a child. Longer horns look dramatic but pull the headband backwards. - Bend the wire. Cut two lengths a little longer than the drawing.
Twist two strands together for each horn if one strand is too thin to hold the curve. Bend each to match the paper and compare them side by side, so the pair is even. - Make a loop at the base. Fold the thick end back on itself with pliers, about 3 cm, to make a loop. The loop is what you will stitch to the headband.
- Cover the sharp ends. Fold the tip back, and wrap both ends in tape until nothing can scratch.
- Pad the wire. Wind batting around each wire, thicker at the base and thinner towards the tip, and hold it with a spiral of masking tape. The padding gives the horn its shape and takes away the stiff, straight look.
- Cut the felt. Wrap a strip of paper around a padded horn to make a pattern: a long, curved, tapering cone with a seam allowance. Check it, adjust, then cut two pieces from felt.
- Sew the cover. Stitch each felt cone along its long edge with small, even stitches.
Keep the seam on the inner curve, where it shows least. - Slide it on. Ease the felt over the padded wire. Push a pinch of filling into the tip so it ends in a point, and tuck the felt snugly at the base.
- Close the base. Fold the felt under at the bottom and stitch it shut, leaving the wire loop free.
- Attach to the headband. Place each horn just above the ear, angled slightly outward.
Stitch through the loop and around the headband many times, then cover the base with a strip of felt to hide the stitching. - Test the balance. Wear the headband in front of a mirror and shake your head gently. Bend the horns until they match, and add a stitch or two wherever they wobble.
Problems you may run into
- The horns flop sideways. The wire is too thin. Twist two strands together, or choose a thicker gauge.
- The headband tilts back. The horns are too long or too heavy. Shorten them, or move them closer to the front of the head.
- The tip looks blunt. Add a little more filling at the end and take a few stitches around it to pinch it into a point.
- The felt wrinkles. The pattern is too wide. Recut it slightly narrower and pull the felt tight before stitching.
- A wire end pokes through. Fold the tip back farther, tape it again, and add a small felt patch over the end.
- The headband slides. Wrap it in felt or glue a strip of non-slip grip tape inside, so it holds
Group costumes work better when every person feels comfortable in their own outfit. Plus-Size Group Halloween Costumes: 11 Costume Ideas That Fit the Group, Not Just the Theme
Fur and body: Krampus costume ideas for the suit
In the Alpine parades, a Krampus is dressed in dishevelled fur, with the body doing as much work as the mask.
A good Krampus costume is shaggy, uneven and heavy-looking, and none of that needs real animal skin.
Here are four builds for four situations: a cold December, a hot one, a Perchten-style costume made from corn husks, and a night when time is short.
6. Faux Fur Strips on a Thrifted Boiler Suit or Hoodie
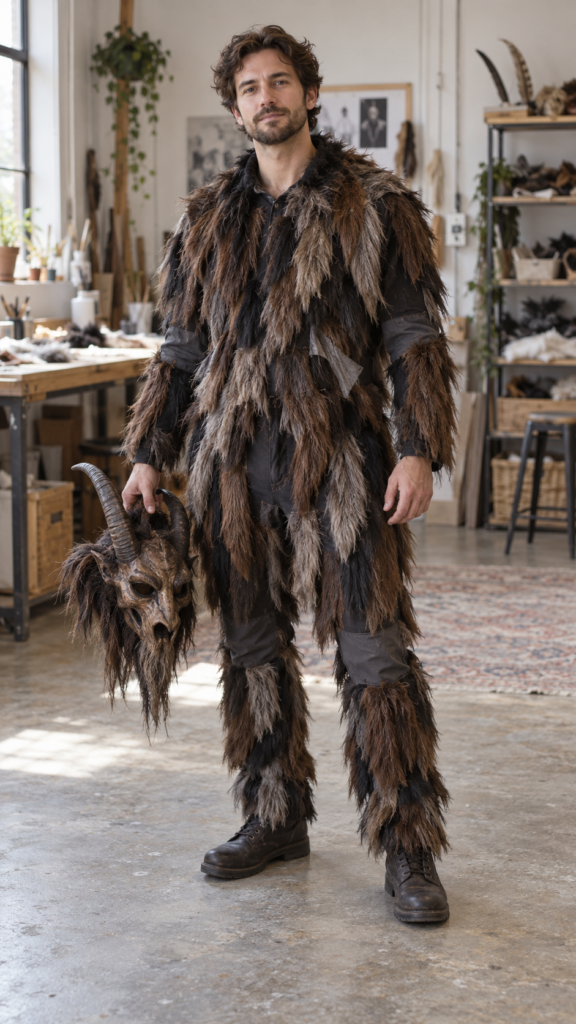
Krampus suits are traditionally fur or goat skin. This build gets the same look from faux fur sewn in overlapping rows, so nothing animal is involved, and it puts a thrifted boiler suit or hoodie to use as the base.
Best for: Cold or mild weather, and anyone who likes to sew.
What you’ll need
- A dark boiler suit, or a hoodie and trousers, bought second-hand
- Faux fur fabric by the metre or yard, in two or three shades of brown, black and grey
- Strong thread and a sturdy needle, or a machine with a heavy-duty needle
- A craft knife or razor blade, and a cutting mat
- Pins or clips
- A pin or comb for pulling the fur out of the seams
How to make it
- Lay the garment flat and place strips of fur on it before cutting, so you can estimate how much fabric you need.
- Cut the fur from the back. Slide a blade through the backing only, not the pile, so the fur keeps its length and the edges don’t look chopped.
- Cut strips about a hand wide. Mix the shades and leave the ends uneven.
- Start at the hem and work upward. Sew each strip along its top edge, with the pile pointing down. The next row overlaps the one below, like roof tiles.
- Pull the trapped fur out of each seam with a pin as you go.
- Cover the shoulders, back and sleeves. Leave small gaps at the elbows and knees so you can bend.
- Trim any long, even-looking sections with scissors until the surface looks rough and natural.
Problems you may run into
- Fur sheds everywhere. Cut and trim outdoors, and shake each strip before sewing.
- The suit is too hot. Fur only on the shoulders, upper back and arms, over a thin cotton layer.
- The seams look bulky. Sew with a long straight stitch and keep the strip’s top edge flat.
- It looks too neat. Mix the strip lengths, cut a few diagonally, and rub dark paint lightly into the pile.
7. Raffia or Jute Shaggy Suit
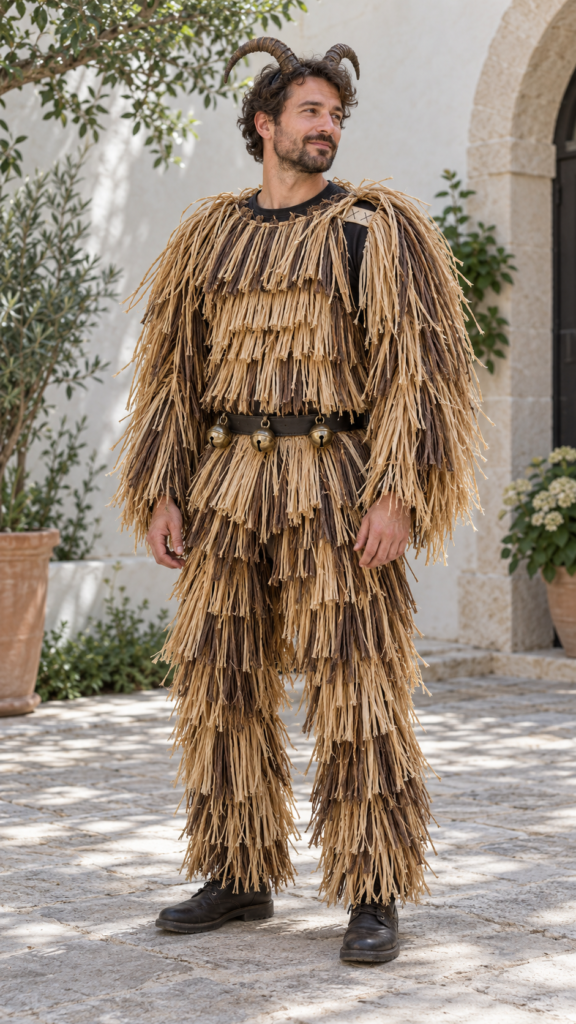
The shaggy outline matters more than the material. Raffia or jute strands give the same untidy, hairy shape as fur and let much more air through, which makes this build the one for hot countries.
Best for: Warm weather, hot halls, and readers who don’t want faux fur.
What you’ll need
- Raffia, or jute twine or rope unravelled into strands
- Cotton tape, about 2 cm wide
- A black or dark base layer (a long-sleeved top and trousers)
- Needle and strong thread
- Scissors
- Fabric dye for natural fibres, in dark brown (optional)
How to make it
- Dye the fibre if you want a darker colour. Follow the instructions on the pack and let it dry completely.
- Cut strands about the length of your forearm.
- Lay a bundle of strands across a length of cotton tape, and stitch along the middle so the strands hang down on both sides like a fringe.
- Make many strips. Sew them onto the base layer in overlapping rows, starting from the hem and working upward.
- Add the longest strands at the shoulders and the arms, and shorter ones at the chest.
- Tease the strands apart with your fingers until the surface looks tangled.
Problems you may run into
- The fibre itches. Wear a thin cotton layer underneath, and sew the tape on the outside of the base so the cut ends point away from skin.
- Strands drop out. Stitch each strip twice along the tape, and shake the suit outdoors before wearing it.
- It looks too pale. Dye the fibre before sewing, or dry-brush dark brown acrylic paint over the finished suit.
- Raffia and jute burn easily. Keep the costume away from candles, torches and any open flame.
8. Corn-Husk Perchten Costume
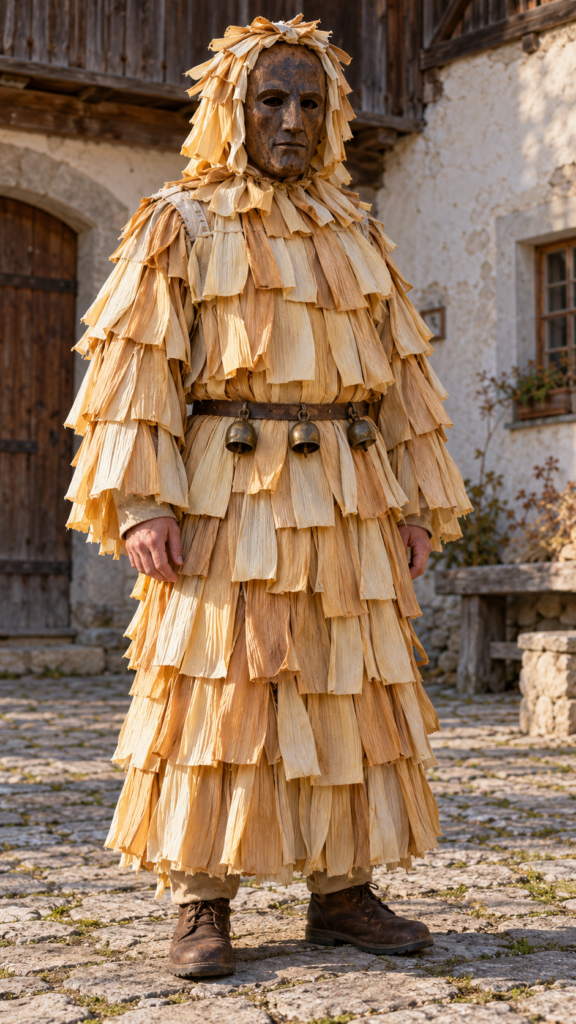
Perchten are a related Alpine winter tradition, and they are not the same as Krampus.
In Breitenbach in Tyrol, Perchten groups walk from farm to farm in December wearing carved wooden masks and robes of corn husks, with bells and drums to drive away the winter spirits.
Their husk costumes are handmade: the husks are taken off the cobs, dried for weeks, and then worked by hand.
Label this one as a Perchten costume in your post, because it belongs to a different tradition. It suits anywhere that grows maize, since the main material is something most people can get from a market for little or nothing.
Best for: Warm countries, readers who want something unusual, and anyone who wants a fur-free costume with real roots.
What you’ll need
- A large quantity of dried corn husks (from fresh maize, saved from the market, or sold dried for cooking)
- A bucket or basin of warm water
- Cotton tape or strong string
- A plain base layer in brown or beige
- A needle and strong thread
- A clean towel
How to make it
- Collect the husks and dry them fully. Spread them in a single layer in a shaded, airy spot and leave them for weeks, as the makers in Breitenbach do.
- Soak the dry husks in warm water for a short time, until they bend without cracking. Pat them dry with a towel.
- Tear each husk lengthwise into strips of different widths.
- Fold a group of strips over a length of tape and stitch along it, so the husks hang down.
- Sew the strips onto the base layer in overlapping rows, starting from the hem and working up. Overlap generously, because husks shrink as they dry.
- Dry the costume flat before you wear it.
Problems you may run into
- The husks crack. They are too dry. Dampen them again and work with a few at a time.
- Mould appears. The husks were packed away damp. Dry the costume completely before storing it, and keep it in a breathable bag.
- It rustles loudly. That is normal. Add a belt of bells (idea 11) and the sound turns into part of the costume.
- Rain softens it. Wear it indoors or on a dry night, and keep a spare layer for the walk.
9. Torn Hessian and Felt Rags Over Black Clothing
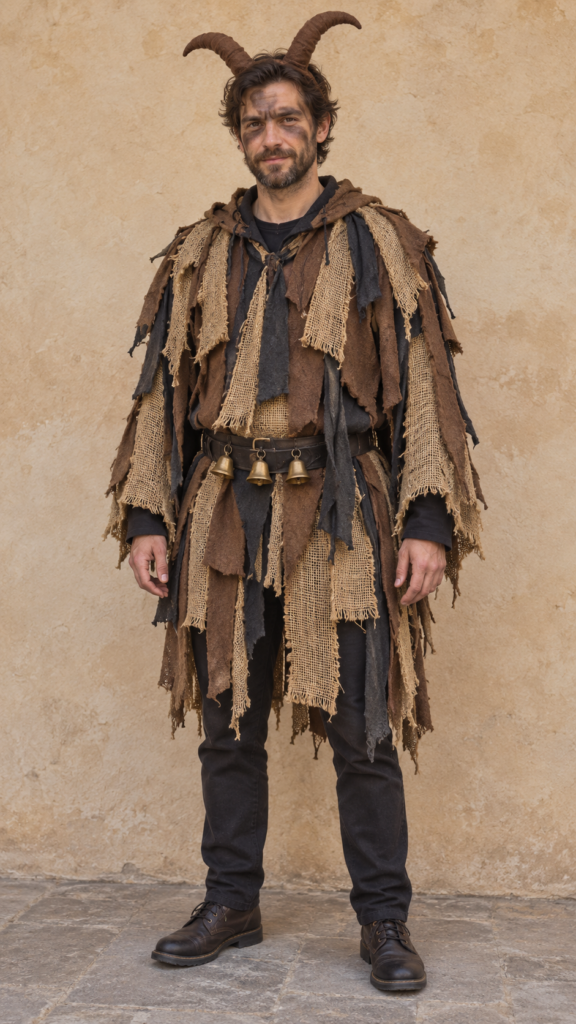
Krampus costumes are meant to look rough and untidy, so a ragged, torn look suits the character. This build gets that look in an evening, with no pattern and almost no sewing.
Best for: The fastest build, first-time makers, and anyone short on time or money.
What you’ll need
- Hessian (burlap), or a clean jute sack from a market or feed store
- Scraps of black and brown felt
- Old dark cotton or fleece offcuts
- Black long-sleeved top and trousers to wear underneath
- Safety pins, or needle and thread
- Weak tea or watered-down brown paint for ageing (optional)
How to make it
- Snip a small cut into the hessian and tear it along the weave. Torn edges fray naturally and look old.
- Tear strips of different widths and lengths, from a hand’s width to the length of your arm.
- Cut or tear the felt and cotton scraps into ragged strips as well.
- Tie or pin the strips onto the black clothing, starting at the bottom and overlapping each row.
- Put the longest strips around the shoulders and sleeves, and shorter ones at the chest and knees.
- Brush on weak tea or watered paint and let it dry, so the hessian looks old and dark.
- Check that nothing hangs low enough to catch your feet.
Problems you may run into
- Hessian itches. Wear the black base layer underneath, and keep the strips away from your neck.
- Strips fall off. Use a second pin or a few stitches at each knot.
- It looks too clean. Rub dark paint into the folds, or scuff the strips with sandpaper.
- The costume snags on doorways. Shorten the strips below the knee.
Coordinating the whole family does not mean everyone needs an identical costume. Family Halloween Costumes: 17 Fun Ideas to Make Everyone Look Like a Team, From Toddlers to Parents
Bells, Rods and Baskets: The pieces that make it Krampus
Fur and a mask make a monster, but bells, a rod and a basket make a Krampus.
They are also the cheapest and quickest builds among these DIY Krampus costume ideas, and they change the costume more than their size suggests. People hear a Krampus before they see one, and the sound is part of the effect.
10. Belt of Bells on Reinforced Webbing
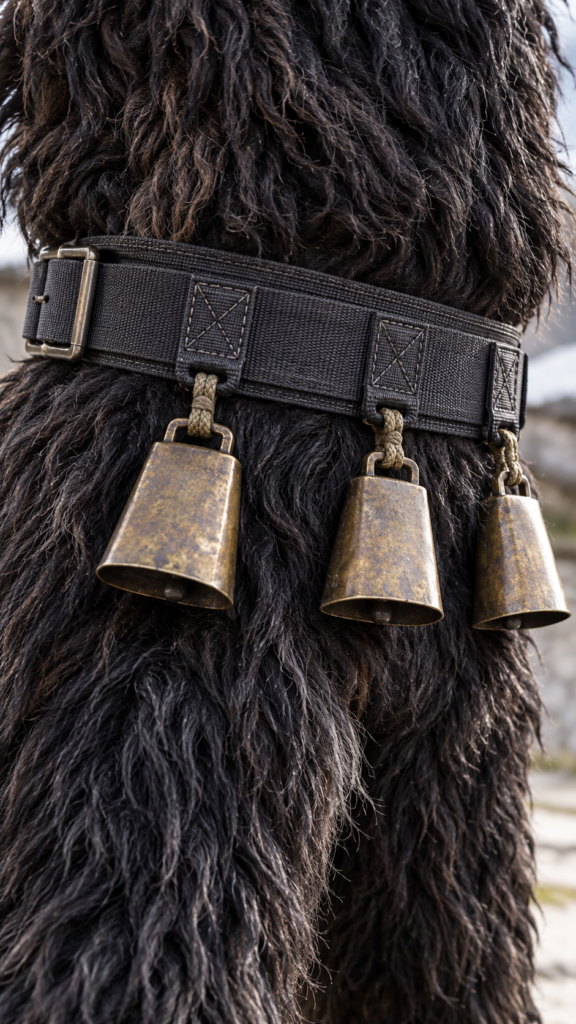
Traditional Krampus runners wear loud bells at the waist, and in the Alpine villages the first sign of their arrival is the muffled ringing of bells in the dark.
Perchten wear bells around the body too, and in Tyrol the bells are meant to put the winter spirits to flight.
Best for: Every build in this post, and the fastest way to add presence to a plain costume.
What you’ll need
- Wide, strong webbing, the kind used for bag straps, cut to your waist measurement plus overlap
- A buckle or side-release clip
- Cowbells, sleigh bells, or a mix of both
- Leather lace or thick nylon cord for hanging the bells
- Heavy-duty thread and a strong needle, or rivets and a rivet tool
- A second strip of webbing for reinforcing the belt (optional)
How to make it
- Measure your waist over the costume, since fur and fabric add thickness. Cut the webbing with room to overlap, and seal the cut ends with a lighter flame held briefly at the edge, or fold and stitch them.
- Fit the buckle and test that the belt closes comfortably.
- Sew or rivet the second strip of webbing to the back of the belt wherever the bells will hang. The double layer carries the weight.
- Thread each bell onto a loop of leather lace or cord. Sew or rivet the loop to the belt, with at least two lines of stitching.
- Space the bells a hand’s width apart so they ring instead of clashing against each other.
- Hang the belt from a hook and tug each bell hard. Any bell that gives way now would drop off during the walk.
- Wear the belt over the fur or fabric, sitting on the hips and not the waist.
Problems you may run into
- The belt sags and drags. The bells are too heavy. Swap the biggest cowbells for sleigh bells, or add a strap that crosses over one shoulder to share the weight.
- The bells clang non-stop. Shorten the loops so each bell hangs closer to the belt, or tie a little felt around the clapper.
- Thread cuts through the webbing. Use two lines of stitching with strong thread, or switch to rivets.
- The belt rubs. Line the inside of the belt with a strip of soft fabric.
11. Birch Rute Bundle, With a Crowd-Safe Alternative
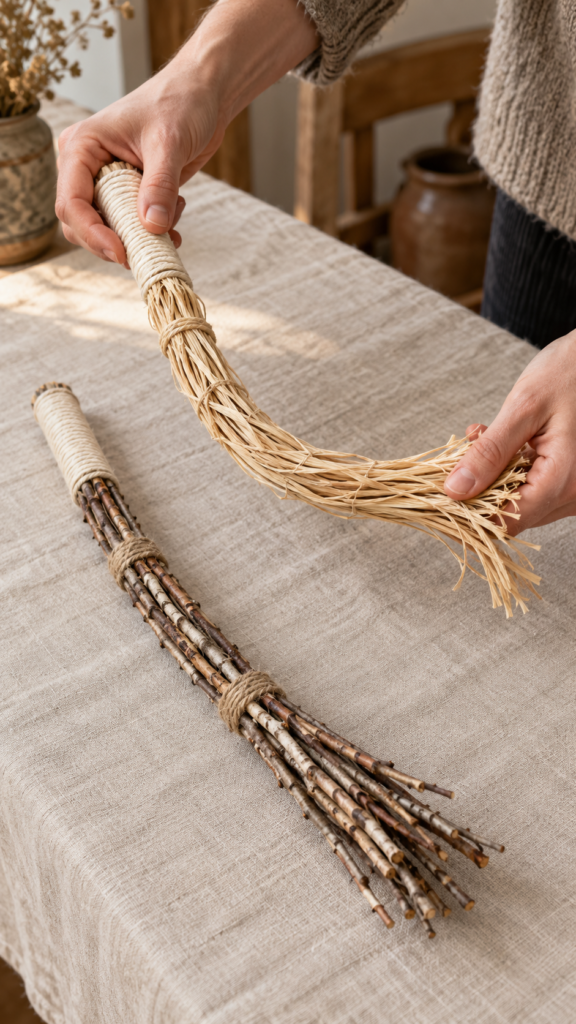
In the old stories, the Krampus carries a bundle of birch twigs, the Rute, and uses it to scare the children who weren’t good during the year. Carvers and tour guides in Austria describe it as part of the costume.
Best for: Anyone who wants the Krampus silhouette to read at a distance, and everyone making a costume for a crowded event.
What you’ll need
- Fresh, flexible twigs, ideally birch. Elsewhere, thin willow shoots or other bendy twigs work in the same way.
- Garden twine, raffia or strong string
- A strip of cotton or leather for the handle
- Scissors or secateurs
- For the soft version: a piece of foam pipe insulation or a foam core, plus raffia, kitchen string and tape
How to make it (twig version)
- Cut about a handful of twigs, roughly the length of your forearm.
- Cut from fallen branches or from a tree whose owner has agreed.
- Hold the twigs together with the thick ends level, and bind them tightly with twine about a hand’s width from the end.
- Wrap the handle with the cotton or leather strip, and tie it off.
- Trim the ends unevenly. A neat bundle looks like a broom, and a ragged one looks like a Krampus.
How to make it (crowd-safe version)
- Cut a length of foam about as long as a forearm.
- Wrap strands of raffia and string around the foam in layers, and tape them in place near the handle.
- Fan the ends out and trim them unevenly.
Problems you may run into
- The twigs snap. Dry twigs are brittle. Keep the bundle in a damp cloth before the event, and use fresh twigs where possible.
- The bundle falls apart. Bind it twice, once near the base and once higher up, and knot the string firmly.
- No birch nearby. Willow, bamboo shoots or soft garden prunings give the same effect. Dry-brush a little brown and grey paint on top for the birch colour.
- It’s a risk around people. Twigs sting. Use the foam version at parties and parades, and treat the rod as something to carry, never to swing.
12. Basket on Backpack Straps
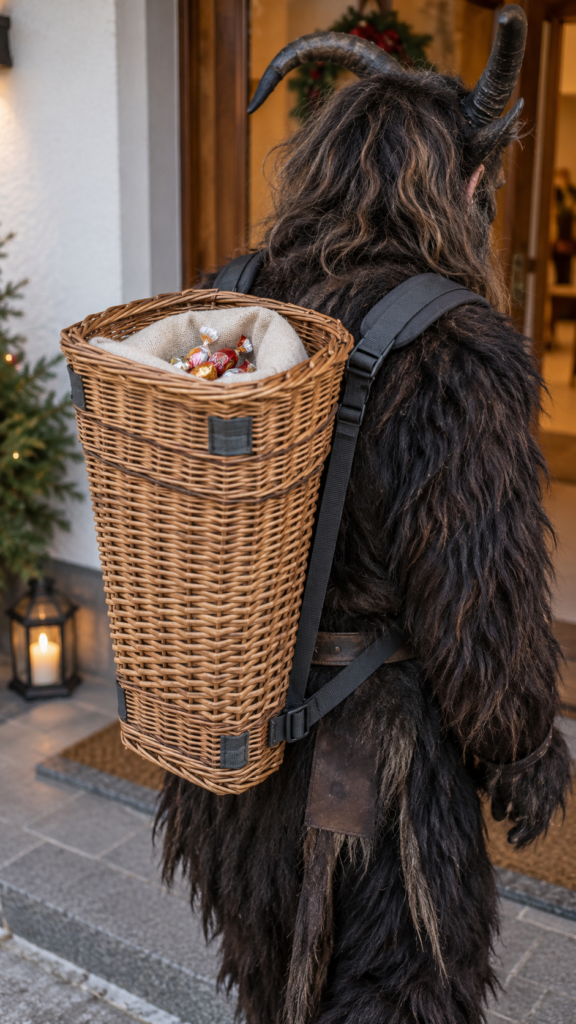
A traditional Krampus carries a wicker basket on his back. In the stories, it is where the children who weren’t good end up.
At a party it holds something kinder, and a basket full of wrapped sweets makes a good reason for the costume to walk around the room.
Best for: Parties, school events and family gatherings.
What you’ll need
- A tall wicker basket from a second-hand shop, or a strong cardboard box
- Two lengths of strong webbing or a pair of straps from an old backpack
- Adjustable slide buckles
- Cable ties, strong thread or small bolts with washers
- Padding for the shoulder straps
- Brown acrylic paint, for the cardboard version
- Wrapped sweets for the party
How to make it (wicker version)
- Choose a basket that is taller than it is wide, so it sits along your back.
- Thread the webbing through the weave on each side, and fix it with cable ties or stitching.
- Add slide buckles to adjust the length, and pad the straps where they cross your shoulders.
- Load the basket with a few sweets, put it on, and walk around to check that it doesn’t lean sideways.
How to make it (cardboard version)
- Cut a strong box into a basket shape, with a curved top edge.
- Paint it brown, and brush a lighter brown over the surface to suggest weaving.
- Reinforce the strap holes with tape or washers, and thread the webbing through.
Problems you may run into
- The basket pulls backward. It is too heavy, or the straps are too long. Shorten the straps and move the sweets nearer the bottom.
- It hits doorframes. Choose a narrower basket.
- The straps dig in. Add padding, and widen the strap where it sits on the shoulder.
- Sweets spill. Add a net or a loose cloth over the top.
- Allergies. Choose sweets that are wrapped and clearly labelled, and ask a parent before handing them to a child.
13. Sound Test: indoors and outdoors

The same bells sound very different in different places. A belt that is lovely on a village street can be deafening in a small hall, and hearing the difference before the night saves the costume from being switched off halfway through the party.
Best for: Every bell setup, and especially costumes for children or indoor events.
What you’ll need
- Your finished belt of bells, worn over the full costume
- A friend to listen
- A phone to record the sound
- A little felt, tape or cotton wool
How to test it
- Wear the full costume and walk around a small room with the door closed. Ask your friend to stand at the far end and tell you how loud it is.
- Record a short clip on the phone while you walk, because a recording shows you what the room hears.
- Repeat outdoors, and compare the two clips.
- Quieten the sound if the room is too loud: wrap a little felt around each clapper, remove a few bells, or swap cowbells for sleigh bells.
- Test again after each change, until the sound feels right for the place.
- Protect children’s ears. Keep the loudest bells away from small guests and keep your distance from anyone near the bells.
Problems you may run into
- It’s too loud indoors. Fewer bells, felt on the clappers, and a slower walk.
- It’s too quiet outdoors. Add a few more bells or swap in larger ones.
- The bells ring when standing still. Tie the loops shorter or stop the clappers with a little tape.
- It annoys the people around you. Ask the organiser about the venue, and switch to the quiet version once everyone is inside.
Matching is not required to make a group costume look connected. 13 Friendsgiving Group Costume Ideas You Can Coordinate Without Matching
Companions: complete the pair
A Krampus never walked alone. He walks with St Nicholas, who gives gifts to the children who were good, while the Krampus has his rod for the ones who weren’t.
That pairing is the heart of Krampusnacht, and it is why the last two DIY Krampus costume ideas here are about the people next to him: the saint who balances the story, and the smaller Krampus who joins in for fun.
14. St Nicholas Costume With a Cardboard-and-Felt Mitre and Dowel Crozier
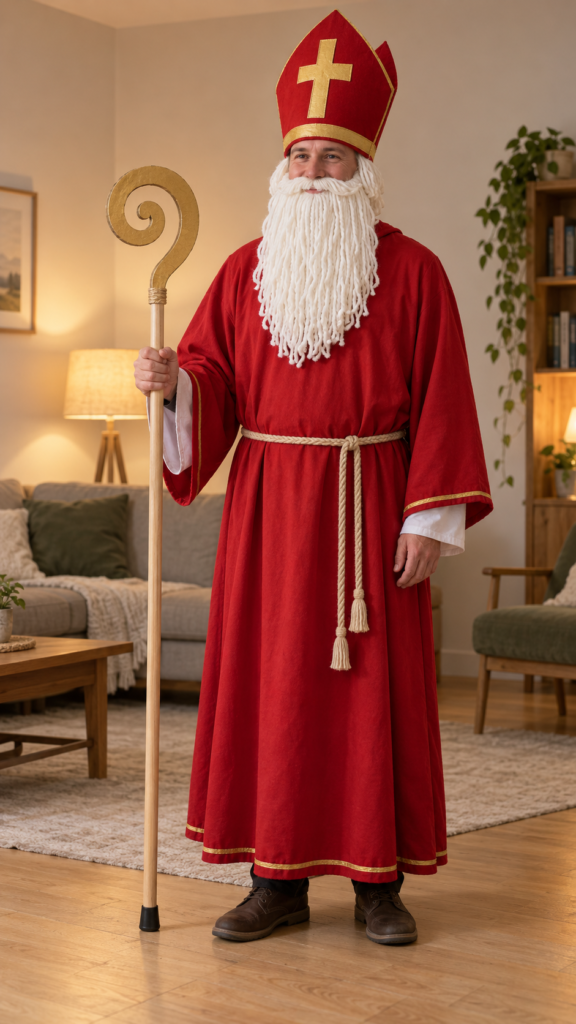
In Alpine villages, St Nicholas and Krampus visit homes together on the evening of December 5 and around St Nicholas Day on December 6. St Nicholas brings gifts and small presents for the children, and the Krampus stays close behind him.
St Nicholas was a bishop, so he wears a bishop’s tall pointed hat (the mitre) and carries a staff with a curled top (the crozier).
This costume is calm where the Krampus is wild, and it is what makes a Krampus costume look like part of the story. One person can make both, and a family or group can split them between friends.
Best for: Pairs, families, school plays and any group that wants the full story.
What you’ll need
- Thick card, such as the side of a strong box
- Red or white felt, plus gold or yellow felt or paper for the cross and trim
- Glue (PVA or hot glue) and a stapler
- A wooden dowel or broom handle, about as tall as your shoulder
- Thick wire, or a strip of thick card, for the curl of the crozier
- Gold paint or gold tape
- A large piece of red or white fabric (an old sheet works) for the robe
- A cord or rope belt
- White cotton wool or white wool for the beard, plus elastic
- Two short ribbons for the back of the mitre (optional)
How to make it
- Measure your head. Measure around it above the ears. The mitre needs a front and a back piece, so each piece is about half that length, plus a little for the overlap.
- Cut the mitre. Draw a tall pointed shape on card, wide at the bottom and narrowing to a point at the top, about as tall as the length of your hand. Cut two of them.
- Cover and join. Glue felt over both pieces. Join them at the sides with glue and staples, leaving the bottom open. Check that it sits comfortably on your head.
- Add the trim. Glue a gold cross to the front, and a band of gold along the bottom edge. Attach two ribbons at the back if you like.
- Make the crozier. Bend the wire into a curl and fix it to the top of the dowel with strong tape. Wrap the join with gold tape or paint it gold. For a safer version, cut the curl from double-layer card and glue it to the dowel.
- Make the robe. Cut a hole for your head in the middle of the large fabric, so it hangs front and back like a poncho. Tie the cord around your waist, and trim the hem so you can walk without tripping.
- Add the beard. Glue cotton wool or wool onto a curved piece of card or felt, and attach elastic at each end to go around the ears.
- Walk in it. Wear it all, carry the staff, and check that the mitre doesn’t slide forward.
Problems you may run into
- The mitre flops or tilts. The card is too thin. Use a double layer, or glue a strip of card around the inside of the bottom edge.
- It slides off. Sew a small elastic strap under the chin, or glue a strip of foam inside the band.
- The staff is too heavy or too tall. Cut the dowel shorter and fit a rubber cap on the bottom so it doesn’t slip.
- The robe drags on the floor. Raise the hem and pin it up on the inside.
- The cotton-wool beard burns easily. Keep it away from candles and any open flame, and choose white wool or yarn when candles will be nearby.
15. Low-Scare Children’s Krampus
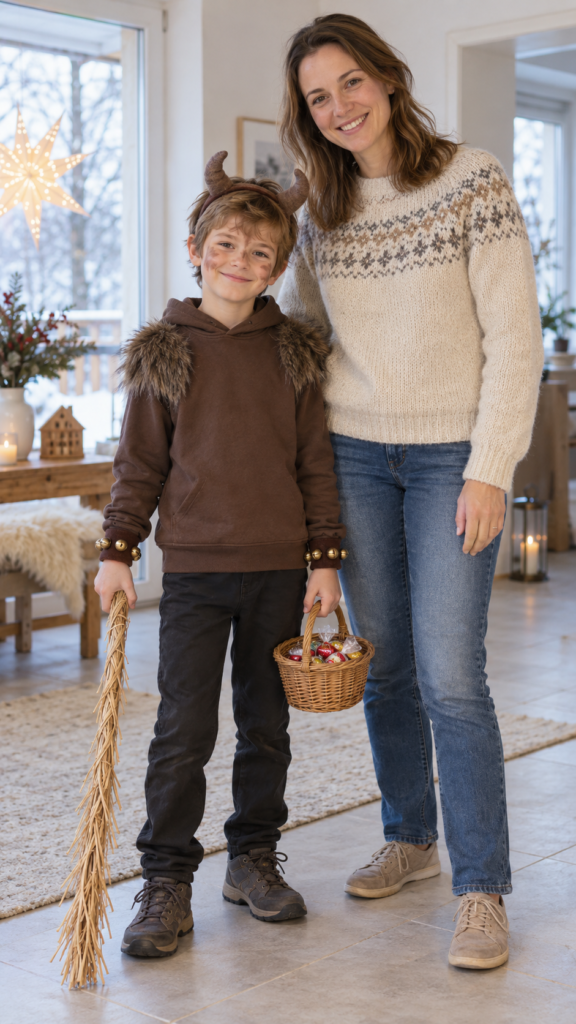
In Alpine villages, boys often start running as Krampus around the age of 10, in simple costumes and basic masks.
Younger children can join the fun with a costume that has all the Krampus pieces and none of the fright: small bells, a soft rod, a basket of sweets, and a face the child can see out of.
This version keeps what makes a Krampus costume work (the horns, the fur and the bells) and takes out the parts that can frighten small children or make them too hot. It is a good first step, and the child can go on to a mask later.
Best for: Children, family photos and parties with small guests.
What you’ll need
- A hoodie or long-sleeved top in brown or black
- Faux fur scraps, or a fur vest
- Felt horns on a headband (idea 5)
- Face paint that is safe for skin, in brown and black (optional)
- Small sleigh bells on wrist or ankle bands, made with elastic and soft felt
- A soft foam rod (idea 11, the crowd-safe version)
- A small cardboard or wicker basket (idea 12) filled with wrapped sweets
- Elastic, needle and thread
How to make it
- Tell the story first. Explain it in simple words: Krampus is the helper who walks with St Nicholas. Let the child decide whether to wear the costume, and what to be, since a child who chooses the costume enjoys it much more.
- Make the top. Sew or glue fur strips onto the hoodie’s shoulders and sleeves, leaving the hood free so it doesn’t bunch up.
- Fit the horns. Put the felt horns on the headband, and check that they sit level and light.
- Make the wrist bells. Sew two or three small sleigh bells onto a strip of elastic and cover the join with felt. Make two for the wrists, and two for the ankles if you like.
- Add the rod and basket. Give the child the foam rod and a small basket. Fill the basket with wrapped sweets for handing out.
- Add a little face paint. Brown brows and a few lines on the cheeks are plenty. Test the paint on a small patch of the child’s skin a day before.
- Practise the walk. Show the child how to ring the bells and stop. Practise handing out a sweet and saying “Happy Krampusnacht”.
- Agree on the rules. The rod stays pointing down, nobody gets touched with it, and the costume comes off the moment the child feels tired or unhappy.
Problems you may run into
- The child feels scared of their own costume. Take it off, let them hold the horns, and put it on again slowly. Skip the face paint and the bells until they are curious.
- The costume is too hot. Use fur on the shoulders only, and put the rest on a cotton layer.
- The bells are too loud for the room. Choose smaller bells, or wrap felt around the clappers.
- The child tires of it. Keep the outing short, and bring a spare, comfortable layer for afterwards.
- Sweets cause trouble. Choose wrapped sweets, and check with parents about allergies before handing them out.
Safety and Etiquette: wear it well
A Krampus costume only works when the person inside it can see, breathe and move, and when everyone around it is comfortable.
It also shows you how to enjoy your DIY Krampus costume ideas without spoiling the evening for anyone.
Check your eyes and breathing before the crowd
A mask narrows your view and traps warm air, and both problems feel much worse in a crowded room.
- Test your view. Put the mask on and walk through a doorway, up a few steps and past a table. If you bump into anything, enlarge the eye holes before the event.
- Check your breathing. Wear the mask for ten minutes while moving around. Dizziness, a damp face or trouble getting a full breath means the mask needs more vents, or you need a lighter option such as the fabric hood.
- Take breaks. Lift the mask off every half hour or so in a cooler spot, and drink water.
- Bring a helper. Ask a friend to walk beside you in a crowd, especially on stairs and kerbs.
- Never drive in the costume. Take off the mask, the horns and the bells first.
Keep rods soft and bells friendly
The birch rod belongs to the story, and a scare should stay a scare.
- Carry the rod pointing down, and never swing it at anyone. Twigs sting, and a bundle swung in a crowd can catch a face.
- Choose the foam-core version (idea 11) for parties, parades and any event with children.
- Check your bells (idea 13) in the actual room. Loud bells near small ears can hurt, so use fewer bells or felt-wrapped clappers inside.
- Watch your width. Horns, baskets and shaggy sleeves take up more room than you expect, so turn slowly in tight spaces.
Face paint and glue
Both are quick to use and easy to get wrong.
- Patch test paint. Dab a little on the inside of your forearm the day before, and wait 24 hours. Redness or itching means that paint is not for your skin.
- Keep paint away from eyes, and take it off with a gentle cleanser before sleeping.
- Glue in fresh air. Open a window or work outside. Contact glue and some spray sealers give off fumes, so read the label on the pack.
- Mind the hot glue gun. The nozzle and the glue burn skin, and a dab on a finger sticks fast. Keep a bowl of cool water nearby.
- Keep flames away from natural fibre. Raffia, jute, corn husks and cotton wool all burn easily, so keep the costume far from candles, torches and heaters.
Children and frights
Krampus is meant to be a little scary, and scary only works when the child is in on it.
- Ask first. Talk to the child (or the parent) before the visit about what will happen, and let them say how much they want.
- Start gently. Small children do best with the low-scare version (idea 15), with no mask and a smile.
- Keep a reveal moment. Take the mask off, say hello and show them the person underneath. Let them touch the horns and the fur. A child who has seen the face behind the mask can enjoy the next visit much more.
- Stop when they ask. Crying, hiding or freezing means the performance is over. Take the mask off, sit down and talk.
- Skip fake blood. Carvers in Austria say too much blood on masks has little to do with the tradition. Dark brown shading and painted wood grain look more like the real thing.
Etiquette on the night
- Visit homes only when the family expects you. In the villages, St Nicholas and Krampus go from house to house, and the household welcomes the visit.
- Follow the organisers at a Krampuslauf (parade). Stay on the route, keep to the agreed space and keep your distance from the crowd.
- Respect the tradition. Krampus and Perchten are living customs for many communities, so describe them honestly if someone asks, and avoid mocking them.
- Ask before taking a photo of someone else’s child, even if they are in costume.
Conclusion
Behind many Krampus in the Alps is someone who stayed up late with a knife, a needle or a pot of glue, trying to get the horns just right.
Young groups there often begin with a simple rubber mask and a rough costume, then grow into the craft year by year.
Yours can begin the same way. Choose one of these DIY Krampus costume ideas, make it slowly, and let it stay a little rough.
A crooked horn won’t spoil anything. It shows the costume was made by hand, and that is what people remember on the night.
When it’s finished, put it on, ring the bells and enjoy being the one who walks in. Share in the comments which idea you picked and how it turned out. Save this post on Pinterest too, so it’s waiting next December when a horn needs mending or a friend asks how you made it.