Patterns confusing you? Learn how to read sewing patterns clearly, avoid common beginner mistakes, and gain confidence with each project.
You thought sewing would feel relaxing… maybe even exciting.
But that moment with the pattern? It threw you off more than you expected.
You opened it, trying to follow along, but nothing felt clear. The lines didn’t make sense. The symbols felt random. You kept looking back and forth, hoping it would suddenly click, but it didn’t.
And after a while, it stopped feeling fun.
It started feeling like you were doing something wrong.
You even wondered if maybe sewing just isn’t for you… even though a part of you still really wants to make your own clothes, your own pieces, something you can actually be proud of.
What makes it harder is this, you can follow steps when someone shows you directly. But with patterns, it feels like you’re left alone to figure things out with no real guidance.
That’s the frustratingone.
Not the sewing itself. Just this one piece that no one really breaks down in a simple, human way.
And the truth is… once this part finally makes sense, everything else becomes easier.
And in this guide, I’ll walk you through how to read patterns in a way that actually makes sense, so you’re not staring at lines and symbols feeling lost anymore.
Getting your sewing projects to look polished starts with the basics, and the Beginner’s Guide to Sewing Machine Basics You’ll Actually Use ensures your machine setup is right from the start.
As a beginner and seasoned sewist, read this: 11 Essential Sewing Tools for Sewists That Help Improve Accuracy and Are Budget-Friendly
The Reason Sewing Patterns Feel Hard
Sewing patterns feel hard not because you can’t understand them—
but because they’re not actually designed to teach you.
They’re designed like blueprints.
A sewing pattern is a construction plan, not a step-by-step lesson. It shows what needs to be done, but it doesn’t slow down to explain how or why in a beginner-friendly way.
That’s why it feels confusing.
You read the instructions and think,
“Why doesn’t this make sense?”
“Why are the diagrams so hard to follow?”
“Did I miss something… or am I just not getting it?”
But what’s really happening is this, the pattern assumes you already know certain basics. It skips explanations. It moves fast. It uses short, efficient wording instead of clear teaching.
Not because you don’t deserve clarity…
but because patterns are written for speed and space, not for learning.
Once you see patterns as blueprints instead of instructions, something shifts.
You stop expecting them to hold your hand…
and start using them as a guide you can interpret.
And that’s when things begin to feel a lot less confusing.
Once your machine feels familiar, knowing How to Find Sewing Patterns That Are Easy to Follow and Beginner-Friendly (Save Hours of Frustration helps you avoid wasted fabric and confusion.
Before You Even Open the Pattern (Where Most Mistakes Start)
Most sewing mistakes do not start when you cut the fabric.
They start before you even open the pattern.
The front of the pattern envelope looks exciting. It shows the finished outfit and makes you want to start right away. But the most important part is actually the back.
That is where the pattern is quietly telling you everything you need to know.
If you skip it, you can end up choosing the wrong size, the wrong fabric, or missing something important—and then it feels like the whole project just didn’t work.
✅ The Back of the Envelope Matters More Than the Front
Turn the pattern over before you do anything else.
The back gives you 3 things you need:
- the size chart
- the fabric suggestions
- the notions list
These may seem small, but they can completely change how your project turns out.
Updating your wardrobe confidently is easier with 2026 Sewing Fashion Trends: Sew Classic Pieces with a Modern Update to Refresh Your Wardrobe.
✅ Do Not Choose Your Normal Clothing Size
This is one of the biggest reasons sewing feels frustrating.
Your sewing pattern size is usually not the same as the size you wear in stores.
You might wear a size 10 in a shop and need a size 14 or 16 in a sewing pattern. That does not mean anything is wrong with your body. Sewing patterns use older sizing systems, and they are often very different from modern clothes.
So please do not choose the pattern size based on what you usually buy.
Instead, take your measurements first.
Use a measuring tape and measure:
- bust
- waist
- hips
Then look at the size chart on the back of the envelope and match your measurements to the chart.
If your measurements fall between two sizes, choose the larger one. It is much easier to make something slightly smaller later than to make it bigger after you cut the fabric
When you choose your size this way, you stop guessing. And that alone makes sewing feel so much calmer.
✅ The Fabric Choice Matters More Than You Think
You can follow every step correctly and still end up with something that does not look right.
A lot of the time, the problem is the fabric.
The pattern may be made for soft fabric that drapes and moves. But if you use a stiff fabric instead, the finished piece can feel bulky, tight, or awkward.
The opposite can happen too. A pattern that needs structure can collapse if the fabric is too soft.
That is why the fabric suggestions on the back are important. They are not random ideas. They are there because the pattern was tested with those types of fabric.
Try to stay close to the suggested fabrics, especially while you are learning. It gives you a much better chance of getting a result that actually looks like the picture
✅ Do Not Ignore the Notions List
The notions list is the small section that tells you what extra things you need.
This might include:
- a zipper
- buttons
- elastic
- thread
- interfacing
It is easy to skip over this part and think, “I’ll figure it out later.”
But nothing is more frustrating than getting halfway through your project and realizing you are missing one small thing that stops everything
Take a minute to check the list before you start. Gather everything first. Then when you sit down to sew, you can actually enjoy it instead of stopping every few minutes to search for something.
A sewing pattern becomes much less confusing when you learn to read this part first.
Before you even open the instructions, the back of the envelope is already helping you make better choices—and saving you from the mistakes that make sewing feel harder than it really is.
If you love style on a budget, Thrift flip Sewing Projects Ideas For People Who want Expensive Style on A Budget will help you create high-end looks without overspending.
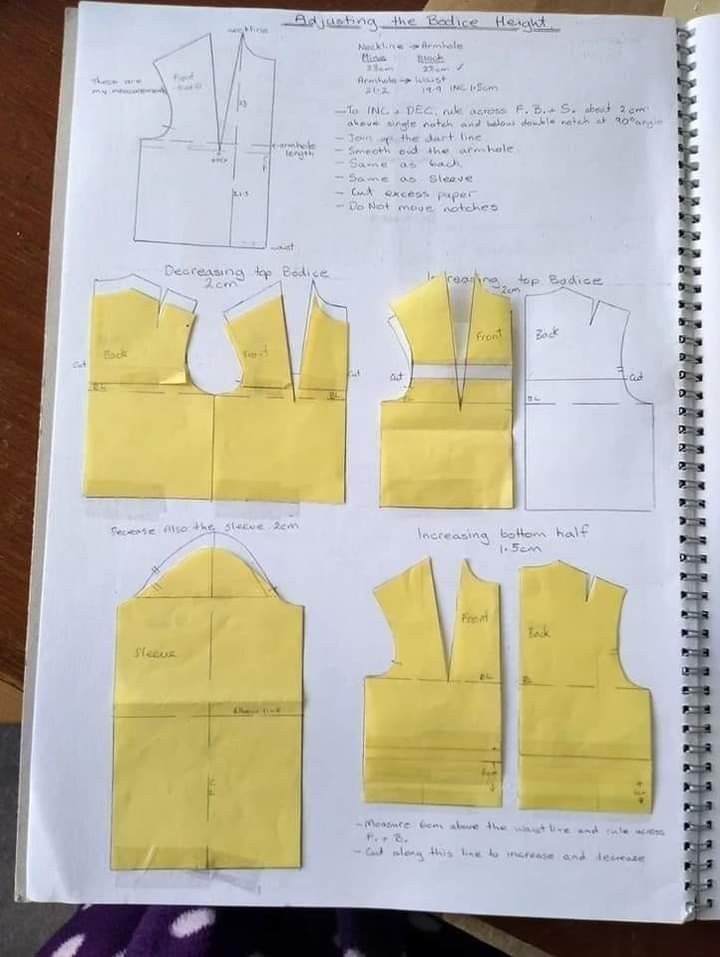
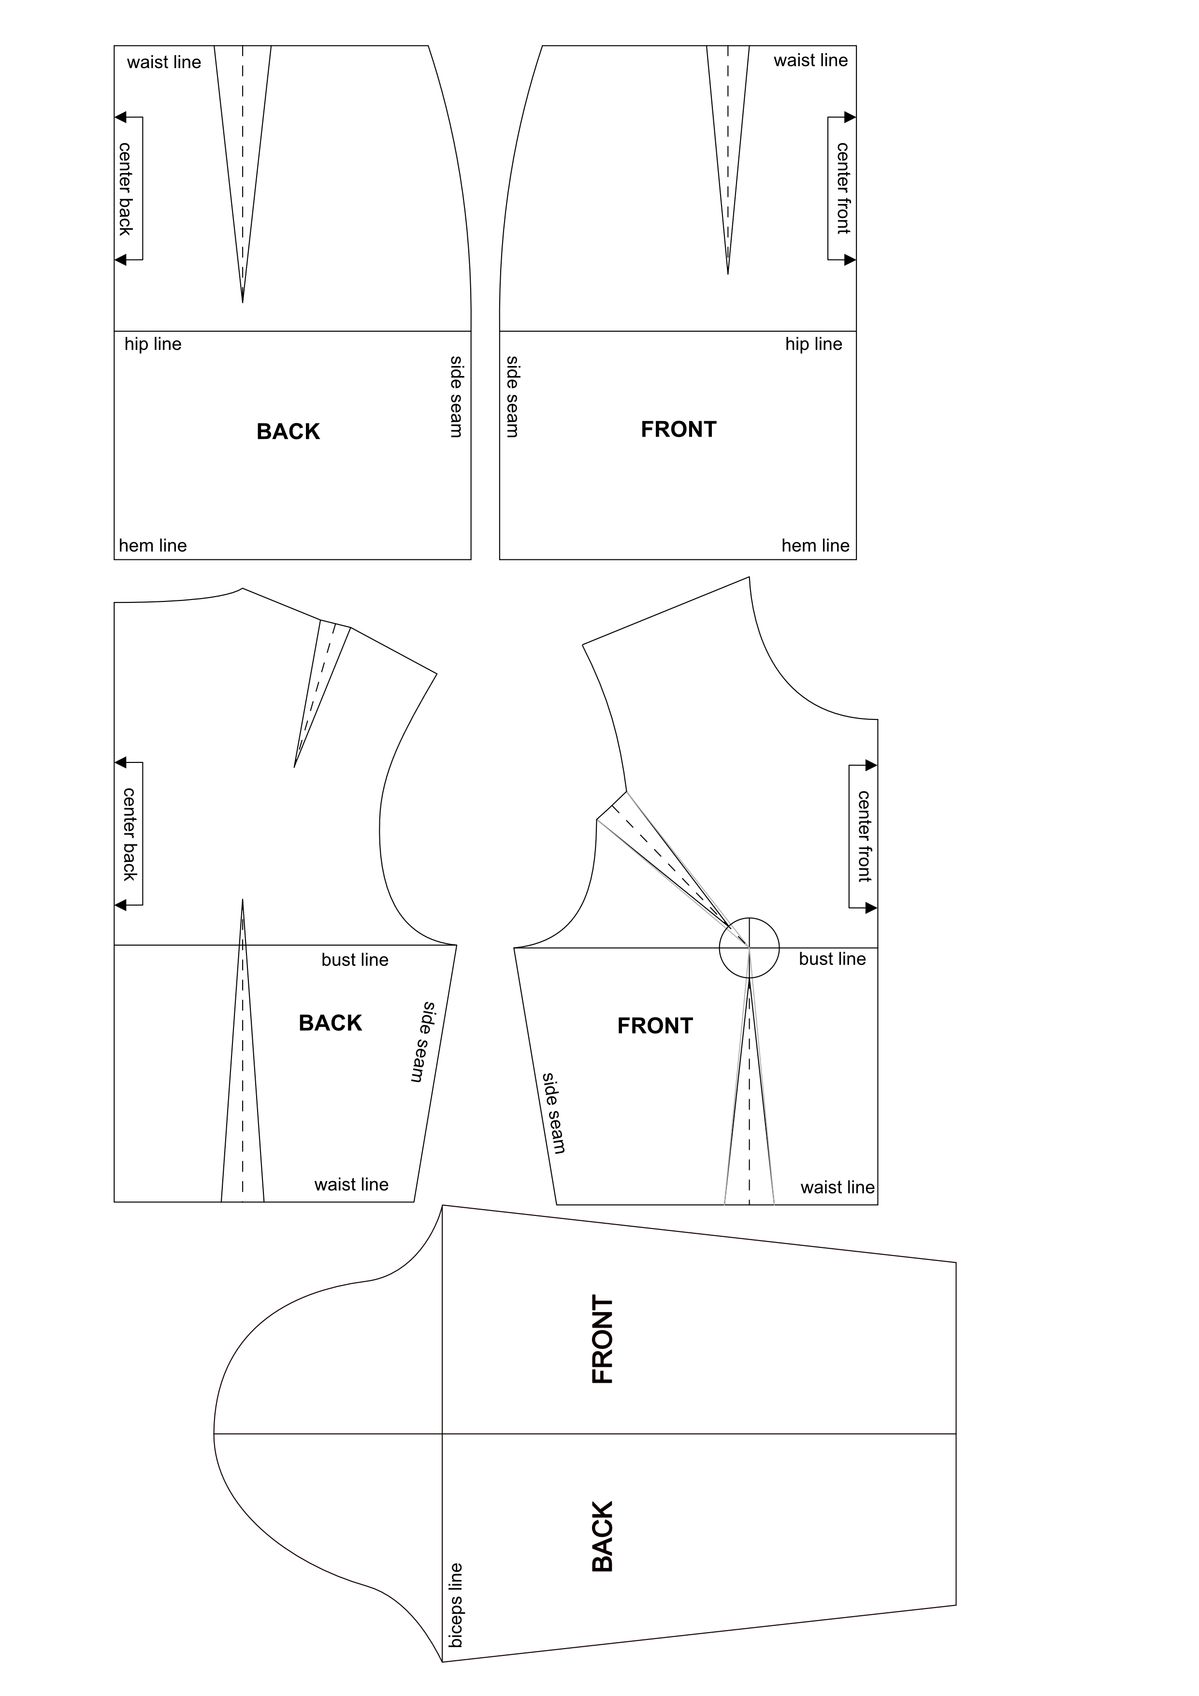
Understanding Pattern Pieces
When you’re learning how to read sewing patterns, it helps to stop looking at everything at once. A pattern only feels confusing when it’s not broken down. Once you see the parts clearly, it starts to make sense.
Every sewing pattern is made up of three main parts:
- The envelope — this is the plan. It tells you what you’re making, the size, fabric type, and what you’ll need.
- The instruction sheet — this is the guide. It shows the steps, diagrams, and order of construction.
- The pattern pieces — these are the actual shapes you place on fabric and cut out.
Most people focus only on the instructions and ignore the rest. That’s where confusion starts.
Now, let’s slow down and look at the pattern pieces themselves. This is where many beginners get stuck, but it’s also where things become clear once you understand what you’re seeing.
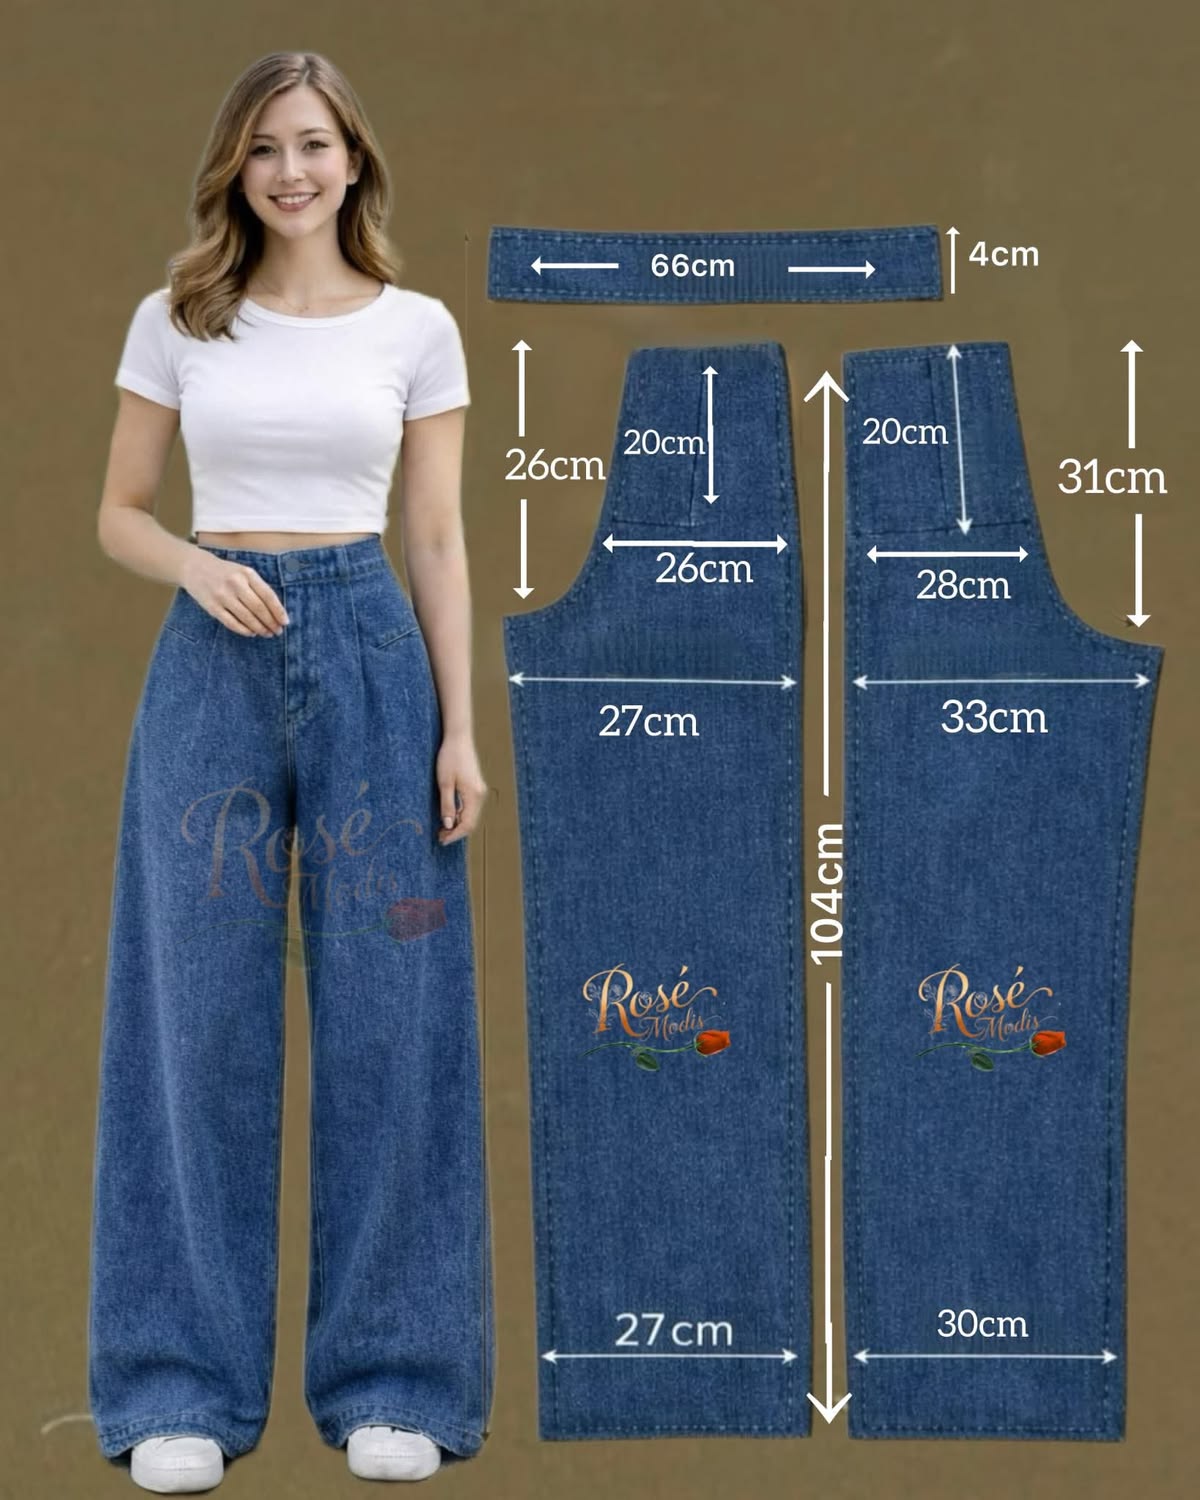
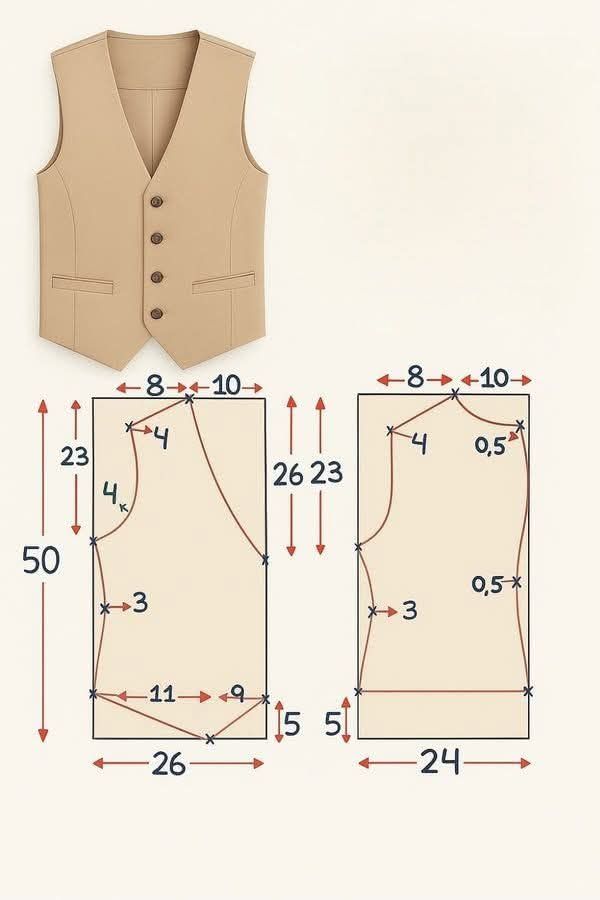
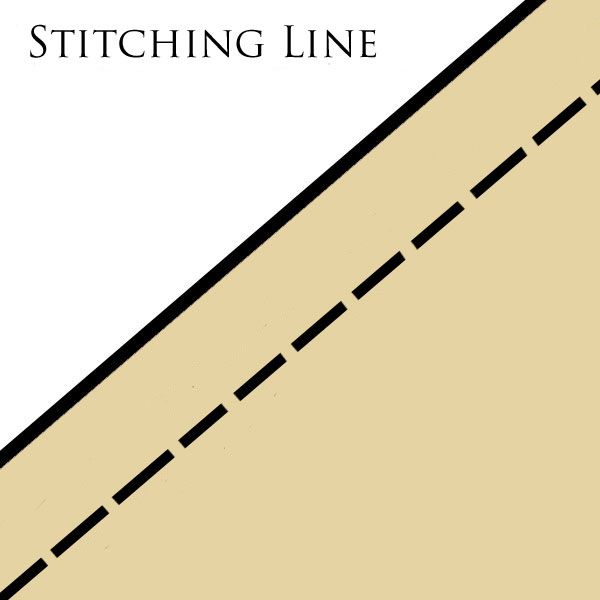
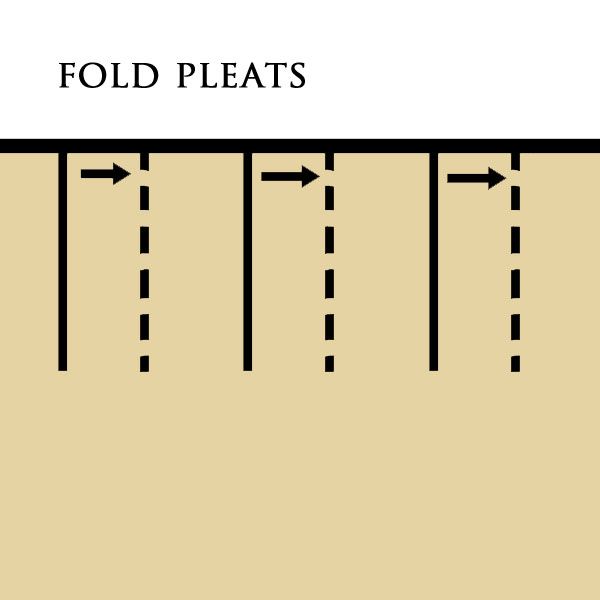
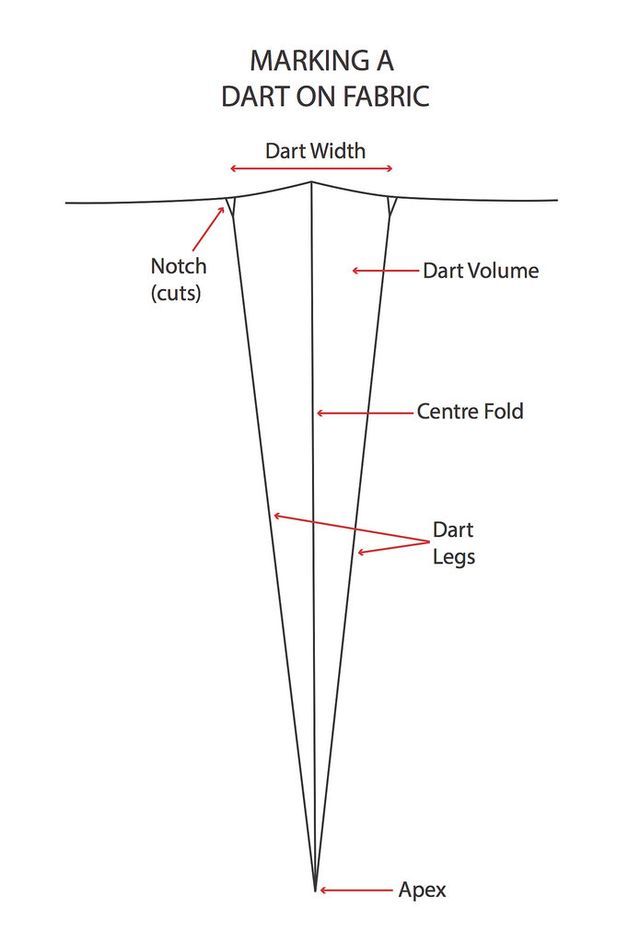
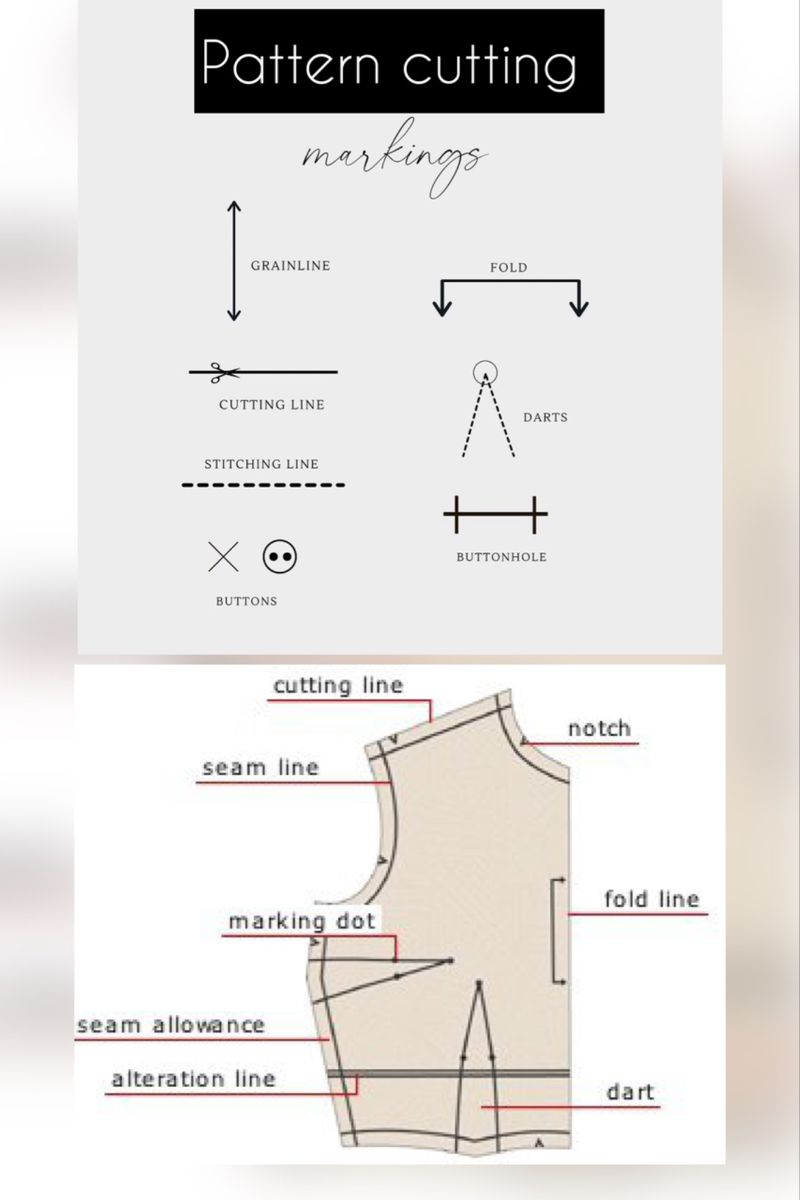
What the Lines and Symbols Really Mean
-
Solid lines
Show where you cut. This is the exact shape of your garment piece.
-
Dotted or dashed lines
Usually show adjustments, like different sizes or length options.
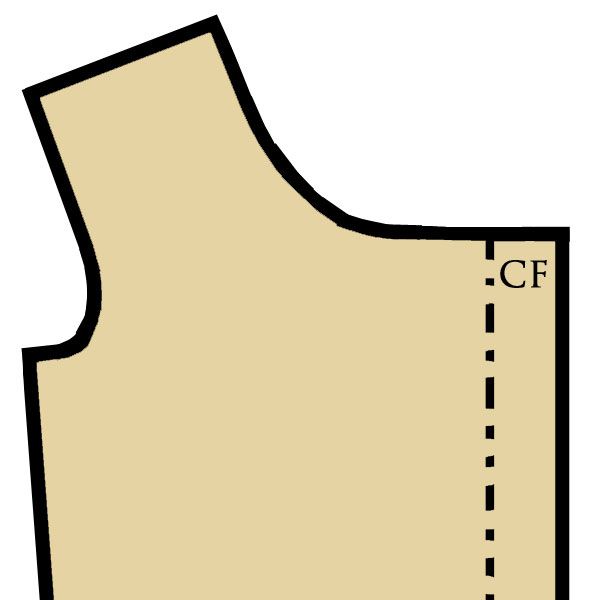
Photo credit: @ Yesterday’s Thimble
-
Arrows (grainline)
Show the direction your fabric should be placed.
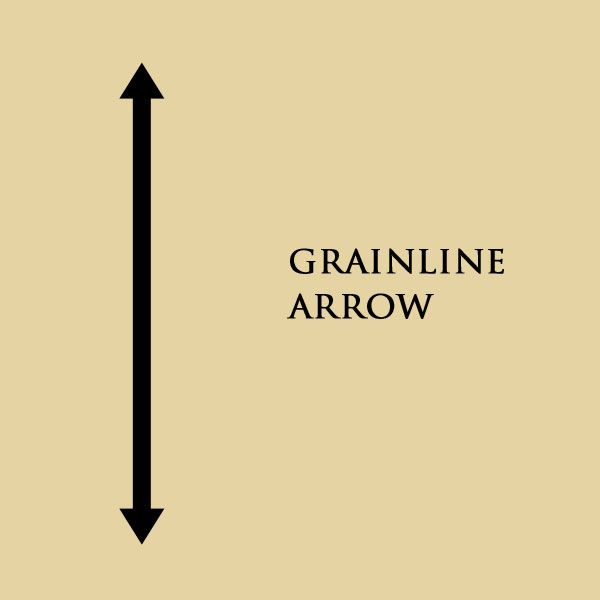
At first, these look like small details, but they affect everything.
Why These Details Matter
The grainline is one of the most important parts to understand when learning how to read sewing patterns. Fabric isn’t the same in every direction. If you place your pattern the wrong way, the fabric won’t hang properly. The result can look twisted, tight in the wrong places, or uneven—even if you followed every step correctly.
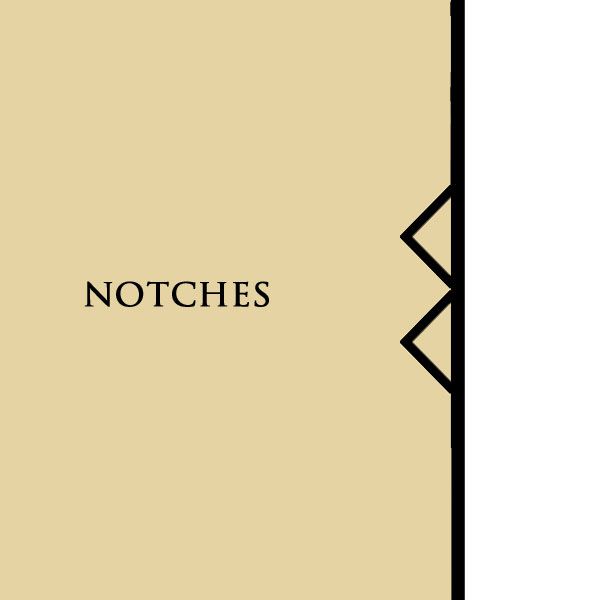
Notches are another detail people often ignore. They are small marks on the edges of pattern pieces. They are not decoration. They are there to help you match pieces together correctly. Think of them as checkpoints that guide you while sewing, so everything lines up the way it should.
Once you start paying attention to these small details, patterns stop feeling random. You begin to see that everything has a purpose, and that’s when how to read sewing patterns starts to feel much more natural.
Choosing the right machine is easier with insights from Industrial vs Domestic Sewing Machines: Which One Should You Buy as a Beginner, so your setup matches your goals.
Making sewing profitable from home is possible when you follow guides likenStruggling to Make Money From Home Sewing? Launch a Profitable Sewing Side Hustle.
Size, Fit & Ease — How to Make Garments Look Right
One of the quietest frustrations in sewing is when your piece fits, but it just doesn’t look right. You followed the pattern, everything seems correct, yet something feels… off.
You can blame themselves, but it’s usually not you, it’s the way size, fit, and ease work in patterns.
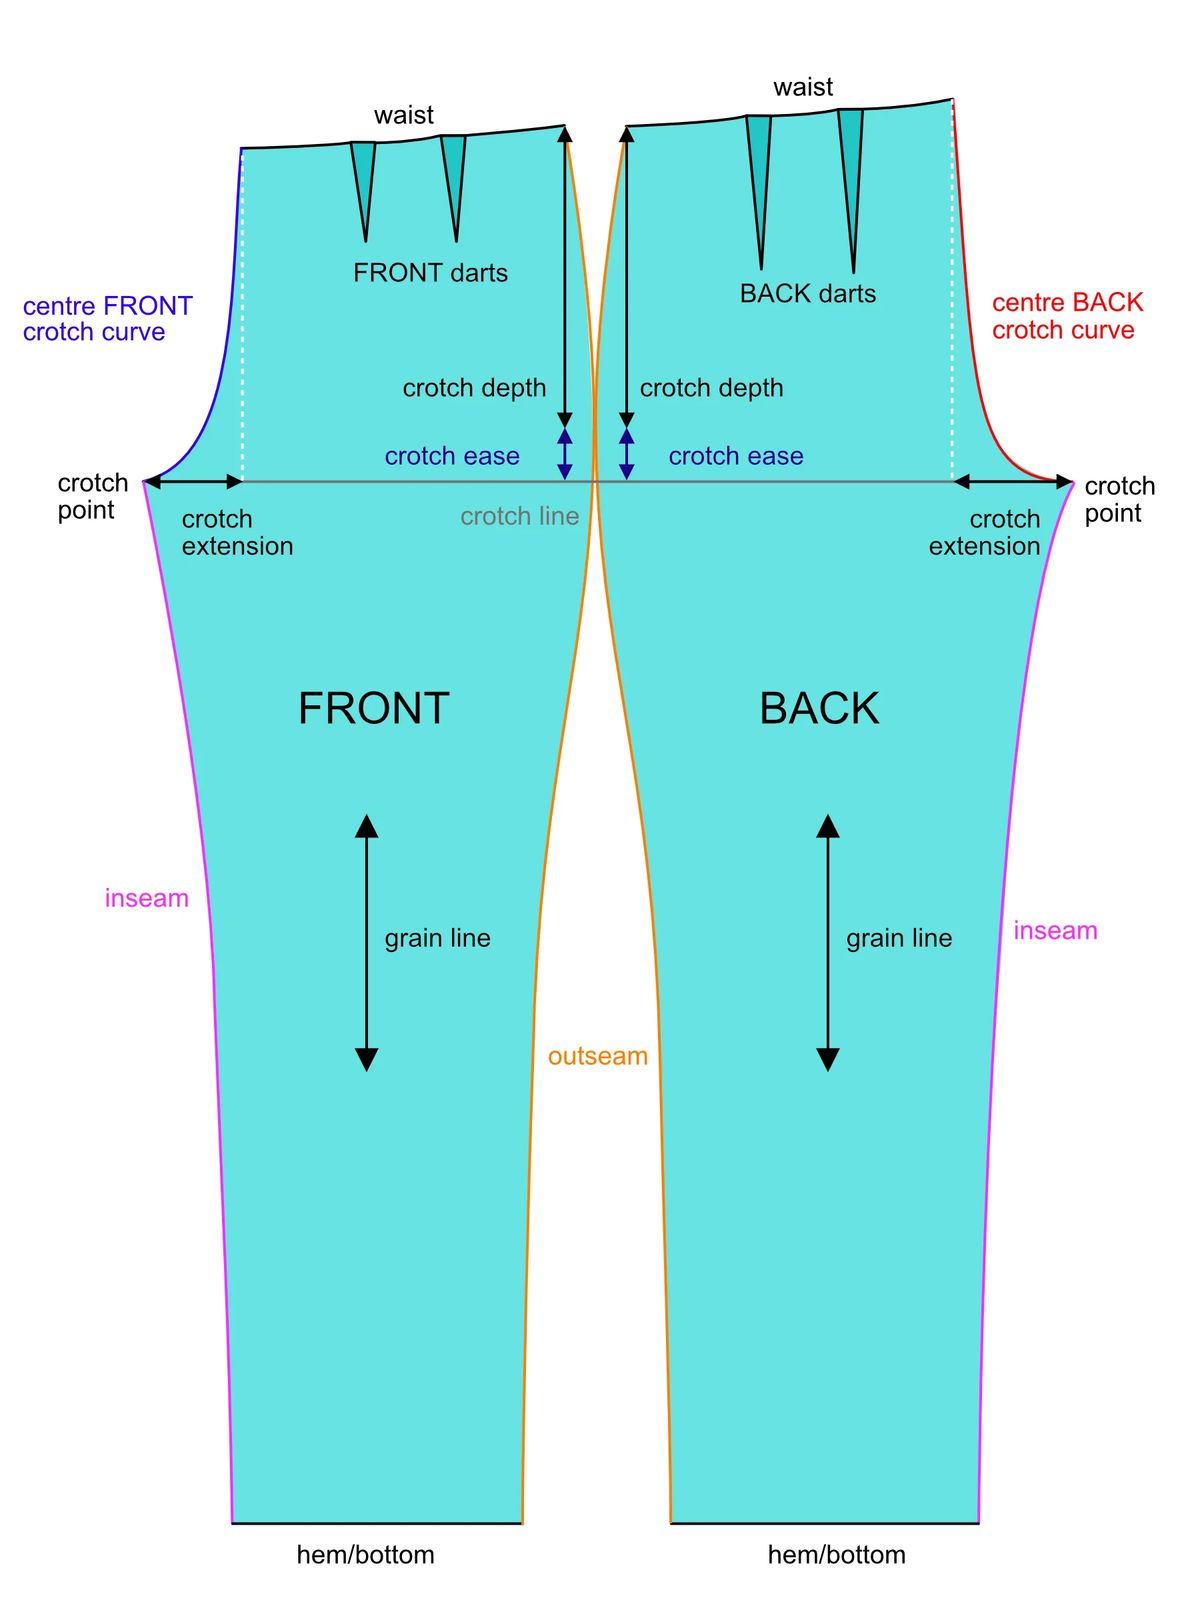
Body Measurements vs Finished Garment Measurements
Your body measurements are only part of the story. Patterns don’t copy your body exactly, they include ease, which is extra space built into a garment to allow movement and comfort.
Ease is why a blouse isn’t skin-tight, a dress can flow, or a skirt doesn’t feel stiff. Without understanding it, your piece may fit technically but hang awkwardly.
Understanding Ease
If your project fits but looks baggy, boxy, or uneven in some areas, it’s usually ease, not the wrong size. Different patterns include different amounts of ease depending on the style and fabric.
How to Use This Knowledge
Before you cut, compare your body measurements with the pattern’s finished measurements. Ask yourself:
- Do I want it slightly looser or more fitted?
- Will I be layering underneath?
- Is the fabric stretchy or stiff?
These questions help you choose the right size confidently and make small adjustments if needed.
When you understand how size, fit, and ease work together, your garments start to look intentional. You’ll stop wondering why something “fits but looks wrong” and start making choices that make your sewing projects look polished and professional.
Taking inspiration from Cultural Fashion: 10 Stunning Traditional Attire from Around the World You Need to See for Style Inspiration can elevate your designs and add a fresh creative edge.
How to Read Sewing Patterns Like an Expert

Before you touch your fabric, there’s a simple process that makes patterns easier to follow. Step by step, you’ll know what to check, how to plan, and when to cut, so you don’t waste time or make mistakes.
Think of it as your personal step-by-step system:
1. Read the Envelope (Make a Plan)
Before touching any fabric, check the back of the envelope. Look at the size chart, fabric suggestions, and notions list. This gives you the full picture and prevents surprises later..
2. Check Measurements
Compare your body measurements to the pattern’s finished garment measurements. Remember, ease is built in—so the size you usually wear might not be the right choice. This ensures your garment fits the way you want.
3. Review Fabric + Tools
Gather your recommended fabric and all tools or notions listed. Using the right materials makes the project smoother and saves you from mid-project frustration.
4. Study the Instruction Sheet Fully
Read every step and diagram before cutting. Mentally walk through the process from start to finish. This gives you confidence and prevents costly mistakes.
5. Identify Pattern Pieces
Lay out all the pieces and make sure you know what each one is for. Label or trace them if needed so nothing gets confusing later.
6. Understand Symbols
Group symbols into positioning, shaping, and assembly marks. Once you know what each mark is telling you, your sewing becomes more intentional and less guesswork.
7. THEN Cut
Only after these steps should you cut your fabric. By now, you know exactly what to do, how it will fit, and how the pieces go together. Cutting too early is the fastest way to create mistakes.
Follow this system every time, and sewing patterns will start to feel like a tool instead of a puzzle. Each project becomes predictable, manageable, and way more enjoyable.
Efficiency and precision also come from clever tips, and 15 Sewing Hacks for Beginners Who Want Neater, More Professional Results shows ways to save time while improving quality.
You’re Not Behind, You’re Learning
It’s easy to feel frustrated when a pattern doesn’t make sense right away. But the truth is, patterns are like a new language, you’re just learning to read it. That means it’s completely normal to feel a little lost at first.
It gets easier with practice. Every time you follow a pattern, you understand a little more, and soon the symbols, lines, and instructions start to make sense.
Start with simple patterns you can manage. Once you finish those, gradually move on to more complex projects. Each step builds your skill and your confidence, and before long, what felt confusing will feel familiar and doable.
Remember: you’re not behind. You’re learning, and every project teaches you something new.