Always running out of time for crafts? these spring diy projects you can stop and pick up again without losing progress actually work.
Spring is a great time to get creative, but not everyone has hours to devote to a single project. Sometimes life interrupts, kids need attention, or you just don’t have a long uninterrupted block to craft. That’s where DIY projects you can stop and pick up again come in, they let you enjoy the process without feeling pressured to finish everything in one sitting.
These spring DIY ideas are designed to be flexible. You can start, take a break, and return later without losing progress or making a mess. Supposedly it’s home decor, small gifts, or fun crafts with kids, the goal is to create something beautiful while keeping your schedule (and sanity) intact.
In this post, you’ll find projects that are simple to organize, and satisfying to complete, even if you only get a few minutes at a time.
Read this next: Indoor Activities for Kids on Rainy Days That Actually Keep Them Busy
Why Flexible DIY Projects Work in Spring
Spring comes with its own pace, the weather changes quickly, flowers bloom and fade, and inspiration can appear and disappear in a flash. Trying to force a project to finish in one sitting often leads to stress or half-done crafts. Flexible DIY projects let you follow that seasonal energy at your own speed.
Breaking projects into short, manageable steps makes crafting approachable, even on busy days. You can start a project, take a break, and come back without losing momentum or worrying about mistakes.
This kind of spring diy projects you can stop and pick up again, encourages creativity without pressure. Instead of focusing on perfection, you can enjoy experimenting with colors, textures, and ideas. It’s less about finishing quickly and more about making the process enjoyable, which is exactly what spring crafting should feel like.
Here’s something else you might like: 10 Super Fun After-School & Homework-Friendly Crafts Kids Can Make in 20 Minutes
Starter Materials That Make DIY Easy to take breaks
Having the right materials can make all the difference when you want to start a craft but might not have a long stretch of uninterrupted time. Choosing items that are reusable, easy to store, and simple to handle ensures you can stop mid-project and come back later without losing momentum.
Materials You will ne needing:
Reusable or Easy-to-Store Materials
- Small jars of paint, markers, or crayons that seal tightly
- Yarn, string, or ribbon that can be rolled up and kept tidy
- Glue sticks, tape, or adhesive dots instead of messy liquid glue
- Paper, cardstock, or scrap materials that can be stacked without getting wrinkled
Tools That Don’t Take Up Space or Need Constant Supervision
- Scissors with safety features for kids
- Small cutting boards or mats that can stay set up
- Brushes or pens that don’t need rinsing immediately
- Containers or trays to keep all materials together
Tips for Organizing Materials to Pause and Restart Effortlessly
- Keep all items for a single project in a labeled box or zip bag.
- Use clear containers so you can see what’s inside at a glance.
- Set up a small “craft corner” where you can leave projects in progress.
- Snap a quick photo of your project before stopping, it helps you remember the next steps when you return.
With these simple materials and organization tips, your spring DIY projects become flexible, low-stress, and easier to enjoy, even if life interrupts.
More posts like this: DIY Projects for People Who Don’t Feel Crafty at All
10 Spring DIY Projects You Can Stop and Pick Up Again
Spring is full of creative energy, but life happens. These projects are designed so you can work in short bursts, step away, and come back without stress or lost progress.
1. Painted Terracotta Pots
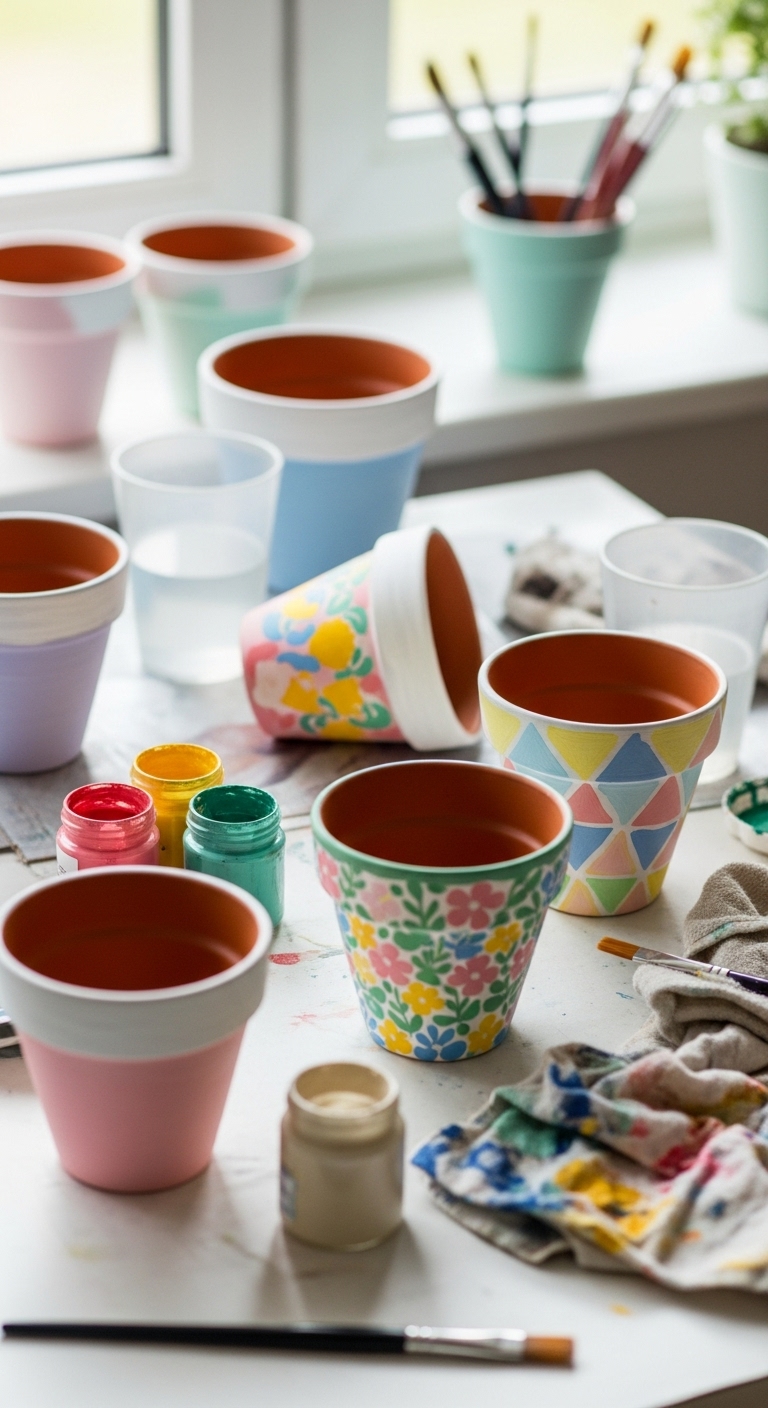
Painting terracotta pots is a simple spring craft that works perfectly in short bursts. You can start by painting one side, walk away, and return later to finish the rest, no stress, no mess piling up. It’s also a project that gives a satisfying, visible result even if you only have 15–20 minutes at a time.
Materials You’ll Need
- Small terracotta pots
- Acrylic paints or chalk paints
- Paintbrushes (various sizes)
- Old newspaper or a mat to protect surfaces
- Cups of water for rinsing brushes
- Optional: painter’s tape for patterns, sealant spray
How to Do It
- Lay down newspaper or a mat to protect your workspace.
- Choose your colors and paint the base coat on the pot.
- Allow the first coat to dry completely (this is a natural pause point).
- Add designs, patterns, or additional layers as desired.
- Once the paint is fully dry, spray a sealant if you want the pot to last outside.
Tips to Pause Mid-Project
- Let the base coat dry before adding details; drying time is a natural stopping point.
- Keep brushes in a cup of water to prevent them from hardening.
- Store the pot in a safe corner while it dries, so you can return later without disturbing the work.
Optional Variations
- Paint geometric shapes with painter’s tape.
- Personalize with initials or small designs.
- Use chalkboard paint on part of the pot to write messages or plant names.
2. Simple Spring Wreaths
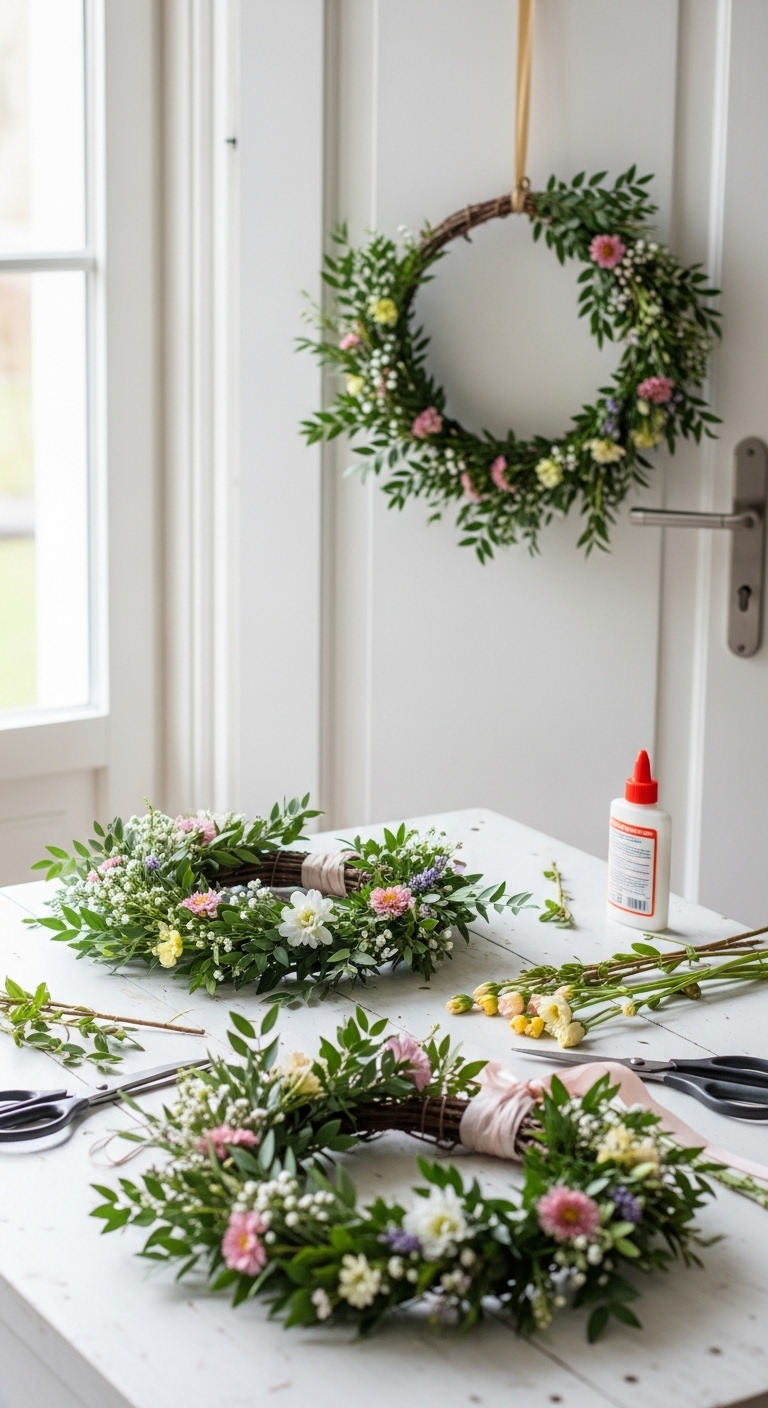
Creating a spring wreath is a project that’s easy to do in sections. You can attach a few flowers or greenery, step away, and come back later to finish adding layers, perfect for short bursts of crafting energy. Even partially finished, the wreath looks appealing, so you can pause without frustration.
Materials You’ll Need
- Grapevine or wire wreath base
- Silk flowers, greenery, or seasonal accents
- Floral wire or hot glue
- Ribbon for hanging
How to Do It
- Start by loosely arranging flowers and greenery on the wreath base.
- Secure sections with floral wire or a dab of hot glue.
- Step back to assess balance and fill in gaps as needed.
- Continue adding decorations in stages until the wreath feels complete.
Tips to Pause Mid-Project
- Cover the wreath with a clean cloth or place it in a safe spot to protect delicate flowers.
- Leave loose ends unglued until you’re ready to finish for flexibility.
- You can stop after attaching major blooms and return later to add smaller accents.
Optional Variations
- Add seasonal ornaments or ribbons for holidays.
- Add dried flowers or herbs for scent.
- Use lights or beads to make it more decorative.
Turn simple Cricut projects into money-making crafts with this beginner-focused guide- 10 Cricut Crafts Beginners Always Struggle With- And How to Make and Sell Them
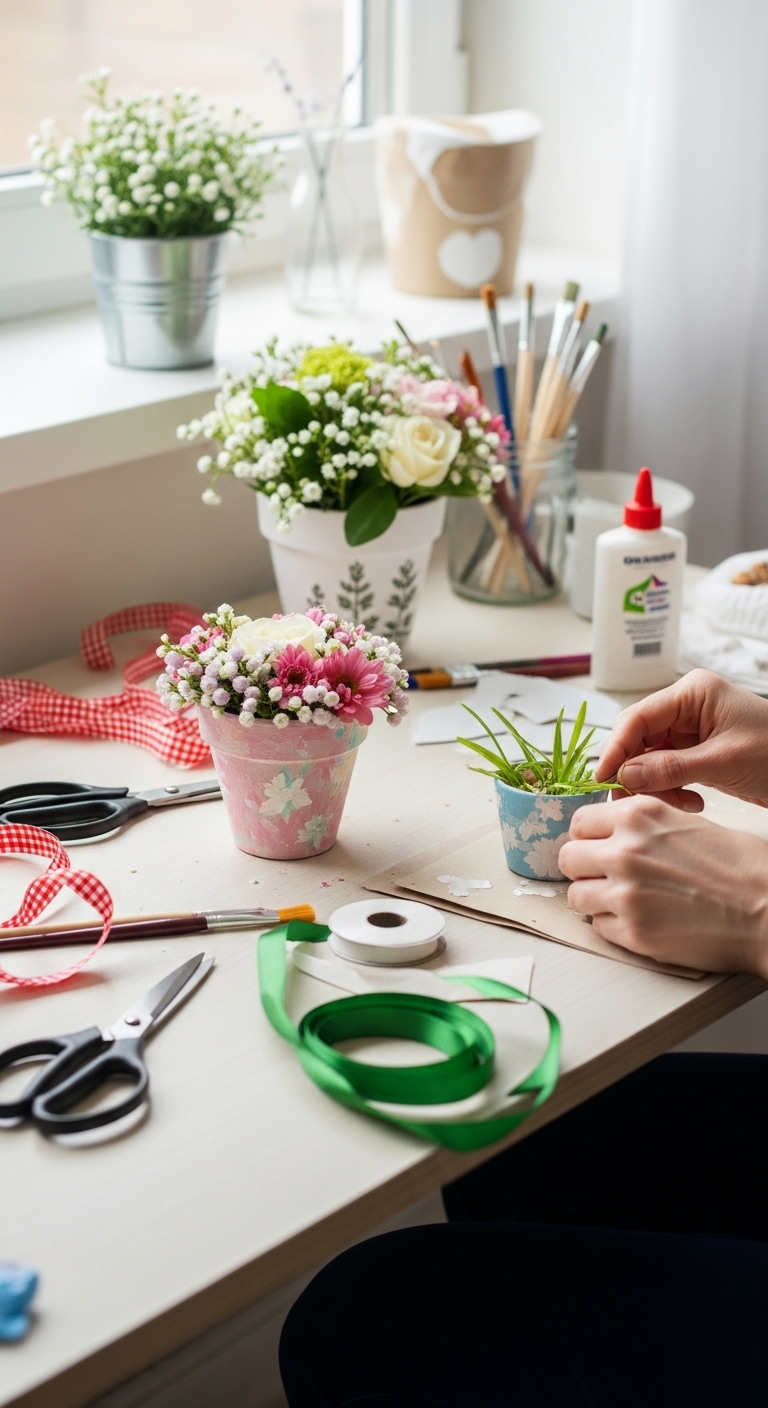
3. Mini Flower Arrangements
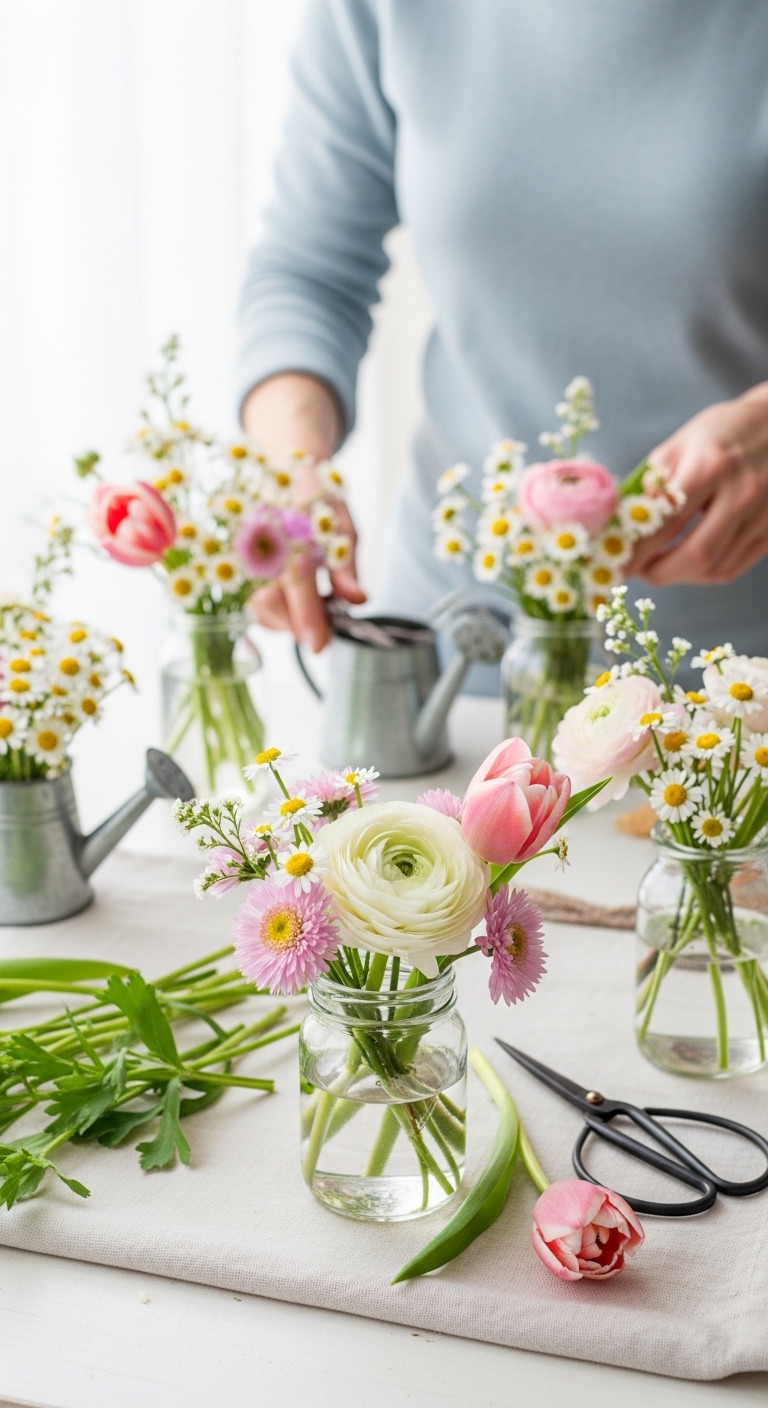
Mini flower arrangements are ideal for busy schedules because you can build them in layers, step away, and finish later. Even arranging a few stems gives a bright, cheerful result, so you get satisfaction quickly without needing long uninterrupted time.
Materials You’ll Need
- Small vases or jars
- Fresh or faux flowers
- Scissors or floral shears
- Optional: floral foam or tape grid
How to Do It
- Trim the flower stems to fit your vase or jar.
- Start with larger blooms and place them evenly.
- Add smaller flowers or greenery to fill in gaps.
- Adjust placement until the arrangement feels balanced.
Tips to Pause Mid-Project
- Keep flowers in water (or floral foam if using) to prevent wilting.
- Pause after placing the main blooms and finish filler flowers later.
- Store in a cool, safe spot until ready to complete the arrangement.
Optional Variations
- Color-code blooms for a themed look.
- Use seasonal wildflowers or foliage.
- Combine multiple mini arrangements for a centerpiece effect.
Another post you’ll enjoy: Quick and Soft Valentine’s Gifts You Can Sew in a Few Hours That Melt Hearts
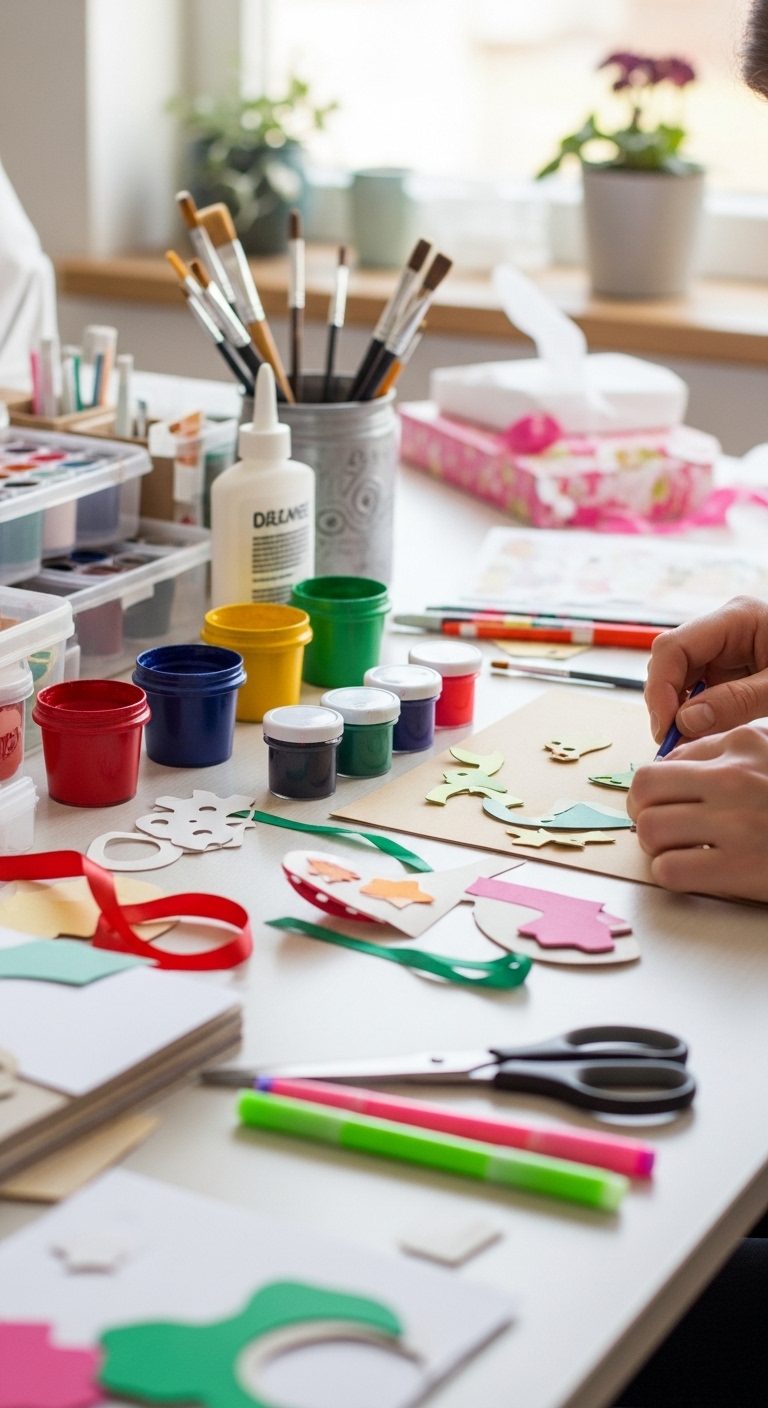
4. Handmade Greeting Cards
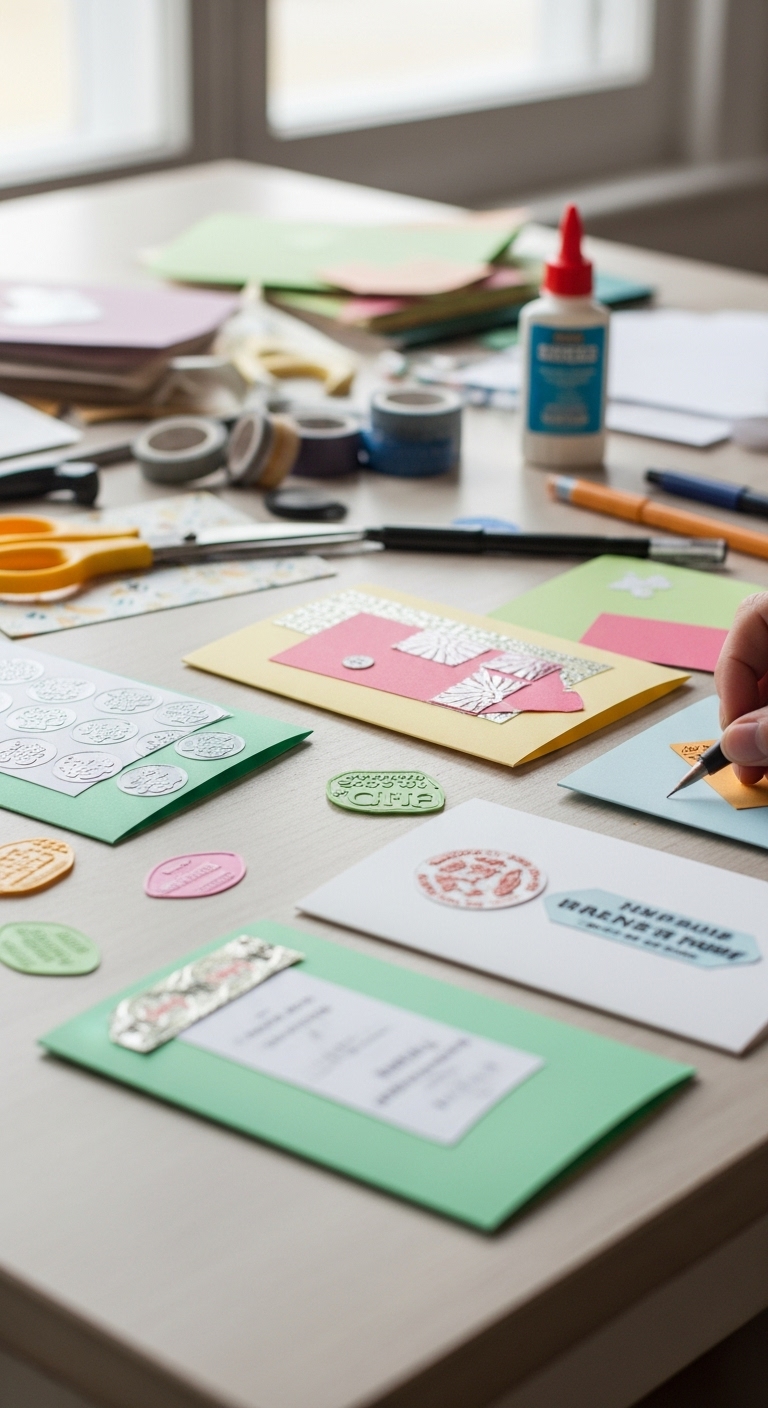
Making greeting cards is a quick, satisfying spring craft you can start and stop without losing progress. You can design a base, step away, and return to add details, messages, or embellishments later.
Materials You’ll Need
- Blank card stock or folded paper
- Colored pens, markers, or pencils
- Stickers, washi tape, or stamps
- Glue stick or double-sided tape
- Optional: embellishments like ribbons, buttons, or sequins
How to Do It
- Choose your card base and fold if needed.
- Sketch or lightly outline your design.
- Add base colors, stickers, or tape (pause here if needed).
- Add final details and personal messages.
Tips to Pause Mid-Project
- Keep pens and embellishments organized in a small container.
- Pause after laying the base design — it won’t smudge or dry out.
- Store cards flat in a safe spot to return to later.
Optional Variations
- Make a series with coordinating colors or themes.
- Add pressed flowers for a spring touch.
- Use layered paper cutouts for dimension.
Take a look at this guide: 10 Low-Cost DIY Crafts to Make and Sell From Home
5. Yarn or String Art
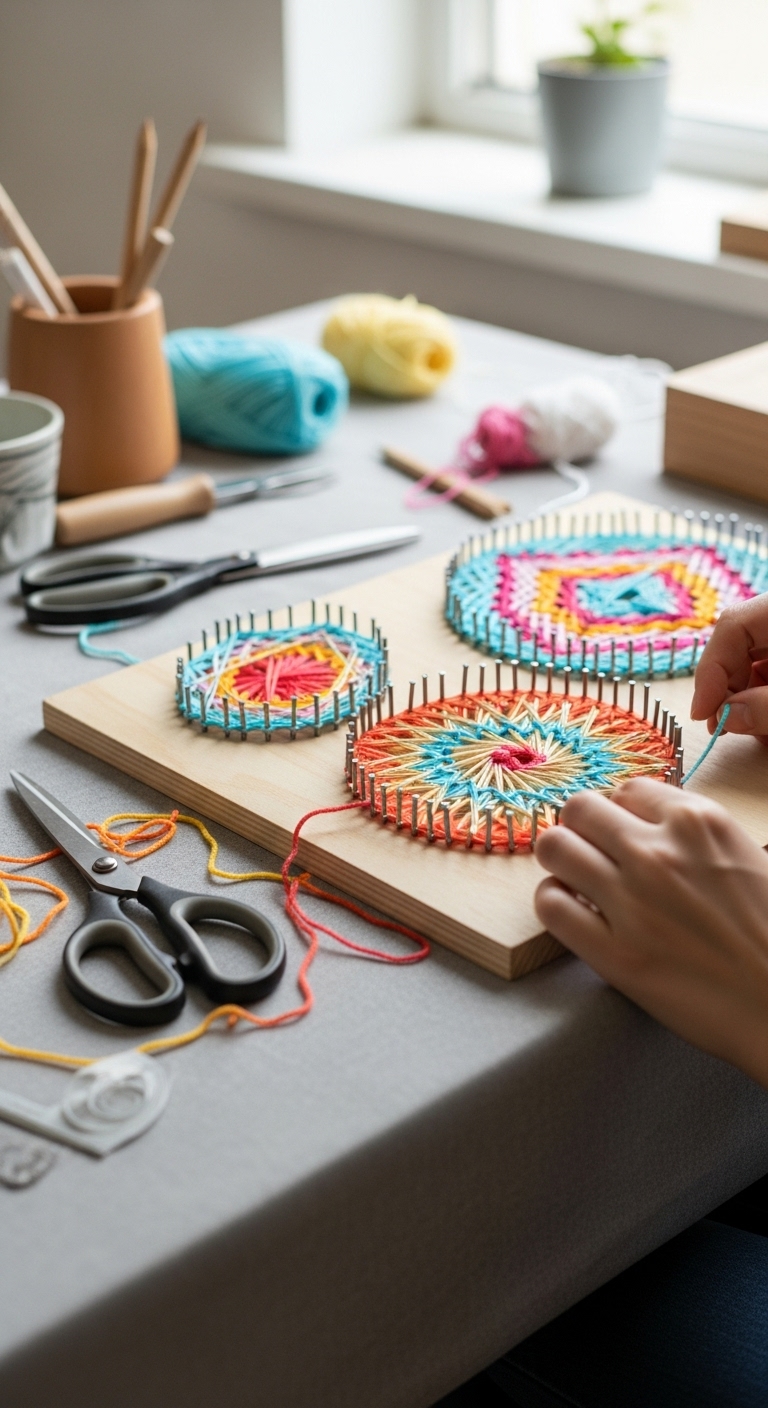
Yarn or string art is perfect for short crafting sessions, you can wrap a few sections of string and stop, then continue later without messing up the design.
Materials You’ll Need
- Wooden board or canvas
- Nails or pins
- Yarn or embroidery thread
- Hammer (if using nails)
How to Do It
- Outline your design lightly on the board.
- Place nails or pins at key points along the outline.
- Begin wrapping yarn between nails in sections.
- Pause after a few rows and resume later to complete the pattern.
Tips to Pause Mid-Project
- Tie loose ends or secure with tape temporarily.
- Store the board flat or upright to avoid tangling the string.
- Keep extra yarn nearby for quick continuation.
Optional Variations
- Use different colors for a gradient effect.
- Add beads or small charms along the string.
- Create seasonal or holiday-themed patterns.
6. Decorated Mason Jars
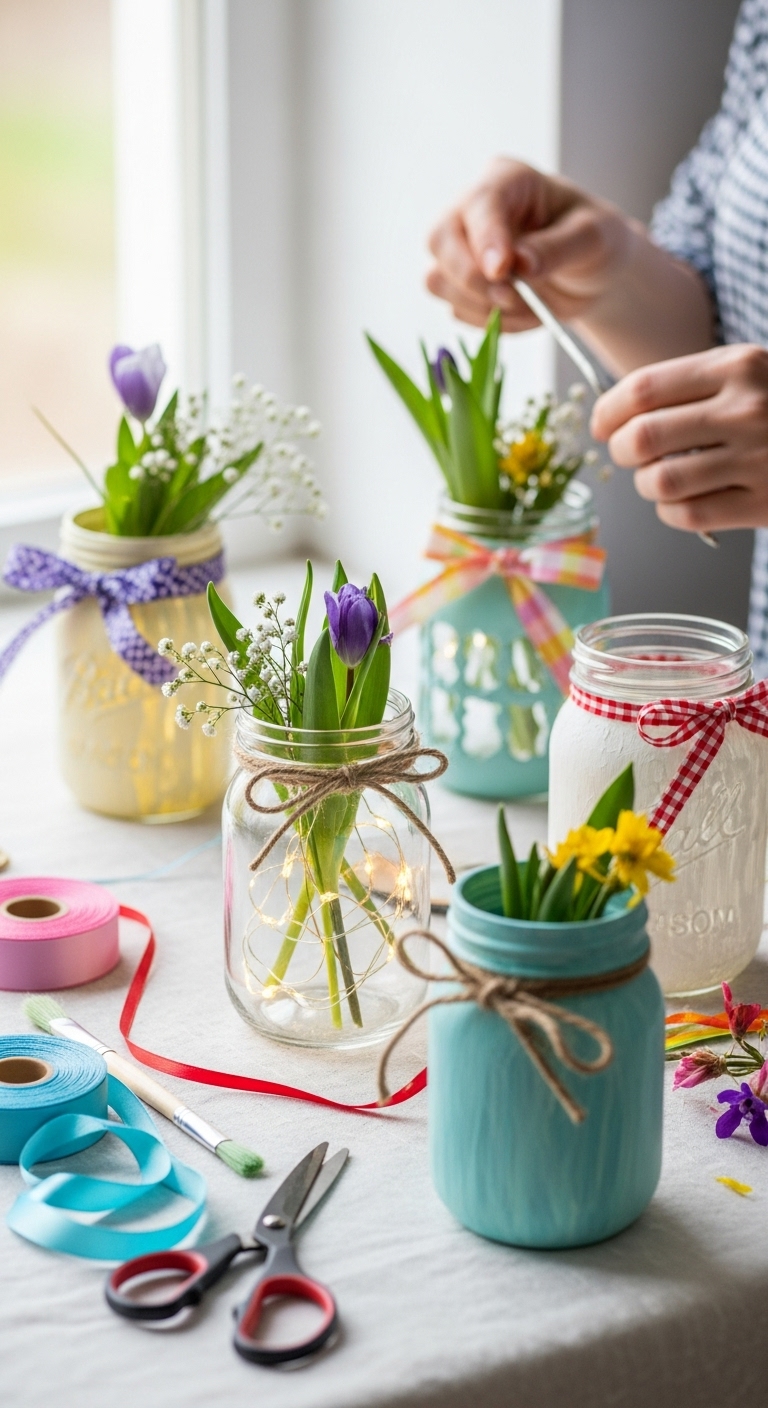
Decorating mason jars is quick and flexible, paint one jar, pause, and continue later, or make a set gradually. They’re practical and make beautiful displays.
Materials You’ll Need
- Mason jars (various sizes)
- Acrylic paints, chalk paints, or glass markers
- Brushes or sponges
- Optional: ribbons, twine, stickers, or decals
How to Do It
- Clean jars thoroughly and dry.
- Paint or decorate a section of the jar.
- Allow paint to dry before continuing.
- Add details like ribbons or stickers once the base is dry.
Tips to Pause Mid-Project
- Let paint dry completely before storing.
- Keep unfinished jars upright to prevent smudges.
- Wrap in paper if stacking to avoid scratches.
Optional Variations
- Turn jars into candle holders, vases, or storage containers.
- Paint seasonal or geometric patterns.
- Personalize with names, initials, or quotes.
7. Upcycled Planters or Containers
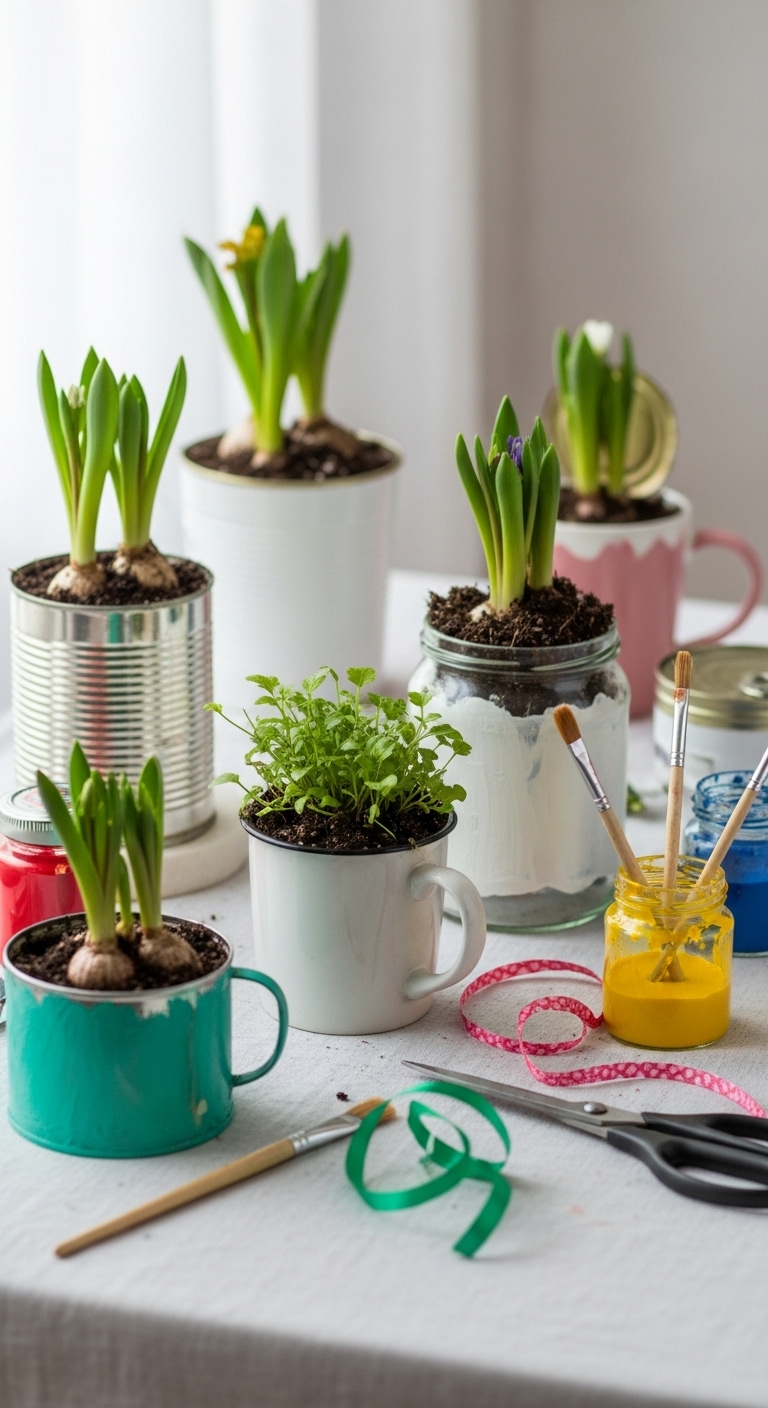
Transforming old containers into planters is ideal for short crafting sessions. You can clean and prep one container, pause, and finish painting or decorating later.
Materials You’ll Need
- Old tins, cups, or small containers
- Acrylic paints or spray paints
- Brushes or sponges
- Soil and small plants (optional)
- Optional: waterproof sealant
How to Do It
- Clean the container and let dry.
- Paint the base coat and let it dry (pause here if needed).
- Add patterns, designs, or labels.
- Fill with soil and plants once decoration is complete.
Tips to Pause Mid-Project
- Keep containers upright to prevent paint smudges.
- Store brushes in water or wrap containers to protect them.
- Finish in stages: base coat one day, details the next.
Optional Variations
- Use containers for herbs in the kitchen.
- Add chalkboard paint to label plants.
- Decorate with twine, buttons, or fabric scraps.
You can bookmark this guide for later: 15 Genius Ways to Upcycle Old Clothes Into Trendy New Outfits
8. Nature Collages with Leaves and Petals
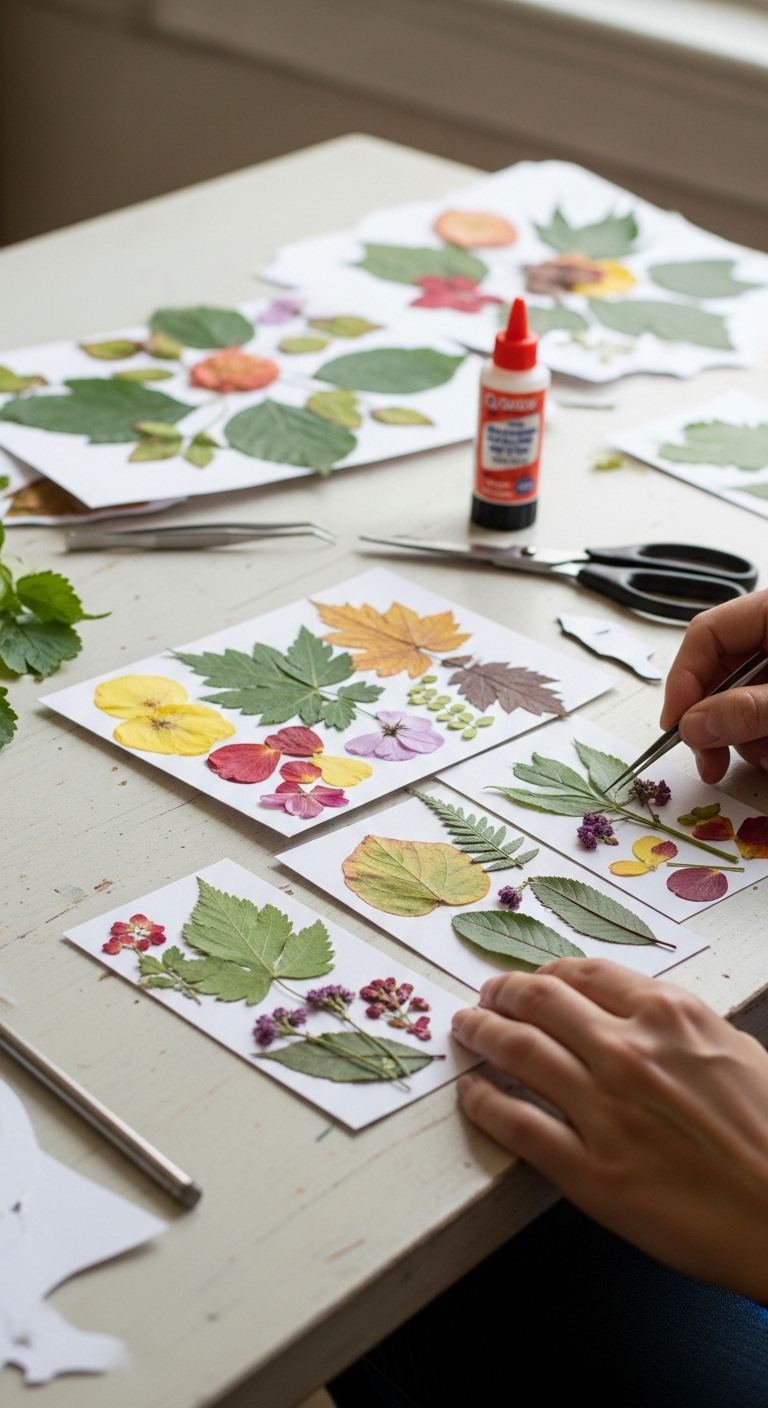
Creating nature collages is an easy, flexible spring craft. You can collect leaves, petals, or small twigs, start arranging them on paper, pause, and come back later without disrupting your design. It’s low-mess and satisfying even in short bursts.
Materials You’ll Need
- Heavy paper or cardstock
- Leaves, petals, small twigs, or pressed flowers
- Glue stick or liquid glue
- Scissors
- Optional: markers, paint, or stickers
How to Do It
- Gather natural materials from your yard or a nearby park.
- Arrange the items loosely on your paper to plan your layout.
- Glue down a few pieces at a time — this is a natural stopping point.
- Add more elements or embellishments once the base is secure.
Tips to Pause Mid-Project
- Keep loose materials in a small container to avoid losing them.
- Pause after gluing the main elements; you can add details later.
- Store flat in a safe place to prevent curling or damage.
Optional Variations
- Create a seasonal theme using spring colors.
- Layer materials for a 3D effect.
- Add small quotes or messages with markers.
9. DIY Bookmarks
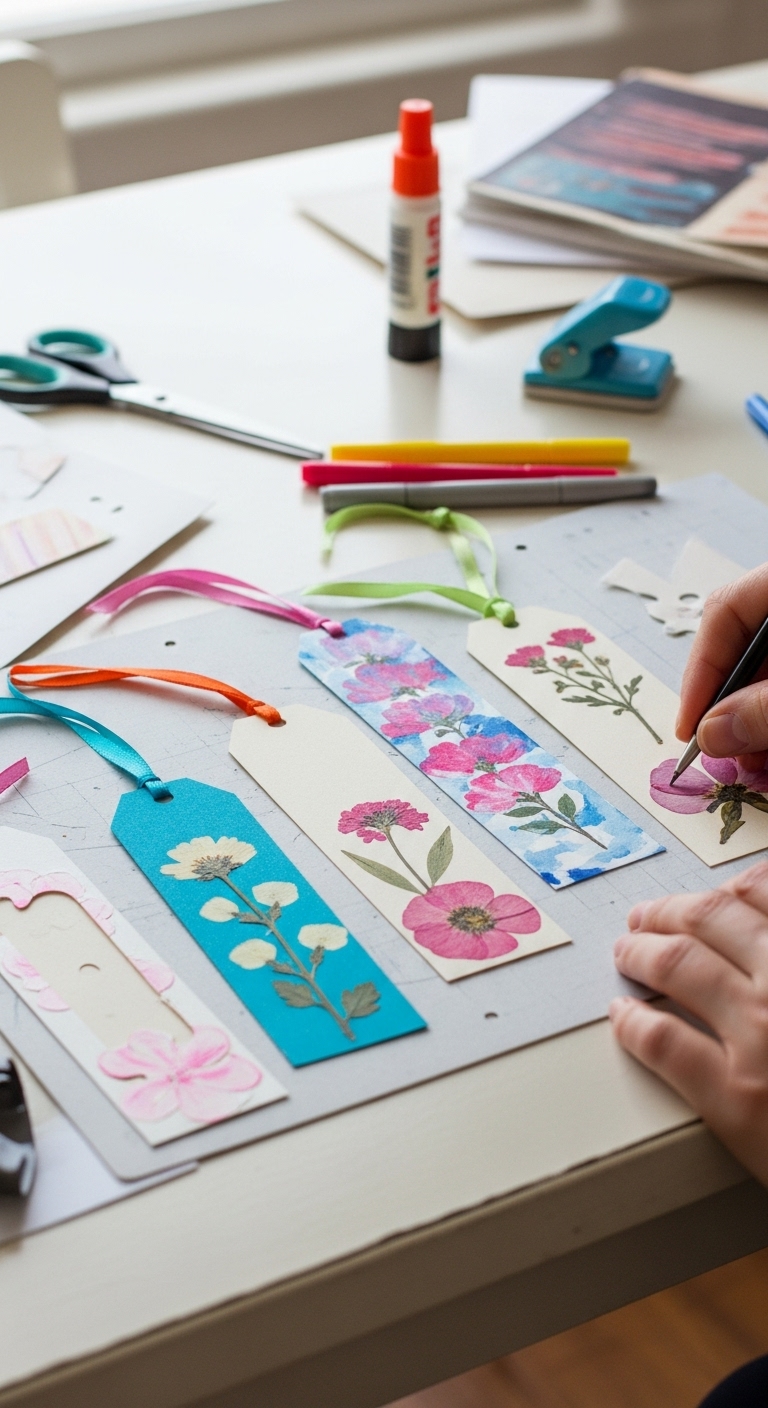
Making bookmarks is a quick, portable craft perfect for short sessions. You can design one bookmark, pause, and continue later, or create a whole set over a few days.
Materials You’ll Need
- Cardstock or thick paper
- Pens, markers, or colored pencils
- Stickers or stamps
- Ribbon or string (optional)
- Scissors and hole punch
How to Do It
- Cut cardstock into bookmark-sized strips.
- Decorate with drawings, patterns, or messages.
- Add ribbon or string if desired.
- Pause at any stage — base designs can wait for final touches.
Tips to Pause Mid-Project
- Keep markers capped and decorations organized.
- Store unfinished bookmarks flat to avoid bending.
- Resume with additional details or embellishments later.
Optional Variations
- Create themed bookmarks (spring flowers, quotes, or animals).
- Laminate or cover with clear tape for durability.
- Use pressed flowers or leaves as embellishments.
10. Easy Wall Hangings
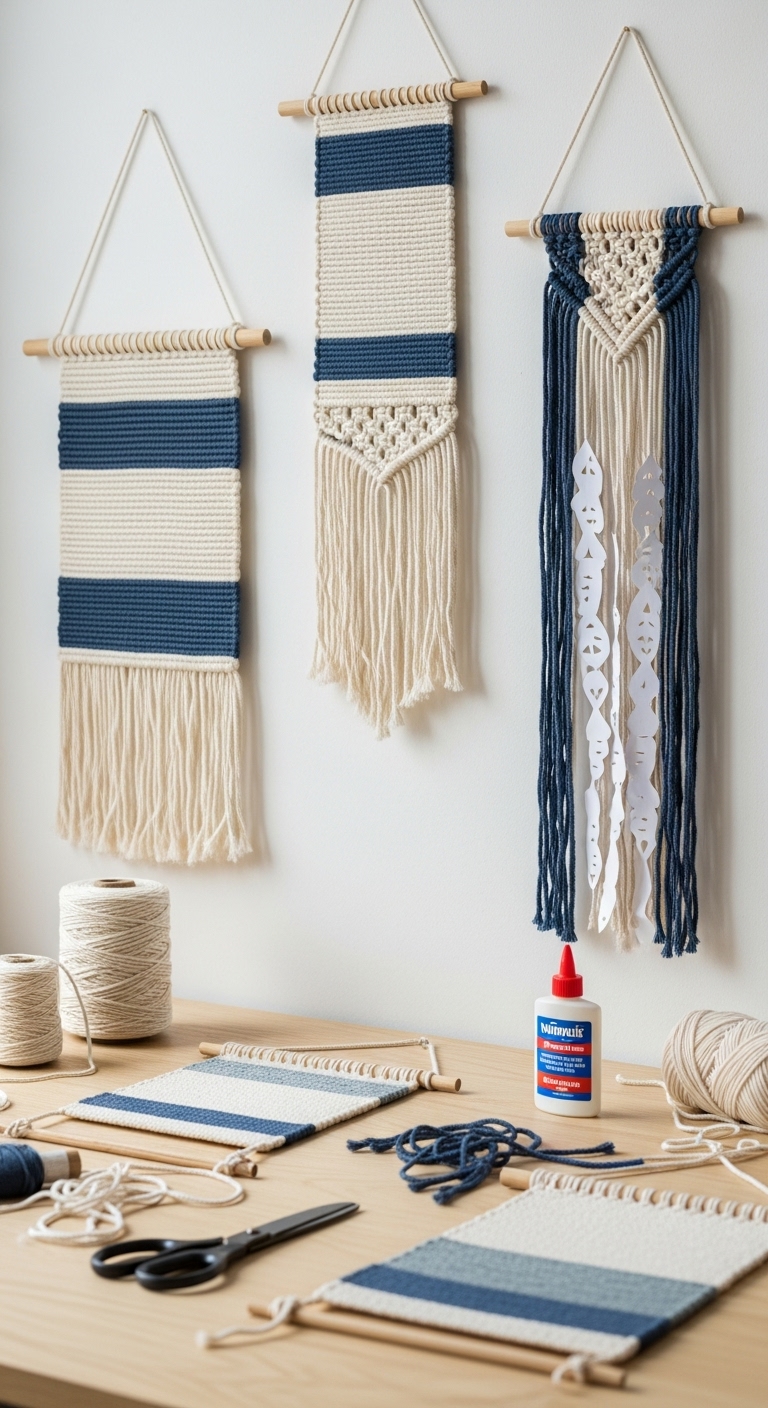
Wall hangings are ideal for modular crafting. You can start one section, pause, and add layers later. Even incomplete, it looks visually interesting, making it forgiving for short sessions.
Materials You’ll Need
- Wooden dowel or branch for the base
- Yarn, string, or fabric strips
- Scissors
- Optional: beads, feathers, or small ornaments
How to Do It
- Cut yarn or fabric into desired lengths.
- Tie strands to the dowel or branch evenly.
- Add decorative elements along the strands as you go.
- Pause after attaching some strands; return later to complete.
Tips to Pause Mid-Project
- Keep unfinished strands organized in a small container.
- Store flat or hang loosely to prevent tangling.
- Pause after major elements; add beads or feathers in a separate session.
Optional Variations
- Mix colors and textures for a layered look.
- Create seasonal themes using spring colors.
- Add tassels, pom-poms, or small trinkets for extra flair.
While you’re here, see this: DIY Bridal Feather Hand Fan Tutorial
Tips for Stopping and Starting Without Losing Momentum

One of the biggest challenges with spring DIY projects is remembering where you left off, especially if life interrupts. A few simple strategies can help you pause and pick up again without losing your rhythm or motivation.
- Use Labeled Containers or Trays
Keep all materials for a project together in one container, basket, or tray. Label it clearly so when you return, you can start right away without searching for supplies.
2. Take Photos of Your Progress
Snap a quick picture of your project before stopping. It serves as a reference for patterns, colors, or placement, so you can pick up exactly where you left off.
3. Keep Tools and Materials Together in One Spot
Designate a small area or shelf for your ongoing projects. Having brushes, scissors, paints, and other tools in one place makes it easy to resume without setup stress.
4. Break Steps Into Clear, Manageable Stages
Divide each project into mini steps, base layer, detail work, finishing touches, so you can stop at a natural breakpoint. This makes the project less overwhelming and more flexible for busy days.
With these simple strategies, your spring DIY projects become stress-free and easy to enjoy, even if you only have short pockets of time to craft.
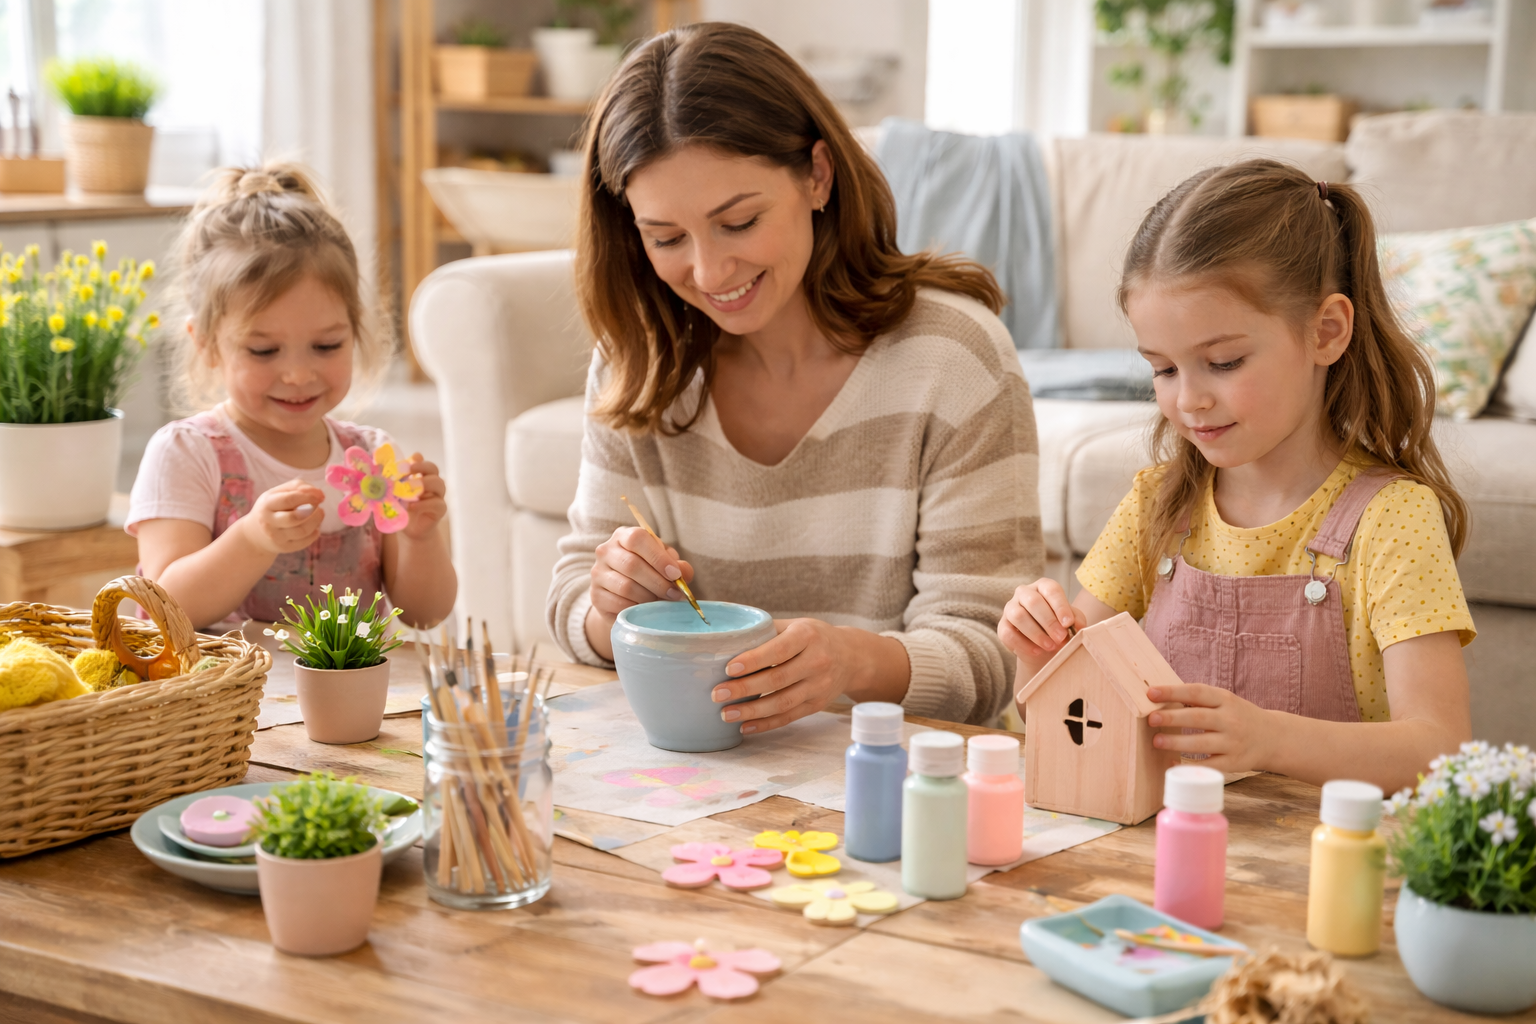
Projects to Do With Kids or Teens
Spring is the perfect time to involve children or teens in spring diy projects that are creative, hands-on, and forgiving. The goal isn’t to create Pinterest-perfect crafts, it’s to let them explore, learn, and enjoy the process while giving you a little breathing room.
Kid-Friendly Projects
Some spring diy projects are naturally suited for younger children like:
- Painting terracotta pots
- Making nature collages with leaves and petals
- Decorating mason jars.
Teens may enjoy slightly more complex crafts like mini wreaths, yarn art, or simple wall hangings. Choosing age-appropriate projects ensures they stay engaged without frustration.
How to Involve Them Without Constant Supervision
- Break projects into clear, short steps so kids can complete one stage at a time.
- Use materials that are safe, easy to handle, and require minimal cleanup.
- Set up a craft station where supplies are accessible, so you don’t have to hover constantly.
- Encourage independent decision-making: let them choose colors, patterns, or shapes — this builds confidence and creativity.
Lessons Beyond Crafting
Even simple spring diy projects teach valuable skills:
- Patience: Waiting for paint or glue to dry before the next step.
- Focus: Concentrating on cutting, painting, or assembling pieces.
- Creativity: Experimenting with colors, textures, or layouts.
- Problem-solving: Adjusting designs if something doesn’t go as planned.
By selecting the right projects and giving children space to explore, you’re not only creating fun seasonal crafts but also helping them develop skills that last beyond spring. These activities become meaningful, enjoyable, and educational, all while keeping the process manageable.
Get the full guide of this DIY here: How to Make DIY Homemade Vaseline for Skin
Conclusion
Flexible crafting doesn’t have to be stressful or time-consuming. Spring DIY projects you can stop and pick up again are all about making creativity work for your schedule, letting you enjoy the process without pressure or perfection.
By choosing the right materials, breaking projects into manageable steps, and setting up a simple craft space, you can start a project today, pause when life gets busy, and return later without losing momentum.
These projects aren’t just about finished crafts, they’re about building creativity, patience, and focus for both you and your kids.
Keep this guide handy so that whenever inspiration strikes, you have spring diy projects you can stop and pick up again, no matter how busy your day is.
This guide walked you through: Spring DIY Projects You Can Stop and Pick Up Again Without Losing Progress.

Right away I am ready to do my breakfast, once having my breakfast coming again to read additional news.
Thank you Rod
I hope you actually did come back to read additional guides? Or its okay, when =ever you can