Curious how sewing projects for adults and kids can bring families together? Try these 12 practical, and fun crafts.
The first time I tried sewing with my niece Kaira, I thought we could knock out a cute little project in under an hour. Ten minutes later, we were looking at a pile of tangled and a sewing machine that seemed to have a mind of its own.
Some projects got finished in one afternoon, others took a couple of days, but every single one left us smiling, proud, and talking about what we’d made.
That’s exactly what makes this list different. These 17 easy sewing projects are designed so adults and kids can actually make progress and finish together, whether that’s in one sitting or over a couple of afternoons .
Each stitch, every tiny mistake, and every shared laugh becomes part of the memory, not just the end product.
These aren’t just crafts, they’re little victories you can hold in your hands: a keychain that sparks pride, a tiny pillow that becomes a favorite nap companion, a mini quilt that carries laughter in every patch.
Andyou know what? You’ll be creating more than objects, you’ll be creating moments of connection, patience, and teamwork that last.
By the time you finish this guide, you’ll have more than a list of projects, you’ll have a roadmap for realistic, fun, and memorable family sewing, one stitch at a time.
Turn ordinary evenings into moments of calm, curiosity, and connection with Craft Night Ideas for Adults to Relax, Unwind, and Get Creative at Home, perfect for unwinding and exploring creativity.
The Secret Ingredient That Makes Sewing Projects for Adults and Kids Memorable (Beyond Just Sewing)
If you want your sewing projects for adults and kids to be more than a few stitches and scraps, there’s one secretwe need to know: emotional connection.
Here’s how you can make every project feel alive, meaningful, and worth finishing:
1. Turn Projects into Keepsakes or Gifts
Instead of just making a pillow or keychain for fun, let your child personalize it. Add a tiny note, embroider initials, or include a small symbol that matters to them. Even a mini quilt can become a memory patchwork, where each square tells a story or marks a special day. It’s not just about the object, it’s about giving your kids ownership, pride, and a memory they can touch.
2. Use Storytelling to Make It Fun and Emotional
Kids love stories, and your sewing projects for adults and kids can become living storybooks. Ask them to decorate, write little messages, or imagine a character for the stuffed animal they’re sewing. Suddenly, it’s not just fabric, it’s a tiny world they’re creating with their own hands. That story makes the project feel alive and makes them want to see it through to the end.
Bring a touch of nature into your creations by learning how to make Resin Jewelry with Real Flowers That Looks Professional at Home ,it’s easier than you think to achieve professional results at home.
3. Mark Each Child’s Contribution
Here’s a little trick that works like magic: label or mark what each child did. Whether it’s a stitch, a painted pattern, or a sewn-on button, make sure they can see their effort. That simple acknowledgment builds pride, motivation, and focus, so they’re more likely to finish the project — and come back for the next one with excitement.
4. Why It Works for Adults Too
It’s not just for kids, adults feel it too. When every effort is recognized, even the simplest sewing projects for adults and kids become a shared ritual of connection. Dont make it about perfection, speed, or even how the project looks in the end. Think of the laughter, the teamwork, and the memory of making something together.
Keep little hands busy and brains engaged with 13 Popsicle Stick Crafts for Kids That Actually Keep Them Busy and Boosts Creativity that spark creativity and can actually hold their attention for longer than expected.
Sewing Projects For Adults and Kids
1. Felt Hand Puppets With Personality Tags
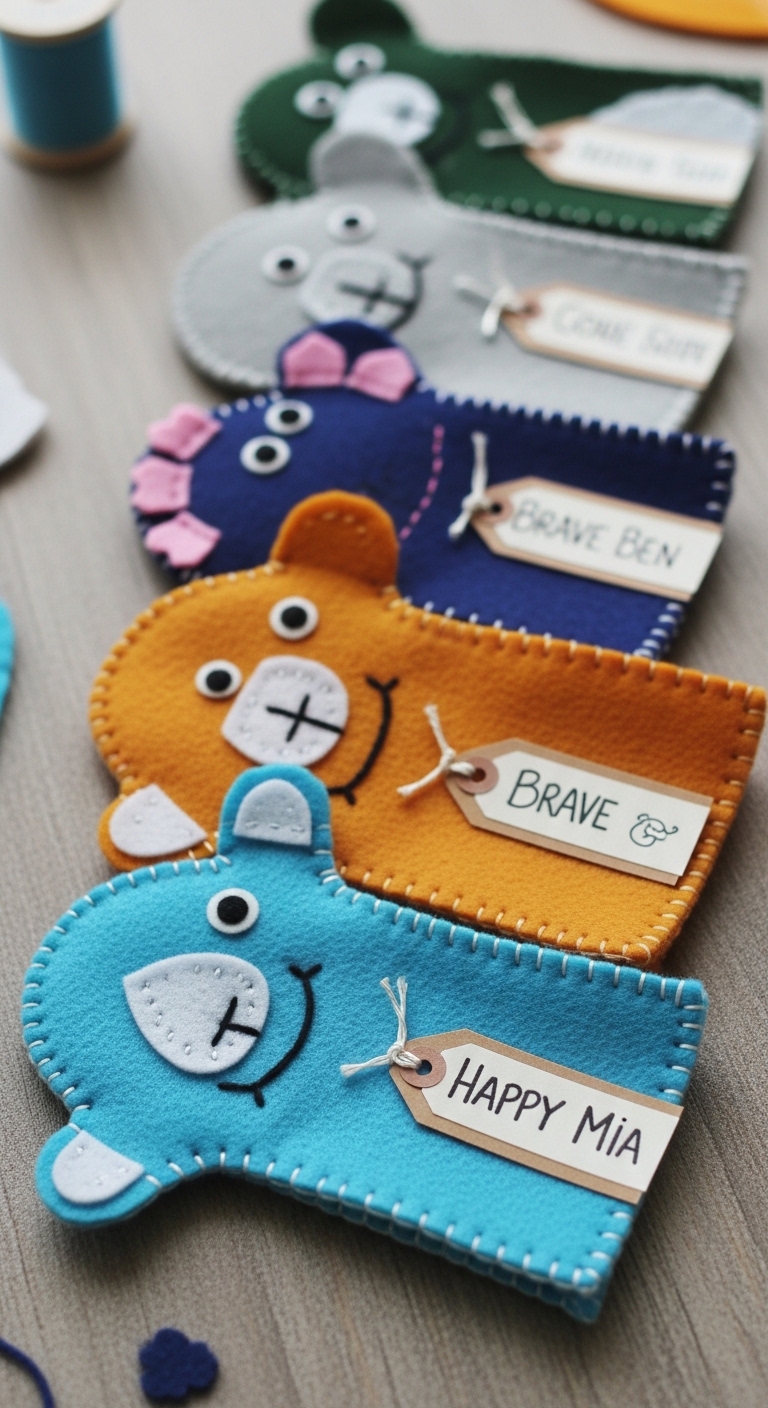
Felt hand puppets are a fun, simple project that adults and kids can make together. Everyone can have a role: one person can cut the pieces, another can do simple stitching, and both can decorate and add personality tags.
Working as a team makes the project faster, more fun, and more satisfying when it’s done.
Here’s a friendly step-by-step guide to make them:
Materials You’ll Need:
- Soft felt sheets
- Blunt-tip or hand-sewing needles
- Thread (matching or contrasting colors)
- Small scraps of fabric or paper for personality tags
- Scissors
- Pencil or fabric marker
Step 1: Cut the Felt Pieces
Start by cutting out the main puppet shapes. You can do a simple oval for the hand or a basic animal shape. Keep it simple — you can always add details later.
Small sewing tweaks can completely transform your thrift finds — check out Thrift flip Sewing Projects Ideas For People Who want Expensive Style on A Budget to see how.
Step 2: Add Personality Tags
Cut a small piece of fabric or paper and write the puppet’s name or a fun trait. This can be sewn or pinned onto the puppet. It gives each puppet a little personality and makes it more interesting.
Step 3: Sew the Pieces Together
Use a running stitch or whipstitch to attach the front and back pieces of the puppet. Take your time and guide the thread around evenly. Don’t worry about perfection, the charm is in the handmade look.
Step 4: Decorate and Personalize
Add details like eyes, ears, or patterns. You can sew on buttons, small felt shapes, or use a fabric marker for features. This step is where the puppet really comes to life.
Step 5: Try It Out
Once sewn and decorated, put your hand inside and test your puppet. Adjust stitches if needed, and enjoy how fun it is to move and animate your creation.
Tip: Keep your thread neat, and don’t make the stitches too tight — this will make the puppet easier to use.
Team Roles: How Adults and Kids Can Work Together
Here’s the trick to making a sewing project actually fun and finished: divide the work based on skills and comfort.
- Cutting: Adults handle sharp scissors or tricky shapes, while kids can cut simple straight lines or pre-drawn shapes.
- Stitching: Adults can do corners or detailed stitching, kids can do longer straight seams.
- Decorating: Both can add buttons, fabric markers, or personality tags — this is where creativity shines.
- Deciding Together: Choose colors, names, or patterns as a team — those shared choices make the project feel personal and collaborative.
By keeping roles clear and simple, everyone feels included, learns a skill, and actually finishes the project without stress. It’s teamwork that works.
Mastering some tricky DIY tools doesn’t have to be frustrating — these 10 Cricut Crafts Beginners Always Struggle With- And How to Make and Sell Themare explained step by step so you can make and even sell your creations.
2. No-Sew Fabric Pocket Organizers
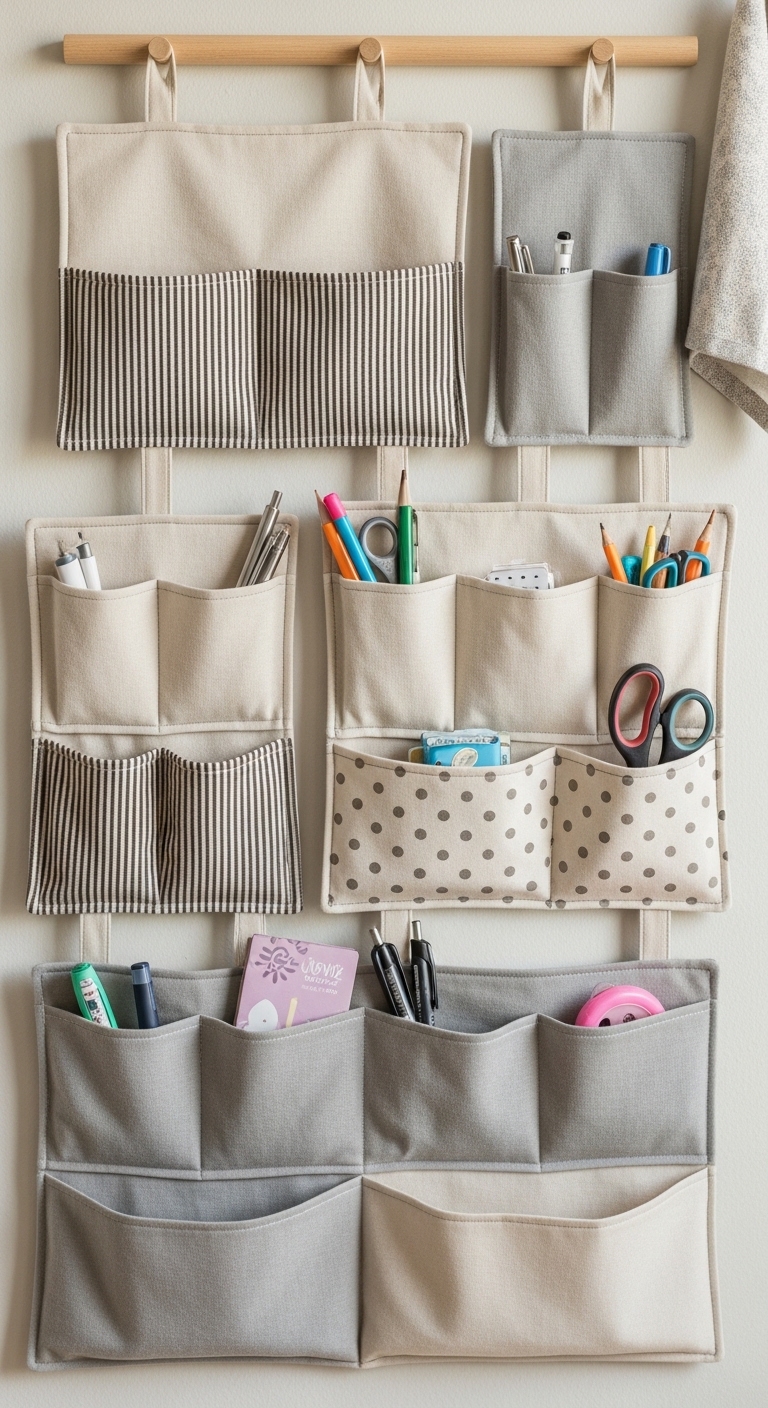
No-sew fabric pocket organizers are practical, easy to make, and perfect for storing small items. Adults and kids can work together naturally: one person can cut and prep the fabric, another can arrange pockets, and both can decorate and assemble.
Here’s a friendly step-by-step guide:
Materials You’ll Need:
- Felt sheets or soft fabric
- Fabric glue or hot glue (with adult supervision)
- Scissors
- Ruler
- Pencil or fabric marker
- Optional: buttons, patches, or small decorations
Step 1: Measure and Cut Fabric
Decide the size of your organizer. Cut a large base piece, then cut smaller rectangles for pockets. Keep measurements simple so the pockets fit neatly on the base. Adults can handle tricky cuts, kids can help cut straight lines.
Step 2: Arrange the Pockets
Lay the pockets on the base fabric to see how they fit. Move them around until the layout feels balanced. This is a perfect shared creative step, everyone can give ideas.
Step 3: Glue the Pockets
Carefully glue the pockets onto the base. Use fabric glue or a low-temp hot glue gun for safety. Adults can handle the tricky corners, while kids can press pockets down or add decorations while glue sets.
Step 4: Decorate
Add buttons, patches, or small drawings to personalize each pocket. Both adults and kids can take turns decorating. This makes each organizer unique and personal.
Step 5: Hang or Use
Once the glue dries, your organizer is ready. Hang it on a wall, the back of a door, or use it to store craft supplies, stationery, or small toys.
Team Roles:
- Cutting: Adults handle tricky cuts or precise measurements; kids can cut larger, simple shapes.
- Arranging: Both can place pockets and decide on layout — everyone’s input counts.
- Gluing: Adults apply glue carefully; kids press pockets in place and hold until it sticks.
- Decorating: Everyone adds personal touches, stickers, patches, or drawings.
- Decision-Making: Choose colors, patterns, and pocket placement together — shared choices make it a true team project.
Keeping roles simple like this ensures the project is finished efficiently, fun, and satisfying for everyone.
Make spring celebrations meaningful with Eco-Friendly Easter Crafts You Can Make and Reuse Year After Year designed to be reused year after year, blending fun, creativity, and sustainability.
3. Reusable Snack Bags With DIY Labels
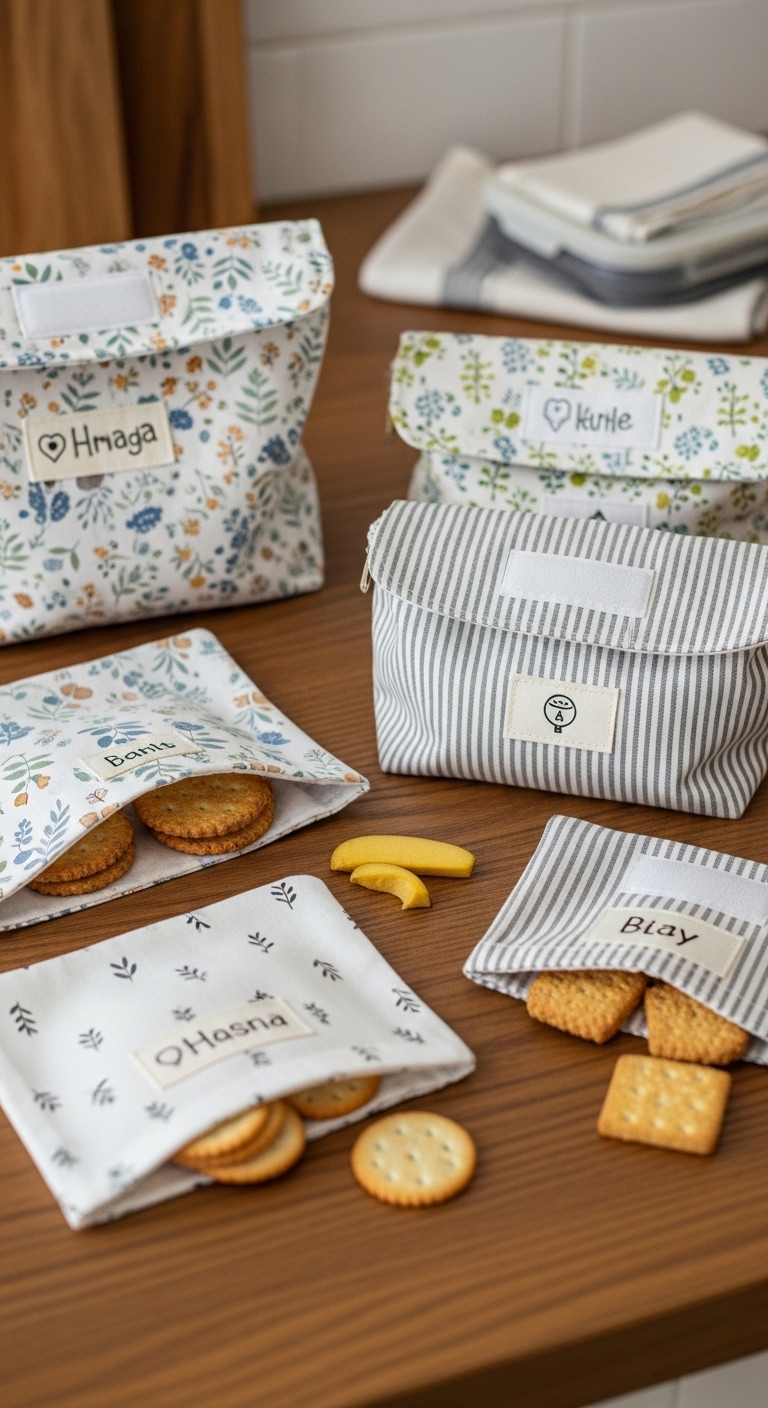
Reusable snack bags is another sewing projects for adults and kids. This craft are eco-friendly, practical, and fun to personalize. Making them together is a great way to teach simple sewing or no-sew skills while creating something useful.
Adults and kids can divide tasks: one person can prep the fabric, another can attach labels, and both can decorate.
Here’s a step-by-step guide:
Materials You’ll Need:
- Cotton or canvas fabric
- Iron-on or sew-on labels, or plain paper for DIY tags
- Velcro, snap buttons, or fold-over fabric for closures
- Fabric markers or paints
- Scissors
- Fabric glue (optional)
Step 1: Cut the Fabric
Decide the size of your snack bags. Cut two rectangles for each bag. Adults can handle precise cuts; kids can cut simpler straight lines.
Step 2: Attach Closures
Add Velcro, snaps, or fold-over flaps so the bag can open and close easily. Adults can handle tricky placement; kids can press or help hold pieces in place.
Step 3: Add DIY Labels
Create small labels with names, icons, or fun patterns. Use fabric markers, paints, or glue-on paper. Both adults and kids can get creative here — personalization makes the bags unique.
Step 4: Assemble the Bag
Glue or sew the sides of the bag together. Adults can manage corners and tricky seams; kids can press edges and make sure the sides line up.
Step 5: Decorate and Finish
Add any extra decorations, like small patches, initials, or drawings. This is a fun collaborative step, and everyone’s contribution shows in the final product.
Team Roles:
- Cutting: Adults handle precision cuts; kids manage larger or straight pieces.
- Closures: Adults attach Velcro or snaps; kids press and help align.
- Labels and Decoration: Everyone adds designs, names, or fun details.
- Assembly: Adults handle tricky seams; kids help press and keep edges aligned.
- Decision-Making: Choose fabrics, colors, or patterns together, shared decisions make it a true team project.
This setup ensures the project is finished efficiently, fun, and personalized, while teaching skills and encouraging teamwork.
Build imagination and fine motor skills at the same time with Farm Animal Crafts for Toddlers: Build Creativity and Fine Motor Skills Beyond Playtime, turning simple playtime into a learning adventure.
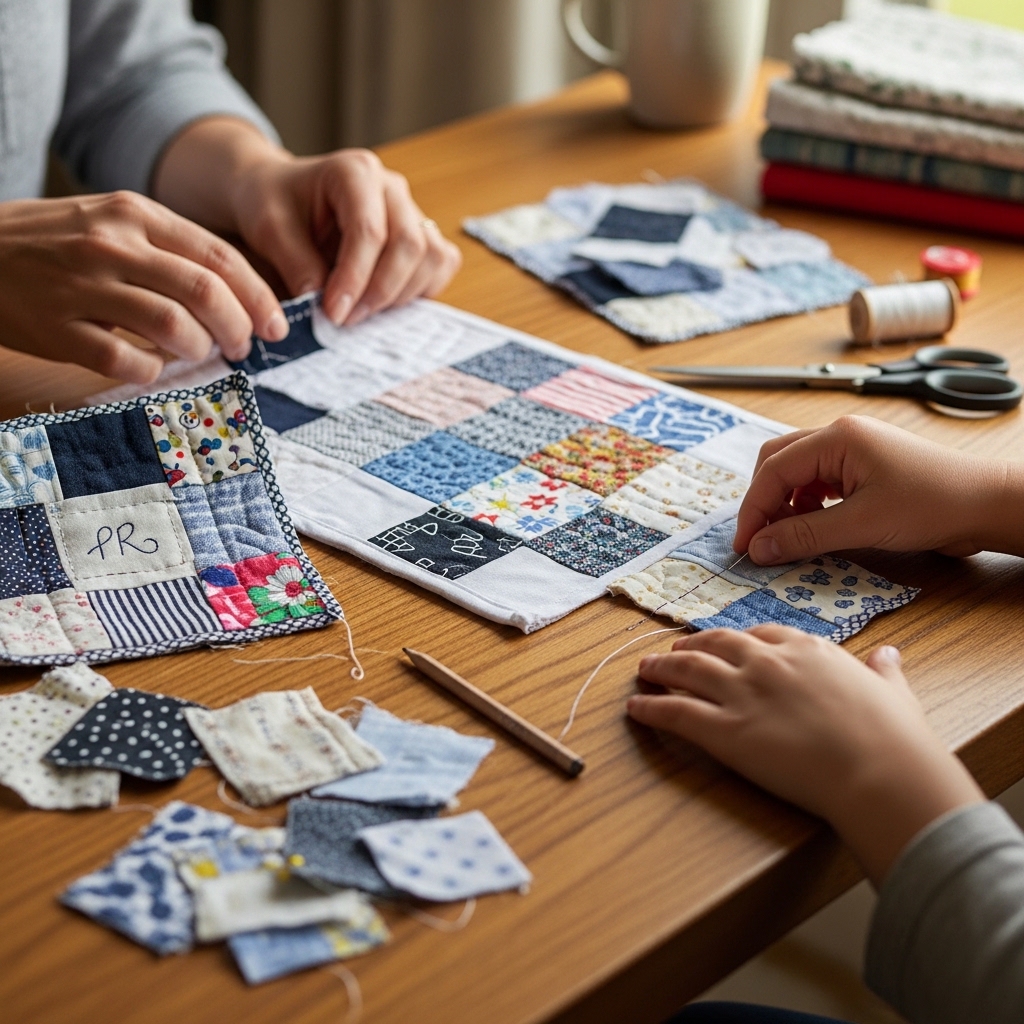
4. Mini Memory Quilts Using Old Clothes
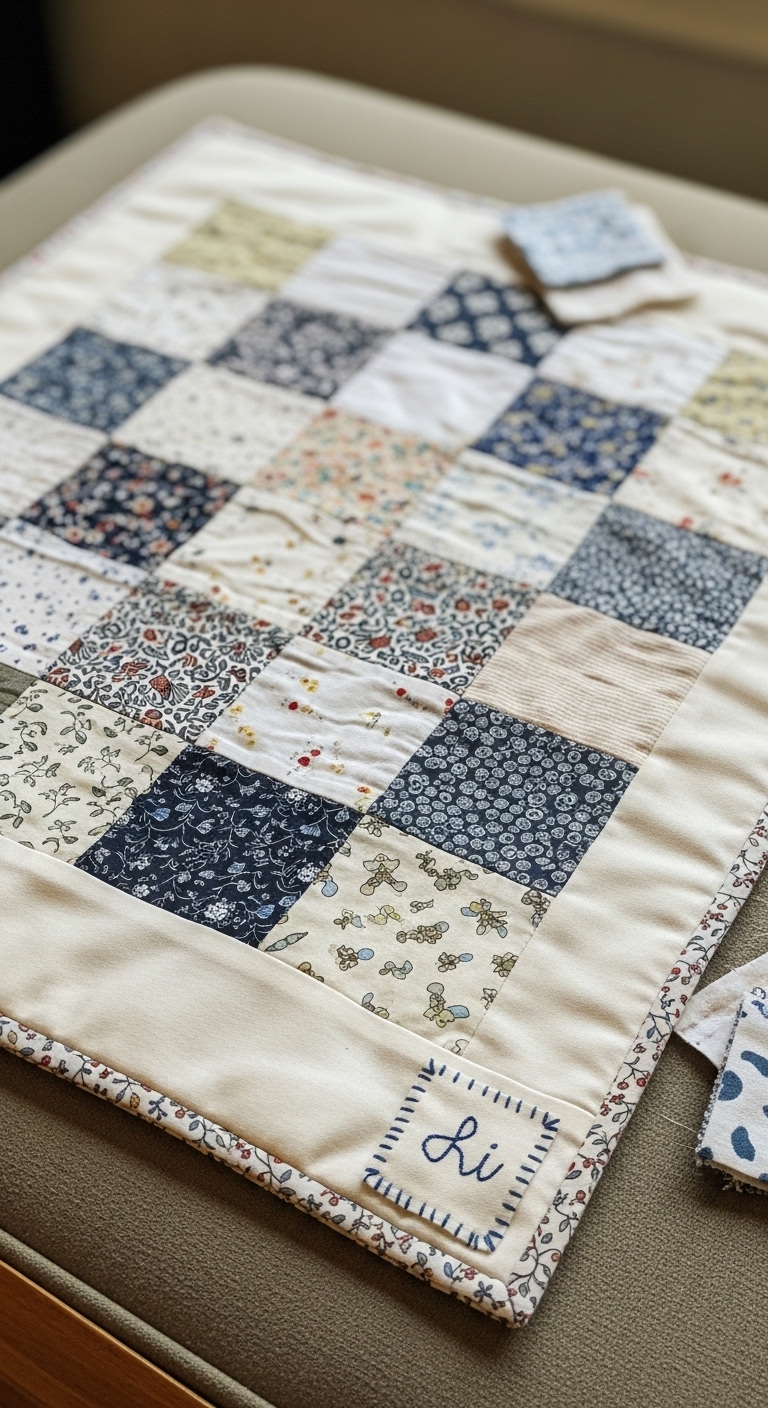
Mini memory quilts using old clothes are a fun, meaningful sewing project for adults and kids. They transform old t-shirts, baby clothes, or worn-out fabric into a keepsake quilt filled with stories and memories.
Everyone can have a role: one person can cut squares, another can sew pieces together, and both can personalize each patch. Working as a team makes the quilt special, creative, and finishable without stress.
Here’s a friendly guide to make them:
Materials You’ll Need:
- Old clothes or fabric scraps
- Sewing machine or hand-sewing needles
- Thread (matching or contrasting colors)
- Scissors
- Fabric marker or chalk
- Optional: embroidery thread, buttons, patches for decoration
Step 1: Select and Prep Fabric
Pick old clothes that have special meaning or fun patterns. Wash and iron them. Adults can handle cutting tricky pieces, while kids can help sort patterns or decide which pieces go together.
Step 2: Cut Squares or Shapes
Cut fabric into uniform squares or rectangles. These will form the quilt patches. Adults handle precise cuts; kids can cut simple shapes or trim edges.
Step 3: Arrange the Layout
Lay the patches out on a flat surface. Decide together on the order — grouping colors, patterns, or themes. This shared planning makes the quilt feel personal and collaborative.
Step 4: Sew the Pieces Together
Use a running stitch, whipstitch, or sewing machine to join the squares. Adults can manage corners or complex stitching; kids can sew longer straight seams with guidance.
Step 5: Add Personal Touches
Decorate patches with embroidery, buttons, or small stitched designs. Both adults and kids can add their unique touches — each patch can tell a story or memory.
Step 6: Finish the Edges
Fold over the quilt edges and sew or glue them neatly. This step keeps the quilt durable and tidy. Adults can handle tricky corners; kids can help press or hold edges while sewing.
Team Roles:
- Cutting: Adults manage tricky shapes and edges; kids cut simpler squares.
- Arranging Layout: Both plan the quilt’s design, colors, and patterns together.
- Sewing: Adults handle complex stitching; kids do straight seams or decorative stitching.
- Decorating: Everyone adds embroidery, buttons, or patches, personalization is the highlight.
- Decision-Making: Shared choices on fabric placement, colors, and stories make it truly collaborative.
5. Simple Drawstring Bags for Toys or Gifts
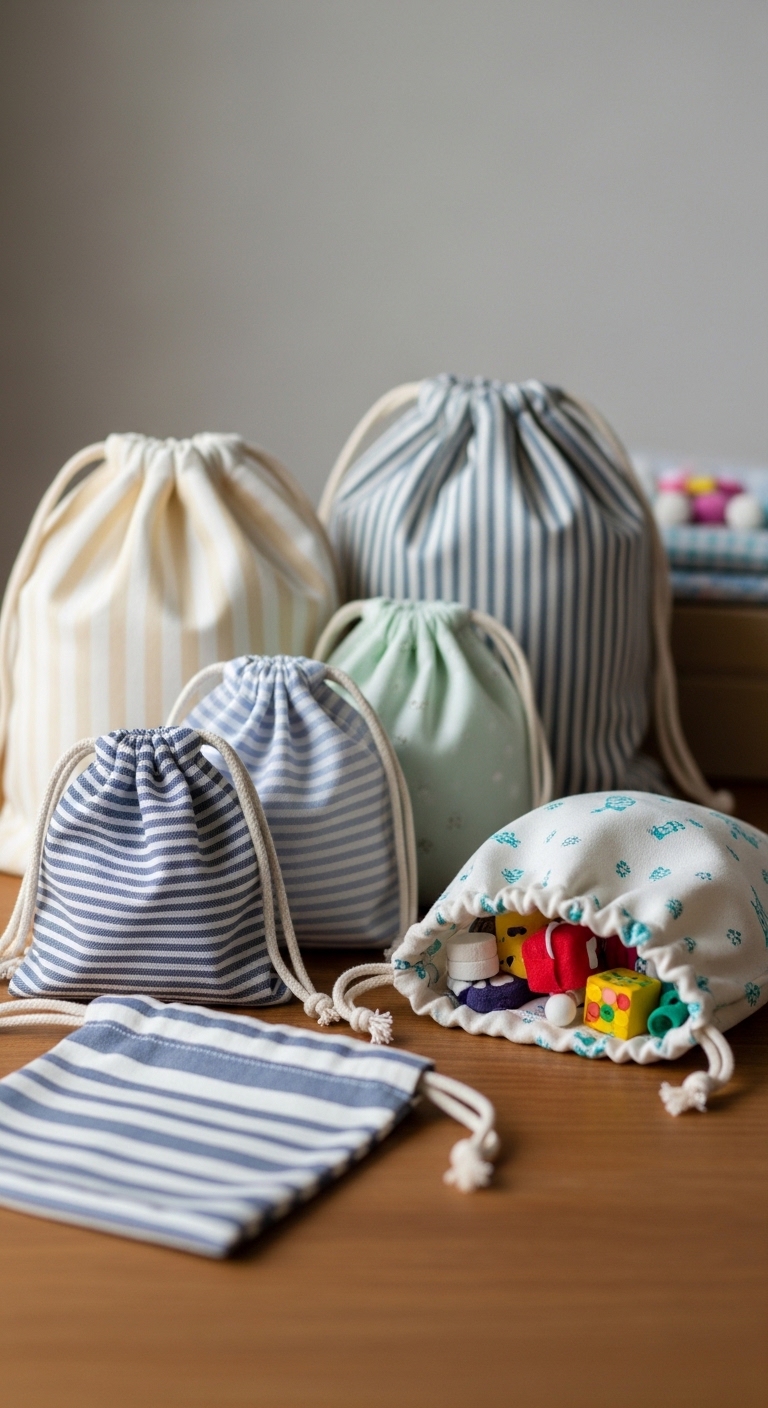
Simple drawstring bags are practical, fun, and easy to personalize. They’re great for storing toys, small gifts, or even craft supplies. Adults and kids can share tasks naturally: one can cut fabric, another can stitch or thread the drawstring, and both can decorate. Teamwork keeps it smooth, fun, and rewarding.
Here’s a friendly guide to make them:
Materials You’ll Need:
- Cotton or canvas fabric
- Sewing machine or hand-sewing needles
- Thread
- Scissors
- Ribbon, cord, or shoelace for drawstring
- Fabric markers, patches, or stickers for decoration
Step 1: Cut the Fabric
Decide the size of your bag and cut two rectangles. Adults can handle precision cuts; kids can cut straight lines or help trim edges.
Step 2: Sew the Sides
Place the rectangles right sides together and sew along the sides, leaving the top open. Adults can manage corners; kids can guide the fabric or press seams.
Step 3: Create the Drawstring Channel
Fold the top edge over twice to create a channel for the drawstring and sew along the edge. Adults handle tricky folds; kids can help press fabric flat or mark the channel.
Step 4: Insert the Drawstring
Thread the ribbon, cord, or shoelace through the channel. Adults can push through tricky ends; kids can pull or hold the cord while threading.
Step 5: Decorate
Add fabric markers, patches, or stickers to make each bag unique. Both adults and kids can contribute creative touches.
Step 6: Test and Use
Pull the drawstring closed and open to ensure it works smoothly. Fill the bag with toys, small gifts, or craft supplies — it’s ready to use!
Team Roles:
- Cutting: Adults handle precision; kids cut simple shapes or trim.
- Sewing: Adults manage tricky corners; kids guide fabric or press seams.
- Drawstring: Adults thread cord through the channel; kids pull and help adjust.
- Decorating: Everyone adds personal touches like drawings, patches, or stickers.
- Decision-Making: Pick colors, patterns, or designs together , shared choices make it fun and collaborative.
This setup ensures everyone learns, contributes, and completes the bag successfully, turning a simple project into a team-based, enjoyable experience.
Rainy days don’t have to be boring — these Indoor Activities for Kids on Rainy Days That Actually Keep Them Busy actually keep them busy while boosting learning, play, and creativity indoors.
6. DIY Scrunchies With Elastic
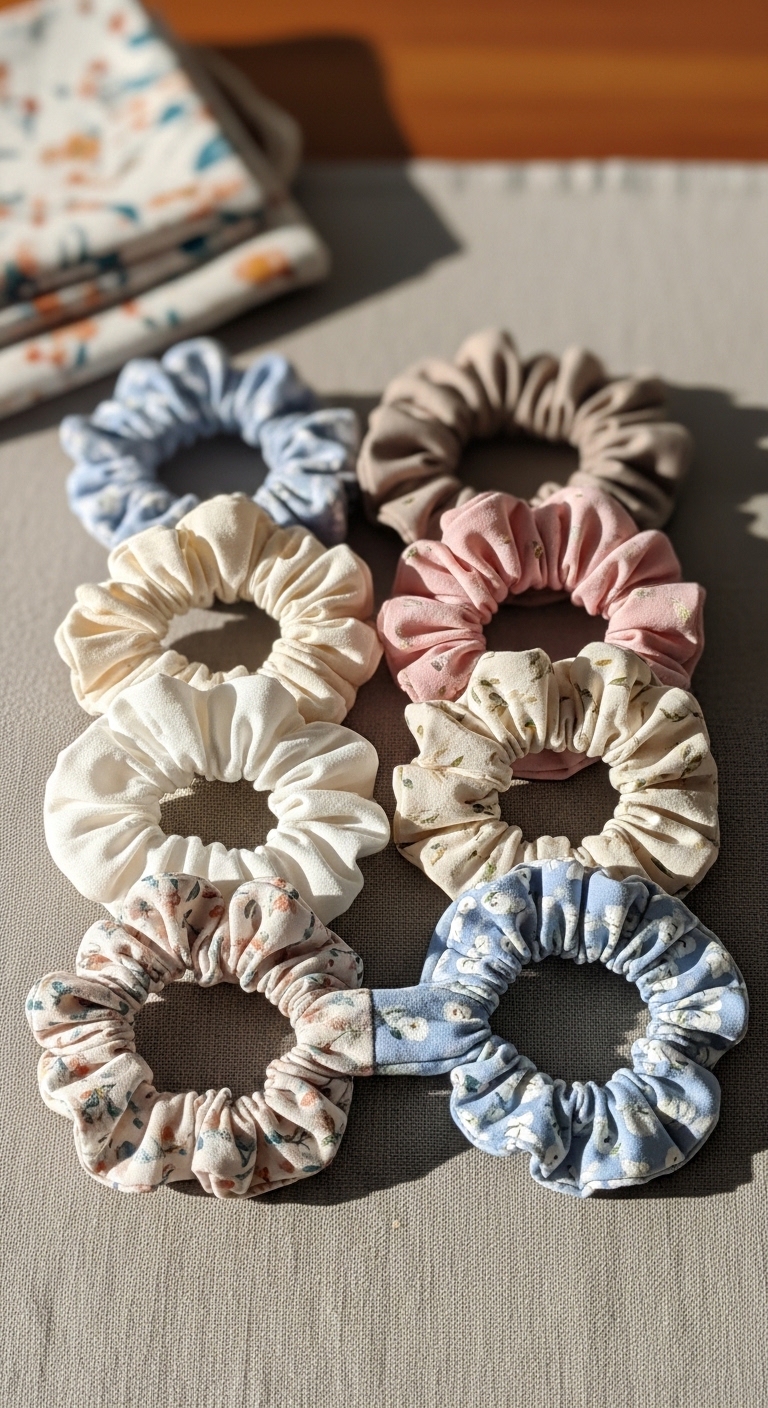
DIY scrunchies with elastic are fun, wearable, and surprisingly easy to make. They’re perfect for learning how to handle stretchy material, and adults and kids can work together naturally: one person can cut and prep the fabric, another can sew and insert the elastic, and both can add decorative touches.
Here’s a friendly guide to make them:
Materials You’ll Need:
- Fabric scraps (cotton, satin, or soft stretchy fabric)
- 1/4-inch elastic
- Sewing machine or hand-sewing needles
- Thread
- Scissors
- Safety pin or bodkin
- Optional: beads or small charms for decoration
Step 1: Cut the Fabric
Cut a rectangle of fabric about 22 inches long and 4 inches wide (adjust for larger or smaller scrunchies). Adults can handle precise measuring; kids can cut straight edges or trim fabric.
Step 2: Fold and Sew
Fold the fabric lengthwise right sides together and sew along the long edge, leaving the short ends open. Adults handle tricky stitching; kids can guide the fabric or help press seams flat.
Step 3: Turn Fabric Right Side Out
Use a safety pin or finger to turn the tube right side out. Adults can manage narrow ends; kids can push the fabric through the tube.
Step 4: Insert Elastic
Attach a safety pin to one end of the elastic and thread it through the fabric tube. Adults can handle tight spots; kids can pull and hold the elastic steady. Sew the elastic ends together securely.
Step 5: Close the Ends
Tuck in the fabric edges and stitch the ends closed. Adults can manage tricky folds; kids can press or hold while stitching.
Step 6: Personalize
Add small beads, charms, or decorative stitching. Both adults and kids can contribute creative touches — every scrunchie is unique!
Team Roles:
- Cutting Fabric: Adults handle measurements and tricky cuts; kids cut straight lines or trim excess.
- Sewing: Adults manage tricky seams; kids guide fabric or help press.
- Elastic Insertion: Adults handle tight ends; kids pull and hold.
- Decorating: Everyone adds beads, charms, or stitching — creativity shines here.
- Decision-Making: Choose fabric, colors, and embellishments together — collaboration makes it fun and personal.
This approach ensures DIY scrunchies with elastic are finished efficiently, enjoyable, and teach practical skills, all while encouraging teamwork and creativity.
7. Personalized Pencil Cases With Monograms
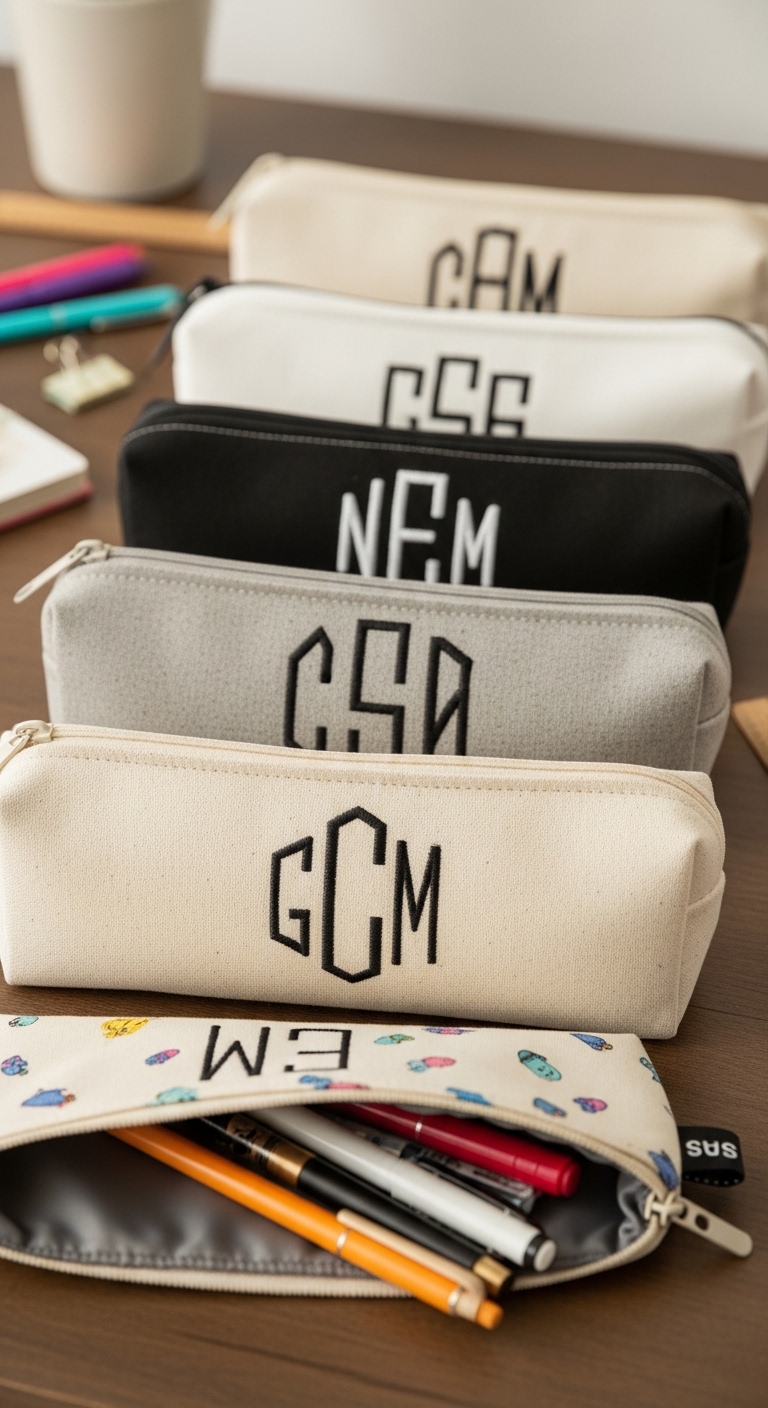
Personalized pencil cases with monograms are perfect for school supplies, gifts, or just keeping pens and pencils organized. Adults and kids can share tasks naturally: one handles cutting and sewing, the other can design or add monograms. Working as a team makes the project creative, efficient, and satisfying.
Here’s a friendly step-by-step guide:
Materials You’ll Need:
- Fabric for the pencil case (cotton, canvas, or felt)
- Fusible interfacing (optional for sturdiness)
- Sewing machine or hand-sewing needles
- Thread
- Scissors
- Zipper (6–9 inches)
- Fabric scraps for monograms or applique
- Fabric markers or chalk
- Pins or clips
Step 1: Cut the Fabric
Cut two rectangles for the pencil case body. Adults handle precision cuts; kids can cut simple straight lines or trim edges.
Step 2: Add Monograms or Applique
Use fabric scraps to cut letters or shapes for the monogram. Iron-on interfacing or fabric glue can hold pieces in place before sewing. Kids can arrange letters or designs; adults can stitch them securely.
Step 3: Attach the Zipper
Place the zipper between the two fabric pieces and sew along the edges. Adults handle tricky corners; kids can hold or guide fabric as it feeds through the machine.
Step 4: Sew the Pencil Case
Sew the sides and bottom of the case. Adults manage corners or detailed stitching; kids can press seams and help align edges.
Step 5: Decorate (Optional)
Add extra stitching, buttons, or small patches to make the pencil case unique. Both adults and kids can contribute creative touches.
Step 6: Test and Use
Open and close the zipper to make sure it works smoothly. Fill with pens, pencils, or small school supplies — the pencil case is ready!
Team Roles:
- Cutting Fabric: Adults handle precision; kids cut larger pieces or trim edges.
- Monogram/Applique: Adults stitch securely; kids arrange letters or add designs.
- Zipper Attachment: Adults sew tricky edges; kids help guide fabric.
- Sewing Case: Adults manage corners; kids press seams or hold edges.
- Decorating: Everyone adds personal touches — creativity is the highlight.
- Decision-Making: Choose fabrics, colors, and monogram style together, shared choices make it personal and collaborative.
Make after-school hours exciting and productive with 10 Super Fun After-School & Homework-Friendly Crafts Kids Can Make in 20 Minutes, perfect for homework-friendly creativity bursts.
8. DIY Aprons for Kids and Adults
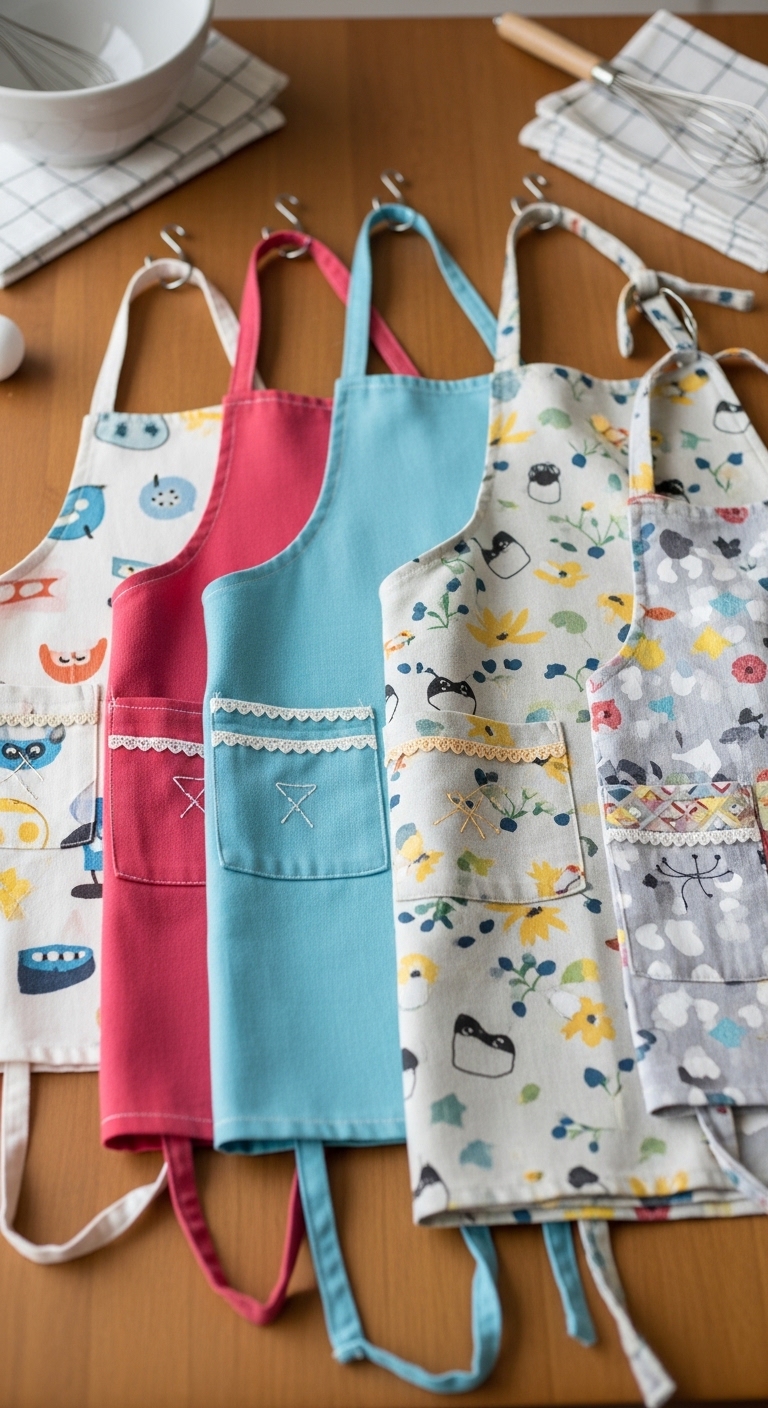
These aprons aren’t just for cooking, they’re perfect for crafts, painting, or even gardening. Making your own apron teaches functional stitching, handling straps, and color coordination, while giving both adults and kids a sense of accomplishment.
Doing this sewing projects for adults and kids as a team makes the project faster, more enjoyable, and lets everyone personalize their apron.
Materials You’ll Need:
- Fabric (cotton or canvas is best)
- Sewing machine or hand-sewing needles
- Thread
- Scissors
- Pins or clips
- Ribbon, bias tape, or matching fabric for straps
- Fabric markers or paint for decoration
Step 1: Measure and Cut the Fabric
Decide the apron size, adults can measure carefully, while kids can help pick the shape or trim edges. Cut a rectangle for the body of the apron and optional smaller rectangles for pockets.
Step 2: Sew the Body
Fold edges to prevent fraying and sew around the perimeter. Adults handle tricky corners; kids can press or guide fabric along straight seams.
Step 3: Add Straps
Attach straps for the neck and waist using ribbon, bias tape, or fabric strips. Adults can sew them securely; kids can help position and hold straps in place.
Step 4: Add Pockets (Optional)
Sew on one or more pockets, adults handle corners; kids can decide placement or press edges. Pockets are great for holding brushes, utensils, or small tools.
Step 5: Decorate and Personalize
Use fabric markers, paints, or small embellishments to add designs, initials, or patterns. Both adults and kids can contribute — this step brings personality and creativity to the apron.
Step 6: Test and Adjust
Try the apron on and adjust straps if necessary. Everyone can check comfort and fit to make sure it works for both kids and adults.
Team Roles:
- Cutting: Adults handle precise measurements; kids cut simple shapes or trim edges.
- Sewing: Adults manage tricky corners; kids press seams and help guide fabric.
- Strap Attachment: Adults sew securely; kids hold and position straps.
- Decorating: Everyone adds colors, initials, or designs — creativity shines.
- Decision-Making: Choose colors, patterns, and pocket placement together, shared choices make it fun, collaborative, and personal.
With this approach, DIY aprons for kids and adults aren’t just functional, they’re teaching projects that encourage teamwork, creativity, and pride in a finished product.
Even if you’ve never crafted before, these DIY Projects for People Who Don’t Feel Crafty at Allare approachable, fun, and surprisingly satisfying.
9. Soft Balls or Beanbags for Games
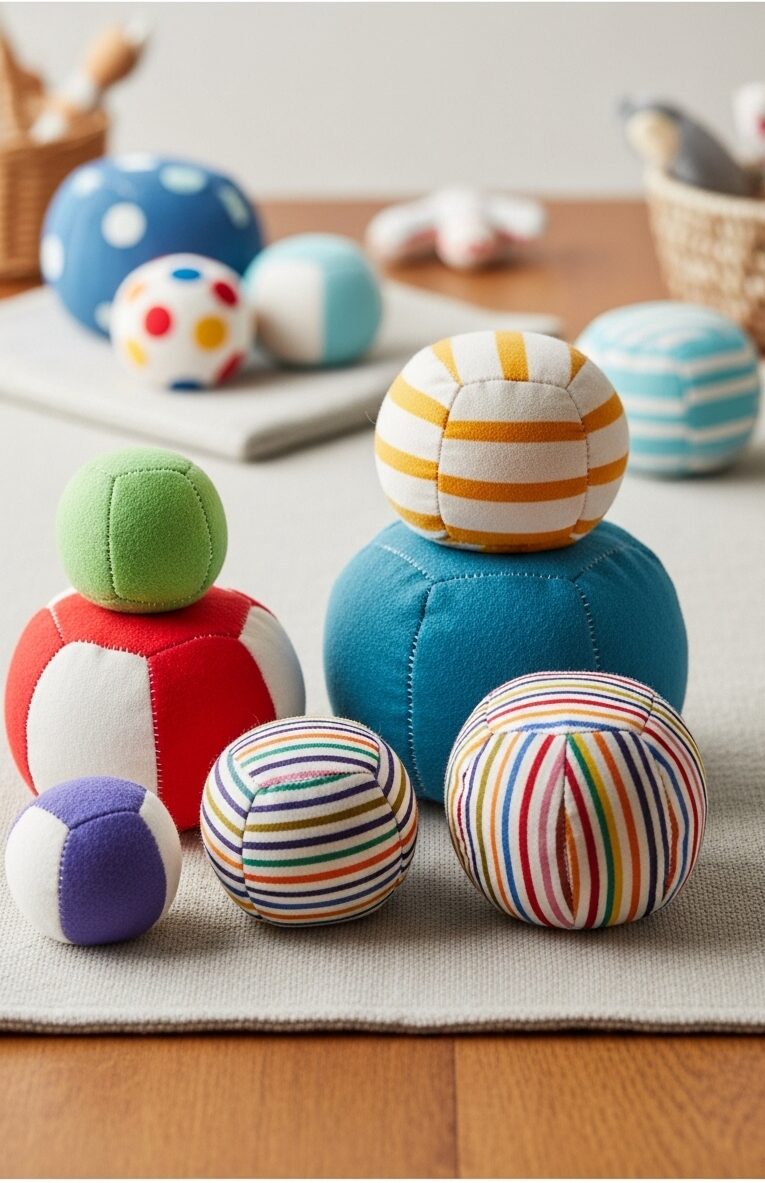
Soft balls or beanbags are versatile and fun, perfect for indoor or outdoor games. Making them together teaches pattern cutting, basic sewing, and stuffing techniques, and helps kids develop hand-eye coordination while giving adults a chance to guide and collaborate.
Materials You’ll Need:
- Fabric scraps (cotton, felt, or canvas)
- Sewing machine or hand-sewing needles
- Thread
- Scissors
- Fabric marker or chalk
- Polyester stuffing, rice, or dried beans
- Pins or clips
Step 1: Draw and Cut the Pattern
Draw simple shapes like circles or squares on the fabric. Adults can handle complex curves; kids can cut straight or pre-drawn lines. Each shape will become one side of your beanbag.
Step 2: Sew Two Pieces Together
Place two pieces of fabric right sides together and sew around the edges, leaving a small opening for stuffing. Adults can manage corners or tricky curves; kids can hold fabric or guide seams.
Step 3: Turn Right Side Out
Carefully turn the sewn piece right side out. Adults handle narrow openings; kids can help push fabric through.
Step 4: Stuff the Beanbag
Fill the bag with stuffing, rice, or beans until it’s soft but firm. Adults can ensure even filling; kids can add stuffing gradually and feel the texture.
Step 5: Close the Opening
Hand-sew or machine-stitch the opening closed. Adults handle tricky edges; kids can help press fabric or hold seams.
Step 6: Test and Play
Gently toss or roll the beanbag to check shape and weight. Use them in games that build coordination and teamwork — it’s ready for fun!
Team Roles:
- Cutting: Adults handle curves; kids cut straight lines or help trim edges.
- Sewing: Adults handle corners and curves; kids press seams or guide fabric.
- Stuffing: Adults ensure even filling; kids add stuffing gradually.
- Closing: Adults sew openings; kids hold or press edges.
- Decision-Making: Choose shapes, colors, and filling together, shared choices make the project collaborative and enjoyable.
This approach makes soft balls or beanbags for games educational, fun, and finishable, while teaching practical sewing and coordination skills.
10. DIY Doll Clothes
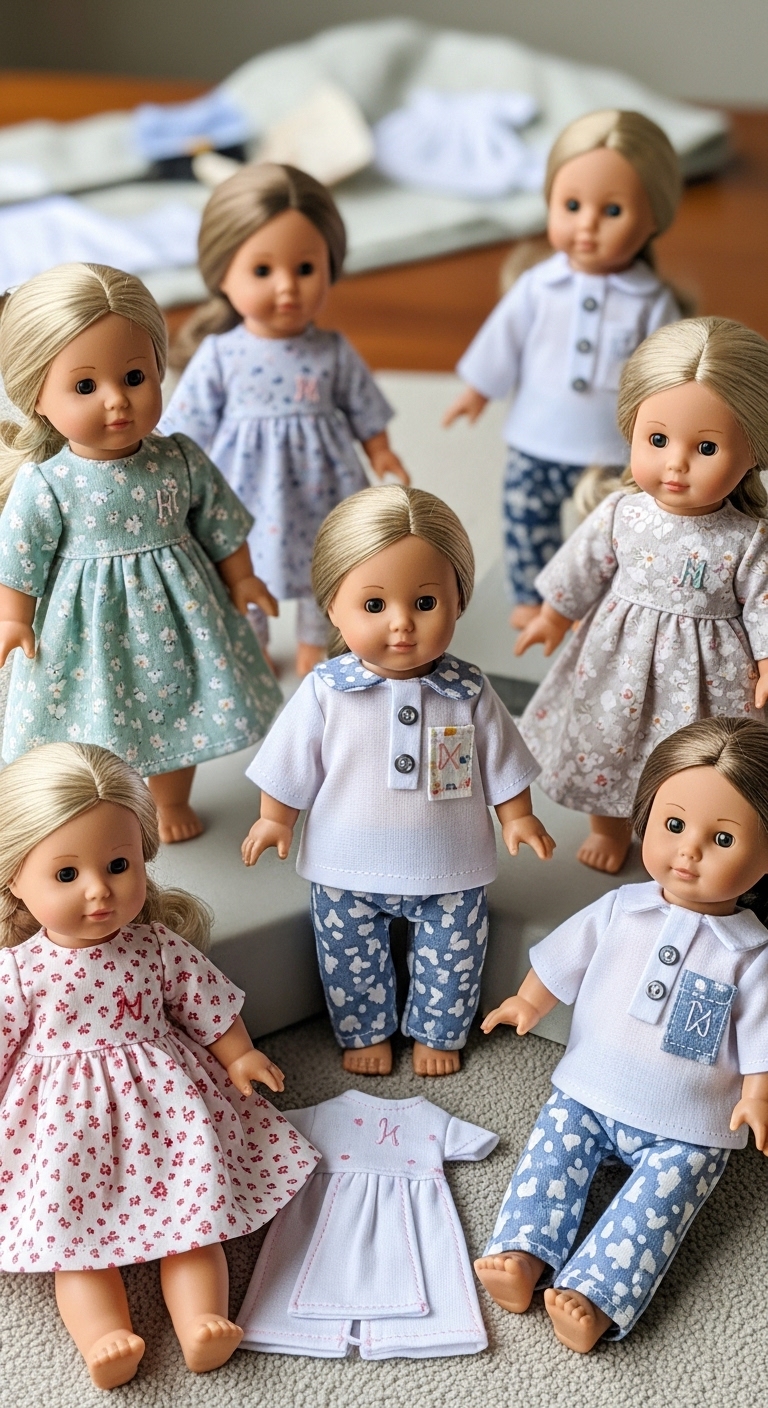
DIY doll clothes with easy templates are a perfect way to teach pattern following, basic sewing skills, and creativity. This project lets adults and kids work together, one can cut fabric while the other sews, and both can decorate and personalize each outfit.
Working as a team makes the project fun, collaborative, and actually finishable.
Materials You’ll Need:
- Fabric scraps (cotton, felt, or soft fabric)
- Sewing machine or hand-sewing needles
- Thread
- Scissors
- Fabric markers or chalk
- Pins or clips
- Easy doll clothes templates (printable or hand-drawn)
- Optional: buttons, ribbons, or small embellishments
Step 1: Select the Template and Fabric
Choose a doll clothes template. Adults can trace the template carefully; kids can pick fabrics or help cut along straight lines. This ensures the clothes fit the doll properly.
Step 2: Cut the Fabric Pieces
Cut the fabric following the template shapes. Adults handle tricky curves and corners; kids can cut simpler lines or trim edges. Each piece will form part of the outfit.
Step 3: Pin Pieces Together
Align the fabric pieces and pin them in place. Adults can manage precise alignment; kids can help hold pieces steady.
Step 4: Sew the Pieces
Sew along the edges following the template lines. Adults handle corners or small details; kids can sew longer straight seams or guide the fabric through the machine.
Step 5: Add Decorative Elements
Attach buttons, ribbons, or embroidery to personalize the outfit. Both adults and kids can add creative touches, this step brings unique personality to each doll outfit.
Step 6: Test the Fit
Dress the doll in the new clothes and adjust seams if needed. Everyone can check fit and comfort, it’s ready to display or play with.
Team Roles:
- Template Selection & Fabric: Adults trace carefully; kids pick fabrics and help cut straight lines.
- Cutting: Adults handle curves; kids trim or cut simpler parts.
- Sewing: Adults manage detailed stitching; kids do straight seams and help guide fabric.
- Decorating: Everyone adds ribbons, buttons, or embroidery — creativity is shared.
- Decision-Making: Choose templates, fabrics, and decoration together, collaboration makes it fun, engaging, and personal.
11. Handmade Coasters with Fun Patterns
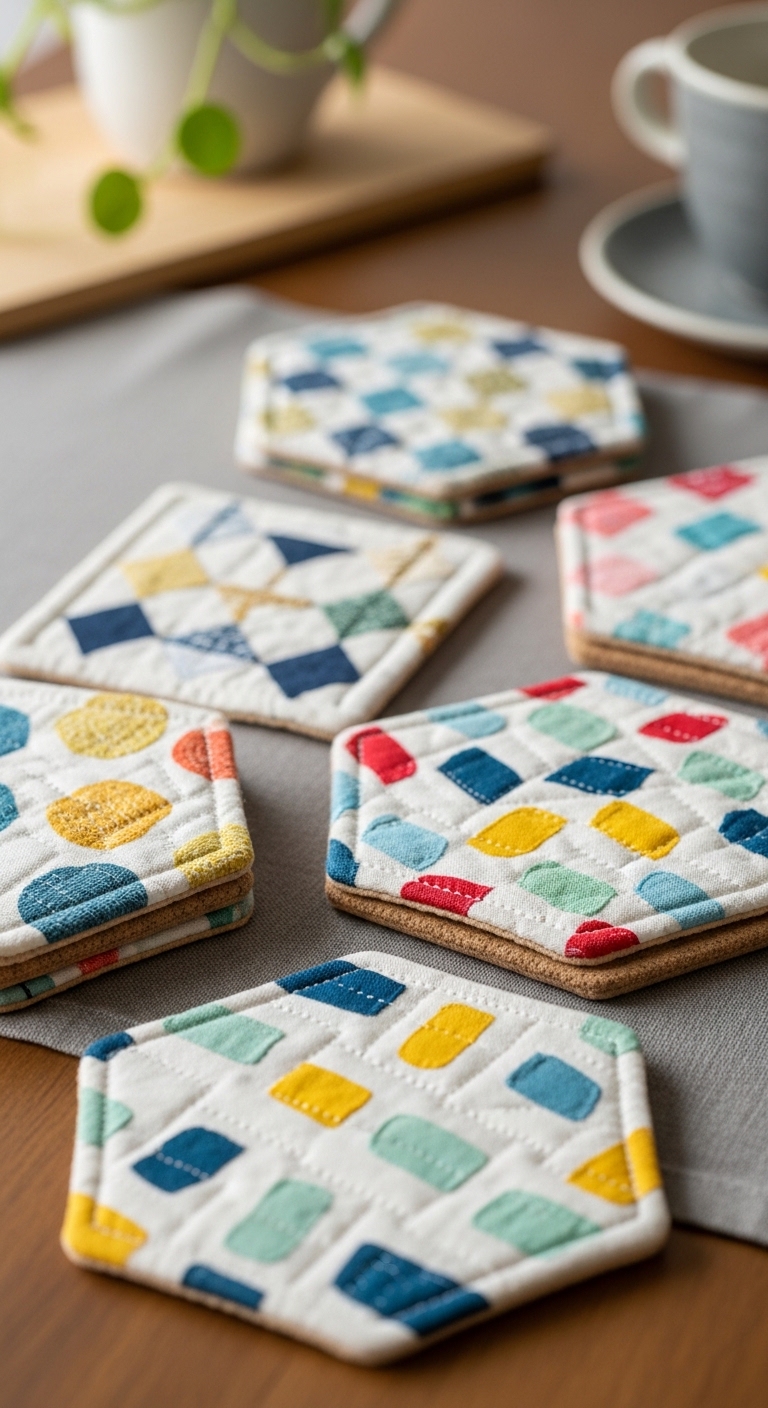
Handmade coasters with fun patterns are small, practical projects that teach quilting basics while producing something you can use every day. These coasters are perfect for experimenting with colors, fabrics, and simple stitches.
Teamwork makes the project efficient, enjoyable, and memorable.
Materials You’ll Need:
- Fabric scraps (cotton or quilting fabric works best)
- Batting (thin quilt batting or felt)
- Sewing machine or hand-sewing needles
- Thread
- Scissors
- Pins or clips
- Fabric markers or stamps for decoration (optional)
Step 1: Cut Fabric Pieces
Cut fabric into squares or desired shapes for your coasters. Adults handle precise cuts; kids can cut simple shapes or trim edges. Each square will form a layer of the coaster.
Step 2: Layer Fabric and Batting
Place the batting between two fabric pieces, right sides out. Adults can align layers carefully; kids can help press and smooth the edges.
Step 3: Pin Layers Together
Pin the fabric and batting to keep everything in place. Adults handle tricky corners; kids can hold or help align edges.
Step 4: Sew the Edges
Sew around the perimeter of the coaster, catching all layers. Adults handle corners or small details; kids can sew straight edges or guide fabric through the machine.
Step 5: Add Fun Patterns
Use fabric markers, stamps, or simple stitching to add patterns, initials, or designs. Both adults and kids can contribute creative touches — this is where each coaster becomes unique.
Step 6: Test and Use
Place the finished coasters under cups or mugs. They’re functional, protect surfaces, and showcase your handiwork.
Team Roles:
- Cutting: Adults handle precise squares and tricky cuts; kids trim edges or cut simple shapes.
- Layering & Pinning: Adults align layers; kids press, smooth, or hold fabric.
- Sewing: Adults manage corners and detailed stitching; kids sew straight edges or guide fabric.
- Decorating: Everyone adds patterns, initials, or simple designs — creativity is shared.
- Decision-Making: Choose colors, fabrics, and patterns together — shared decisions make the project personal and collaborative.
Turn thrifted or inexpensive materials into income with 10 Low-Cost DIY Crafts to Make and Sell From Home, giving your creativity a practical purpose.
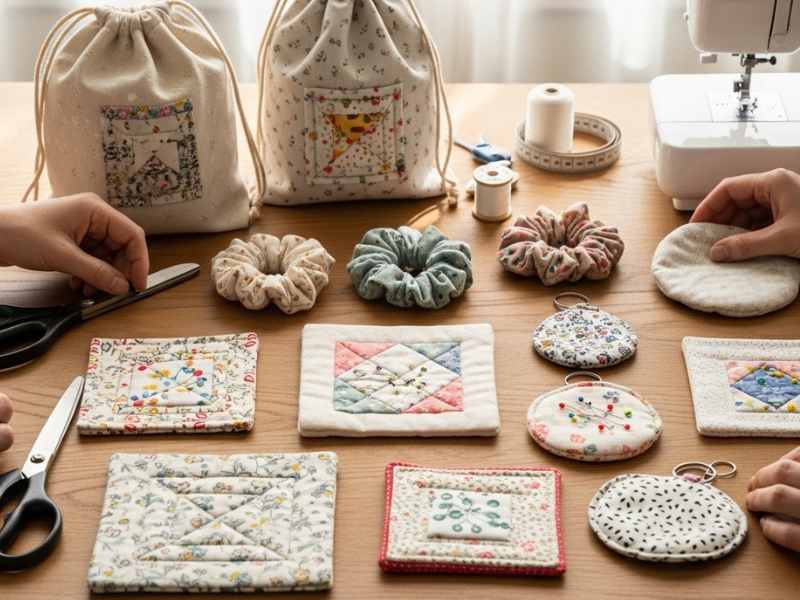
12. Fabric Keychains or Bag Charms
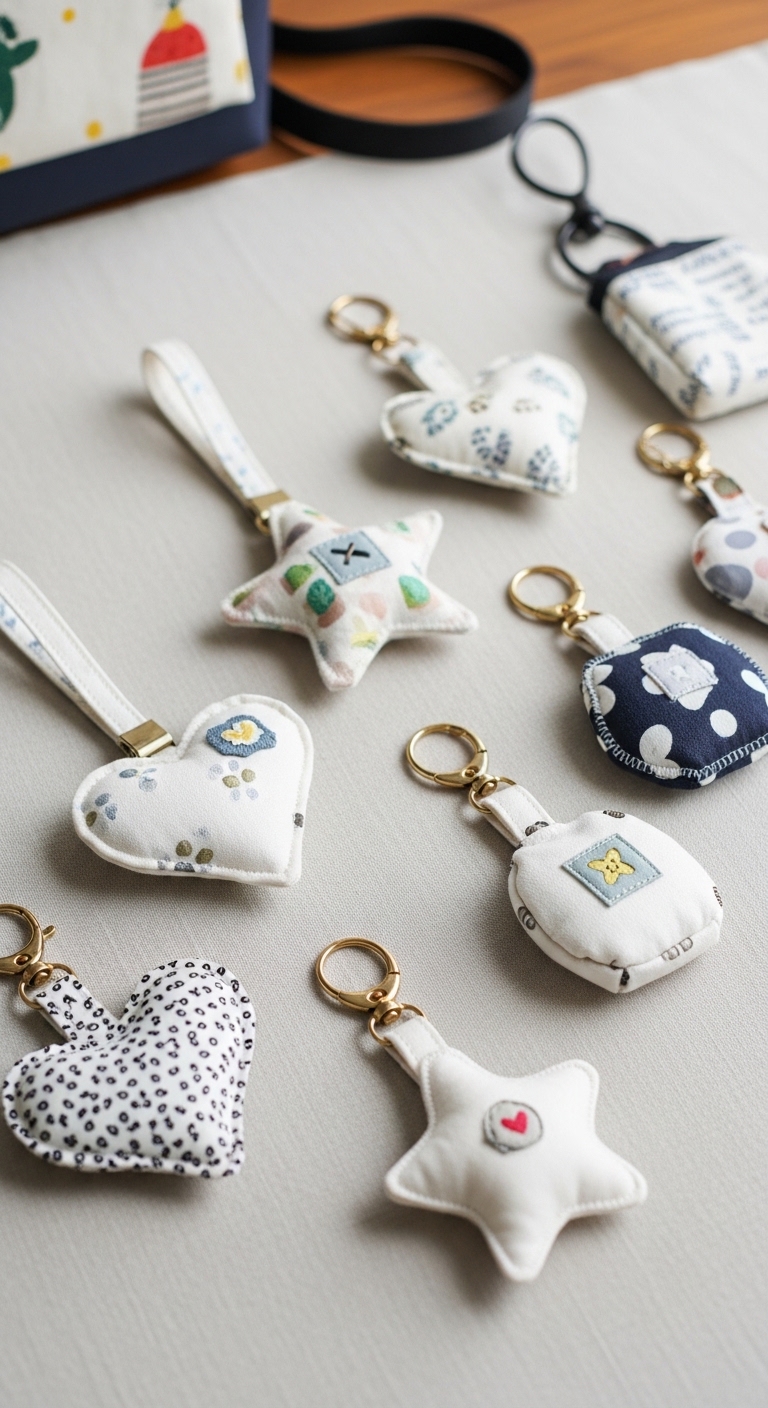
Last on our list for the sewing projects for adults and kids is Fabric keychains or bag. They charms are small, and fast projects that give a sense of accomplishment. They’re perfect for practicing precision sewing, small-scale stitching, and creative design.
Adults and kids can share tasks: one handles cutting and shaping, the other sews and decorates. This teamwork ensures the project is finished smoothly, fun, and personalized.
Materials You’ll Need:
- Fabric scraps (cotton, felt, or soft canvas)
- Sewing machine or hand-sewing needles
- Thread
- Scissors
- Key rings or lobster clasps
- Pins or clips
- Fabric markers, buttons, or small embellishments
Step 1: Choose a Shape and Cut Fabric
Decide on a simple shape, circle, star, heart, or rectangle. Adults can trace and cut precise shapes; kids can cut along straight lines or trim edges. Each keychain uses two identical fabric pieces.
Step 2: Pin Pieces Together
Place the two fabric pieces right sides together and pin along the edges. Adults handle tricky corners; kids can help hold the fabric steady.
Step 3: Sew Around the Edges
Sew a small seam around the edge, leaving a tiny opening for turning and stuffing (if desired). Adults handle corners and curves; kids can sew longer straight edges or guide fabric.
Step 4: Turn Right Side Out
Carefully turn the keychain right side out. Adults manage narrow openings; kids can help push the fabric through.
Step 5: Add Stuffing (Optional)
Add a little stuffing for a plush effect. Adults can ensure even filling; kids can gently add and shape the stuffing.
Step 6: Attach Key Ring or Clasp
Insert a key ring or lobster clasp through the seam or a small loop. Adults handle secure attachment; kids can hold the key ring in place.
Step 7: Decorate and Personalize
Add buttons, embroidery, fabric markers, or small charms. Both adults and kids can get creative, every keychain or bag charm becomes unique and special.
Team Roles:
- Cutting Shapes: Adults handle tricky curves; kids trim edges or cut straight shapes.
- Pinning & Layering: Adults align and pin corners; kids help hold fabric steady.
- Sewing: Adults manage curves and tiny seams; kids sew straight edges or guide fabric.
- Stuffing & Attaching Key Rings: Adults ensure even stuffing and secure attachment; kids help shape and hold.
- Decorating: Everyone adds buttons, embroidery, or charms — creativity is shared.
- Decision-Making: Choose shapes, colors, and decoration together — collaboration makes it fun and personal.
CONCLUSION
The real magic of sewing projects for adults and kids isn’t just the finished craft, it’s the sense of pride, teamwork, and creativity you build along the way. Every stitch, color choice, and little design decision is a chance to learn, explore, and connect, whether it’s your first project or your tenth.
Don’t keep those creations to yourself! Share your results with family, friends, or the wider world. Post them on Pinterest, add them to family albums, or show off on social media. Seeing your work displayed can inspire others and remind you of the skills and memories you’ve created.
Even small wins count. Start with one project today, finish it, and celebrate that accomplishment. These moments turn ordinary days into meaningful experiences, teach practical sewing skills, and leave you with keepsakes you’ll treasure long after the thread is cut.
Sewing projects for adults and kids aren’t just crafts, they’re memories, learning experiences, and creative adventures rolled into one. So grab your fabric, pick a project, and see how much fun making something together can be.
Before you leave, also read this: Stay motivated on multi-step projects with Spring DIY Projects You Can Start, Stop, and Pick Up Again Without Losing Progress so progress is never lost no matter your schedule.
This post talked on Easy Sewing Projects for Adults and Kids they can Actually Complete Together.