Tired but kids want treats? Check out these Quick No-Bake desserts you can make without turning on the oven your kids will love them.
The kids come home and the house feels like a whirlwind. Backpacks thrown on the floor, shoes everywhere, and a chorus of “I’m hungry!” ringing from every angle possible.
Probably tired, and you just want a minute to breathe, but someone wants a snack, someone wants chocolate, and someone else is climbing onto the couch like a jungle gym.
Most desserts feel impossible. The oven is hot, recipes take forever, and let’s be honest, half the time the kids don’t even eat them. You need something quick, easy.and actually works.
That’s why no-bake desserts are lifesaver. Ten or fifteen minutes, with a few simple ingredients, and you’ve got a treat your kids will smile at, maybe even help make, and actually eat. No heat, stress and no dishes piled up for clean up.
By the end of this post, you’ll have 6 quick no-bake desserts you can make without turning on the oven and your kids will love treats that save your sanity and you can easily make even on a busy day.
Add this to your reading list: Vegan & Plant-Based Desserts: Easy and Delicious Recipes for Every Sweet Tooth
How No-Bake Desserts Save You Time, Energy, and Sanity
Afternoons can feel overwhelming, every parent knows the scene: kids are asking for snacks, attention, and sometimes arguing over what they want. You still need to get dinner started, and the idea of another baked dessert feels impossible. That’s where no-bake desserts shine.
They save time because you don’t need the oven or long preparation. You save energy because kids can help stir, layer, or decorate without turning it into a mess. And you save sanity because cleanup is minimal, with a few bowls and spoons, a quick wipe of the counter, and you are done.
These desserts aren’t just convenient. They’re a way for kids to learn small skills naturally.
Measuring ingredients teaches math. Stirring and layering builds coordination. Finishing a dessert gives them pride and confidence. And all of this happens while they’re having fun.
Most importantly, these desserts let you stay in control instead of feeling pulled in a hundred directions. They’re simple enough that the kids can help without turning it into a mess.
While they stir, layer, or decorate, they’re focused, not arguing, not running around. You can guide them calmly, keep an eye on the kitchen, and still get dinner started.
The snack gets done, the kids are happy, and you’re not losing your mind in the process. That’s real relief.
Here’s what to read next: What to Make for Dinner When You’re Too Tired to Cook but Still Hungry
The Setup Mistakes That Make Dessert Time Stressful (and How to Fix Them)

Even the easiest no-bake dessert can turn chaotic if your setup isn’t right. Kids spill ingredients, tools get misplaced, and suddenly what was supposed to be a fun snack turns into a mess you’re still cleaning up an hour later.
Most parents get frustrated here, it’s not the recipe, it’s the setup.
Here’s how to fix it:
- Create a kid-friendly station: Use a small table or countertop just for dessert prep. Lay out ingredients in little bowls and keep tools within easy reach. Kids can focus on the task instead of searching for things or knocking stuff over.
- Portion ingredients ahead of time: Pre-measure sugar, chocolate chips, or cookie crumbs into small cups. Kids love pouring and mixing, and it keeps the counter cleaner.
- Protect your surfaces: Lay down parchment paper or a silicone mat. Quick cleanup, no sticky disasters.
- Keep it simple: Only give kids what they really need for the dessert. Extra ingredients or tools usually mean extra mess.
When you set up properly, even quick no-bake desserts become calm, manageable, and fun. Kids get to stir, layer, or decorate, and you stay in control, no yelling, and no chasing around.
Check these out too: What to Make for Valentine’s Day When You’re Vegan and Short on Time
Quick No-Bake Desserts You Can Make Without Turning on the Oven Kids Will Actually Eat
1. Edible Cookie Dough Cups

Waiting for cookies to bake can feel endless, especially when kids want a treat right now. Edible Cookie Dough Cups solve that problem, no oven, no long prep, just hands-on fun.
Kids get to scoop, shape, and decorate their own little dough cups, and you get a quick, mess-manageable snack that actually keeps them entertained.
Materials Needed:
- 1 cup all-purpose flour (heat-treated for safety)
- 1/2 cup unsalted butter, softened
- 1/2 cup brown sugar
- 1/4 cup white sugar
- 1 tsp vanilla extract
- 2–3 tbsp milk
- 1/2 cup mini chocolate chips
- Mini cupcake liners or silicone molds
Tools:
- Mixing bowl
- Spatula or spoon
- Measuring cups and spoons
Steps to Make It:
- Mix butter, sugars, and vanilla in a bowl until smooth.
- Slowly add flour and milk, mixing until it forms a soft dough.
- Fold in mini chocolate chips.
- Scoop dough into cupcake liners or silicone molds.
- Let kids press it down and shape into little cups.
- Optional: top with sprinkles, chocolate drizzle, or a mini candy.
Kid-Friendly Learning:
- Measuring ingredients teaches math skills.
- Stirring and folding develops motor skills and hand-eye coordination.
- Shaping cups encourages creativity and spatial awareness.
Variations:
- Use chocolate chips for white chocolate or peanut butter chips.
- Add crushed nuts, cereal, or mini candies for texture.
- Mix in a little cocoa powder for a chocolatey version.
Cleanup Tip:
- Line muffin tins with cupcake liners for easy removal.
- Use a silicone spatula to minimize dough sticking to bowls.
- Keep a damp cloth nearby for quick counter wipes.
Another post you’ll enjoy: 7 Quick Anti‑Inflammatory Spring Lunches That Keep Kids Happy and Full
2. Fruit Sushi
Turning fruit into sushi rolls makes snack time exciting and interactive. Fruit Sushi is a no-bake, hands-on treat that lets kids roll, assemble, and experiment with flavors and colors.
It’s quick, playful, and gives them a sense of accomplishment while sneaking in a healthy serving of fruit. And keeps them focused for 10–15 minutes, while teaching them basic skills like rolling, arranging, and working with textures.
Ingredients:
- 1 cup cooked sticky rice (or sushi rice)
- 1 tsp honey (optional, for sweetness)
- 1 banana, sliced into strips
- 1 kiwi, peeled and sliced
- 1/2 cup strawberries, thinly sliced
- Coconut flakes or chia seeds (optional toppings)
- Fruit leather sheets or nori sheets (optional for rolling)
Tools:
- Small cutting board
- Butter knife or kid-safe knife
- Spoon
- Plate or tray for assembly
- Rolling mat or parchment paper (optional)
Steps to Make It:
- Mix the cooked rice with a little honey if desired.
- Let kids flatten small portions of rice onto a fruit leather sheet or parchment.
- Place fruit slices on top of the rice.
- Help them roll the sheet carefully into a sushi-like roll.
- Slice rolls into bite-sized pieces.
- Optional: sprinkle coconut flakes or chia seeds for decoration.
Kid-Friendly Learning:
- Fine motor skills: rolling and slicing fruit safely.
- Creativity: arranging colors and shapes in patterns.
- Patience and focus: working step by step to make a “perfect” sushi roll.
Variations:
- Try different fruits: mango, blueberries, or thin apple slices.
- Use yogurt as a “glue” instead of sticky rice.
- Make dessert rolls with chocolate spread inside for an occasional treat.
Cleanup Tip:
- Set up a small tray for kids to work on, keeps the rice from spreading everywhere.
- Use a damp cloth to wipe the surface between rolls.
- Keep one small bowl for discarded fruit scraps.
Readers Also Liked: Kid-Friendly Dinners for Picky Eaters — Beyond Nuggets, Fries, and Pizza
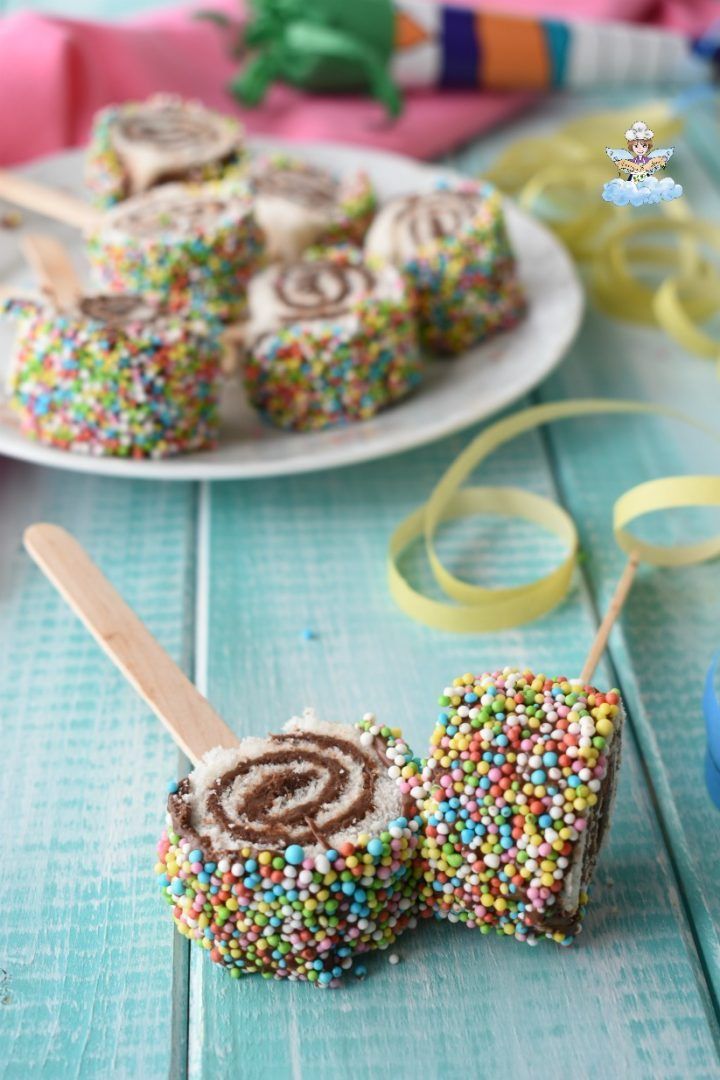
3. Mini Cookie Sandwiches with Cream Filling

Mini cookie sandwiches are an easy way to turn a basic treat into something kids enjoy putting together. Instead of baking or mixing, kids spread the filling, press the cookies together, and decorate the edges how they like.
Because everything is already prepared, this works well on busy afternoons. It’s sweet, quick, and gives kids control over how their dessert turns out without creating a mess.
Materials Needed:
- Small round cookies (chocolate chip, vanilla, or graham-style)
- Whipped cream cheese, frosting, or thick whipped cream
- Mini chocolate chips, sprinkles, or crushed cookies (optional)
Tools
- Plate or tray
- Spoon or butter knife
- Small bowls for toppings
Steps to Make It:
-
- Lay out the cookies on a tray.
- Let kids spread a small amount of cream filling on one cookie.
- Press another cookie on top to make a sandwich.
- Roll the edges in sprinkles, chocolate chips, or crushed cookies if using.
- Chill for a few minutes if needed, then serve.
Kid-Friendly Learning:
- Spreading the filling helps develop hand control and coordination.
- Pressing cookies together teaches gentle pressure and fine motor skills.
- Decorating the edges encourages creativity, decision-making, and color awareness.
Variations:
- Use cream filling for pudding, yogurt, or peanut butter.
- Use different cookie flavors for variety.
- Make themed versions with holiday sprinkles or crushed candies.
Cleanup Tip:
- Line the tray with parchment paper to catch crumbs.
- Keep fillings in small bowls to avoid over-scooping.
- Wipe hands and the counter with a damp cloth for quick cleanup.
While you are still here, read: Why Valentine’s Day Meals Fail at Home-And How to Plan One That Actually Feels Romantic
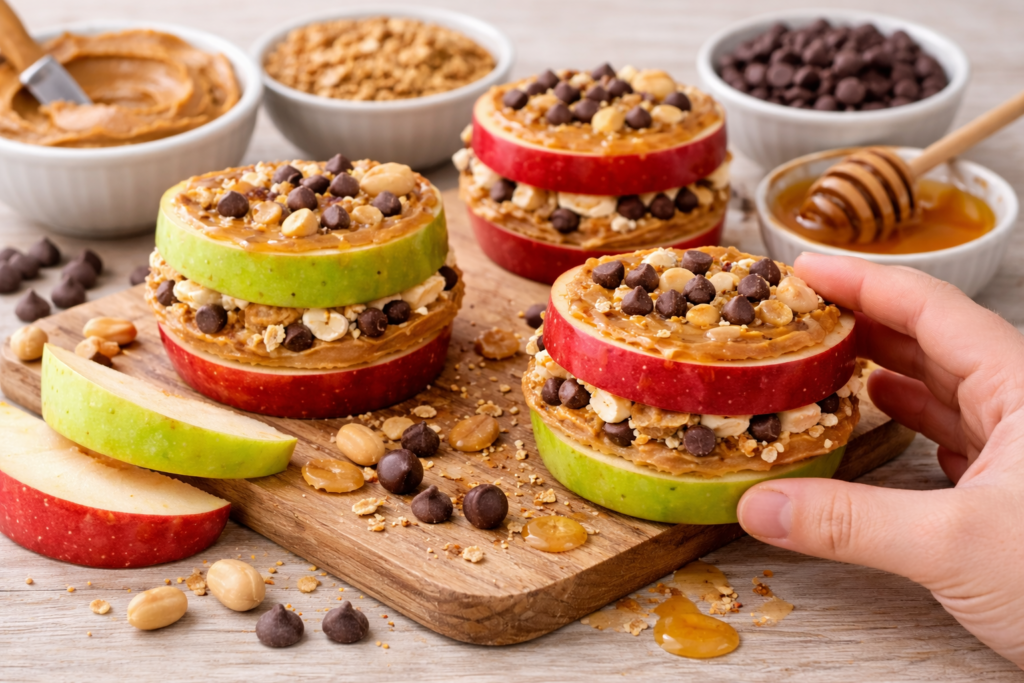
4. Peanut Butter & Apple “Stackers”

Peanut butter and apple stackers are a simple after-school snack kids can make on their own with very little help. They take just a few minutes and don’t require cooking or special ingredients.
Instead of handing kids a finished snack, this idea lets them slice, spread, and stack the apples themselves. That small bit of involvement keeps them focused and slows snack time down, which helps on busy afternoons.
It’s a no-bake, kid-friendly dessert that fills them up, keeps mess low.
Ingredients:
- 2 apples, sliced into rounds
- 1/4 cup peanut butter (or any nut/seed butter)
- Mini chocolate chips, raisins, or granola for topping
Tools:
- Small plate or tray
- Butter knife or spoon
- Napkins (for easy cleanup)
Steps to Make It:
- Lay out apple slices on a tray.
- Spread a thin layer of peanut butter on one slice.
- Let kids stack another apple slice on top and repeat to build their tower.
- Decorate the edges with chocolate chips, raisins, or a sprinkle of granola.
- Serve immediately or chill for a few minutes if desired.
Kid-Friendly Learning:
- Counting and sequencing: stacking slices teaches numbers and order.
- Fine motor skills: spreading peanut butter and placing toppings carefully.
- Decision-making and creativity: kids choose how to layer and decorate their towers.
Variations:
- Add cinnamon or a drizzle of honey for extra flavor.
- Use pears or banana slices instead of apples.
Cleanup Tip:
- Line a tray with parchment paper to catch drips.
- Keep a damp cloth nearby to quickly wipe sticky fingers.
- Use a small bowl for toppings to avoid spills on the counter.
You might find interesting: Easy Cabbage Recipes That Get Kids Eating Their Veggies — Dumplings, Salads & More
5. Fruit & Yogurt Parfait Cups
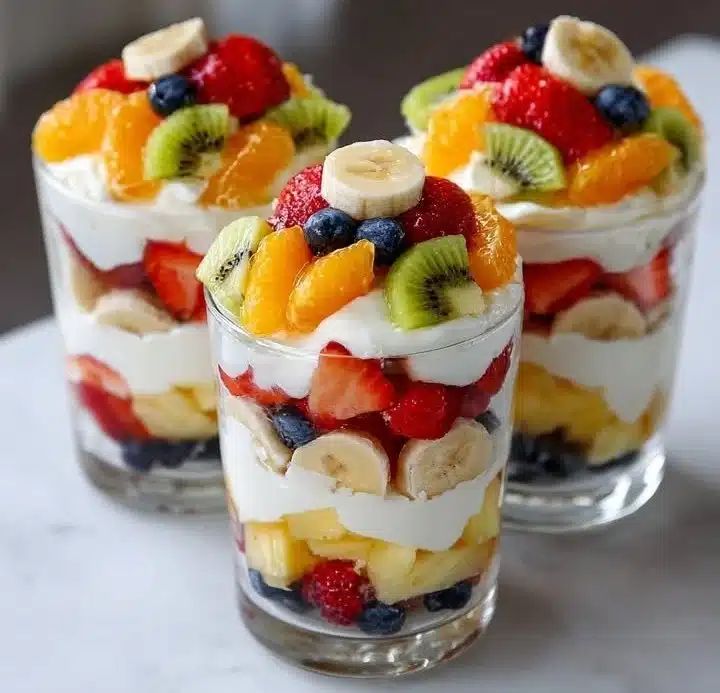
Photo credit: @ Lucy Home Cooking
Kids love colorful, interactive snacks they can make themselves. Fruit & Yogurt Parfaits are perfect for this, layered cups of creamy yogurt, fresh fruit, and crunchy granola that kids can assemble. They feel like a treat, but they’re healthy, quick, and let your kids take charge of their snack.
Materials Needed:
- Yogurt (plain, flavored, or Greek)
- Fresh fruit (strawberries, blueberries, banana slices, or mango)
- Granola or crushed cereal
- Honey or maple syrup (optional)
Tools
- Small cups or jars
- Spoons
Steps to Make It:
-
- Wash and cut the fruit into bite-sized pieces.
- Let kids spoon a layer of yogurt into the cup.
- Add a layer of fruit on top.
- Sprinkle granola or crushed cereal over the fruit.
- Repeat layers until the cup is full.
- Optional: drizzle honey or maple syrup on top before serving.
Kid-Friendly Learning:
- Layering teaches sequencing and order.
- Measuring yogurt and toppings introduces basic math concepts.
- Choosing fruit and assembly encourages decision-making and creativity.
Variations:
- Subsistute yogurt for pudding or cream cheese mixture.
- Use seasonal fruits to keep it fresh and colorful.
- Add a few chocolate chips or mini candies for special treats.
Cleanup Tip:
- Keep a damp cloth handy to wipe spills.
- Use small bowls for toppings to minimize mess.
- Let kids eat directly from their cups to reduce extra dishes.
6. Rice Cereal Treat Nests
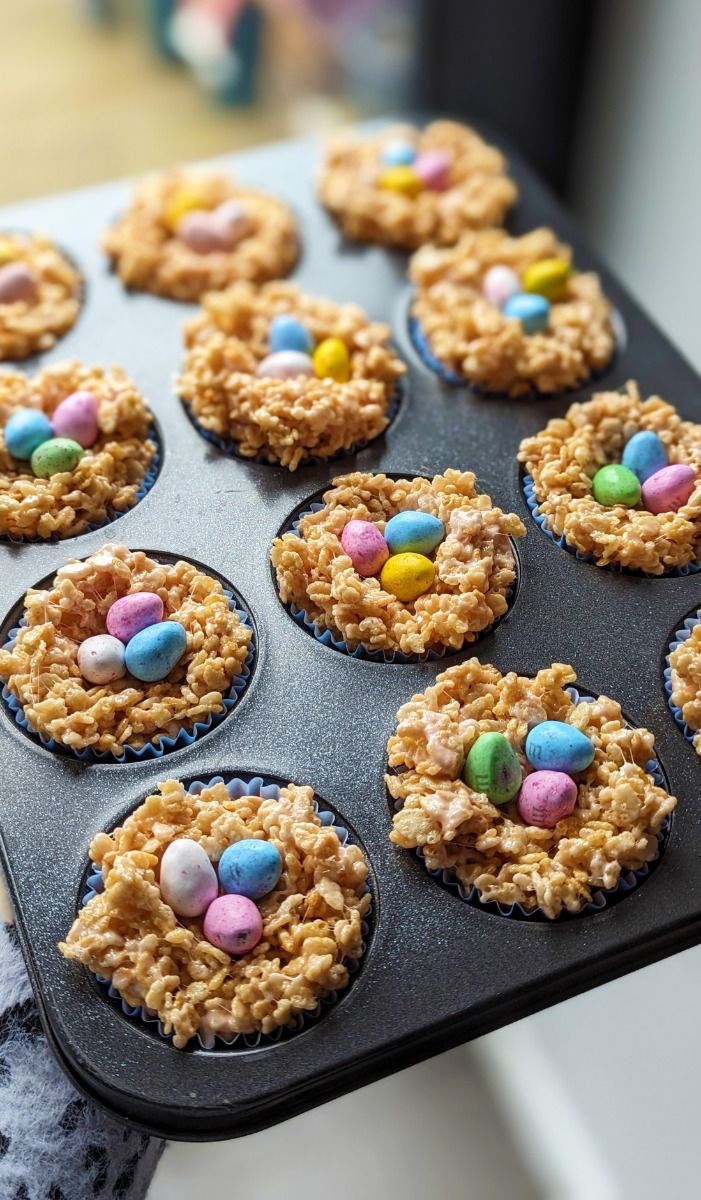
These little nests are a hands-on dessert that lets children build, shape, and fill their own treats. Rice Cereal Treat Nests are quick to prepare, don’t require baking, and turn snack time into a fun activity where kids feel proud of what they make. They’re sweet, crunchy, and perfect for holiday or everyday treats.
Materials Needed:
- 3 cups rice cereal
- 1 cup mini marshmallows
- 3 tbsp butter
- Chocolate chips, fresh fruit, or candy for filling
- Muffin tin or small bowls
- Spoon or spatula
- Parchment paper
Steps to Make It:
- Melt butter in a pan over low heat.
- Stir in the marshmallows until smooth and fully melted.
- Remove from heat and fold in the rice cereal until evenly coated.
- Have kids press the mixture into muffin tins or small bowls to form nest shapes.
- Let nests cool slightly, then fill with chocolate chips, fruit, or candy.
- Serve right away or chill for firmer nests.
Kid-Friendly Learning:
- Mixing the cereal and marshmallow strengthens hand-eye coordination.
- Shaping nests develops fine motor skills and spatial awareness.
- Filling nests encourages creativity and independent decision-making.
Variations:
- Try using melted chocolate or peanut butter to bind the cereal instead of marshmallows.
- Add textures like crushed cereal, nuts, or sprinkles for extra crunch.
- Make themed nests for holidays by changing the fillings or toppings.
Cleanup Tip:
- Line muffin tins with parchment paper to make removing nests easy.
- Keep a damp cloth handy to wipe sticky fingers and surfaces.
- Use small bowls for toppings to reduce spills on counters.
Readers Also Like:
Homemade Moist Banana Bread Cake Recipe with Toasted Coconut Topping
How to Make and Maintain a Sourdough Starter — The No-Fail Routine for First-Time Bakers
Turn Snack Time Into a Mini Activity the Kids Actually Enjoy
Snack time can be more than just grabbing a quick bite. With no-bake desserts you can make without turning on the oven, you can turn simple treats into a fun, hands-on activity that keeps kids engaged and proud of what they make.
- Let kids decorate: Offer sprinkles, chocolate drizzle, or fruit faces so they can personalize their desserts. It’s a small way for them to express creativity and feel ownership over their snack.
- Mini taste tests or friendly dessert competitions: Challenge siblings to create the most colorful parfait or the tallest Rice Cereal Nest. Friendly competitions teach patience, taking turns, and decision-making.
- Encourage problem-solving and creativity: When kids figure out how to layer, stack, or decorate their desserts, they’re building skills without even realizing it.
- Take photos and make a “dessert wall” or scrapbook: Documenting their creations gives a sense of accomplishment and turns snack time into memories you can look back on, a perfect mix of fun, learning, and pride.
By adding these simple touches, no-bake desserts you can make without turning on the oven become more than just a treat, they turn into a shared experience, a learning opportunity, and a moment of joy for both kids and parents.
Also Read: How to Bake Sourdough Bread for the First Time (Beginner-Friendly Step-By-Step Guide)
Tips for Stress-Free No-Bake Dessert Sessions

Making no-bake desserts you can make without turning on the oven should be fun, not stressful. These tips help keep the process smooth for both you and the kids:
- Limit time to 20–25 minutes – Kids can lose interest quickly, so keeping the session short keeps it fun and focused.
- Prep ingredients ahead of time – Wash fruit, measure toppings, and line trays before starting to avoid frustration and keep things moving.
- Use small containers for portioning – Mini bowls or plates make it easier for kids to handle ingredients and reduce mess.
- Clean as you go – Stick to the “one bowl, one spoon, one plate” method to minimize dishes and stress.
- Encourage creativity – Remind kids there’s no “wrong” way to build or decorate their desserts. Let them experiment with flavors, colors, and shapes.
With these strategies, no-bake desserts you can make without turning on the oven stay fun, hands-on, and manageable, turning snack time into a simple, joyful activity everyone enjoys.
Frequently Asked Questions
- Can these desserts be made vegan, dairy-free, or gluten-free?
Yes! You can substitute dairy ice cream for plant-based alternatives, use gluten-free cookies or flour, and use butter for coconut oil or vegan spreads. - How long can they sit before they spoil?
Most no-bake desserts are best eaten within a few hours, though many can be stored in the fridge for up to 24 hours. Always check perishable ingredients like yogurt or fresh fruit. - Can toddlers participate safely?
Absolutely, with supervision. Toddlers can help with mixing, spreading, or decorating, but avoid sharp tools or small choking hazards. - Which desserts are easiest for rainy days?
Quick, hands-on options like Edible Cookie Dough Cups, Mini Ice Cream Sandwiches, or Rice Cereal Treat Nests work well indoors and keep kids engaged without needing much space or prep.
Conclusion
No-bake desserts you can make without turning on the oven aren’t just snacks, they’re opportunities for fun, learning, and connection.
Kids get to practice creativity, problem-solving, and fine motor skills while enjoying a treat, and parents get a simple, manageable way to handle snack time.
Try one today, see which your kids love most, and save this post for stress-free dessert afternoons.