10 Low-Cost DIY Crafts to Make and Sell From Home
You are about to read: Low-Cost DIY Crafts to Make and Sell From Home.
Ever scroll online and see people making money from simple crafts and wonder, “Could I do that from home too?” The truth is, you can, and you don’t need a big budget or fancy tools to start.
If you’ve got a little creativity and some basic supplies, you can make DIY projects that people actually want to buy. These crafts are low-cost, beginner-friendly, and perfect for testing the waters of a home business.
By starting small, you can learn what sells, practice your skills, and maybe even turn a hobby into a side hustle, all without spending a fortune.
You should read: DIY Bridal Feather Hand Fan Tutorial
10 Low-Cost Crafts to Make and Sell on a Tight Budget
-
Handmade Beaded Bracelets
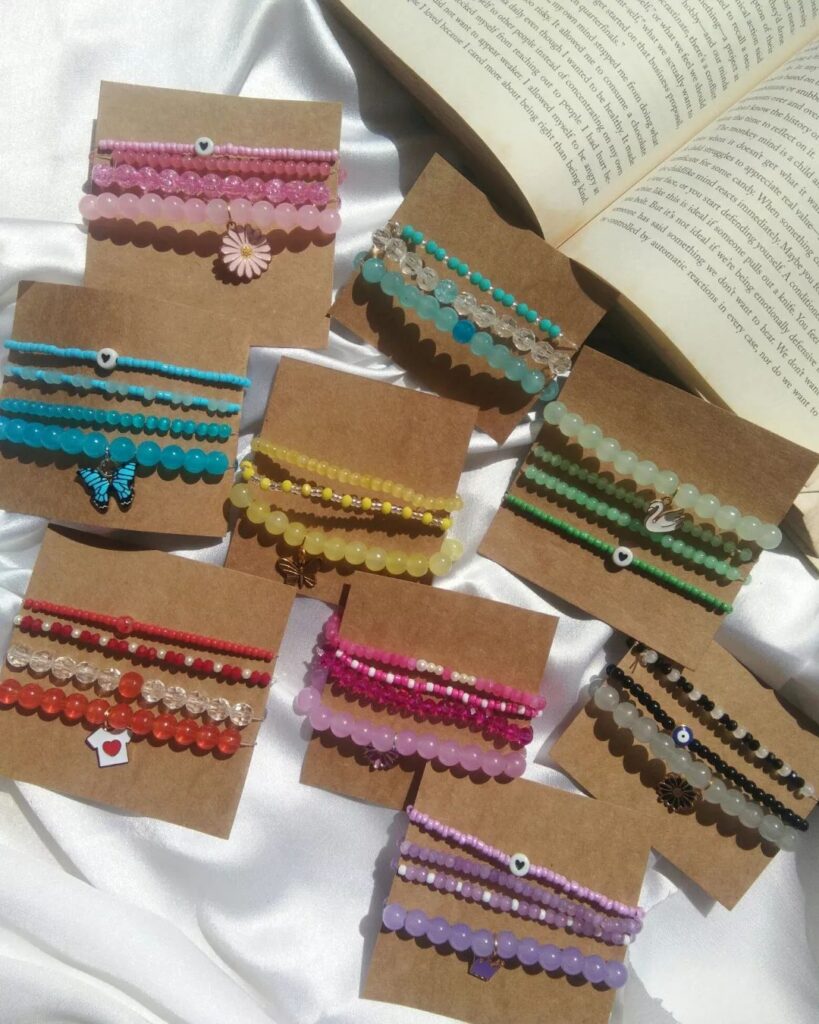
Photo credit: @ handmade craftholic
Handmade beaded bracelets are one of the most reliable low-cost crafts to make and sell from home because they require very little money to start, yet they offer endless design options. Someone who is struggling financially can begin with just a few packs of beads and a roll of elastic cord.
These bracelets sell well because people love affordable accessories they can buy for gifting, personal use, or matching outfits. Know that you can create many designs from a small amount of materials, making them one of the easiest DIY crafts to sell online if you are trying to build small income from home.
Read: Understanding Fabrics for Sewing: Choosing the Right Material for Every Project
Materials Needed:
- A small pack of beads (plastic beads are the cheapest and still very pretty)
- Elastic cord (1 roll can make many bracelets)
- Scissors
- Tape (optional, helps keep beads from sliding)
- Optional charms or pendants for decoration
Step-by-Step Instructions:
Prepare Your Workspace:
Lay your beads out on a flat surface where they will not roll away. Group them by color or size so you can easily design patterns. This makes the process faster and helps you create bracelets that look neat and intentional.
Measure the Cord:
Wrap the elastic cord gently around your wrist or the wrist of the person you’re selling to. Add an extra 2–3 cm to allow room for tying. If you want to sell online, use a standard measurement of 17–18 cm for women and 20 cm for men.
Cut the Cord:
Use clean, sharp scissors so the ends don’t fray. If the edges fray, it becomes harder to thread the beads smoothly.
Plan Your Design:
Before threading, place the beads in the order you want, this prevents mistakes and makes the bracelet look more professional.
You can create:
- alternating color patterns
- single-color minimalist designs
- mixed texture styles
- charm bracelets
- Buyers love bracelets that look intentional and stylish, so this step is important.
Thread the Beads:
Start inserting beads one by one. If the cord slips, tape one end to the table. This simple trick keeps everything steady and avoids frustration for beginners.
Check the Fit:
When the beads reach the end of your design, wrap the bracelet around your wrist again to make sure it’s not too tight or too loose. Adjust by adding or removing a bead.
Tie a Secure Knot:
Tie a double or triple knot. Pull tightly so the knot does not loosen with wear. To make it look neat, slide the knot into a bead hole (if the bead opening is large enough).
Test the Bracelet:
Gently pull the bracelet from different sides. This ensures that it won’t snap when a buyer wears it. A strong bracelet builds trust and increases your chances of repeat sales.
Add Finishing Touches:
If you want your bracelets to stand out, add small charms. These make the bracelet look more valuable even when the cost of making it is still low.
Sales Advantage:
Handmade bracelets are one of the most affordable and easy handmade items to sell both online and offline. This makes them perfect for someone trying to earn quickly, especially if they want to start a small home business with little money.
Suggested Selling Price: ₦1,000 – ₦1,500 per bracelet
This gives you a profit margin between ~150% and ~500%, which is pretty good for a low-cost handmade item.
2. Handmade Greeting Cards

Photo credit: @ Lively
Handmade greeting cards are one of the most reliable low-cost crafts to make and sell from home because they require very little money to start, yet they offer endless customization options. Someone who is struggling financially can begin with just a few sheets of cardstock, colored pens, and stickers.
These cards sell well because people love personalized items they can buy for birthdays, weddings, anniversaries, or other special occasions. The best part is that you can create many different designs from a small amount of materials, making them one of the easiest DIY crafts to sell online if you are trying to build small income from home.
- Materials Needed:
- Cardstock or thick paper
- Colored pens or markers
- Stickers or decorative paper
- Glue or tape
- Optional ribbons or embellishments
Step-by-Step Instructions:
Prepare Your Workspace:
Choose a clean, flat surface with good lighting. Arrange your cardstock, pens, stickers, and other materials so they are easy to reach. This will help you work efficiently and keep designs neat.
Cut the Card Base:
Cut cardstock to your desired size (commonly 5×7 inches). Fold it neatly in half so the card can stand upright. Make sure the edges are straight for a professional look.
Plan Your Design:
Decide on a theme or style for your card before decorating. Planning prevents mistakes and ensures your cards look professional.
Decorate the Front:
Use markers, stickers, or layered decorative paper to create your design. Keep spacing balanced and designs clean. Buyers are more likely to purchase cards that look intentional and thoughtful.
Write the Message Inside:
Write a general greeting or leave space for personalization. Offering customization can help attract online buyers or repeat customers.
Add Finishing Touches:
Attach ribbons, small embellishments, or a touch of glitter. These small additions can make a card feel more valuable and professional.
Check Quality:
Ensure all ink is dry, edges are neat, and the card can stand flat. High-quality cards are more likely to sell and get repeat orders.
Sales Advantage:
Handmade greeting cards are one of the most affordable and easy handmade items to sell both online and offline. This makes them perfect for someone trying to earn quickly, especially if they want to start a small home business with little money.
Suggested Selling Price: ₦500 – ₦800 per card
Selling sets of 5–10 cards can increase sales and offer more value to buyers.
3. Fabric Hair Scrunchies
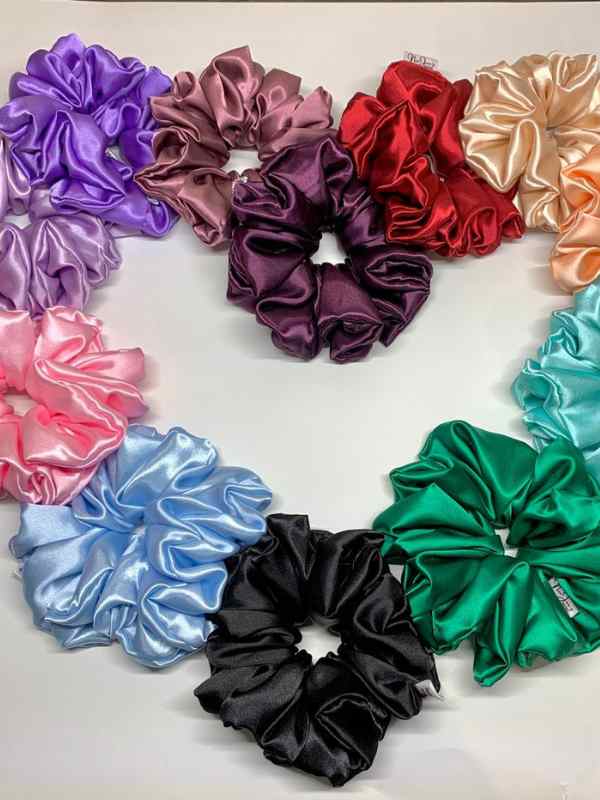
Photo credit: @ Lui Crafty
Fabric hair scrunchies are one of the most reliable low-cost crafts to make and sell because they require very little money to start, yet they appeal to a wide audience. Someone who is struggling financially can begin with fabric scraps or old clothes and a small piece of elastic.
These scrunchies sell well because people love affordable and reusable hair accessories that match their outfits. You can create many different designs from a small amount of fabric, making them one of the easiest DIY crafts to sell online if you are trying to build small income from home.
Materials Needed:
- Fabric scraps or old clothes
- Elastic bands
- Needle & thread or sewing machine – already at home
- Scissors – already at home
Step-by-Step Instructions:
Prepare Your Fabric:
Choose soft and comfortable fabric. Cut a rectangle about 20×8 cm. Using scrap fabric helps keep costs low and adds variety to your products.
Fold the Fabric:
Fold the fabric lengthwise with the patterned side inside. This hides the seam inside the scrunchie for a neat finish.
Sew the Fabric Tube:
Using needle and thread or a sewing machine, sew along the long edge to form a tube. Leave one end open to insert the elastic. Make sure stitches are tight and even.
Cut and Insert the Elastic:
Measure elastic to fit comfortably around a wrist (15–18 cm). Use a safety pin to guide it through the fabric tube, keeping the elastic centered.
Secure the Elastic Ends:
Tie a firm knot or sew the ends together tightly to ensure the scrunchie stretches without breaking.
Close the Fabric Tube:
Sew the remaining opening neatly. Hide the seam inside if possible for a polished look.
Test the Scrunchie:
Gently stretch it to ensure elasticity holds. A durable scrunchie builds trust with buyers and increases chances of repeat sales.
Sales Advantage:
Fabric scrunchies are affordable, trendy, and easy handmade items to sell both online and offline. This makes them perfect for someone trying to earn quickly, especially if they want to start a small home business with very little money.
Suggested Selling Price: ₦300 – ₦500 per scrunchie
Selling sets of 3–5 scrunchies can increase perceived value and attract more buyers.
Another helpful read: DIY Projects for People Who Don’t Feel Crafty at All
4. Decorative Candle Jars
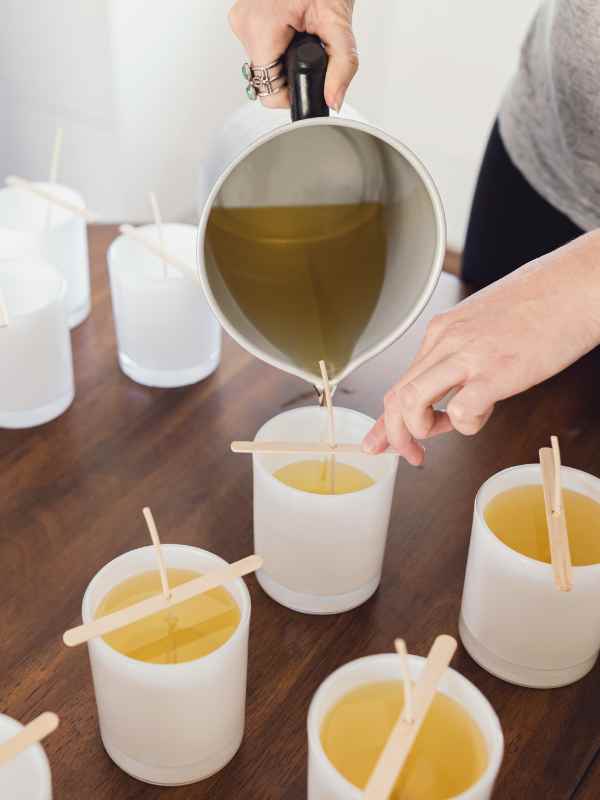
Decorative candle jars are one of the most reliable low-cost crafts to make and sell from home because they require very little money to start, yet they appeal to buyers looking for gifts or home décor. Someone who is struggling financially can begin with small glass jars, wax, and a wick.
Candles sell well because people love affordable, handcrafted items that make their homes calm or can be gifted. The best part is that you can create many variations from a small amount of materials, making them one of the easiest DIY crafts to sell online if you are trying to build small income from home.
Materials Needed:
- Wax (leftover or new)
- Small glass jars
- Wick
- Essential oils or fragrance (optional)
- Food coloring or candle dye (optional)
Step-by-Step Instructions:
Prepare the Jar:
Clean the glass jar thoroughly and ensure it is completely dry. A clean jar allows wax to set properly and gives a professional finish.
Attach the Wick:
Center the wick using tape or a wick holder. Keeping the wick straight ensures even burning.
Melt the Wax:
Use a double boiler to melt the wax safely. Avoid direct heat to prevent burning. Stir occasionally to ensure even melting.
Add Color and Fragrance (Optional):
Add essential oils for scent and a small amount of dye or food coloring for visual appeal. These small touches increase perceived value.
Pour Wax into Jar:
Slowly pour the melted wax into the jar, keeping the wick centered. Pour in layers if necessary to prevent air bubbles.
Let Wax Set:
Allow the candle to cool completely for 2–3 hours without moving the jar. This ensures a smooth surface.
Trim the Wick:
Cut the wick to about 1 cm above the wax. This ensures safe burning and a polished look.
Optional Decoration:
Add ribbons, labels, or paint designs on the jar to enhance visual appeal. Decorative jars often sell faster and at higher prices.
Sales Advantage:
Decorative candle jars are affordable, easy handmade items to sell, and appeal to a wide audience. This makes them perfect for someone trying to earn quickly, especially if they want to start a small home business with low initial investment.
Suggested Selling Price: ₦1,500 – ₦2,000 per candle jar
Offering themed candles or gift sets can increase sales and attract more buyers.
5. Handmade Keychains
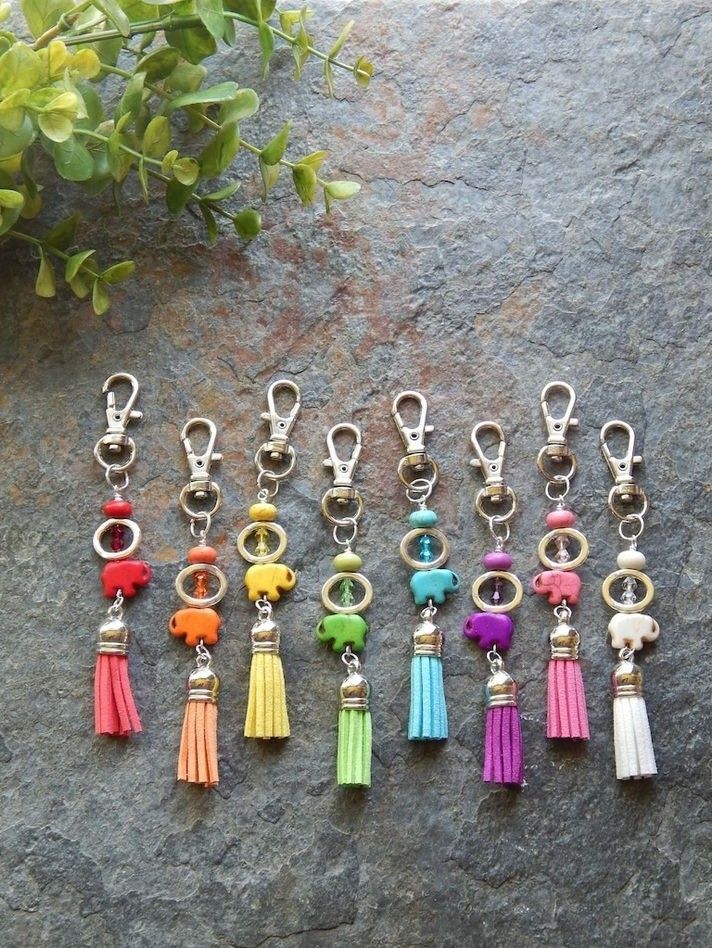
Photo credit: @ Trisha Paulsen
Handmade keychains are one of the most reliable low-cost crafts to make and sell because they require very little money to start, yet they are highly versatile. Someone who is struggling financially can begin with beads, threads, or small charms to create unique designs.
Keychains sell well because people love personalized and affordable accessories for themselves or as gifts. You can make many designs from a small amount of materials, making them one of the easiest DIY crafts to sell online for extra income.
Materials Needed:
- Keyring hooks
- Beads, threads, or charms
- Scissors
- Glue (optional, for securing ends)
Step-by-Step Instructions:
Prepare Your Workspace:
Choose a clean surface and arrange your materials so everything is easy to reach. This keeps your designs organized and production efficient.
Plan Your Design:
Decide on the type of keychain you want to make , beaded, knotted, or charm-based. Sketching a rough layout helps prevent mistakes.
Assemble Keychain:
Cut thread or string to desired length. Thread beads, tie knots, or attach charms according to your plan.
Secure Ends:
Tie knots tightly or use glue to ensure beads or charms do not come loose.
Attach to Keyring:
Loop your finished piece onto the keyring and check stability.
Check Quality:
Gently pull on all parts to make sure nothing comes loose. Durable keychains build buyer trust.
Sales Advantage:
Handmade keychains are easy to make, affordable, and appeal to a wide audience. They are simple to sell online or locally, even in small batches.
Suggested Selling Price: ₦300 – ₦500 per keychain
6. Painted Mason Jars
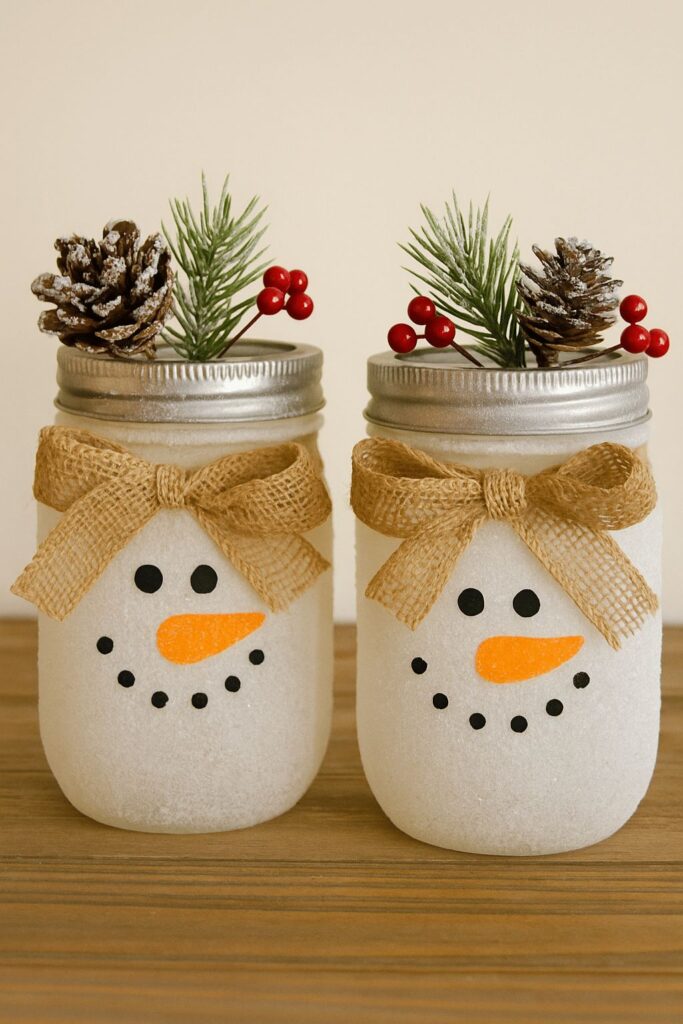
Photo credit: @ DecorHQ
Painted mason jars are one of the most reliable low-cost crafts to make and sell because they require inexpensive materials and allow creative expression. Start with old jars and a few bottles of paint. These jars sell well as decorative home items or gifts, especially when designed with themes or patterns. They can be produced in bulk and sold online or at local markets.
Materials Needed:
- Mason jars
- Acrylic paints
- Paintbrushes
- Optional embellishments (glitter, ribbons)
Step-by-Step Instructions:
Prepare Your Workspace:
Cover your table with newspaper to prevent paint spills. Have all jars and paints ready.
Clean and Dry Jars:
Wash jars thoroughly and remove labels. Ensure jars are completely dry before painting.
Plan Your Design:
Decide on colors, patterns, or themes. Sketch ideas if needed.
Paint the Jars:
Apply paint in thin layers, allowing each layer to dry before adding the next. This prevents streaks and ensures even coverage.
Add Embellishments (Optional):
Glue ribbons, glitter, or decals for extra decoration. Small details can increase the selling price.
Let Jars Dry:
Allow jars to dry completely before handling or packaging.
Check Quality:
Inspect for smudges or uneven paint. Smooth, clean designs sell better and encourage repeat buyers.
Sales Advantage:
Painted mason jars are inexpensive, easy to make, and highly appealing as home décor. They are excellent DIY crafts to sell online and locally, with minimal upfront costs.
Suggested Selling Price: ₦1,000 – ₦1,500 per jar
7. Handmade Coasters
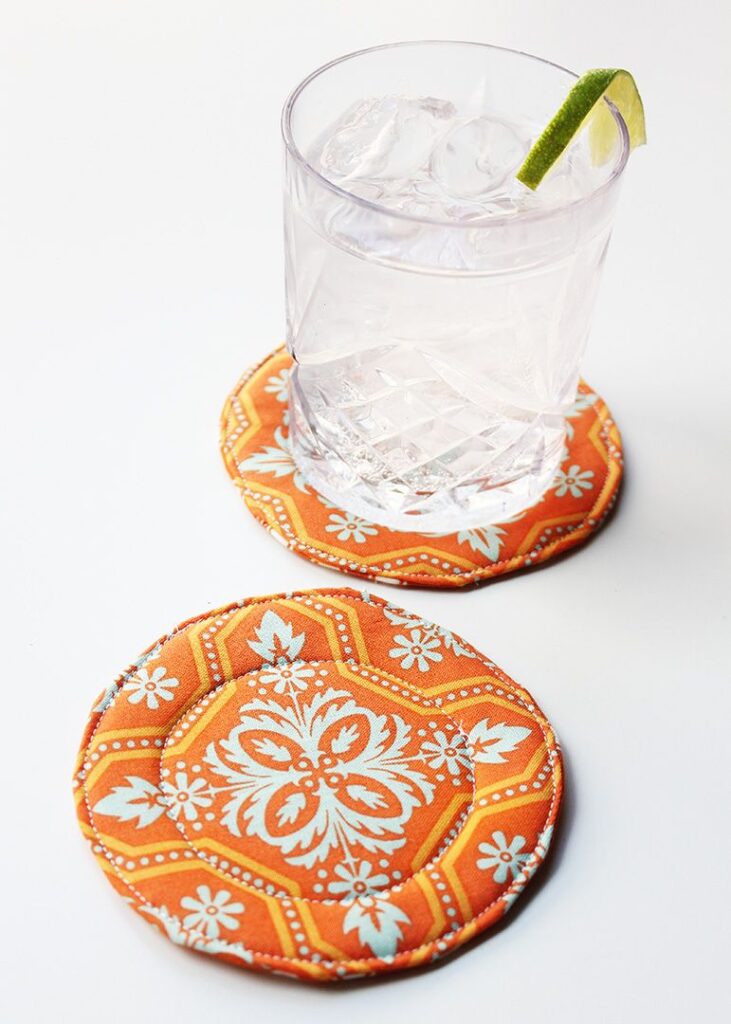
Photo credit: @ Positively Splendid
Handmade coasters are one of the most reliable low-cost crafts to make and sell because they are simple, functional, and customizable. What you need to start with are cork, felt, or wood and some paint or markers. Coasters sell well because they are practical gifts and home accessories. They are lightweight, easy to ship, and can be produced in bulk for consistent sales.
Materials Needed:
- Cork sheets, felt, or wood
- Acrylic paints or markers
- Scissors or craft knife
- Glue (optional, for layered designs)
Step-by-Step Instructions:
Prepare Your Workspace:
Choose a flat surface and gather all materials. Cover your table to protect it from paint or glue.
Cut Base Material:
Cut cork, felt, or wood into square or circular shapes. Standard size is 10×10 cm.
Plan Your Design:
Decide on patterns, quotes, or images. Sketch lightly if needed.
Decorate Coasters:
Use paint, markers, or layered materials to create designs. Allow each layer of paint to dry before adding details.
Seal the Surface (Optional):
Apply a clear sealant or varnish to protect the design and make it last longer.
Check Quality:
Ensure edges are smooth and paint is dry. Durable and attractive coasters are more likely to sell.
Sales Advantage:
Handmade coasters are affordable, easy to make, and appeal to buyers looking for functional, decorative items. They are excellent DIY crafts to sell online and locally.
Suggested Selling Price: ₦500 – ₦800 per coaster, or ₦1,500–₦2,000 for a set of 4
8. Handmade Fabric Tote Bags
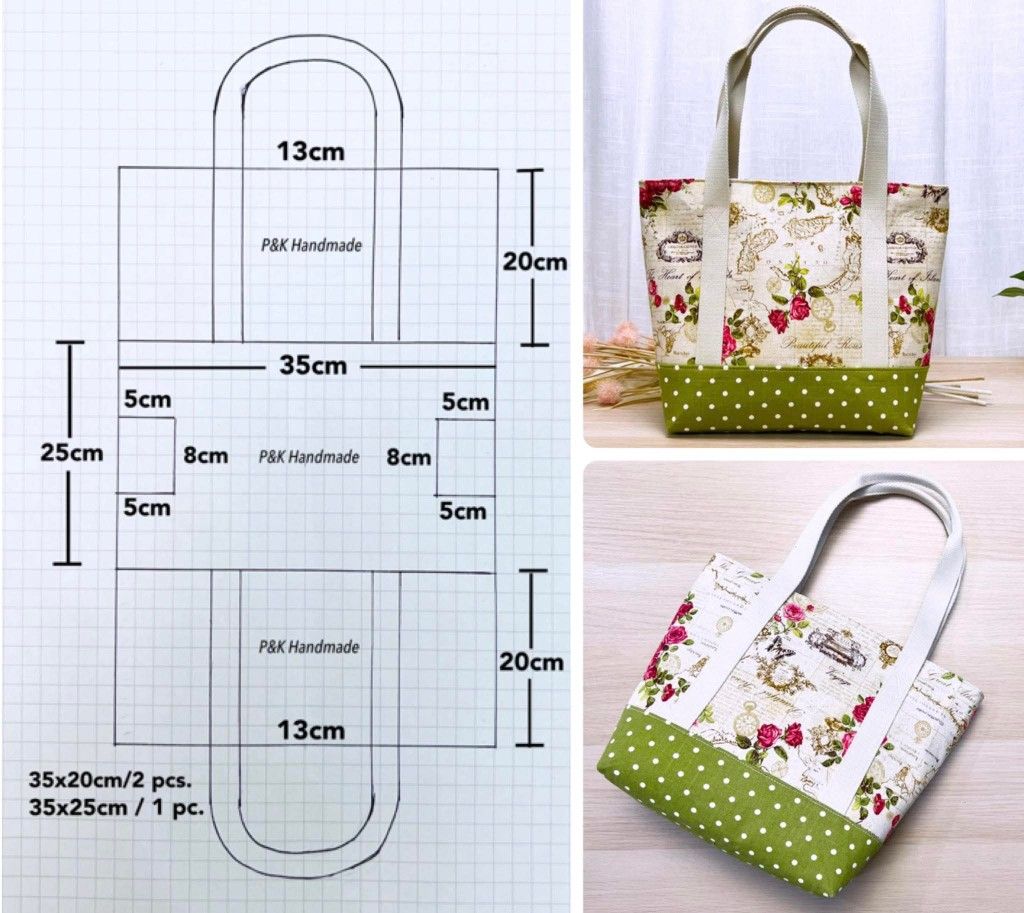
Photo credit: @ Maritza
Handmade fabric tote bags are practical, eco-friendly, and increasingly popular, making them one of the best DIY crafts to sell online. They are relatively cheap to make, highly customizable, and appeal to people who want reusable shopping bags, stylish everyday totes, or personalized gifts.
You only need a few essential tools, making them ideal low-cost crafts to make and sell from home.
Materials Needed:
-
Cotton or canvas fabric (½ yard per bag is enough for small to medium sizes)
-
Sewing machine (or needle and thread for hand sewing)
-
Scissors
-
Pins or clips
-
Measuring tape
-
Iron
-
Optional: fabric paint, patches, or appliqués for decoration
Detailed Step-by-Step Instructions:
Measure and Cut the Fabric:
Decide the size of your tote bag (e.g., 35cm x 40cm for a standard tote). Cut two identical pieces for the body and two strips for the handles (around 5cm x 50cm). Precision here ensures a neat final product.
Prepare the Handles:
Fold each handle strip lengthwise and sew along the edge to make a strong, durable handle. Press with an iron to make folding easier. Handles are a key part of making your easy handmade items to sell look professional.
Sew the Bag Body:
Place the two main fabric pieces together, right sides facing each other. Pin the edges, then sew along the sides and bottom with a 1cm seam allowance. Leave the top open.
Reinforce the Corners:
To prevent wear and tear, sew small triangles at the bottom corners. This gives the tote a flat base and a professional finish.
Attach the Handles:
Position the handles evenly on the top edges of the bag. Pin them securely, then sew multiple stitches to ensure they can hold weight. Buyers appreciate sturdy low-cost crafts to make and sell.
Turn the Bag Right Side Out:
Carefully flip the bag so the right side of the fabric faces out. Press with an iron for crisp edges.
Add Finishing Touches:
Decorate with fabric paint, patches, or appliqués to make each bag unique. Personalized designs often sell faster and at higher prices.
Sales Advantage:
Handmade tote bags appeal to eco-conscious buyers and gift shoppers. They are practical, stylish, and versatile, making them easy handmade items to sell both online and locally.
Suggested Selling Price: ₦2,500 – ₦4,000 per bag
This provides a solid profit margin since materials cost between ₦500 – ₦1,000 depending on fabric choice.
9. Handmade Fabric Bookmarks
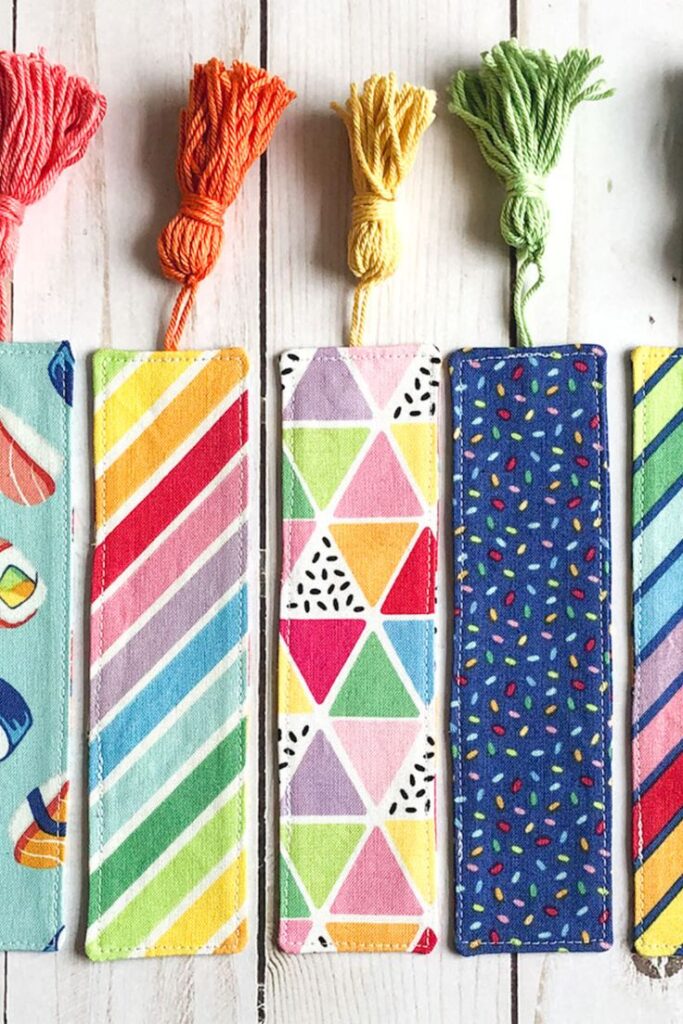
Photo credit: @ Ameroonie Designs
Handmade fabric bookmarks are one of the most reliable low-cost crafts to make and sell from home because they are simple to produce, highly customizable, and useful.
These bookmarks sell well because people love affordable, thoughtful gifts for readers, students, or office use. They are one of the easiest DIY crafts to sell online and locally, especially for small home businesses with minimal investment.
Materials Needed:
- Fabric scraps
- Ribbon
- Needle and thread – already at home
- Scissors
- Glue (optional, for securing edges)
- Optional embellishments (buttons, beads)
Step-by-Step Instructions:
Prepare Your Workspace:
Lay out your fabric scraps, ribbons, scissors, and thread on a clean flat surface. Keeping materials organized helps you work efficiently.
Cut the Fabric:
Cut fabric into rectangles of about 15×5 cm. This standard size works for most books.
Prepare the Ribbon:
Cut a small piece of ribbon, about 10 cm, to attach to the top of the bookmark. This adds a decorative element and makes it easier to find in a book.
Sew or Glue the Edges:
Fold the fabric edges slightly inward to prevent fraying. Sew along the edges or use glue for a neat finish.
Attach the Ribbon:
Secure the ribbon at the top center of the bookmark with a tight stitch or glue.
Add Optional Embellishments:
Decorate with small beads, buttons, or fabric paint. This makes your bookmarks unique and more appealing to buyers.
Check Quality:
Ensure all stitches are secure, edges are neat, and the ribbon is firmly attached. Durable, attractive bookmarks are more likely to sell.
Sales Advantage:
Handmade fabric bookmarks are affordable, easy to make, and appealing to readers of all ages. They are perfect low-cost crafts to make and sell online, and you can sell them individually or in sets for higher profit.
Suggested Selling Price: ₦300 – ₦500 per bookmark, or ₦1,200–₦1,500 for a set of 4.
10. Handmade Soap Bars
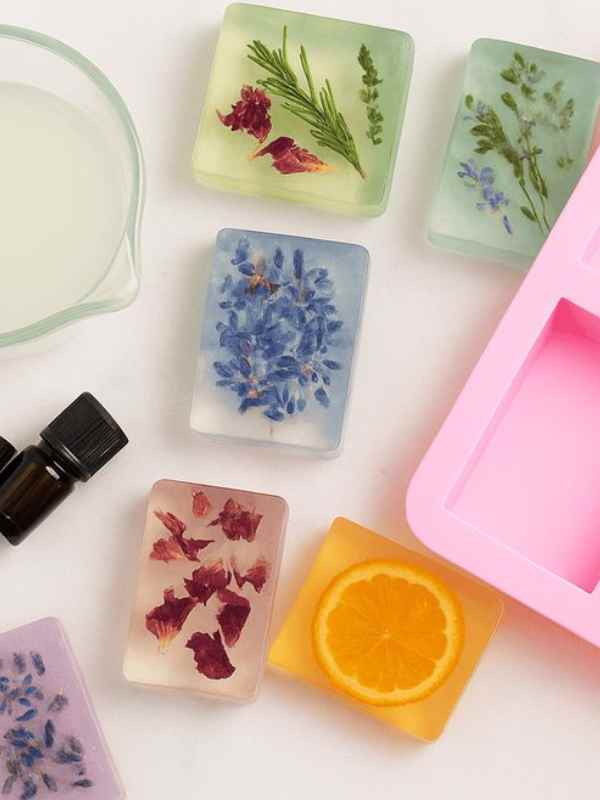
Photo credit: @ Essence Embers
Handmade soap bars are one of the most reliable low-cost crafts to make and sell because they require inexpensive ingredients and are always in demand.
Soaps sell well because people love affordable, natural, and visually attractive personal care items. They are highly popular DIY crafts to sell online, especially for home businesses seeking consistent income.
Materials Needed:
- Glycerin soap base
- Soap molds
- Essential oils (optional)
- Herbs, dried flowers, or colorants (optional)
- Knife or cutter
- Microwave-safe container
Step-by-Step Instructions:
Prepare Your Workspace:
Clean your work surface and gather all ingredients and tools. Ensure molds are clean and dry.
Cut the Soap Base:
Cut glycerin soap base into small cubes. This makes it easier to melt evenly.
Melt the Soap Base:
Place cubes in a microwave-safe container and heat in short intervals, stirring between each, until fully melted. Avoid overheating.
Add Fragrance and Color:
Mix in essential oils, colorants, or dried herbs evenly. This creates visually appealing and aromatic soap bars.
Pour into Molds:
Carefully pour melted soap into molds. Tap gently to remove air bubbles and ensure smooth surfaces.
Let Soap Set:
Allow the soap to cool completely for 1–2 hours. Do not remove from molds too early to avoid breaking.
Remove from Molds:
Gently pop the soap bars out of molds. Check edges and trim any excess for a clean finish.
Package and Label:
Wrap in cellophane or decorative paper and label with scent or ingredients. Packaging increases perceived value and helps attract buyers.
Sales Advantage:
Handmade soap bars are practical, affordable, and always in demand. They are excellent low-cost crafts to make and sell online, and selling sets or gift packs can increase revenue.
Suggested Selling Price: ₦500 – ₦800 per bar, or ₦1,500–₦2,000 for a set of 3.
How to Sell Your Handmade Crafts Online

Selling your handmade crafts online is one of the fastest ways to reach customers beyond your local area. For someone trying to earn income from home, this method allows you to start small and grow gradually.
Supposedly you are selling DIY crafts to sell online, low-cost crafts to make and sell, or easy handmade items to sell, following these steps can help you turn your hobby into a profitable business. Check this out too: Thrift Business in Nigeria: How to Start a Profitable Thrift Clothing Business in 2025
1: Choose the Right Online Platform
There are multiple online marketplaces and social media platforms where you can sell crafts:
- Etsy: Perfect for handmade items, jewelry, and personalized crafts.
- Jumia & Konga: Great for reaching buyers in Nigeria.
- Instagram & Facebook Shops: Use social media to sell directly to followers.
- Shopify: If you want a dedicated online store with more control over branding.
Each platform has its advantages. Beginners often start with Instagram or Facebook because setup is free and easy.
2: Take Attractive Photos
High-quality photos are essential for online sales. Tips include:
- Use natural light for bright, clear images.
- Show multiple angles of your product.
- Include lifestyle images (like someone wearing your bracelet or using your coaster).
- Keep the background simple to make your item stand out.
3: Write Clear and Persuasive Descriptions
A good product description informs buyers and encourages them to purchase:
- Start with what the product is and its key features.
- Mention materials used, size, and colors.
- Include benefits: why it’s useful or special.
4: Set Fair Prices
Price your crafts so you cover materials, time, and profit:
- Calculate material cost + time spent + profit margin.
- Compare similar items online to ensure your prices are competitive.
- Offer bundle deals to encourage multiple sales.
5: Promote Your Products
Simply listing items is not enough, promotion is key:
- Use hashtags on Instagram and TikTok like #handmadecrafts, #DIYcraftsforsale, #easyhandmadeitems.
- Post regularly with updates, behind-the-scenes videos, or tips.
- Encourage satisfied customers to leave reviews and tag you.
6: Handle Orders Professionally
When a buyer purchases:
- Package the item neatly with labels or ribbon.
- Ship promptly and provide tracking information if possible.
- Follow up politely to ensure satisfaction.
Read This Too: How to Make DIY Homemade Vaseline for Skin
Packaging and Presentation Tips That Sell
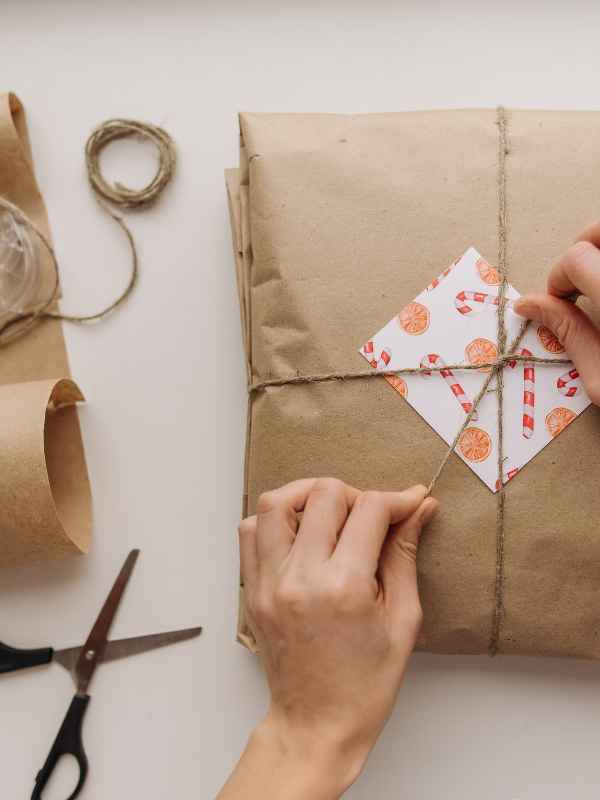
When selling DIY crafts to sell online or low-cost crafts to make and sell, packaging and presentation can make the difference between a product that sells quickly and one that sits on the shelf. Thoughtful presentation communicates quality, professionalism, and care, even for easy handmade items to sell.
1: Choose the Right Packaging Materials
The materials you choose should protect your products and enhance their appearance. Options include:
- Kraft paper or cardboard boxes for candles, soaps, and jewelry.
- Clear cellophane bags for fabric items like scrunchies or bookmarks.
- Small reusable pouches for keychains or bracelets.
Using packaging materials that match the style of your crafts not only protects the product but also adds value in the eyes of your buyers.
2: Branding Your Handmade Crafts
Adding a simple logo, tag, or sticker helps your products stand out. Even for low-cost crafts to make and sell, branding creates recognition and encourages repeat buyers. You can:
- Print labels with your business name and contact info.
- Attach small thank-you notes to each order.
- Use consistent colors and fonts to create a professional look.
3: Make it Gift-Ready
Many buyers purchase easy handmade items to sell as gifts. Wrapping items neatly or adding ribbons and bows can instantly increase the perceived value:
- Tie a ribbon around a soap bar or candle jar.
- Place small sets of handmade coasters or bookmarks in a decorative box.
- Use tissue paper to add a soft, premium feel inside packaging.
4: Protect Your Product During Delivery
If selling online, secure packaging ensures your crafts arrive in perfect condition. Even DIY crafts to sell online like painted mason jars or handmade bracelets benefit from protective layers:
- Wrap fragile items in bubble wrap.
- Use cardboard inserts to prevent movement in boxes.
- Seal packages tightly to prevent spills or damage.
5: Presentation Photography
Good packaging also makes your products look more appealing in photos. When listing handmade crafts for sale online:
- Display items in their packaging to show buyers how they will receive them.
- Use natural lighting to highlight textures and colors.
- Include close-ups to capture details that make your product unique.
6: Keep It Consistent
Consistency in packaging and presentation makes your brand look professional. Buyers are more likely to trust and recommend someone whose low-cost crafts to make and sell look polished every time.
Thoughtful packaging and professional presentation elevate your easy handmade items to sell from ordinary to highly desirable. Small investments in materials, branding, and care go a long way in attracting buyers, increasing sales, and building a reliable home-based craft business.
Using Social Media to Boost Sales

Social media is one of the most powerful tools for selling DIY crafts to sell online, low-cost crafts to make and sell from home, and easy handmade items to sell. Even a small home-based business can reach thousands of potential buyers when you use platforms strategically.
1: Choose the Right Platforms
Not all social media platforms work the same for selling handmade crafts. Focus on:
- Instagram: Great for visual content like bracelets, painted jars, or handmade coasters. Use reels, stories, and posts to showcase your products.
- Facebook: Use Marketplace, groups, and pages to connect with local buyers. Posting consistently helps build trust.
- TikTok: Short, engaging videos showing how you make your crafts can go viral and attract a wide audience.
- Pinterest: Perfect for sharing creative ideas and driving traffic to your online shop or website.
2: Create Engaging Content
Your posts should tell a story, highlight your craft’s uniqueness, and demonstrate value:
- Share behind-the-scenes videos of making DIY crafts to sell online.
- Post before-and-after photos of your finished low-cost crafts to make and sell.
- Use captions to explain materials, inspiration, or the benefits of your easy handmade items to sell.
3: Use SEO-Friendly Hashtags and Keywords
Keywords help people find your products organically. Include relevant tags like:
- #DIYCraftsToSellOnline
- #HandmadeItemsForSale
- #EasyHandmadeItemsToSell
- #LowCostCraftsToMakeAndSell
- #HandmadeBusiness
Combine general and niche hashtags for better reach.
4: Engage With Your Audience
Social media is not just for posting; it’s about building relationships:
- Reply to comments and messages promptly.
- Ask questions in posts to encourage interaction.
- Share customer photos or testimonials with permission.
Engagement increases visibility and helps you build a loyal following for your DIY crafts to sell online.
5: Promote Special Offers and New Products
Social media is ideal for announcing promotions:
- Offer discounts for first-time buyers.
- Bundle products for better deals.
- Introduce new designs or limited editions of low-cost crafts to make and sell.
6: Track Performance
Check which posts get the most likes, shares, and comments. This helps you understand what buyers prefer and refine your marketing strategy.
How to Build a Brand Around Your Handmade Crafts
Building a strong brand for your handmade crafts helps you stand out in a crowded market and encourages repeat sales. Whether you are selling DIY crafts to sell online, low-cost crafts to make and sell, or easy handmade items to sell, having a recognizable brand creates trust and professionalism, even for small home businesses.
1: Define Your Brand Identity
Your brand identity reflects your style, values, and the type of crafts you create:
- Decide on your niche: e.g., jewelry, home décor, or personalized gifts.
- Choose a business name that is easy to remember and reflects your products.
- Determine a color palette and design style that matches your crafts.
2: Create a Logo and Visual Style
Even simple crafts benefit from a recognizable logo and consistent visuals:
- Use free tools like Canva to design a clean logo.
- Apply the same fonts, colors, and style across all packaging, social media, and online listings.
- Visual consistency helps buyers quickly recognize your handmade crafts for sale.
3: Develop a Brand Voice
Your brand voice is how you communicate with customers:
- Decide on a friendly, professional, or playful tone for social media posts and product descriptions.
- Use this voice consistently in captions, emails, and messages.
- A clear brand voice makes your low-cost crafts to make and sell feel professional and trustworthy.
4: Packaging and Presentation
Branding goes beyond a logo. Packaging and presentation reinforce your brand:
- Use branded labels, stickers, or tags on all products.
- Choose packaging that reflects your brand style (e.g., eco-friendly, minimalistic, or colorful).
- Highlight your brand on social media posts and product photos.
5: Build an Online Presence
Your online presence strengthens your brand identity:
- Set up social media accounts using your brand name.
- Create a simple website or online shop with consistent branding.
- Share content that reflects your style and values, like tutorials or behind-the-scenes videos of DIY crafts to sell online.
6: Engage and Grow Your Audience
A strong brand attracts loyal customers:
- Interact with followers by responding to comments and messages.
- Encourage customers to share photos of your products.
- Offer loyalty discounts or giveaways to keep buyers returning.
Common Mistakes To Avoid

Home-based craft business can be exciting, but beginners often make mistakes that slow growth or reduce sales. Whether you are creating DIY crafts to sell online, low-cost crafts to make and sell from home, or easy handmade items to sell, following these tips will help you avoid common pitfalls and set your business up for success.
- Don’t Underestimate Material Costs
Many beginners forget to account for the true cost of materials:
- Always calculate the total cost of beads, fabrics, soap base, molds, or packaging.
- Factor in shipping costs if you order online.
- Correct pricing ensures that your low-cost crafts to make and sell remain profitable.
- Avoid Skipping Quality Checks
Selling easy handmade items to sell requires products to look polished and function well:
- Inspect each product for defects before shipping or selling.
- Ensure jewelry knots are tight, soap bars are smooth, and bookmarks have clean edges.
- High-quality products increase customer trust and lead to repeat purchases.
- Don’t Ignore Marketing
Even the best DIY crafts to sell online won’t sell if people don’t see them:
- Use social media consistently to showcase your work.
- Take attractive, clear photos with good lighting.
- Write product descriptions with keywords like DIY crafts to sell online, low-cost crafts to make and sell, easy handmade items to sell naturally integrated.
- Avoid Overcomplicating Your Designs
Beginners sometimes try to create very complex products too soon:
- Start with simple, low-cost crafts to make and sell that you can produce efficiently.
- Focus on clean, professional designs that appeal to buyers.
- Once you master basics, gradually introduce more creative designs.
- Don’t Price Too Low or Too High
Pricing mistakes are common among beginners:
- Too low: You may sell quickly but make little profit.
- Too high: You may lose buyers.
- Base your prices on material cost + labor + desired profit margin. Compare similar products online for reference.
- Avoid Neglecting Customer EngagementCustomer relationships are key for a small craft business:
- Respond promptly to inquiries or messages.
- Thank buyers and encourage them to leave reviews.
- Engaged customers are more likely to buy again and recommend your easy handmade items to sell.
Start Your Home-Based Craft Business Today
Starting a craft business from home doesn’t have to be overwhelming. By focusing on low-cost crafts to make and sell from home, you can create easy handmade items to sell that appeal to buyers both online and locally.
From handmade beaded bracelets to fabric bookmarks and handmade soap bars, these DIY crafts to sell online offer real opportunities for anyone looking to earn extra income or build a small business with minimal investment.
The key to success lies in combining creativity with smart selling strategies:
- Take high-quality photos and write compelling product descriptions.
- Use social media to promote your easy handmade items to sell and connect with buyers.
- Ensure packaging and presentation reflect professionalism, even for low-cost crafts to make and sell.
- Price your products fairly, focusing on both affordability and profit.
- Build a brand that buyers can recognize and trust.
Even if you are struggling financially, starting with DIY crafts to sell online allows you to take control of your income, showcase your creativity, and gradually grow a sustainable home-based business. The combination of thoughtful design, smart marketing, and attention to detail ensures that your handmade crafts will attract buyers, generate sales, and help you achieve your entrepreneurial goals.
Start small, stay consistent, and watch your low-cost crafts to make and sell.
You just read: Low-Cost DIY Crafts to Make and Sell From Home.