Handcrafted Petal Floral Hand Fan for Easter Weddings: A DIY Guide
Have an outdoor ceremony and worried about the heat? This handcrafted petal floral hand fan for easter weddings: a diy guide gives you a stylish, useful solution.
I know what you might be thinking.
“Can I really make something like this myself?”
“Won’t it look cheap?”
“What if I ruin the fan?”
I had those same thoughts before I started.
Most of us are used to buying accessories for weddings. We walk into a store, pick a fan, and that’s it. But when I wanted something soft, floral, and elegant for a wedding, I couldn’t find exactly what I had in mind. Most of them felt too busy, or just not special enough.
So I decided to try making one myself.
Not because I’m a professional designer. but because I wanted something that matched my outfit and felt personal.
This petal fan floral hand fan may look detailed, but it is not as complicated as it seems. The secret is patience, neat layering, and understanding where to place each piece so it looks balanced.
If you have never tried a project like this before, don’t worry. You don’t need advanced skills. You just need to follow each step carefully and give yourself time.
In this guide, I will show you exactly how I built this fan, from the base structure to the layered petals and the handle details. I will also share the small mistakes I avoided so yours can look clean and elegant, not messy.
By the end of this post, you won’t just see a beautiful fan. You’ll understand how to create one yourself.
And that feeling, holding something you made with your own hands, is different.
Let’s start.
Like our floral petal fan, a bridal feather fan can also elevate your wedding loo. You’ll love our DIY Bridal Feather Hand Fan Tutorial — another charming handmade idea for wedding accessories.
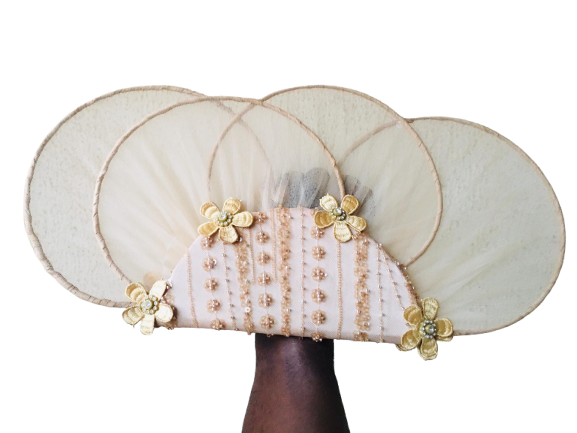
The Design Decisions Behind This Handcrafted Petal Floral Hand Fan
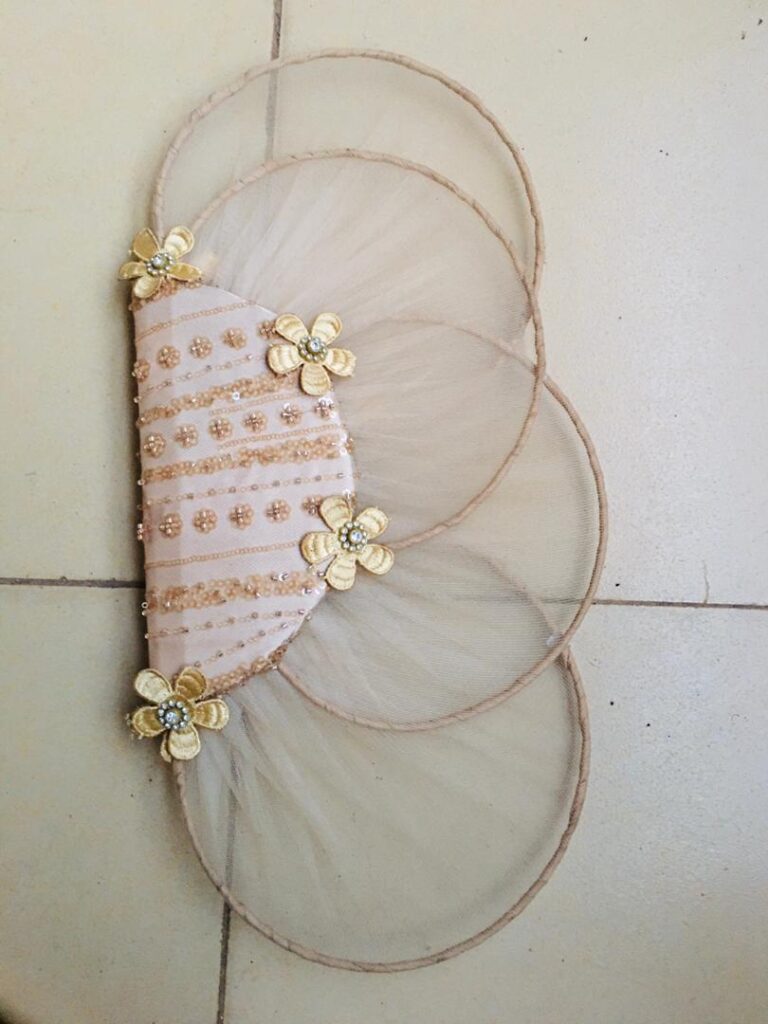
When I started working on this handcrafted petal floral hand fan, every detail had a reason. I didn’t just add things because they looked nice. I wanted the final result to feel balanced, elegant, and suitable for the occasion.
-
Why Layered Mesh?
The layered mesh is what gives the fan its soft, blooming look.
If I had used just one flat layer, the fan would look plain and lifeless. By adding multiple layers and slightly overlapping them, it creates depth. It almost looks like flower petals opening.
Layering also makes the fan look fuller and more expensive. It gives structure without making it heavy. For a wedding setting, that soft volume makes a big difference.
-
The Embellished Top
Without it, the fan would just be soft mesh all around. The decorated panel gives the eye somewhere to rest. It also brings a touch of formality, which is important for weddings.
Weddings, especially Easter weddings are usually elegant and calm. The stones and bead details reflect light gently, not too flashy, just enough to make the fan feel special.
That small structured section is what moves this piece from “simple DIY” to “occasion accessory.”
-
The handle is often ignored in many DIY fans, but I didn’t want that.
When you hold a fan, people see the handle just as much as the top. Adding floral detailing there makes the entire design feel complete. It connects the top mesh petals to the bottom part of the fan.
It also makes the handcrafted petal floral hand fan, look intentional from every angle, not just from the front.
-
The Color Choice and Easter Elegance
For the wedding, I wanted something soft and refined.
Bright colors can sometimes feel too loud for spring ceremonies. So I chose tones that feel calm, warm, and graceful. Soft gold and neutral shades work well because they pair easily with pastel dresses, lace outfits, or chiffon fabrics.
Easter is about renewal and lightness. The color choice reflects that. It doesn’t overpower the outfit. It complements it.
That balance is what makes this Handcrafted Petal Fan Floral Hand Fan suitable for a formal Easter event instead of just everyday use.
This fan is a perfect project to pick up whenever you have time, just like our spring DIY Projects You Can Start, Stop, and Pick Up Again Without Losing Progress that are flexible for busy schedules.
Materials I Used
- Candle gum – Acts as a strong adhesive to secure layers, petals, and embellishments in place. It ensures the fan stays intact without messy glue marks.
- Fascinator wire – Provides structure and flexibility for the fan’s petals, helping them hold their shape while allowing slight movement for a natural, airy look.
- Net – Adds texture and dimension to the petals. It creates a soft, layered effect, making the fan feel light, elegant, and floral rather than flat.
- Cardboard – Forms the base or backing of the fan. It gives a strong platform to attach petal layers and ensures the fan doesn’t flop or bend.
- Fabric of your choice – Covers the cardboard and fan layers, adding color, softness, and visual appeal. You can pick a pastel or patterned fabric to match the Easter wedding theme.
- Round plate cover – Serves as a template for cutting perfect circular or rounded petal shapes, keeping the fan symmetrical and neat.
- Scissors – For cutting fabric, net, and cardboard precisely. Clean cuts make layering and finishing much easier.
- Cutter – Helps with detailed cuts, especially on the cardboard or for shaping the petals, ensuring crisp edges and professional-looking finishes.
- Bias tape – Used to wrap the fascinator wires. This gives a neat finish and protects the wires, while helping the net and petals attach smoothly.
-
Trimmings or flower design (optional) – These are decorative finishing pieces added to the handle or base of the fan. They enhance the overall look without overpowering it. A simple floral trim can make the fan feel more wedding-ready while keeping it elegant and balanced.
- Pin and Thread – Secures and used for small attachments.
Even if you don’t think of yourself as crafty, you might enjoy simple projects like this, and you can start with beginner-friendly ideas from our DIY Projects for People Who Don’t Feel Crafty at All
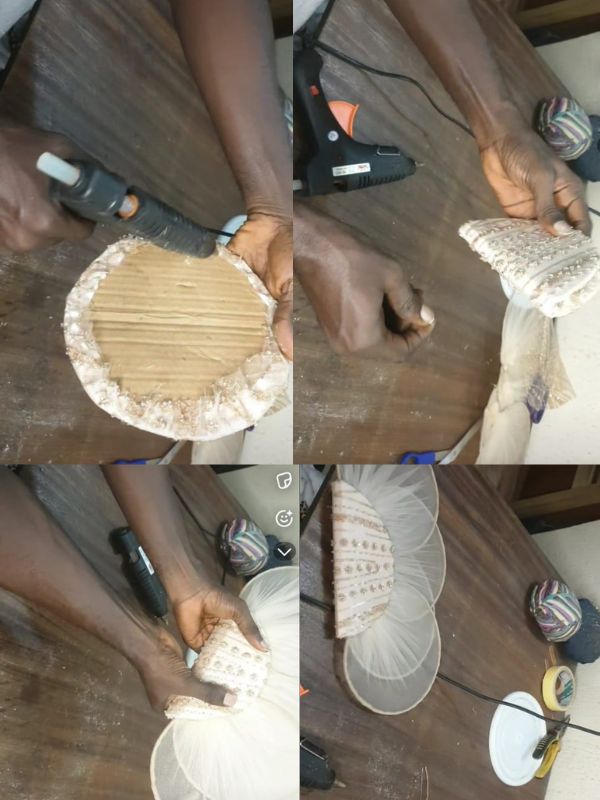
Step-by-Step On How I Built the Fan
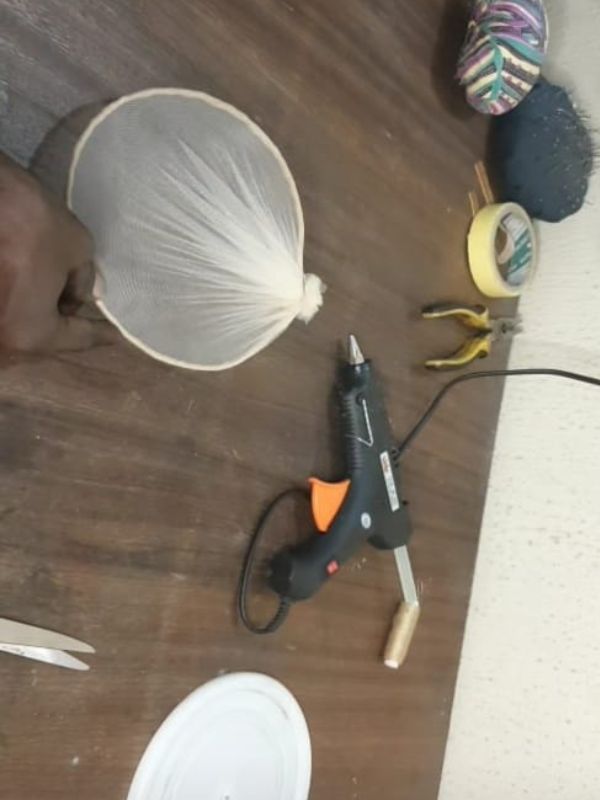
1️⃣ Get Your Materials Ready
Before you start, make sure all your materials are in front of you: fascinator wire, net, bias tape, candle gum, cardboard, fabric, round plate cover, scissors, cutter, and thread. Having everything ready makes the process smoother and less stressful.
2️⃣ Prepare the Fascinator Wires

Take your fascinator wire and measure four pieces using your pliers. You only need four cut pieces. To be safe, cover the tips of each wire with cello tape so they don’t cut the net or injure you while working. Safety first!
3️⃣ Wrap the Wires
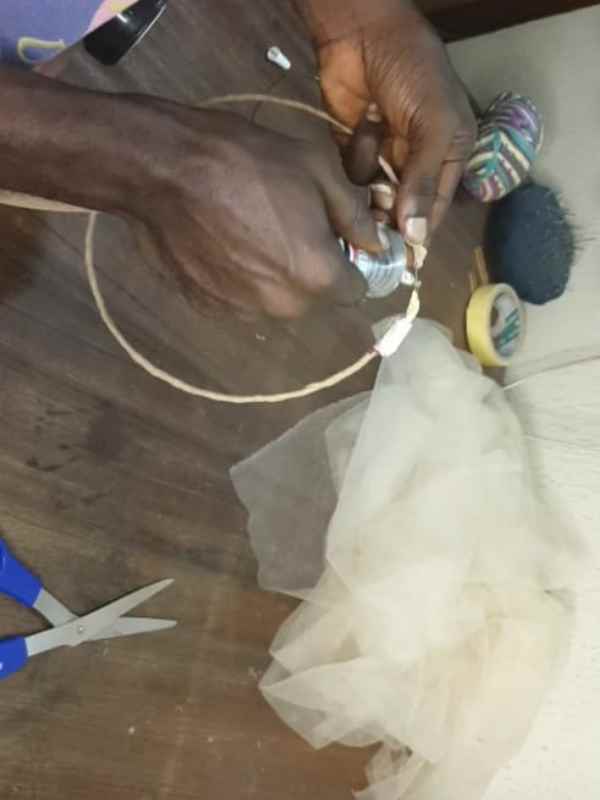
Grab gum, your bias tape, and one of the cut wires. Apply candle gum along the wire, then carefully wrap the bias tape all the way from one end to the other. Repeat this for the other three wires until all four wires are fully wrapped. Wrapping the wires makes them look neat and helps them hold the net and petals better.
4️⃣ Cover the Wires with Net
Take one wrapped wire and place it on top of the net. Cut the net to size so it covers the wire completely. Tie the leftover net with a thread to secure it. Do the same for the remaining three wires. When done, all four wires should be fully covered in net.
5️⃣ Assemble the Fan Petals
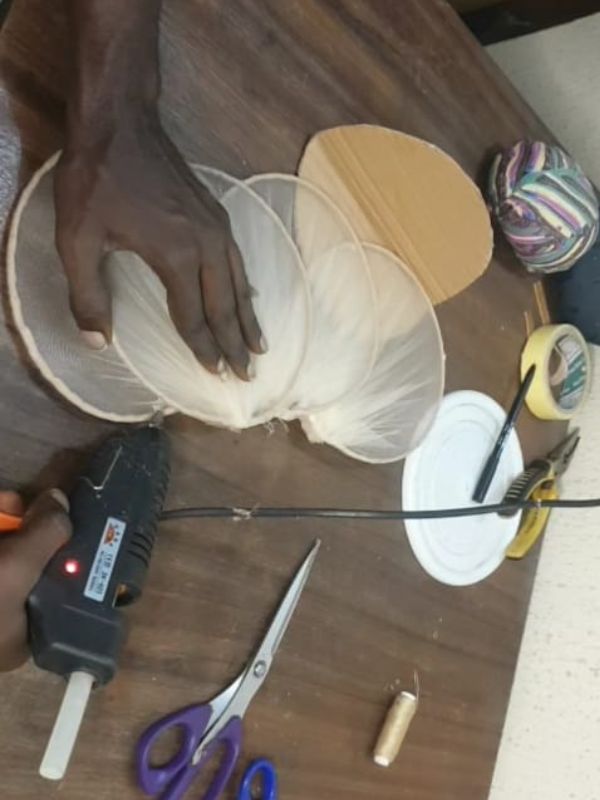
Once the wires are covered, place each wire on top of each other in a fan shape. Apply candle gum at every point where the wires meet. Make sure the gum is strong so the wires stay together and the fan is stable. This step is important because it gives your fan its structure and makes it hold its shape.
6️⃣ Prepare the Fan Handle
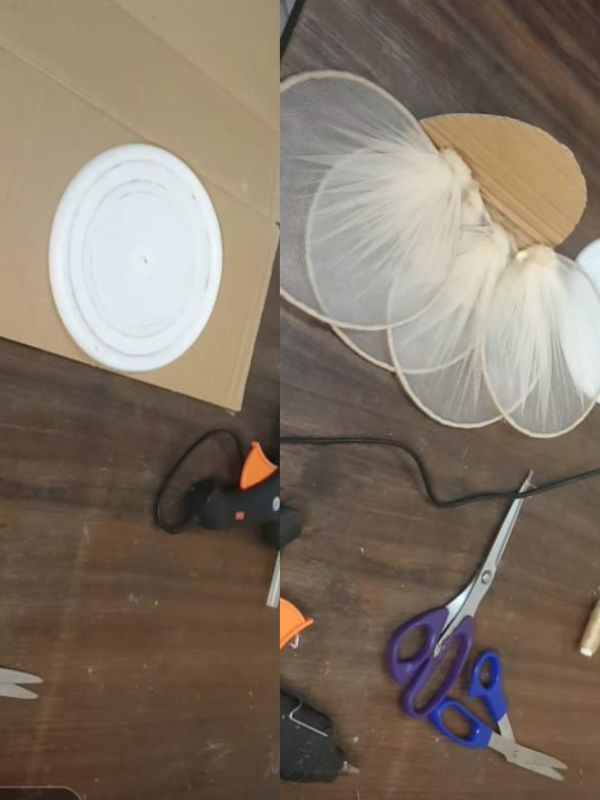
Use your round plate cover as a template and place it on top of your cardboard. Cut the cardboard to size—this will be your fan handle. Next, place the cardboard on top of your fabric and cut around it, leaving about half an inch to one inch extra. This extra fabric will help you cover the edges neatly.
7️⃣ Cover the Handle with Fabric
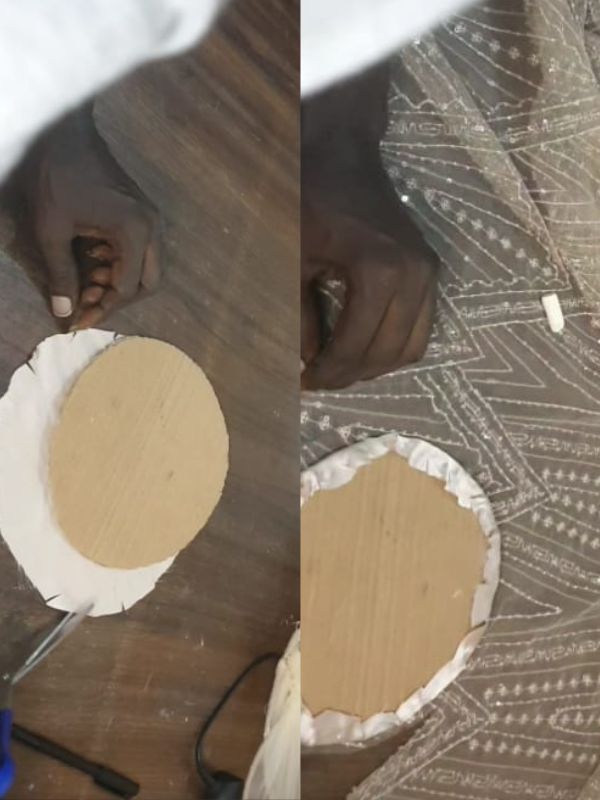
Trim the edges of the fabric carefully, apply candle gum, and wrap the fabric over the cardboard so none of the cardboard is showing. Make sure it’s smooth and tight. A well-covered handle makes the fan look clean and professional.
Using leftover fabric to wrap the fan handle is a great way to make your project both elegant and eco-friendly, similar to our fabric scrap sewing hacks that turn small pieces into beautiful keepsakes.
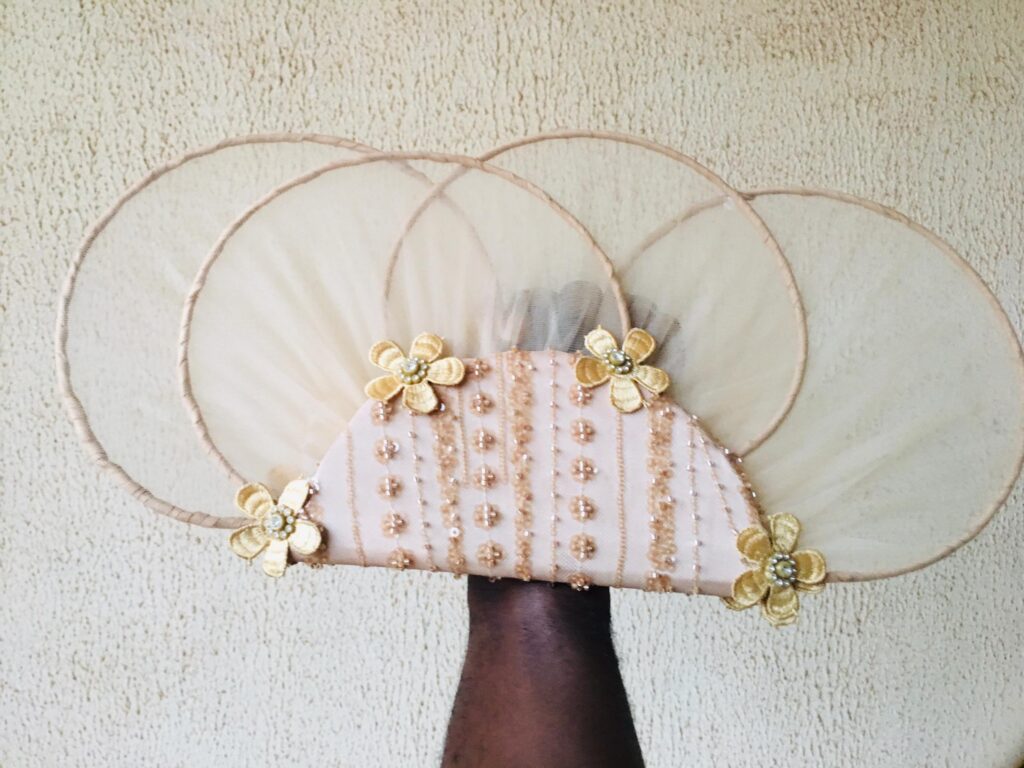
8️⃣ Attach the Fan Petals to the Handle
Take your four glued fascinator wires and place them between the cardboard handle. Apply candle gum at the center on one side and press firmly. Turn to the next side, apply gum, and press again. Check carefully to make sure everything is tight and secure.
9️⃣ Add the Trimmings or Flower Design
Once the fan is fully assembled and firm, this is where the trimmings or flower design come in.
Apply a small amount of candle gum to the base and top of the handle or the meeting point where the wires join. Or anywhere you feel like.
Place your trimmings neatly and press gently.
Keep it simple, the goal is to enhance the fan, not overcrowd it.
This final touch adds elegance and gives the fan a soft wedding finish.
Beyond making something beautiful for yourself, crafts like this DIY hand fan could even inspire new hobbies, see our post on 7 surprising hobbies that could actually make you cash for ideas.
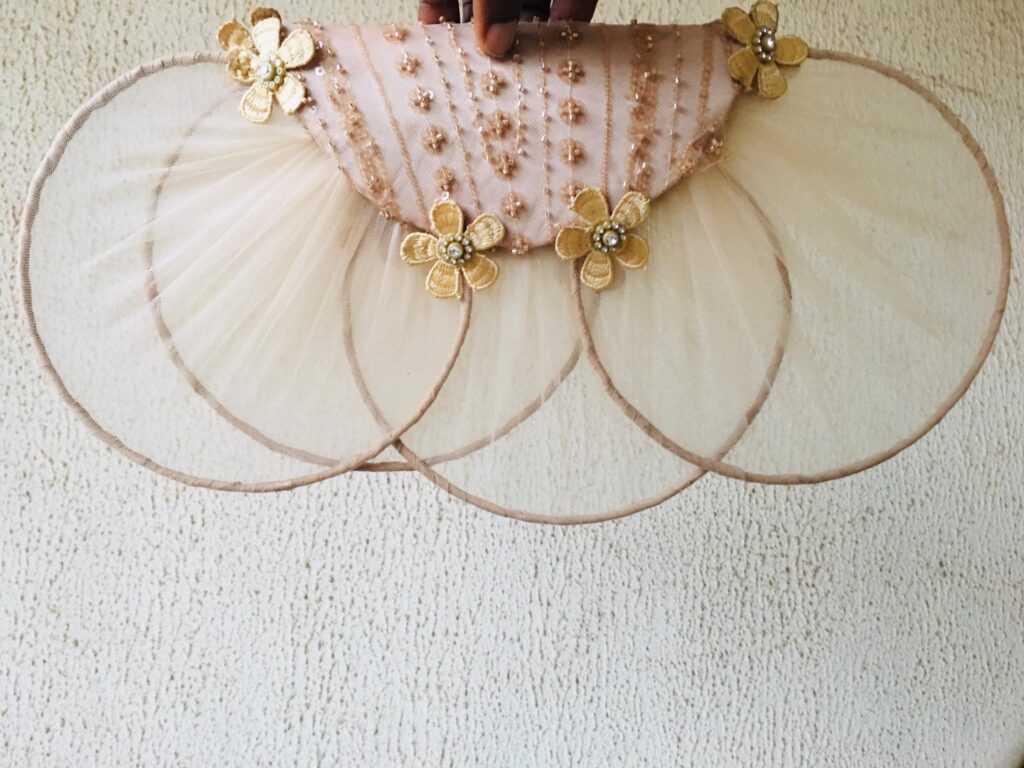
What Makes This Fan Look Wedding-Ready
Not all handmade fans look polished, some can feel floppy, uneven, or over-done. Here’s what makes this petal fan stand out and perfect for any occassion:
1️⃣ Balanced Layering
The petals are carefully layered, starting from the bottom and building up. This gives the fan fullness without looking bulky, creating a soft, dimensional floral effect that’s visually appealing.
2️⃣ Clean Finishing
Every edge is neatly wrapped, wires are hidden under fabric or bias tape, and stray threads are trimmed. Clean finishing makes a huge difference, when the details are tidy, the fan instantly looks professional.
3️⃣ Strong Structure
The combination of fascinator wires, candle gum, and carefully layered net ensures the fan holds its shape. A fan that flops or bends looks homemade, but a strong, structured fan feels high-quality and ready for display or use at a ceremony.
4️⃣ Elegant Color Choice
Soft pastels, subtle creams, and gentle Easter-inspired tones help the fan blend seamlessly with wedding décor and outfits. The right colors can make even a small DIY piece look intentional and sophisticated.
5️⃣ Thoughtful Design Details
Features like the structured top panel, symmetrical petal layers, and floral handle detailing show that this fan was carefully planned. Attention to design details makes the difference between a craft and an elegant accessory.
If you enjoy hands-on projects like creating layered net petals for a fan, you might also like our Farm Animal Crafts for Toddlers: Build Creativity and Fine Motor Skills Beyond Playtime in fun, creative ways.
If I Were to Make It Again
-
Patience Is Key
Making this handcrafted petal floral hand fan for Easter weddings taught me that rushing never helps. At first, I hurried through wrapping the wires and layering the net, and some petals ended up uneven. Taking your time to carefully place each layer makes everything come together beautifully.
2. Handle Comfort Matters
The cardboard base worked well, but if I make this again, I would extend the handle by about 1–2 extra inches before cutting it out. When the fan head is wide and full, a short handle can feel a bit small in your hand. Making it slightly longer gives better balance and makes it more comfortable to hold.
I would also make sure the cardboard is either doubled or wrapped tightly with fabric so it feels firm and secure. A wedding fan isn’t just for display, it will be held, carried, and possibly used throughout the ceremony. A strong, well-sized handle makes the fan feel stable, comfortable, and more professionally made.
3. Expect Small Adjustments
Not everything fits perfectly the first time, and that’s totally normal for DIYers. Some wires overlapped too much or the net needed a little extra trimming. I learned to adjust as I went, and those little fixes are what I enjoyed.
4. Mistakes Make It Personal
Every small mistake is part of the process. Instead of stressing, I embraced them. Each adjustment, fold, and tiny imperfection adds character. By the end, seeing all the layers come together and knowing I made it myself made the fan feel extra special.
Final Tip for Fellow DIYers
If you’re creating your own handcrafted petal floral hand fan for Easter weddings, remember: slow and steady wins the race. Focus on the layers, the structure, and enjoy the process. The little struggles will make your finished fan look thoughtful, elegant, and truly one-of-a-kind.
How to Style This DIY Hand Fan for Weddings
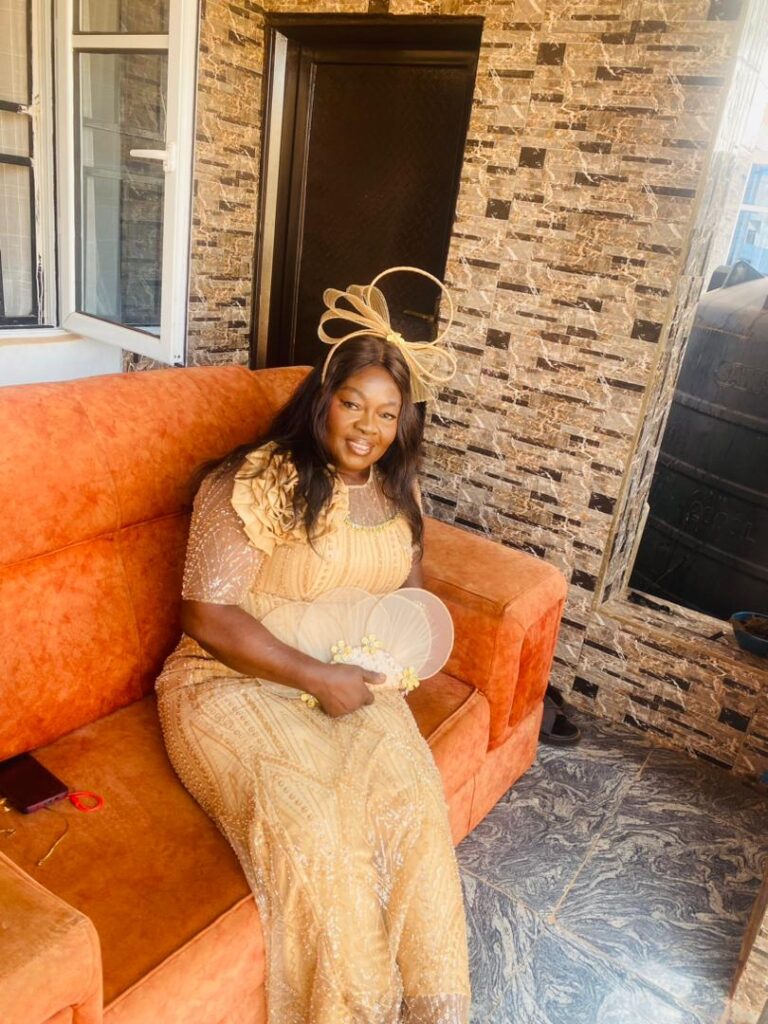
This fan isn’t just something you hold , it’s part of your overall look. When styled well, it becomes a soft statement piece that completes your outfit beautifully.
How you can rock yours:
-
Pair It with Soft, Flowing Fabrics
This fan works best with pastel dresses, lace outfits, chiffon gowns, or soft-flowing fabrics. Because the net petals give a light, airy look, it blends naturally with romantic silhouettes.
If your dress has simple detailing, the fan adds texture. If your outfit already has volume, the fan balances it without overpowering your look.
-
Perfect for Outdoor or Daytime Ceremonies
Outdoor weddings, especially Easter weddings, often come with warm weather and bright sunlight. This DIY hand fan is both stylish and practical.
It keeps you cool during the ceremony while still looking elegant in photos. Instead of holding a random paper fan, you’re holding something beautiful and intentional.
-
A Thoughtful Bridesmaid or Guest Accessory
This fan can also be made in matching colors for bridesmaids. It adds coordination without being too loud.
You can even customize each one slightly so every bridesmaid feels special. Guests will notice the effort, and it makes for lovely photo moments.
-
Adds Personality Without Overdoing It
The beauty of this DIY fan is that it doesn’t scream for attention. It adds charm quietly.
It shows creativity.
Shows effort.
And shows style.
A well-made handcrafted petal floral hand fan for Easter weddings adds that soft “wow” factor, the kind that feels elegant, not dramatic.
Conclusion
Creating this handcrafted petal floral hand fan for Easter weddings was more than just a DIY project, it was a reminder that handmade pieces carry a different kind of beauty.
From measuring and wrapping the wires to carefully layering the net and securing the handle, every step required patience and attention. And while it wasn’t flawless on the first try, that’s exactly what made it special. DIY is not about perfection, it’s about intention.
What I love most about this fan is that it feels personal. It’s structured yet soft. Simple yet elegant. Practical yet beautiful. And knowing it was made by hand makes it even more meaningful, especially for something as special as an Easter wedding.
If you’ve been thinking about making your own, this is your sign to try. Gather your craft materials, take your time, and enjoy the process. The finished piece won’t just be a fan, it will be something you created with care, and that alone makes it unforgettable.