Think you can’t make a wreath? try these 7 diy spring wreaths you can make with garden finds or everyday items, no crafting experience needed, and they’re easier than you think.
Feeling like you want your home to feel fresh and lively this spring, but not sure where to start? I get it. Crafting a wreath can seem intimidating, your situation might be ‘what if you don’t have a garden, fancy supplies, or the time to do it perfectly?
Well, you don’t need any of that. These 7 DIY spring wreaths using garden finds or everyday items are designed to be simple, flexible, and stress-free. You can use flowers from the store, herbs from your kitchen, twigs from a walk session, or craft supplies you already have at home.
Each wreath is a project you can start, pause, and finish without feeling stuck or overwhelmed, and they’re perfect for beginners, busy adults, or even families who want a fun creative activity together.
So, grab your scissors, wire, ribbons, or any small items lying around, and let’s get started.
By the end, you’ll have wreaths that feel personal, cheerful, and entirely your creation. And yes, you can finish them this weekend, even if you’ve never made one before.
Take a look at this guide: DIY Projects for People Who Don’t Feel Crafty at All
7 DIY Spring Wreaths Using Garden Finds or Everyday Items
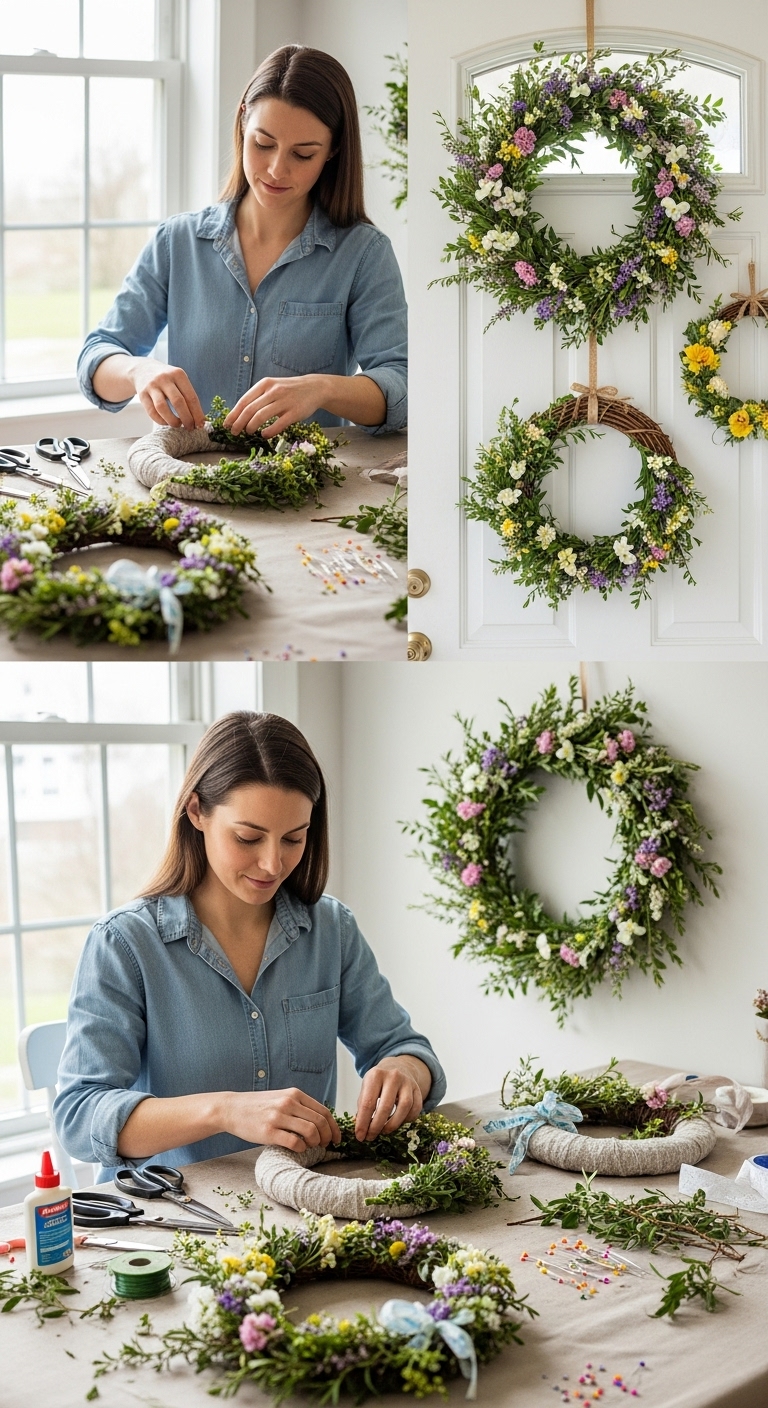
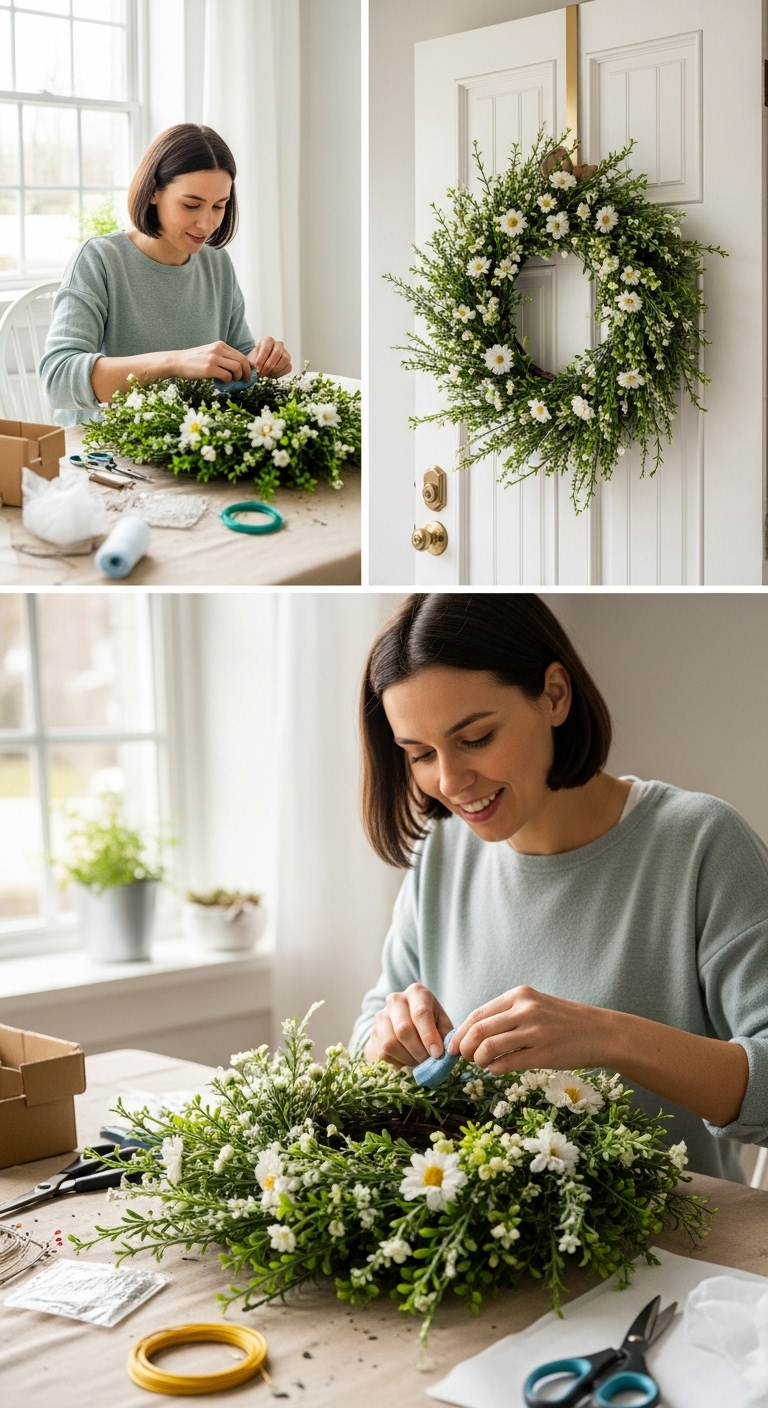
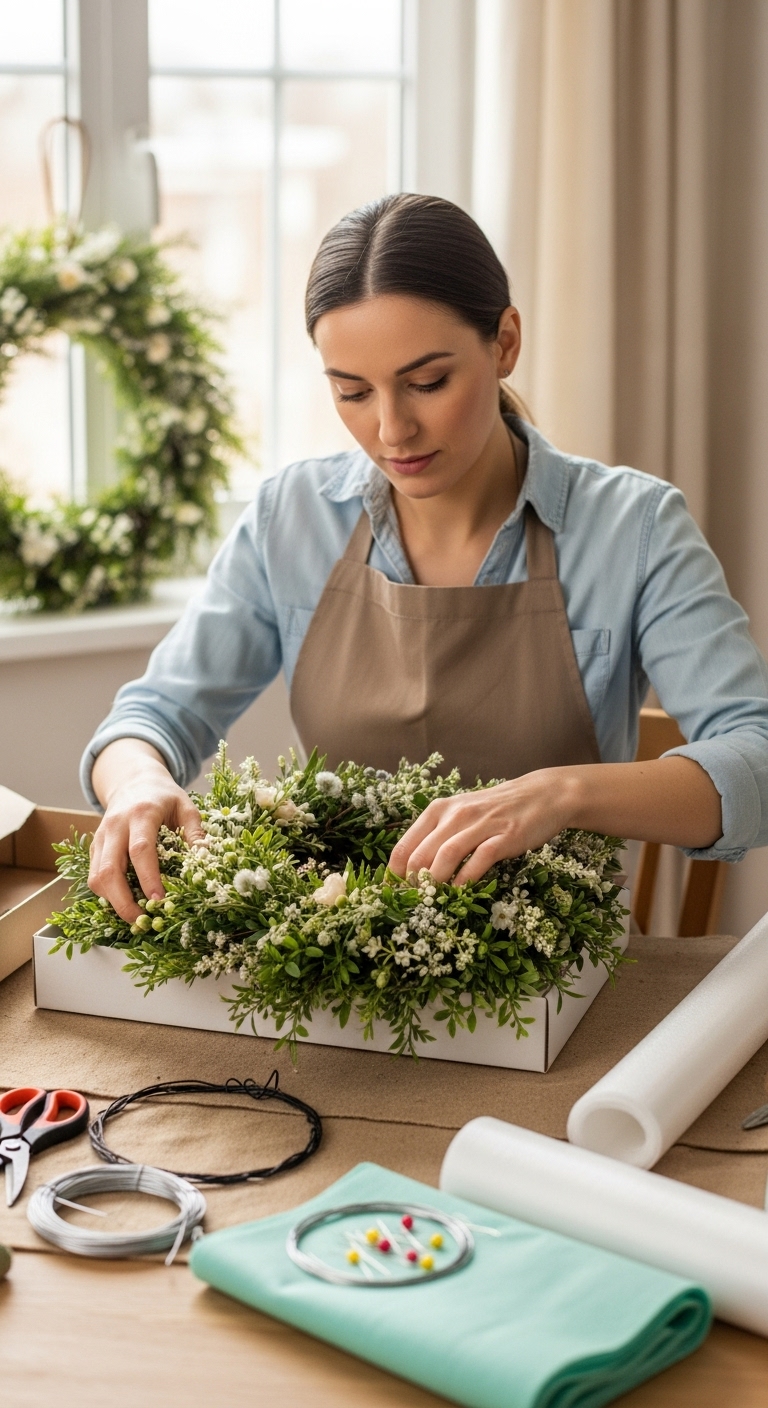
1️⃣ Fresh Flower Wreath
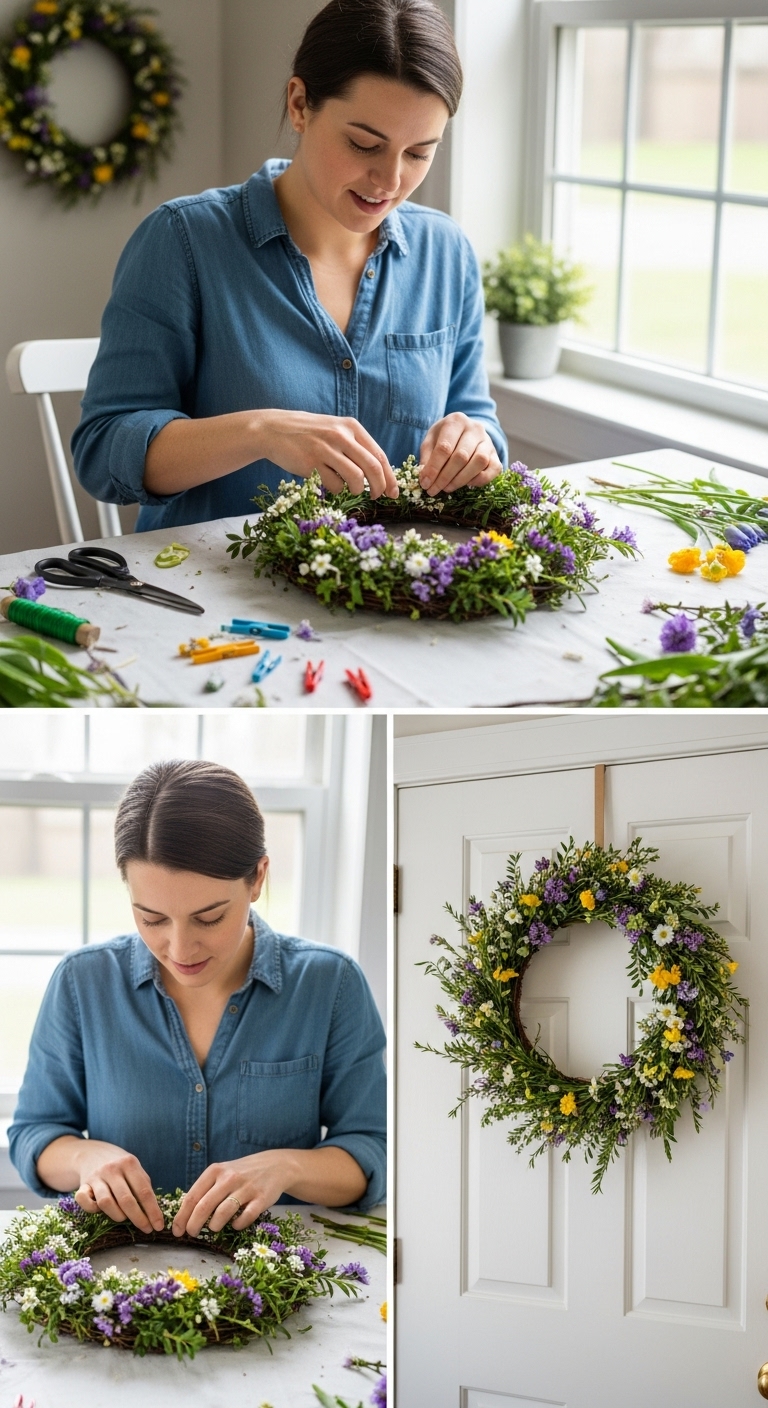
Bring your home to life with a bright, colorful wreath made from fresh flowers. This wreath works for any space, doors, walls, or tables and creates a cheerful, spring-like energy. Even if you don’t have a garden, you can use store-bought or faux flowers to achieve the same look.
Materials Needed:
- Flowers (garden, store-bought, or faux) → main decorative element for color, texture, and bloom fullness
- Wire wreath frame → strong base to attach flowers
- Floral tape or thin wire → secures stems to the frame
- Scissors → trimming stems and leaves for neat placement
Step-by-Step Instructions:
- Prepare your frame
- Lay your wire wreath frame on a flat surface.
- Make sure it’s clean and sturdy. This will be the base of your wreath.
- If using a foam or grapevine frame, lightly secure any loose ends with floral wire.
- Trim the flowers
- Cut flower stems to about 2–3 inches — short enough to attach easily, long enough to wrap around the frame.
- Remove any leaves that will touch the tape/wire directly, so nothing gets messy or hidden.
- Group flowers by size and color for easier layering later.
- Start attaching flowers
- Take one flower and place the stem against the frame at a slight angle.
- Wrap floral tape or wire around the stem and frame tightly but gently so it doesn’t crush the petals.
- Continue adding flowers in the same direction, slightly overlapping stems to cover the frame evenly.
- Build layers for fullness
- Alternate large and small blooms as you go to create depth.
- Fill in gaps with smaller flowers or faux greenery for a balanced, professional look.
- Step back occasionally and look at your wreath from a distance to see if it looks full and even.
- Secure everything
- Once the frame is fully covered, go around the wreath and add a final wrap of floral tape or wire to lock everything in place.
- For extra stability, twist some stems around the frame instead of just taping.
- Finishing touches
- Trim any excess stems or leaves sticking out awkwardly.
- If using fresh flowers, lightly mist the wreath with water to keep it vibrant.
- Optional: Add a ribbon at the top for hanging or an extra pop of color.
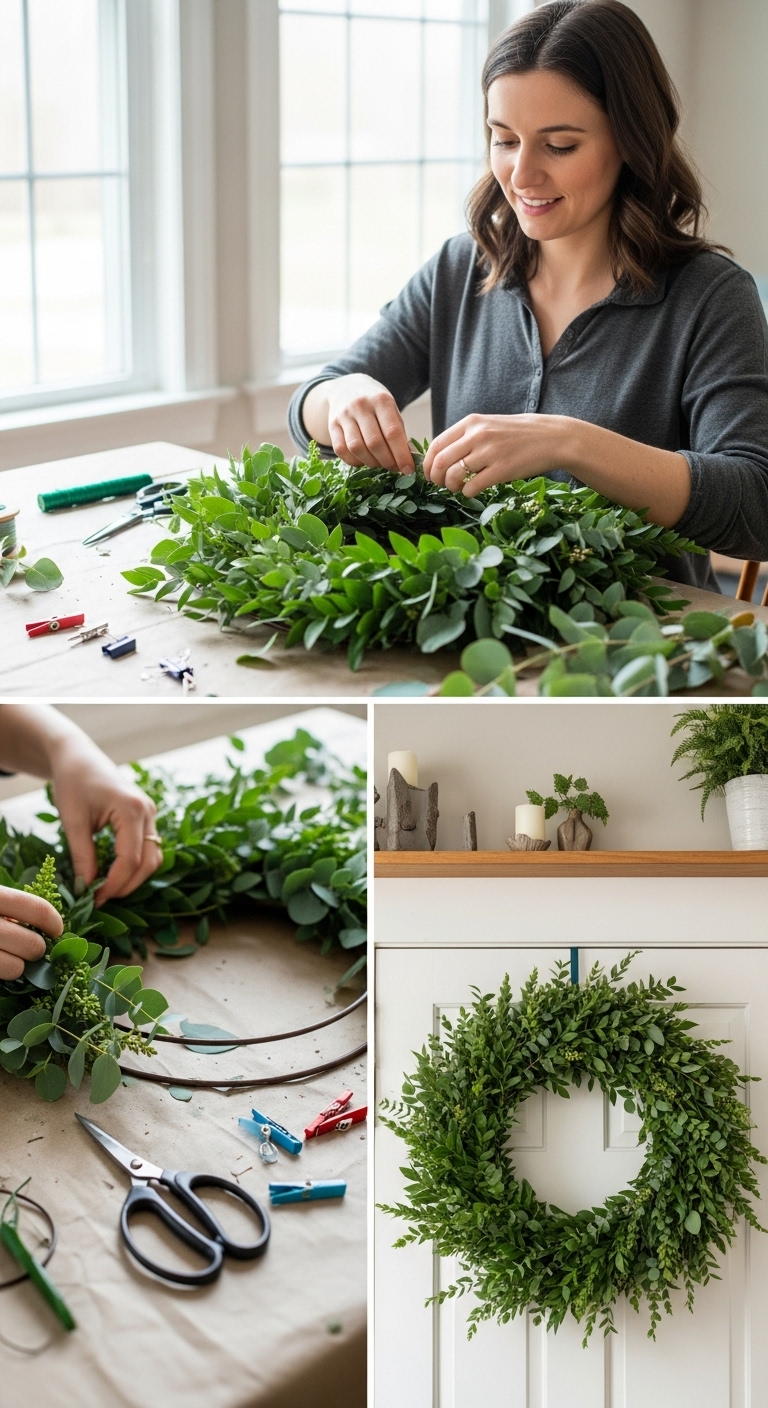
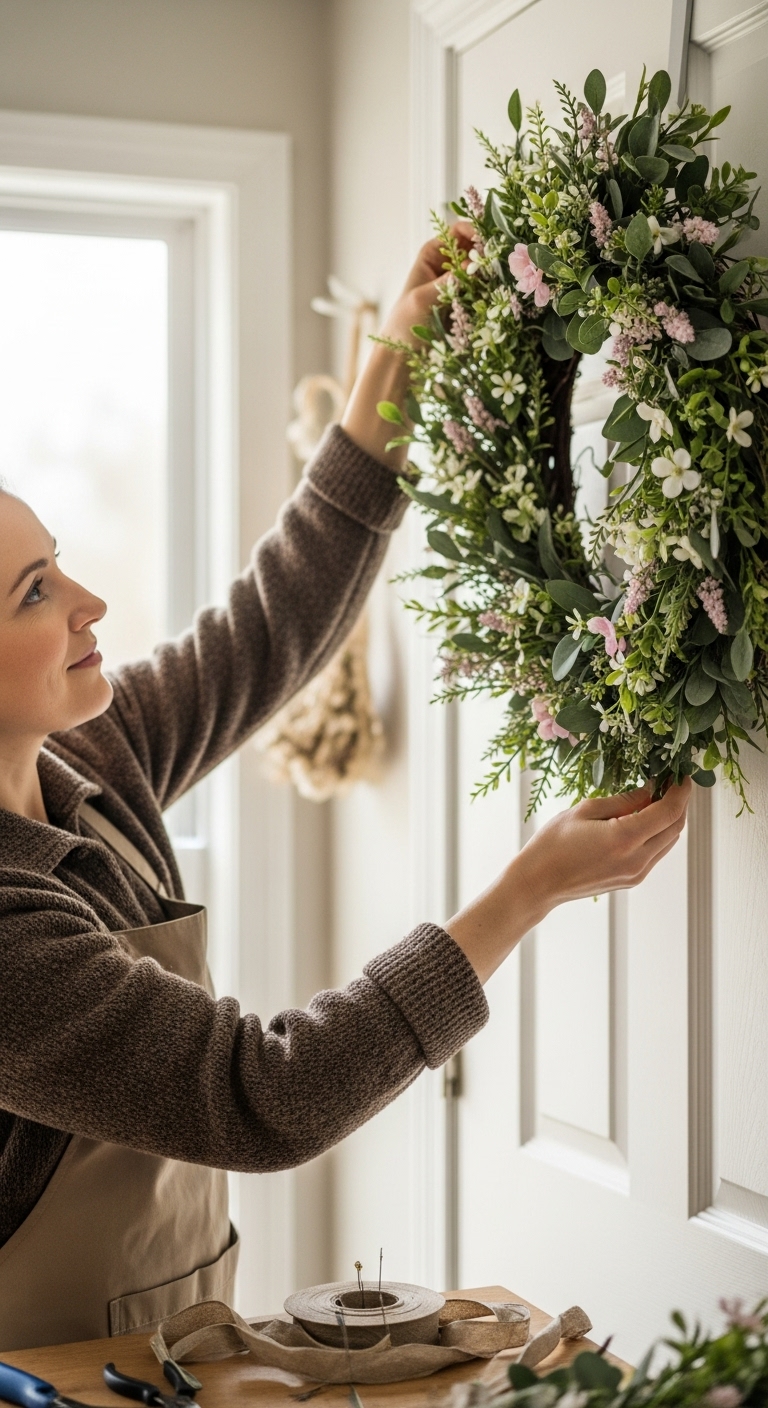
2️⃣ Greenery & Herb Wreath
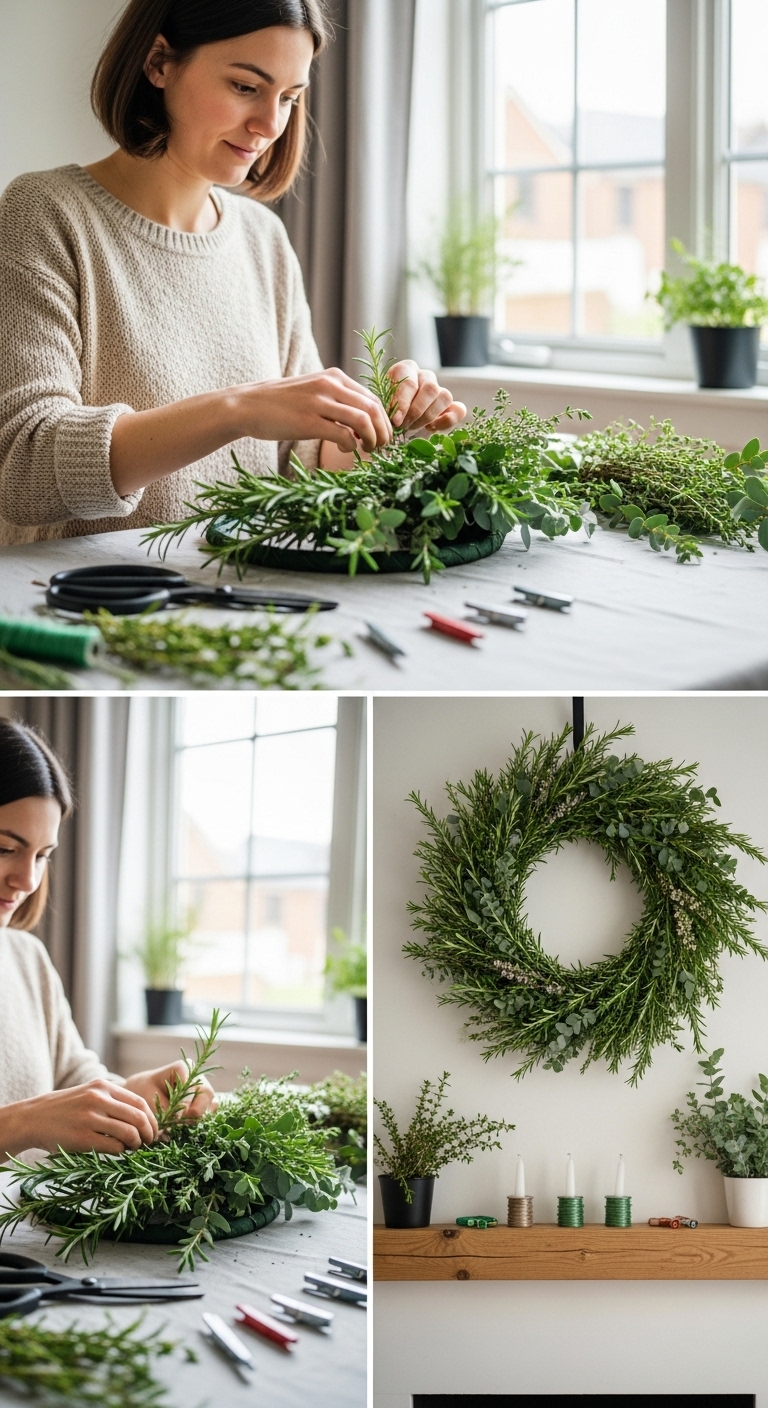
This wreath brings a fresh, natural scent and vibrant greenery into your home. Herbs like rosemary, mint, or lavender not only look beautiful but can fill your space with a subtle, calming fragrance. Even if you don’t have a garden, you can use store-bought herbs, faux greenery, or florist stems to achieve a lush, full look.
Materials Needed:
- Fresh herbs or greenery (garden, store-bought, or faux) → main decorative element and scent
- Wire wreath frame → supports and shapes the wreath
- Floral wire or tape → secures stems to the frame
- Scissors or pruning shears → trims stems and shapes the greenery
- Optional: small flowers or ribbons → add pops of color and visual interest
Step-by-Step Instructions:
- Prepare your frame:
- Lay your wire frame flat on a table.
- Make sure the frame is sturdy and ready to hold the weight of herbs and greenery.
- Trim and sort greenery:
- Cut herbs or greenery into 3–4 inch sections.
- Remove any leaves or parts that would make attachment messy or bulky.
- If mixing different types of greenery, group them by color or texture for easier layering.
- Attach the first layer:
- Take a small bunch of greenery and place it on the frame at a slight angle.
- Wrap floral wire around the stems and frame tightly enough to hold them, but gently so the herbs aren’t crushed.
- Continue adding bunches around the frame, overlapping slightly for a natural, full appearance.
- Add depth and variation:
- Layer different types of greenery for texture — e.g., broad leaves, thin sprigs, or feathery herbs.
- If using optional small flowers, tuck them in between the greenery to create subtle pops of color.
- Secure and refine:
- Once the frame is covered, go around the wreath with extra wire or tape to lock everything in place.
- Trim stems or leaves that stick out awkwardly.
- For fresh herbs, lightly mist with water to keep them vibrant and fragrant.
- Optional finishing touches:
- Add a small ribbon or bow for decoration.
- If using faux greenery, spray lightly with water mist or a matte finish spray for a natural look.
Need a little spring decor motivation, we shared something here for you: Spring DIY Projects You Can Start, Stop, and Pick Up Again Without Losing Progress
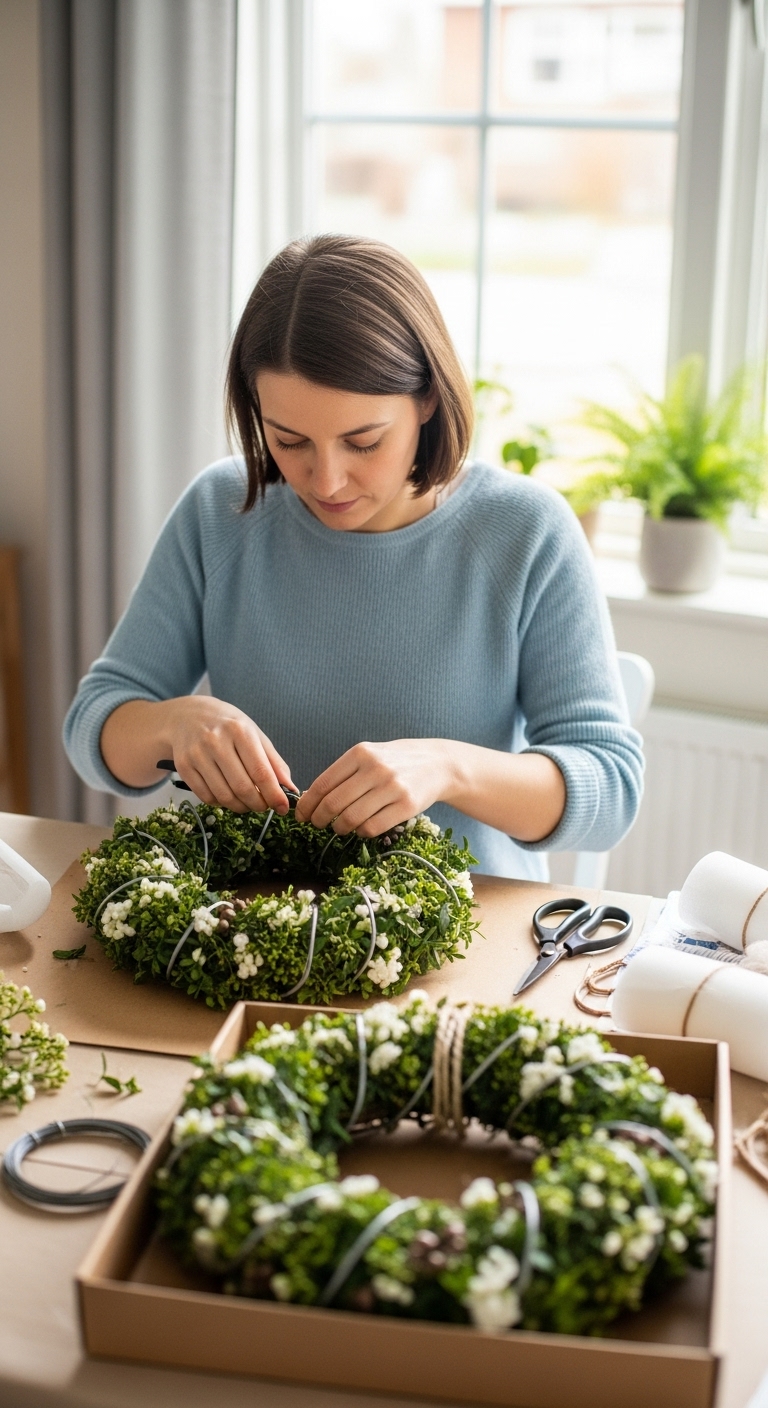
3️⃣ Succulent Wreath
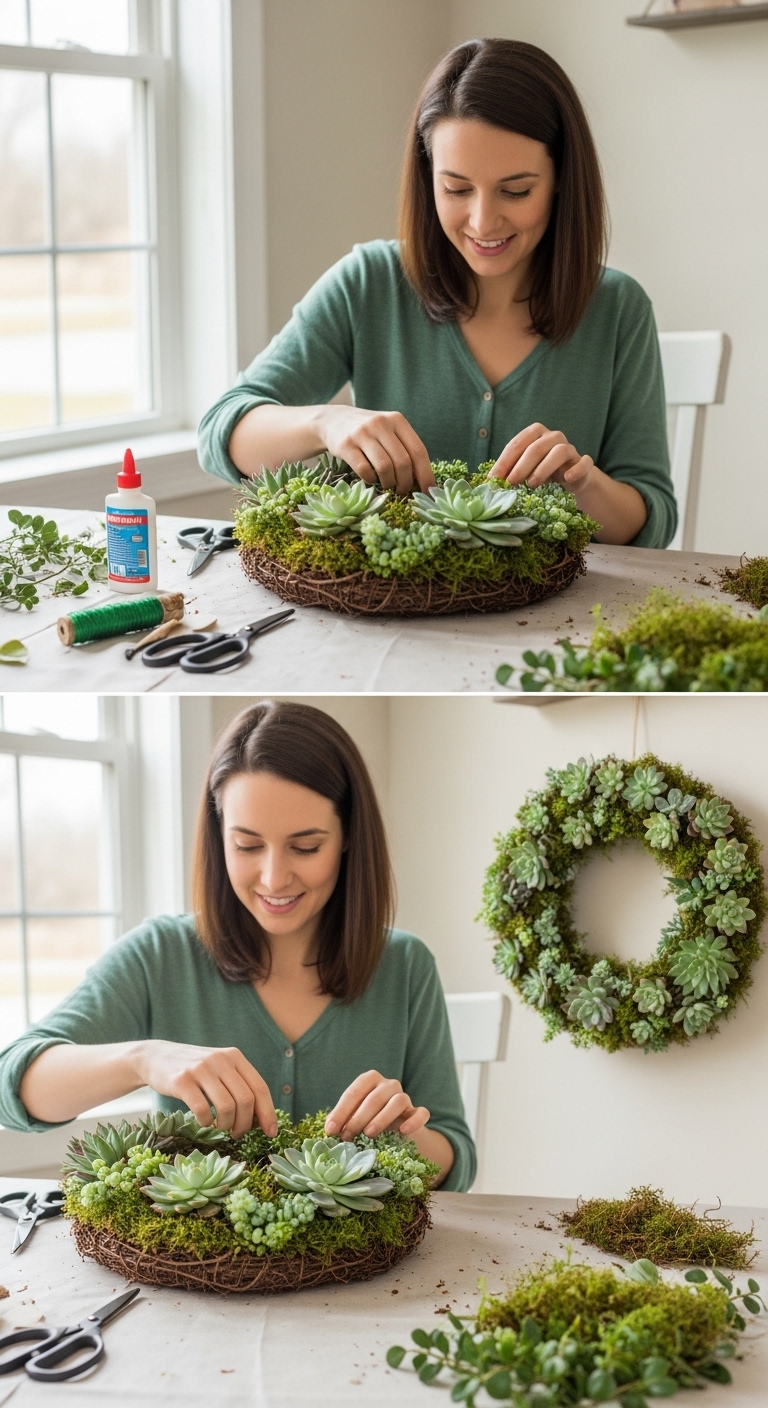
Succulents are low-maintenance, long-lasting, and trendy, making them perfect for a wreath that stays beautiful for weeks. This wreath adds modern texture and greenery to your home and is ideal for beginners because succulents are forgiving and don’t wilt quickly. Even if you don’t have a garden, you can use potted succulents, faux succulents, or cuttings from a store.
Materials Needed:
- Succulents (fresh, potted, or faux) → main decorative element, creates texture and longevity
- Moss → fills gaps and adds volume around succulents
- Wire wreath frame or foam base → sturdy foundation for attaching succulents
- Floral wire or hot glue → secures succulents and moss to the frame
- Scissors or wire cutters → trims moss, stems, and wire as needed
- Optional ribbon → adds color or makes the wreath ready to hang
Step-by-Step Instructions:
- Prepare your frame or foam base:
- Lay the frame flat on your workspace.
- If using a foam base, ensure it’s fully covered in floral tape or moss for stability.
- Prepare the succulents:
- Trim the stems to about 1–2 inches for easy attachment.
- Remove any damaged leaves to make each plant look fresh.
- Group succulents by size and color to plan placement for a balanced arrangement.
- Cover the base with moss:
- Spread moss evenly across the frame or foam base.
- Secure it with floral wire or glue to prevent slipping.
- Attach succulents to the frame:
- Place each succulent on the mossed base.
- Secure with floral wire for live succulents or hot glue for faux succulents.
- Slightly angle each plant to create depth and a natural look.
- Fill in gaps:
- Use smaller moss pieces or mini succulents to fill empty spaces.
- Step back occasionally to check symmetry and fullness.
- Finishing touches:
- Trim any protruding moss or stems for a neat finish.
- Add a ribbon for hanging or as a decorative accent.
- Optional: lightly mist live succulents to keep them healthy.
Another post you’ll enjoy: 10 Low-Cost DIY Crafts to Make and Sell From Home
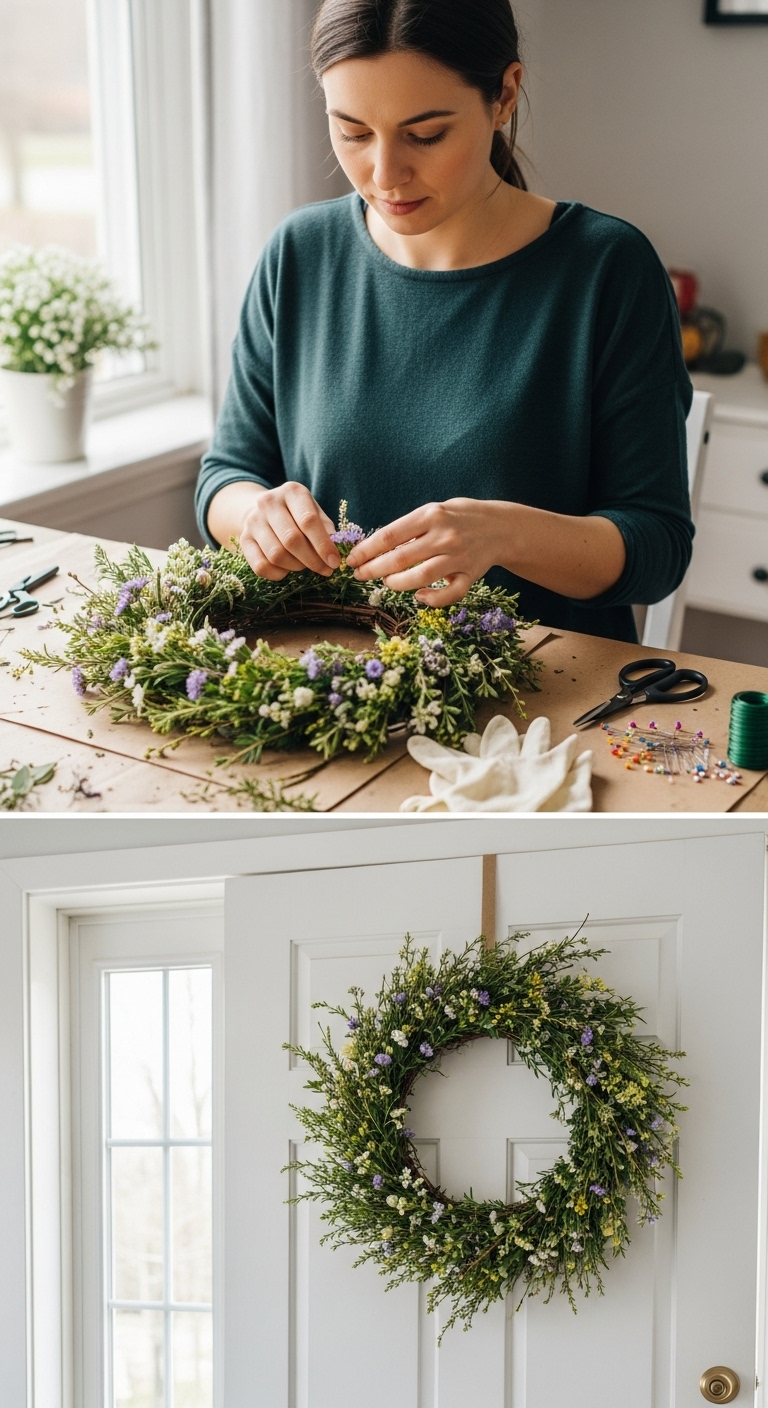
4️⃣ Leafy Spring Wreath
A Leafy Spring Wreath brings a fresh, natural vibe to any space and is perfect for creating a calming, earthy feel indoors. This is one of the DIY Spring Wreaths You Can Make With Garden Finds or Everyday Items, and it works beautifully whether you pick leaves from your garden, grab some from a florist, or even use faux or craft leaves.
Materials Needed:
- Leaves (fresh, store-bought, or faux) → main decorative element, adds texture and volume
- Wire wreath frame or grapevine base → sturdy foundation to attach leaves
- Floral wire or tape → secures leaves to the frame
- Scissors → trims leaves and wire for neat placement
- Optional ribbon or small accents → adds color and personality
Step-by-Step Instructions:
- Prepare your frame:
- Lay your wire or grapevine frame flat on a table.
- Ensure it’s stable and ready to hold leaves.
- Trim and sort the leaves:
- Cut leaves to about 3–4 inches, or adjust based on their size.
- Remove any torn or damaged leaves to ensure a clean look.
- Group leaves by color or shape to help plan layering.
- Attach the first layer of leaves:
- Take a leaf and place the stem against the frame at a slight angle.
- Wrap floral wire around the leaf stem and frame to secure it.
- Continue adding leaves around the frame in the same direction, slightly overlapping to cover gaps.
- Build depth and fullness:
- Alternate different leaf sizes and shades for a natural, textured appearance.
- Step back periodically to check symmetry and make adjustments.
- Secure and refine:
- Once the frame is fully covered, wrap additional wire around stems for extra stability.
- Trim any leaves sticking out awkwardly for a neat finish.
- Optional finishing touches:
- Add a small ribbon, dried flowers, or other accents for a personal touch.
- If using faux leaves, lightly bend or fluff them to make the wreath look natural.
You should also read: Easter Party Ideas for Hosts Who Hate Stress: Throw a Stylish Party Without the Chaos
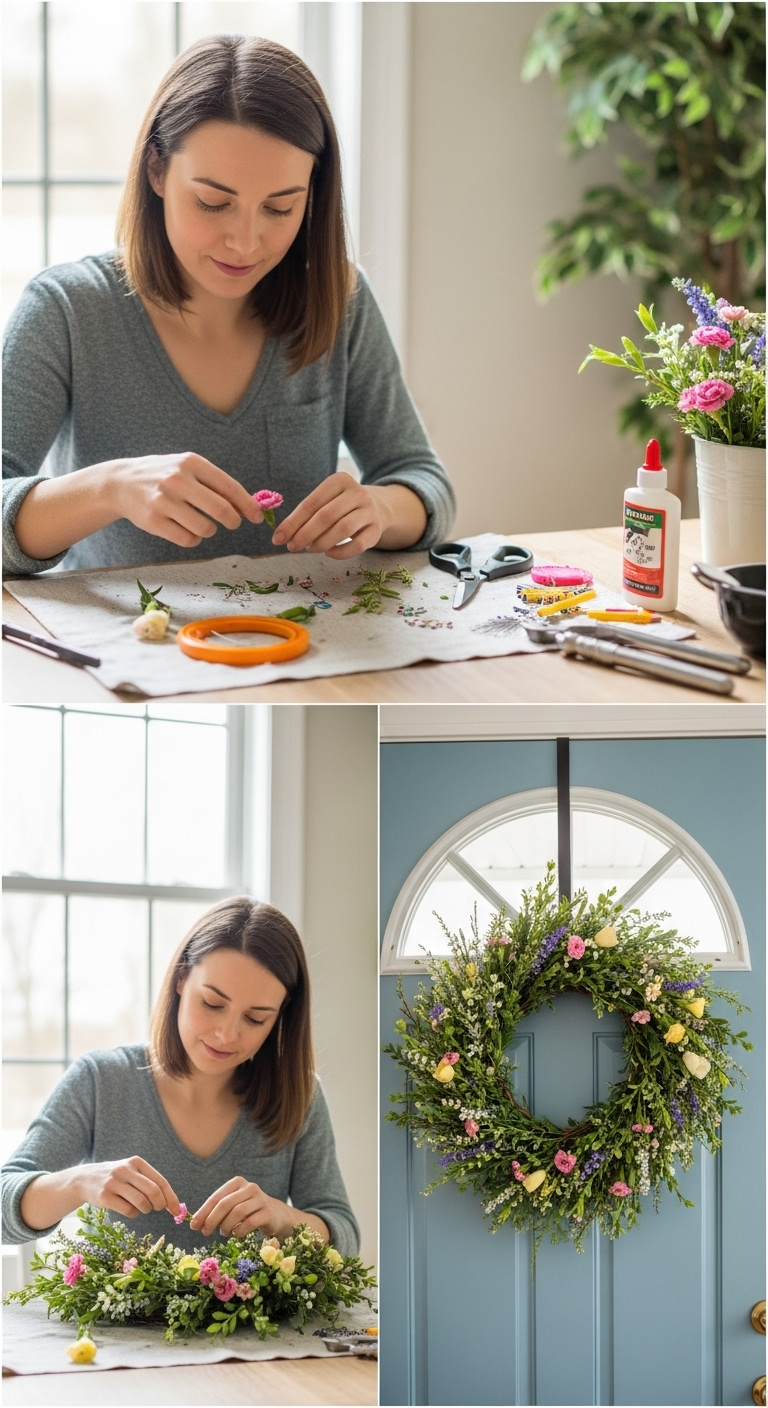
5️⃣ Mixed Garden & Craft Wreath
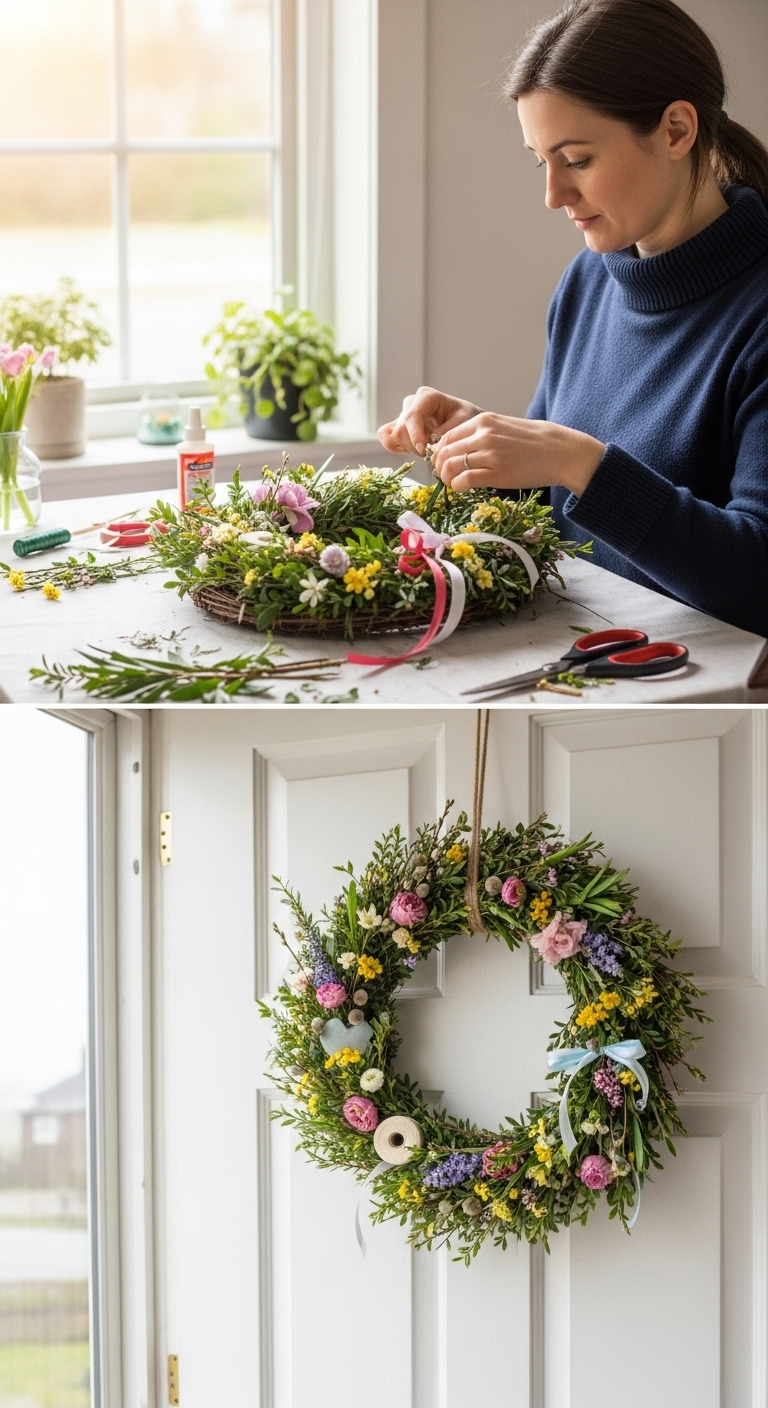
This wreath combines natural elements and craft materials for a creative, layered look. Using a mix of flowers, greenery, leaves, ribbons, or other craft items gives the wreath personality and dimension, making it a standout decoration. It’s perfect for anyone who wants a custom, one-of-a-kind wreath, and it works beautifully whether you pick items from your garden, buy them, or even use simple household materials.
Materials Needed:
- Flowers and greenery (fresh, store-bought, or faux) → main decorative elements for color and texture
- Leaves (real or faux) → add fullness and depth
- Ribbons, bows, or small craft accents → enhance visual interest and create layers
- Wire wreath frame or foam base → sturdy foundation
- Floral wire or tape → secures all elements in place
- Scissors or wire cutters → trims stems, ribbons, and wire as needed
Step-by-Step Instructions:
- Prepare your frame:
- Lay the wreath frame or foam base flat on your workspace.
- Ensure it’s secure and ready to hold multiple layers of materials.
- Sort and plan your materials:
- Group flowers, greenery, and leaves by color, size, or texture.
- Arrange craft accents nearby for easy access.
- Think about the overall shape and balance before attaching anything.
- Attach the base layer:
- Start with greenery and leaves as the foundation.
- Use floral wire or tape to attach stems firmly to the frame.
- Overlap slightly for a full, natural appearance.
- Add flowers:
- Layer flowers on top of the greenery.
- Alternate sizes and colors for depth and visual interest.
- Step back occasionally to see the overall balance.
- Incorporate craft accents:
- Add ribbons, bows, small faux flowers, or other creative elements.
- Tuck them into gaps or weave them around the frame for a cohesive, layered look.
- Secure and finish:
- Wrap extra wire or tape around stems to lock everything in place.
- Trim any awkwardly sticking leaves or ribbons for a polished finish.
- Optional: add a hanging ribbon or bow at the top for display.
6️⃣ Paper or Fabric Wreath
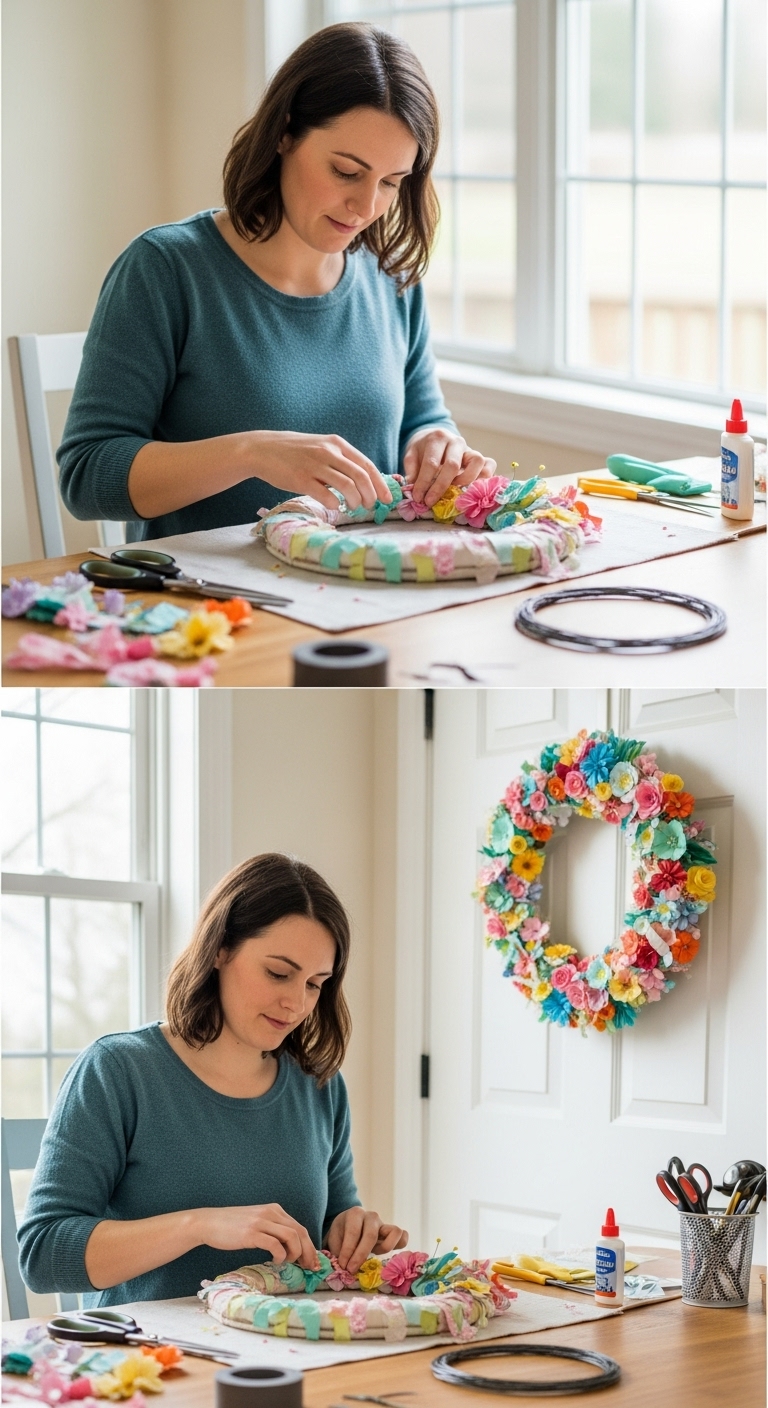
This wreath is creative, colorful, and completely customizable, perfect for anyone who loves DIY but doesn’t have fresh flowers or a garden. Using paper or fabric lets you play with patterns, textures, and colors, creating a wreath that matches your home decor perfectly.
Materials Needed:
- Colored paper, scrapbook paper, or fabric scraps → main decorative element, adds color and texture
- Wire wreath frame or foam base → sturdy foundation
- Hot glue, craft glue, or floral wire → secures paper/fabric pieces to the frame
- Scissors → trims paper or fabric into desired shapes
- Optional embellishments (buttons, beads, ribbons) → add detail and personality
Step-by-Step Instructions:
- Prepare your base:
- Place your frame flat on a table.
- If using a foam base, cover it lightly with fabric or tape for easier attachment.
- Cut your materials:
- Cut paper or fabric into strips, squares, or shapes (flowers, leaves, triangles).
- Plan color patterns for balance and visual interest.
- Attach the base layer:
- Secure each piece to the frame with glue or wire.
- Overlap pieces slightly to cover the frame fully and create a layered look.
- Add texture and depth:
- Fold, curl, or twist paper/fabric strips for dimension.
- Alternate colors and patterns to keep the design dynamic.
- Secure and finish:
- Check for gaps and fill them with small cutouts or extra fabric pieces.
- Add optional embellishments like buttons, beads, or ribbons for extra flair.
- Display:
- Add a ribbon loop to hang the wreath on a door or wall.
7️⃣ Upcycled or Recycled Wreath
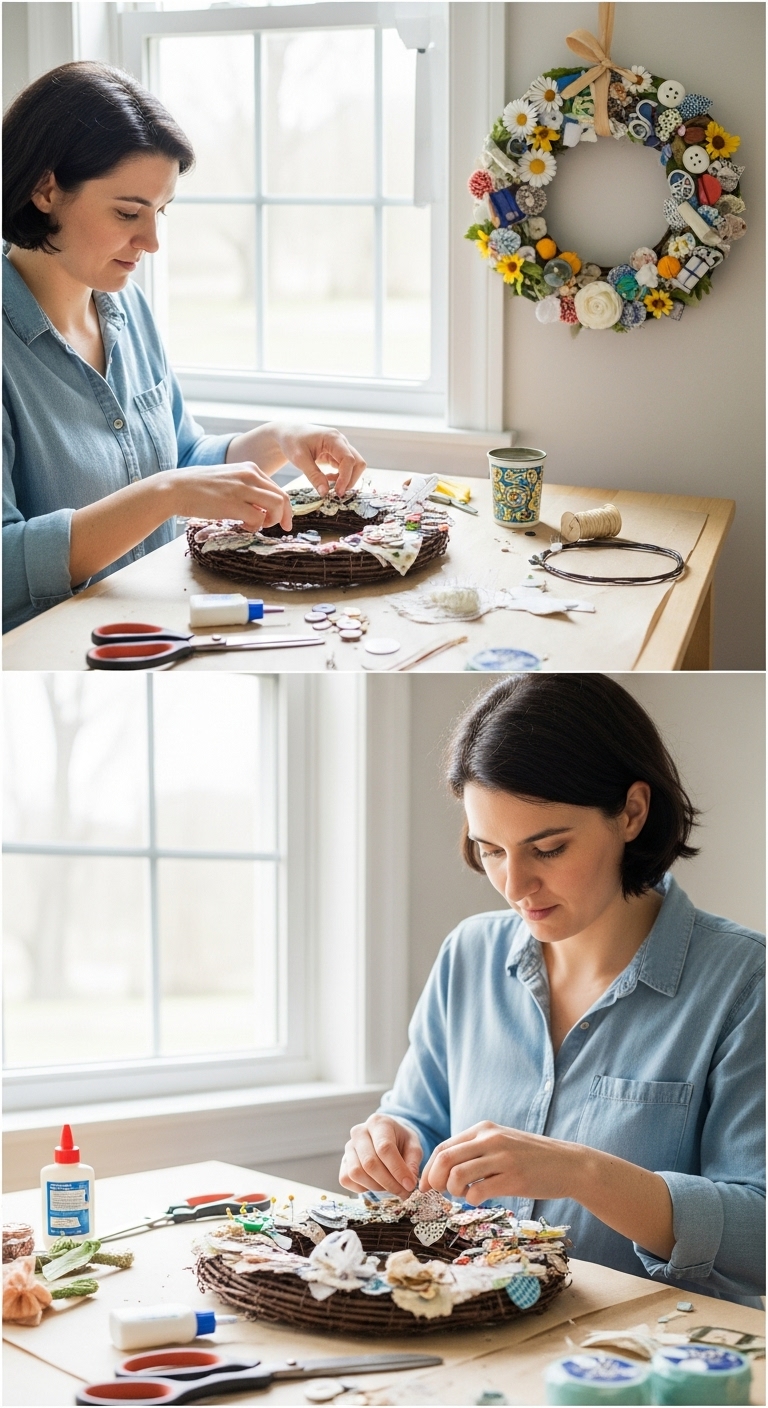
Turn everyday items into something beautiful with this Upcycled or Recycled Wreath, one of the DIY Spring Wreaths You Can Make With Garden Finds or Everyday Items. This wreath is perfect for eco-conscious crafters or anyone who wants to create unique, budget-friendly décor.
Using items like old magazines, bottle caps, corks, leftover ribbons, or scraps from around the house, you can make a one-of-a-kind wreath that adds personality and charm to your home.
Materials Needed:
- Upcycled items (magazines, corks, bottle caps, fabric scraps) → main decorative element, creates texture, color, and uniqueness
- Wire wreath frame or foam base → sturdy foundation to attach materials
- Hot glue, craft glue, or tape → secures items firmly in place
- Scissors or utility knife → trims and shapes materials
- Optional ribbon or bow → adds a polished finishing touch
Step-by-Step Instructions:
- Prepare your base:
- Lay your wire or foam frame flat on a table, ensuring it’s stable.
- Check for any weak spots and reinforce them with floral wire or tape.
- Sort and plan materials:
- Group your upcycled items by size, color, or material type.
- Visualize the layout — larger items form the base, smaller items fill gaps and add interest.
- Attach the first layer:
- Start with the largest or heaviest items, placing them evenly around the frame.
- Secure each item with hot glue, craft glue, or wire depending on weight.
- Slightly overlap pieces to create fullness and a professional, layered look.
- Add smaller details:
- Fill in empty spaces with smaller items like bottle caps, corks, or fabric scraps.
- Alternate colors and textures for visual interest and balance.
- Step back occasionally to check symmetry and overall flow.
- Secure and refine:
- Go around the wreath, adding extra glue or tape to lock pieces in place.
- Trim protruding edges for a clean, polished finish.
- Optional: add a ribbon loop for hanging, or a bow to highlight a section.
- Final touches:
- Inspect the wreath from different angles.
- Adjust placement slightly if some items feel out of balance.
- Your wreath is now ready to display on doors, walls, or as a centerpiece.
You can bookmark this for later: Indoor Activities for Kids on Rainy Days That Actually Keep Them Busy
Mistakes in Making the DIY Spring Wreath — And How to Fix Them

Crafting a wreath might look simple at first glance, but even experienced crafters stumble over a few common challenges. What you should know is that none of these are permanent obstacles, with a little guidance, your wreath can come together beautifully, even if it’s your first time.
Let’s walk through the spots that usually trip people up and how you can handle them
1. Crowding the Frame
When you’re excited to make your wreath look full, it’s easy to jam too many flowers or greenery in one spot. It might feel like “more is better,” but instead, the wreath can end up looking flat or awkward.
The trick is to start with a base layer, maybe soft greenery or smaller filler leaves, and then gradually build in the blooms.
Give yourself a moment to step back as you work, because seeing the wreath from a distance helps you notice if anything looks too heavy.
Those small gaps actually make the finished wreath look natural and layered, just like a professional florist would arrange it.
2. Skipping Preparation
One of the biggest time-sinks in wreath-making is not prepping your materials first. When stems are uneven, ribbons aren’t cut, or pieces aren’t sorted, it slows you down and makes the whole process feel chaotic.
Take a few minutes before you start to lay everything out, group flowers, herbs, and greenery by size and color, and trim stems to the lengths you’ll need.
This simple prep step makes the actual crafting almost effortless, and you’ll notice the difference immediately. It also helps you stay calm and confident while you create.
3. Ignoring Balance and Flow
A common issue is placing large or bold flowers all in one spot while leaving other areas sparse. The wreath might feel off even if all the elements are beautiful individually.
To get the visual flow right, place your heaviest pieces first, then alternate colors and textures around the frame.
Don’t worry about perfect symmetry, slightly uneven arrangements actually feel more natural and professional. Taking a quick pause to look at your wreath from a few angles is an easy habit that makes a huge difference.
4. Not Thinking About Longevity
Fresh flowers and herbs are gorgeous, but they don’t last forever. Beginners sometimes forget this and get frustrated when their carefully arranged blooms start wilting.
Mixing fresh, dried, or faux elements is a simple way to extend your wreath’s life.
Even a few long-lasting accents like faux greenery or preserved flowers can keep the wreath looking vibrant for weeks.
If you’re using fresh flowers, mist them lightly and keep the wreath in a cool area away from direct sunlight. A little planning here goes a long way.
Something fun to check out: Quick and Soft Valentine’s Gifts You Can Sew in a Few Hours That Melt Hearts
5. Over-Focusing on Perfection
Many first-time crafters obsess over making everything perfectly symmetrical. The reality is that wreath-making is an art, not a science.
Embrace small imperfections, a leaf sticking out slightly or a bloom leaning at an angle adds charm and personality.
Focus instead on color harmony, layering, and texture. Often, what seems like a flaw up close actually looks perfect from a normal viewing distance.
6. Choosing the Wrong Tools or Adhesives
Beginners sometimes struggle with what to attach stems with or how to secure heavier elements like succulents. Wire is great for flowers and herbs, while hot glue works for lightweight craft pieces or paper elements.
The key is testing as you go and understanding the purpose of each tool, once you get the hang of it, your wreath holds together beautifully, and assembly feels smooth instead of stressful.
Making a wreath is as much about learning the rhythm and flow as it is about the materials. Mistakes are normal, they’re part of the process. The best wreaths come when you pause, adjust, and trust your instincts.
By keeping these common pitfalls in mind, your DIY spring wreaths will not only look stunning but also feel effortless to create.
Using Everyday Items for a Stunning Spring Wreath

You don’t need a garden bursting with flowers to make a beautiful, eye-catching spring wreath. In fact, some of the most unique and creative wreaths come from items you already have at home.
Whether it’s kitchen herbs, leftover ribbons, fabric scraps, twigs from a walk, paper, or even small decorative objects, these everyday items can be transformed into a stunning, seasonal centerpiece.
1. Look Around with a Creative Eye
Start by surveying your home for materials.
- Twigs and sticks – form the base of a rustic wreath.
- Fabric scraps or ribbons – fold or tie to create petals, bows, or texture.
- Dried fruit slices or pinecones – add natural color and dimension.
- Paper – create flowers, leaves, or decorative shapes.
Tip: Don’t overthink. If it looks like it might add color, texture, or interest, grab it. The more unique the item, the more personalized your wreath becomes.
2. Build a Strong Base
Even everyday items need a solid foundation.
- Use a wire, cardboard, or foam frame — whatever you have.
- Arrange your largest pieces first to anchor the wreath.
- Leave small gaps to prevent overcrowding, this helps the wreath look balanced and professional.
Tip: Twine or floral wire works wonders for securing items quickly and keeps everything in place.
Keep reading: 10 Super Fun After-School & Homework-Friendly Crafts Kids Can Make in 20 Minutes
3. Layer Materials for Depth
A wreath made with ordinary items can still look rich and full if you layer creatively.
- Start with greenery or leaves (real, faux, or paper).
- Add medium elements like flowers, fabric strips, or herbs.
- Finish with small accents — beads, ribbons, or tiny decorative objects.
Tip: Alternate textures — soft fabric with stiff paper, shiny accents with matte objects — to create visual interest that draws the eye.
4. Mix Natural and Crafted Elements
Blending natural items with handmade or everyday materials gives your wreath a professional edge.
- Example: twigs + paper flowers + kitchen herbs.
- Example: ribbon bows + dried citrus slices + faux greenery.
Tip: Keep color in mind — 2–3 main colors work best to avoid a chaotic look. Even muted tones can pop if you vary texture and placement.
5. Don’t Stress Perfection
The beauty of using everyday items is that mistakes aren’t permanent.
- If something doesn’t sit right, move it.
- Slight asymmetry is your friend — it makes the wreath look natural and handmade.
- Focus on overall harmony rather than exact symmetry.
Tip: Step back every few minutes to see the whole wreath. What looks awkward up close might look balanced from a normal viewing distance.
-
Make It Personal and Fun
The final touch is your personal signature.
- Add a ribbon that matches your home decor.
- Include a small charm, bead, or ornament that has meaning.
- Try combining your everyday items in unusual ways, creativity here is limitless.
Tip: Ask family members to contribute a piece. Not only does it make the wreath more meaningful, but it also turns crafting into a shared activity.
Making Your Spring Wreath Last Longer for Next Season
After spending time creating your spring wreath, the last thing you want is to watch it fade, shed, or fall apart before next year arrives. Most wreaths don’t fail because they’re poorly made, they fail because they’re stored or displayed the wrong way.
A few small adjustments can keep your wreath looking fresh, intact, and reusable long after spring ends.
Choose the Right Display Spot (This Matters More Than You Think)
Where you hang your wreath plays a huge role in how long it lasts.
- Direct sunlight fades colors quickly, especially fabric, paper, and faux florals.
- Rain and humidity weaken glue, wire, and natural materials.
- Strong wind loosens attachments over time.
What You Can Do:
Hang your wreath on a covered door, porch, or indoor wall. If it must go outside, rotate it occasionally to prevent uneven fading.
Handle Natural Materials with Extra Care
Wreaths made with twigs, dried flowers, leaves, or herbs need a bit of protection.
- Let natural elements dry completely before long-term use or storage.
- Avoid misting or spraying water once the wreath is finished.
- A light coat of clear craft sealant can help reduce brittleness and shedding.
This step alone can double the life of wreaths made with garden finds.
You’ll love this too: DIY Clothes That Never Fit? My Brother Ruined His Clothes—Until He Tried These 7 Tailoring Hacks
Secure Weak Points Before Storing

Most wreaths don’t fall apart during use, they break down while being stored.
Before packing yours away:
- Check for loose florals, bows, or accents.
- Reinforce with wire or glue where needed.
- Trim frayed ribbon ends to prevent unraveling.
Taking five minutes now saves a full repair job next spring.
Store It the Right Way
Improper storage is the #1 wreath killer.
- Store wreaths flat or hanging, never squashed.
- Use a wreath storage bag, box, or large breathable container.
- Keep them away from heat, moisture, and pests.
If space is limited, hang the wreath in a closet using a sturdy hook, just make sure nothing presses against it.
Label and Protect Seasonal Pieces
If your wreath includes spring-specific items like pastel ribbons or floral accents:
- Remove delicate or seasonal pieces and store them separately.
- Label storage boxes so you know what belongs together next year.
This makes refreshing your wreath faster and keeps fragile elements from unnecessary wear.
Refresh, Don’t Rebuild Next Year
A well-stored wreath doesn’t need to be remade, it just needs a quick update.
Next spring:
- Dust it gently or use a hair dryer on a cool, low setting.
- Swap one or two accents for a fresh look.
- Tighten the hanger and you’re ready to go.
This turns your wreath into a reusable seasonal decor piece instead of a one-time project.
Easy Ways to Personalize Your Wreath
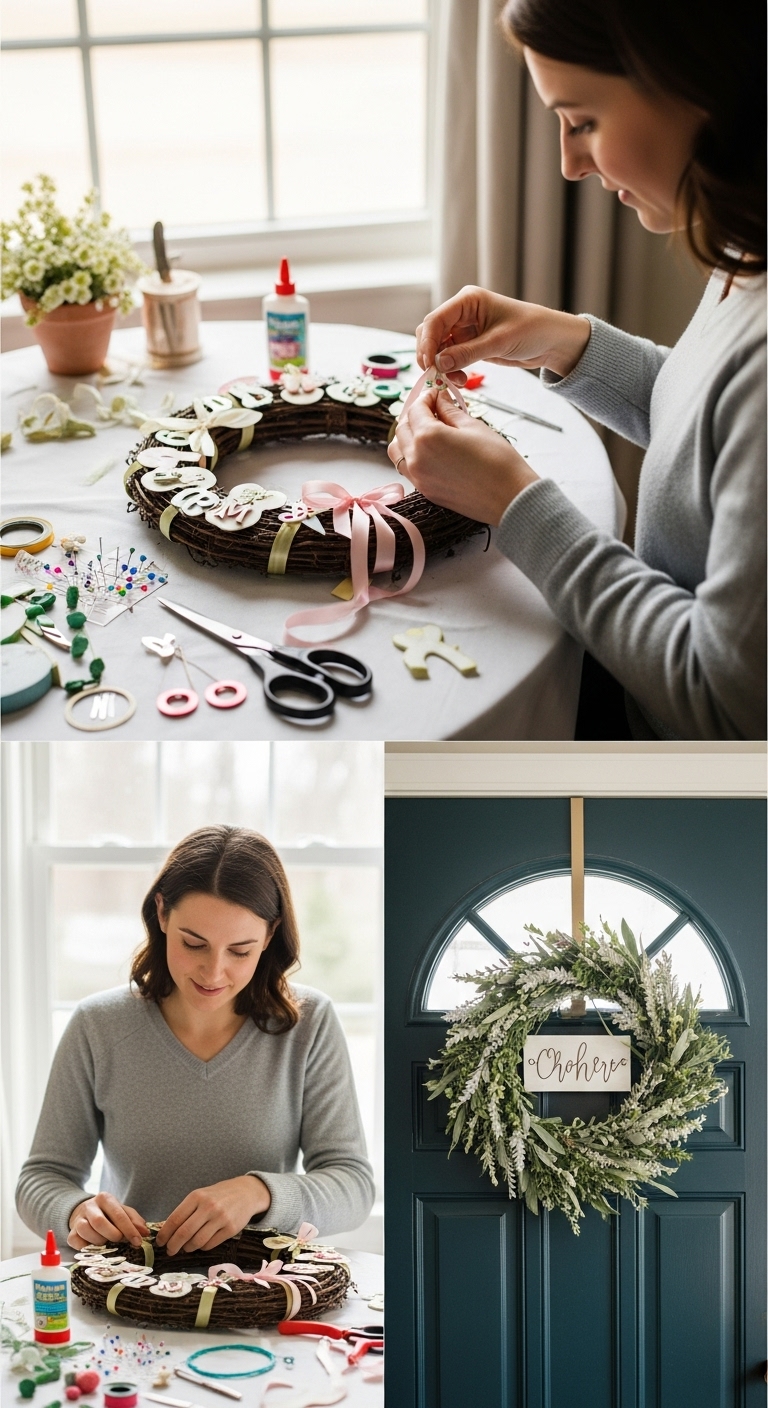
One of the biggest fears new crafters have is ending up with something that looks unpleasant. The truth is, personalization doesn’t require special tools or advanced skills, it’s about small, intentional choices that reflect your style, and even your season of life.
Here are simple, low-pressure ways to make your wreath feel personal without overthinking it.
Start With a Color That Already Exists in Your Home
Instead of choosing trendy spring colors, look around your space.
- A front door color
- Outdoor cushions or doormats
- Entryway wall art
Pulling one of those colors into your wreath instantly makes it feel intentional and cohesive. Even a single ribbon, flower, or accent in that shade can tie everything together.
Add One Meaningful Element (Not Many)
Personalization works best when it’s subtle.
Consider including:
- A flower you love or always notice in spring
- A herb that reminds you of cooking at home
- A fabric scrap from an old scarf or table runner
You don’t need to explain it to anyone — the fact that it means something to you is enough.
Play With Texture, Not Just Decor
Wreaths stand out when they feel layered and interesting up close.
Mix:
- Soft (fabric, ribbon, dried petals)
- Natural (twigs, leaves, raffia)
- Structured (wire frame, wooden accents)
This keeps your wreath from looking flat, even if the design itself is simple.
Use Letters, Tags, or Subtle Signs Sparingly
Initials, small wooden tags, or short words can add personality without overwhelming the design.
Tips:
- Keep text small and neutral
- Attach it loosely so it can be removed later
- Place it slightly off-center for a relaxed look
This way, your wreath stays flexible and reusable across seasons.
Let Imperfection Be Part of the Style
Perfect symmetry often makes wreaths look store-bought.
Slightly uneven florals, an off-center bow, or visible layers of greenery add charm and authenticity. These “imperfections” signal that your wreath was handmade — and that’s exactly the point.
Refresh Instead of Redoing
Personalization doesn’t have to be permanent.
You can:
- Swap ribbons when your mood changes
- Add seasonal accents and remove them later
- Update colors without touching the base
This makes your wreath feel like a living piece of decor, not a finished project you can’t touch again.
Here’s a tip you’ll enjoy: How to Make DIY Homemade Vaseline for Skin
Kid-Friendly Wreaths That Let Everyone Get Creative
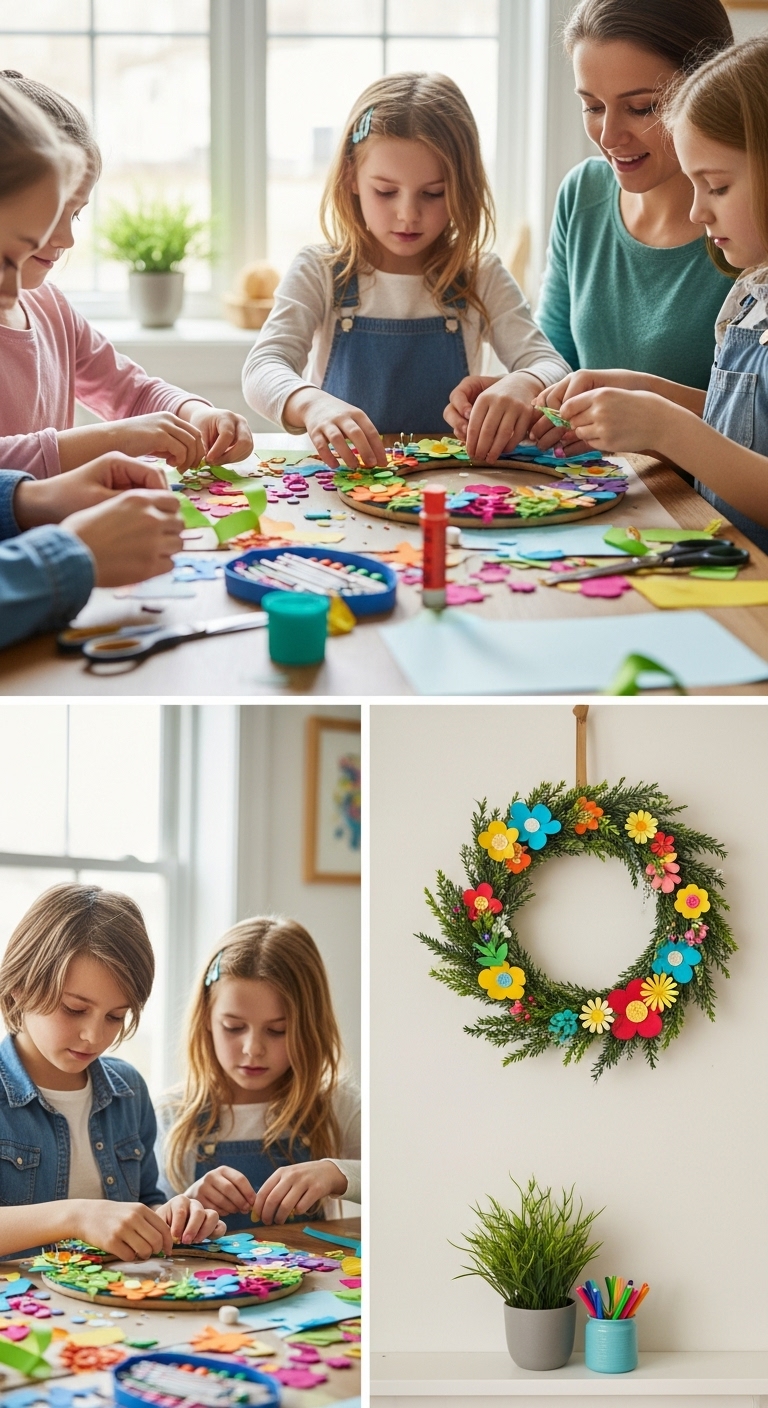
One reason many people avoid crafting with kids is the fear of mess, wasted materials, or a project that turns stressful halfway through. But wreath-making can actually be one of the most forgiving and flexible crafts to do as a family, especially when the goal isn’t perfection, but participation.
Kid-friendly wreaths work best when the design allows room for choice, movement, and small hands. That’s exactly why DIY spring wreaths you can make with garden finds or everyday items are such a great fit for families.
Choose a Base That Can Handle Experimenting
The foundation matters more than the decorations when kids are involved.
- Grapevine wreaths, cardboard rings, or foam frames hold up well when items are repositioned.
- These bases allow kids to add, remove, and adjust pieces without ruining the entire design.
- If something looks “off,” it’s easy to fix, no pressure, no tears.
This alone removes a lot of the anxiety parents feel before starting.
Let Kids Work in Small, Independent Sections
Instead of asking children to decorate the whole wreath, give them clear but flexible boundaries.
- One child handles greenery placement
- Another adds flowers or ribbons
- Younger kids focus on pressing, tying, or tucking lightweight items
This keeps everyone engaged without overwhelming them — and the wreath naturally ends up layered and interesting.
Use Everyday Materials That Feel Familiar
Kids feel more confident when they recognize what they’re working with.
Great options include:
- Leaves, sticks, or flowers picked together
- Paper shapes, fabric scraps, yarn, or ribbon
- Buttons, beads, or recycled craft items
When materials feel familiar, creativity flows more freely — and kids are more likely to stay involved until the end.
Design With “Changeability” in Mind
One of the smartest ways to keep wreath-making kid-friendly is to avoid permanent attachment where possible.
- Use twine, pipe cleaners, or removable hooks
- Save glue for adult-handled steps only
- Allow pieces to be swapped later
This turns the wreath into something kids can revisit, update
Conclusion
Making a spring wreath doesn’t have to be complicated, expensive, or intimidating. Whether you’re working with garden finds, everyday items, or crafting alongside kids, the goal is simply to create something that feels welcoming and personal to your home.
These wreath ideas are meant to be flexible, you can start small, take a break when you need to attend to other things, and return when you’re ready without feeling like you’ve failed the project. That freedom is what makes crafting enjoyable, not stressful.
If you’ve been waiting for the right time or the right supplies, let this be your reminder that you already have enough to begin. Choose one wreath style that feels manageable, try it this weekend, and let the process be just as satisfying as the finished result.
And if you do make one, don’t keep it to yourself, share your creation or your experience in the comments. Your version might be exactly the encouragement someone else needs to start.
This post covers: DIY Spring Wreaths Using Garden Finds or Everyday Items.


Thanks on your marvelous posting! I really enjoyed reading it, you can be
a great author.I will remember to bookmark your
blog and definitely will come back someday. I want to encourage continue your great work, have a nice
morning!
Oh, thank you so much Dani
You all give me the motivationa and encouragement to keep writing.
I appreciate this comment so much.