Your first loaf doesn’t have to be scary! Learn how to bake sourdough bread for the first time with this beginner-friendly guide.
Baking sourdough bread for the first time can feel intimidating. Many first-time bakers get stuck wondering what a “starter” really is, how long to let the dough rise, or if they’ll ruin everything before it even goes in the oven.
The truth is, beginners don’t fail because sourdough is impossible, they fail because the process isn’t explained clearly.
That question — “How do I even get my starter right?” — is exactly why this guide exists as a follow-up to How to Make and Maintain a Sourdough Starter — The No-Fail Routine for First-Time Bakers
These guides together give you a clear, step-by-step plan, so anyone can bake their first loaf confidently and keep their starter healthy for future baking.
With simple ingredients, patience, and a straightforward plan, sourdough can be approachable, even for someone baking their first loaf.
Baking Process
Step 1: Preparing Your Ingredients and Workspace
Before you start, gather all your ingredients and set up a clean, organized workspace. Doing this makes baking sourdough bread for beginners much easier and helps you follow step-by-step sourdough bread recipes without stress.
For a basic, beginner-friendly loaf, you’ll need:
- Active sourdough starter (your bubbly, ready-to-use starter)
- Bread flour (you can also mix all-purpose and whole wheat flour)
- Filtered water
- Salt
Also, have a large mixing bowl, a spatula or wooden spoon, and a clean kitchen towel ready. Lightly dust your countertop with flour to prevent sticking while kneading.
Taking time to prepare sourdough bread ingredients and your workspace is more than just being organized, it sets you up for success. Even beginners learning how to make and bake sourdough bread at home will find this step gives confidence and ensures your starter can transform into a perfect, homemade loaf. You should read: Homemade Moist Banana Bread Cake Recipe with Toasted Coconut Topping
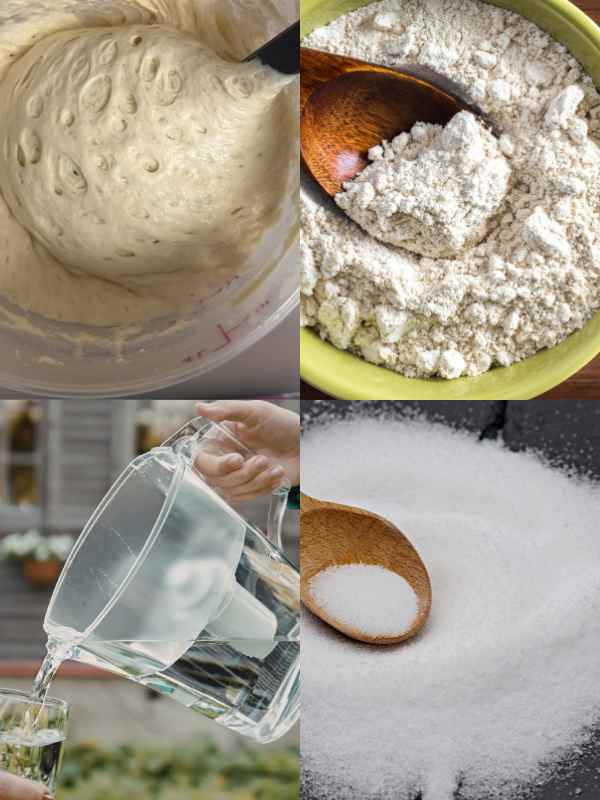
Step 2: Mixing and Autolyse
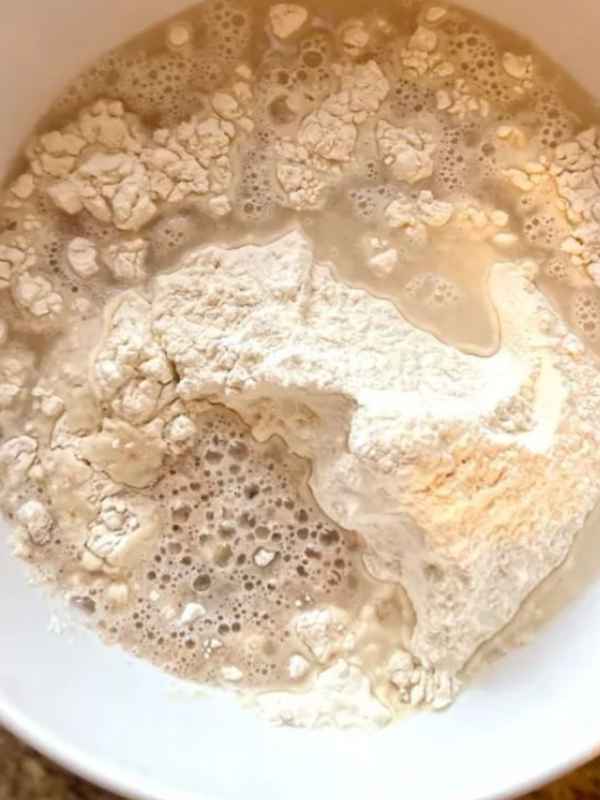
Photo credit: @ Amy Bakes Bread
Once your ingredients and workspace are ready, it’s time to mix your dough, the very start of making sourdough bread from scratch. Begin by measuring your flour and water carefully. The right ratio is key to creating a dough that’s easy to handle and will rise properly.
- Combine Flour and Water
Pour your measured flour into a large bowl, then slowly add water. Use your hands or a spatula to mix until no dry flour remains. This is called the autolyse stage, a resting period where the flour hydrates and the gluten starts developing naturally. Even beginners following a step-by-step sourdough bread recipe will notice that this makes the dough softer and easier to work with later. - Rest the Dough
Cover the bowl with a clean kitchen towel or plastic wrap and let it rest for 20–45 minutes. During this time, the flour absorbs water fully, which improves texture and flavor. Many people skip this step, but it’s crucial for achieving a tender, flavorful loaf, one of the secrets of easy sourdough bread recipes for beginners. - Add Starter and Salt
After the autolyse, add your active sourdough starter and salt to the dough. Mix thoroughly until the starter and salt are fully added. This stage activates the natural yeast in your starter, which helps the dough rise and develop flavor.
Taking your time with this step ensures a stronger, more elastic dough. For anyone learning how to bake sourdough bread at home, mastering the mixing and autolyse stage sets the foundation for a soft, flavorful, and well-risen loaf.
You might want to make this: How to Make Homemade Tiger Nut Drink Without Preservatives: Stays Fresh Longer
Step 3: Bulk Fermentation and Stretch & Fold
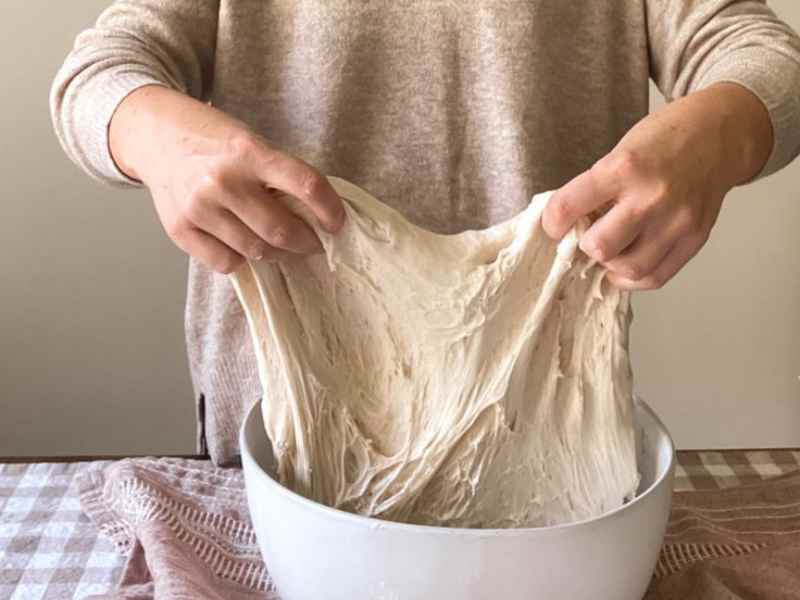
Photo credit: @ Chasing Our Simple
After mixing your dough and incorporating the sourdough starter and salt, the next stage is bulk fermentation. This is where your dough starts to develop flavor, strength, and rise, a critical step in how to bake sourdough bread from scratch.
- Let the Dough Rest
Place your dough in a clean, lightly oiled bowl. Cover it with a damp cloth or plastic wrap to prevent drying out. Let it sit at room temperature for 3–5 hours, depending on the warmth of your kitchen. During this time, the natural yeast from your starter will slowly ferment the dough, creating the gentle rise and the signature sourdough taste. - Stretch and Fold
Every 30–45 minutes, gently lift one side of the dough and fold it over itself. Rotate the bowl and repeat on all sides. This simple stretch and fold technique strengthens the gluten without heavy kneading, making it perfect for beginners following easy sourdough bread recipes. It also helps trap air, which creates those lovely holes in your finished loaf. - Observe the Dough
By the end of bulk fermentation, your dough should feel puffy, elastic, and slightly jiggly. You’ll notice bubbles forming throughout, a good sign that your starter is active and your dough is fermenting properly. This step is crucial in step-by-step sourdough bread baking guides, ensuring a light and airy loaf. - Tips for Beginners
- Don’t worry if your dough looks imperfect. Slight variations are normal, and practice improves your feel for the dough.
- Keep your kitchen warm but not hot; 24–26°C (75–78°F) is ideal.
- Use a timer to stay consistent with stretch and fold intervals, especially if you’re learning how to bake sourdough bread for the first time.
Bulk fermentation is where your dough truly transforms. By staying patient and gentle, you’ll see your simple mixture of flour, water, and starter develop into a dough ready to bake into a beautifully rustic, homemade sourdough loaf.
This might help: What to Make for Valentine’s Day When You’re Vegan and Short on Time
Step 4: Shaping and Proofing
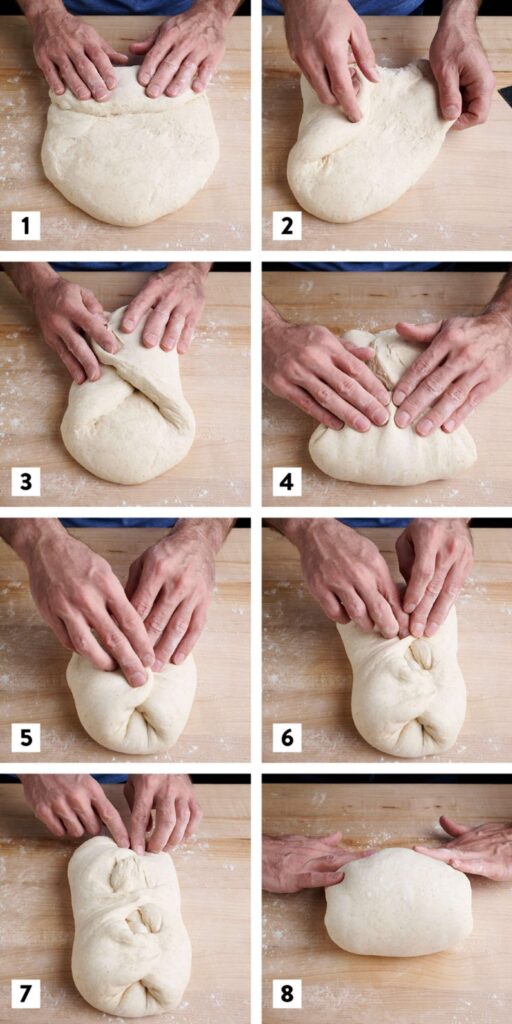
Photo credit: @ King Arthur Baking Company
Once your dough has gone through bulk fermentation and shows a light, airy structure with bubbles, it’s time to shape it into a loaf. This step is essential in how to bake sourdough bread, helping your bread hold its shape while achieving that beautiful rise in the oven.
- Prepare Your Surface
Lightly flour a clean countertop or a large cutting board. Gently turn your dough onto the surface, being careful not to deflate all the air bubbles that formed during fermentation. These bubbles are key to getting a soft, open crumb. Using simple sourdough bread techniques for beginners ensures that even your first loaf will have a professional feel. - Pre-Shape the Dough
Using your hands, gently fold the edges of the dough towards the center to form a rough round or oval shape. Let it rest for 15–20 minutes, covered with a damp cloth. This rest, called the bench rest, allows the gluten to relax, making the final shaping easier and more consistent. - Final Shaping
After the bench rest, carefully tighten the shape by folding and tucking the dough to create surface tension. For a round loaf (boule), gently rotate it in your hands while tucking the edges under. For an oval loaf (batard), fold the sides in and roll lightly to seal. This technique improves oven spring, the way your bread rises in the oven, and creates a smooth, attractive crust. - Proof the Dough
Place your shaped dough into a well-floured proofing basket (or a bowl lined with a floured towel). Cover it and let it proof at room temperature for 1–2 hours, or until it slightly puffs up. For a longer, more complex flavor, you can refrigerate the dough for 8–12 hours. This slow fermentation enhances the tangy taste that makes sourdough bread so delicious, which is a crucial tip in any step-by-step sourdough bread recipe. - Tips for Beginners
- Avoid pressing too hard while shaping; gentle handling preserves the air bubbles.
- Lightly flour the basket or towel to prevent sticking — it also creates a beautiful pattern on the crust.
- Don’t worry if your loaf isn’t perfectly round; homemade sourdough is meant to look rustic.
Shaping and proofing are where your dough starts to look like a real loaf. With patience and careful handling, even first-time bakers can achieve a sourdough bread that’s both beautiful and delicious.
While you are still here, read: What to Make for Dinner When You’re Too Tired to Cook but Still Hungry
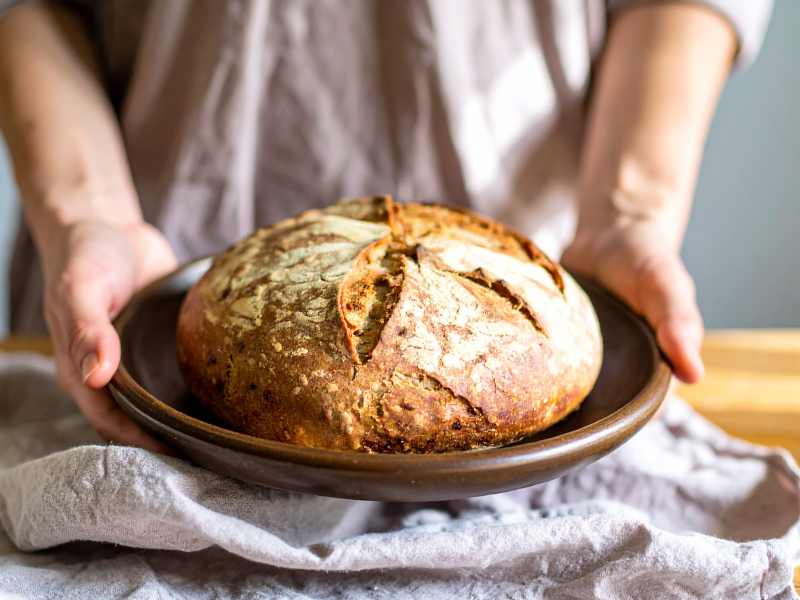
Step 5: Scoring and Baking
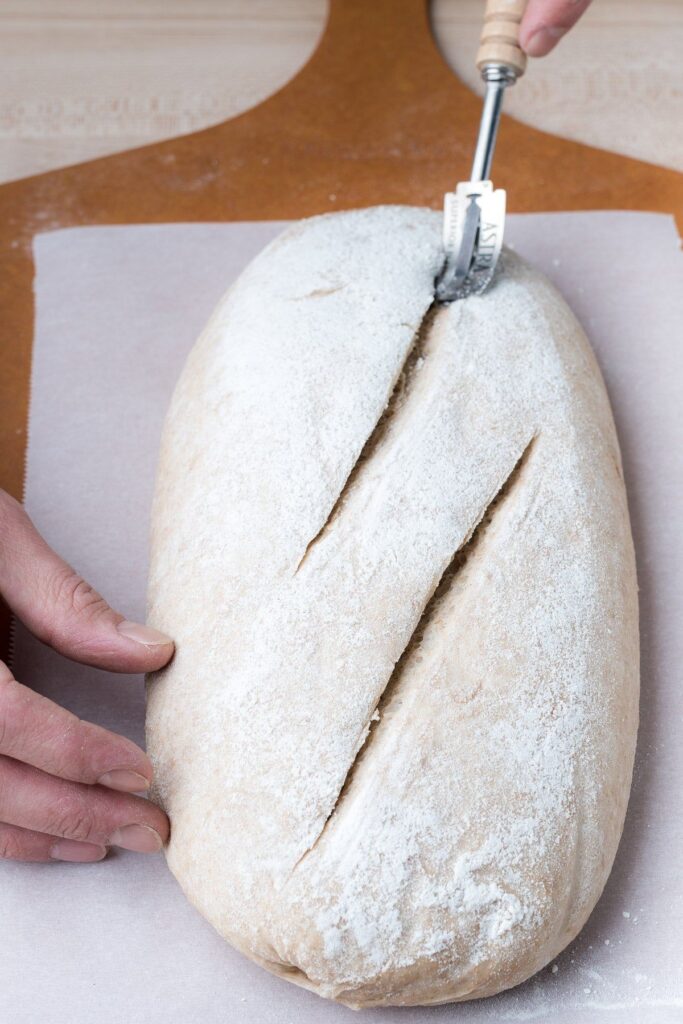
Photo credit: @ King Arthur Baking Company
Scoring your dough is more than just decoration, it’s an essential step in how to bake sourdough bread for the first time bakers. The cuts allow steam to escape and give your loaf the beautiful oven spring that makes homemade sourdough so impressive.
- Preheat Your Oven
Preheat your oven to 230°C (450°F) with a Dutch oven or baking stone inside. Preheating ensures that your bread gets an immediate burst of heat, which helps it rise quickly and form a crisp, golden crust, a key element in easy sourdough bread recipes. - Score the Dough
Gently remove your proofed dough from the basket and place it on parchment paper if using a Dutch oven, or directly on a floured peel for a baking stone. Using a sharp knife or a bread lame, make 1–3 shallow cuts on the surface. You can do a single long slash, a cross, or diagonal lines. These cuts guide how the bread expands in the oven. Beginners often worry about this step, but even simple scoring works fine. - Add Steam (Optional)
If not using a Dutch oven, add a small pan of water to the oven bottom to create steam. Steam keeps the crust soft during the first 10–15 minutes, allowing the bread to expand fully before forming a firm crust. This tip is important in sourdough baking tips for beginners to get a nice rise and airy crumb. - Bake the Bread
Place the dough in the oven and bake for 20 minutes with the lid on (if using a Dutch oven) or with steam, then remove the lid or pan of water and bake for another 20–25 minutes. The bread is done when it’s golden brown, sounds hollow when tapped at the bottom, and smells wonderfully fragrant. - Cool Properly
Let the bread cool completely on a wire rack before slicing. Cooling finishes the baking process and helps set the texture inside. Cutting too soon can result in a gummy crumb, something many beginners encounter, but easy to avoid with patience.
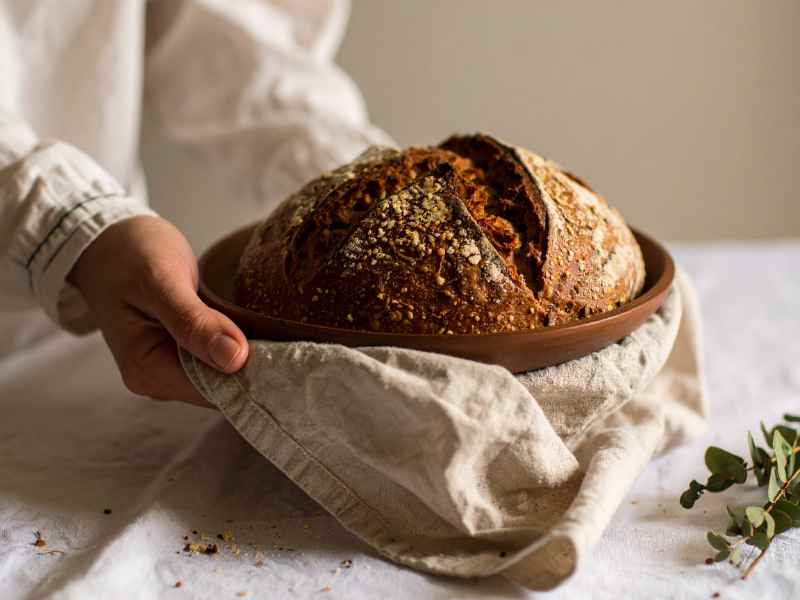
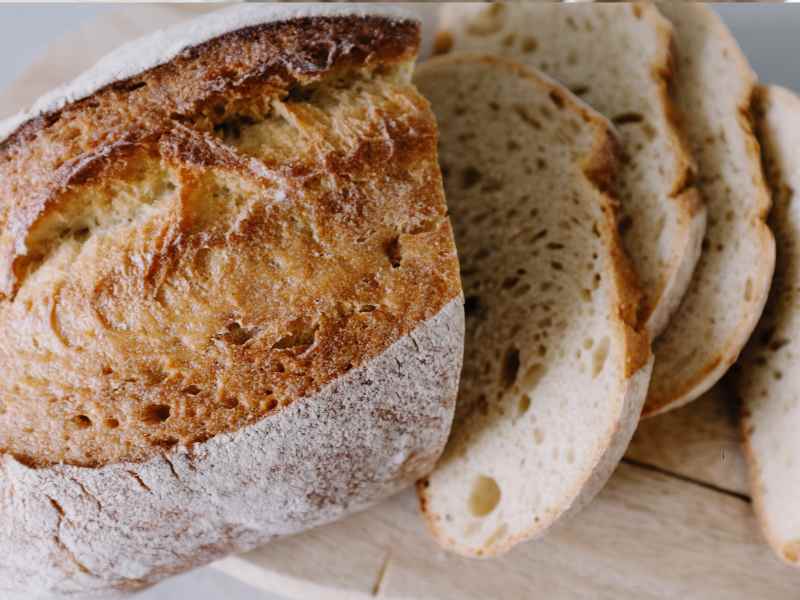
Baking is where your efforts truly pay off. Following these steps carefully ensures that your homemade sourdough bread has a golden, crisp crust, a tender inside, and a delicious, slightly sour flavor that’s uniquely yours.
Tips for Storing and Serving Your First Sourdough Bread
Once you’ve successfully baked your first loaf, knowing how to bake sourdough bread for the first time isn’t complete without learning how to store and serve it properly. Proper handling ensures your bread stays fresh, maintains its texture, and tastes as delicious as the first day. Also read: How to Make Crispy Fish Rolls at Home – Easy Nigerian Snack Recipe
Storing Your Bread
Sourdough bread is best enjoyed fresh, but it can last several days if stored correctly. Keep your loaf at room temperature in a paper bag or wrapped loosely in a clean kitchen towel.
This allows the crust to stay crisp while preventing the inside from drying out. Avoid storing it in plastic, as this can make the crust soft and chewy, and the bread can go stale faster.
If you won’t finish the bread within a couple of days, consider freezing slices. Wrap them tightly in plastic wrap or foil, and place them in an airtight container or freezer bag. When you’re ready to eat, simply toast or warm the slices — the flavor and texture remain excellent.
This tip is especially useful for beginners learning how to bake sourdough bread for the first time, as it helps reduce waste and keeps your efforts from going to waste.
Serving Your Bread
When it comes to serving, sourdough is versatile. Slice it thick for hearty sandwiches, thin for bruschetta or toast, or even serve it alongside soups and stews. Let the bread cool fully before slicing to ensure a perfect crumb. Using a serrated bread knife makes slicing easier and keeps the loaf looking neat.
For added flavor, try lightly toasting a slice and brushing it with butter or olive oil. The simple aroma and taste of fresh sourdough can turn a regular meal into something special.
Understanding how to bake sourdough bread for the first time and pairing it with proper storage and serving tips, even beginners can enjoy their homemade bread at its best for days.
You can enjoy your Sourdough Bread with my Homemade Greek Yoghurt Recipe: How to Make It Naturally from Scratch
How to Bake Sourdough Bread Without a Dutch Oven
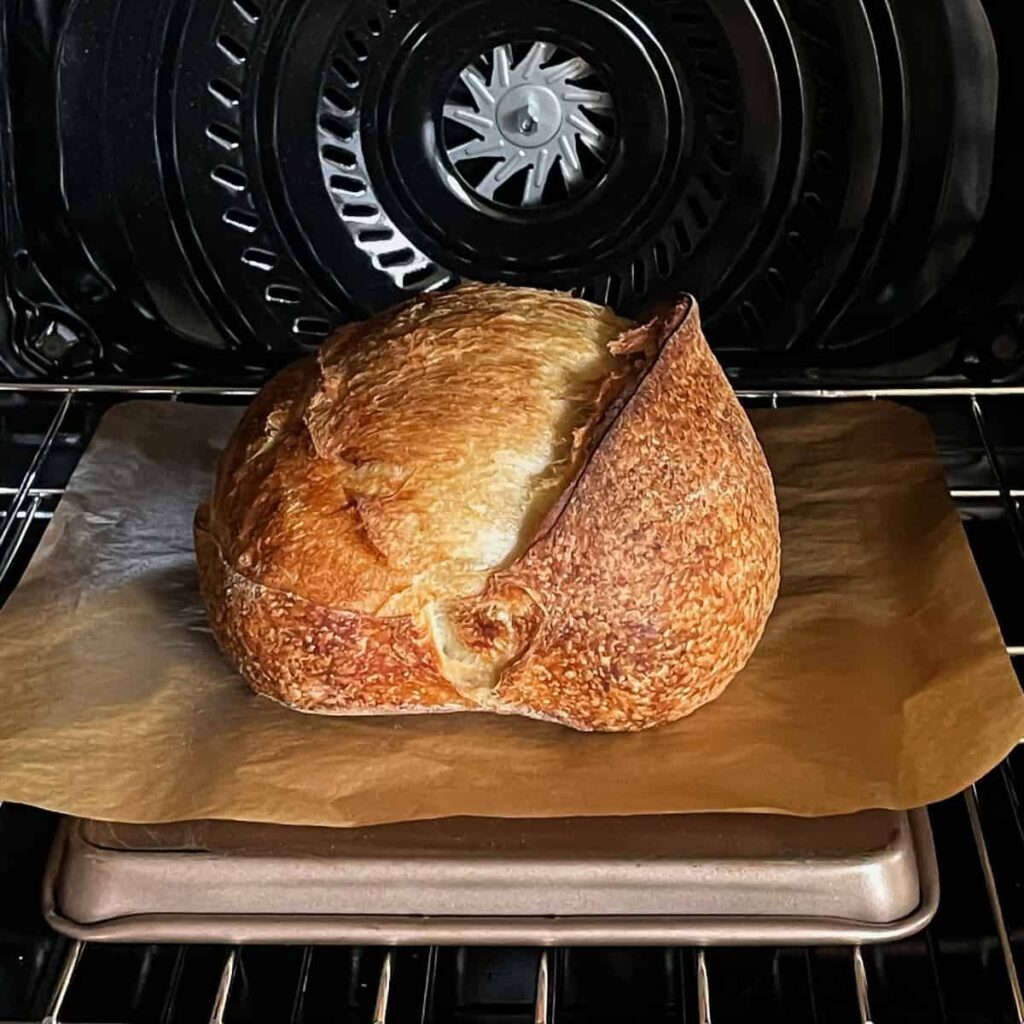
Photo credit: @ Carrie Voyles
Not everyone has a Dutch oven at home, and that’s perfectly okay. You can still bake a beautiful, crusty sourdough loaf using simple kitchen equipment. This method is ideal for beginners learning how to bake sourdough bread for the first time without investing in specialized tools.
Materials & Equipment Needed:
- A baking tray or sheet
- A deep roasting pan or oven-safe pot (optional, for steam)
- Parchment paper
- Sharp knife or bread lame for scoring
- Sourdough starter, flour, water, and salt
Step-by-Step Instructions:
- Prepare Your Dough:
Follow your usual sourdough recipe to mix and knead your dough. Allow it to ferment and rise according to your starter’s activity. Proper fermentation is key to flavor and texture, even when you’re not using a Dutch oven. - Shape the Loaf:
Once your dough has risen, gently shape it into a round or oval loaf. Place it on a parchment-lined baking tray. - Preheat the Oven:
Set your oven to 230°C (450°F). Preheating is essential because a hot oven helps create a good crust. - Create Steam Without a Dutch Oven:
Steam is crucial for a crispy crust. Place a shallow oven-safe pan with water on the bottom rack while preheating. Just before putting the bread in, pour a cup of hot water into the pan to create steam, or use a spray bottle to mist the oven walls quickly. - Score the Dough:
Use a sharp knife or bread lame to make shallow cuts on the surface of your dough. This controls how your loaf expands during baking and gives it a professional look. - Bake:
Slide the tray with your loaf into the oven. Bake for 25–35 minutes or until the crust is golden brown and the loaf sounds hollow when tapped on the bottom. - Cool Properly:
Remove the loaf from the oven and let it cool completely on a wire rack before slicing. Cooling allows the interior to set, giving you that soft, tender crumb.
Even without fancy tools, you can achieve a delicious, crusty loaf. This method ensures beginners can still learn how to bake sourdough bread for the first time and enjoy homemade bread with confidence.
Creative Ways to Flavor Your First Sourdough Loaf
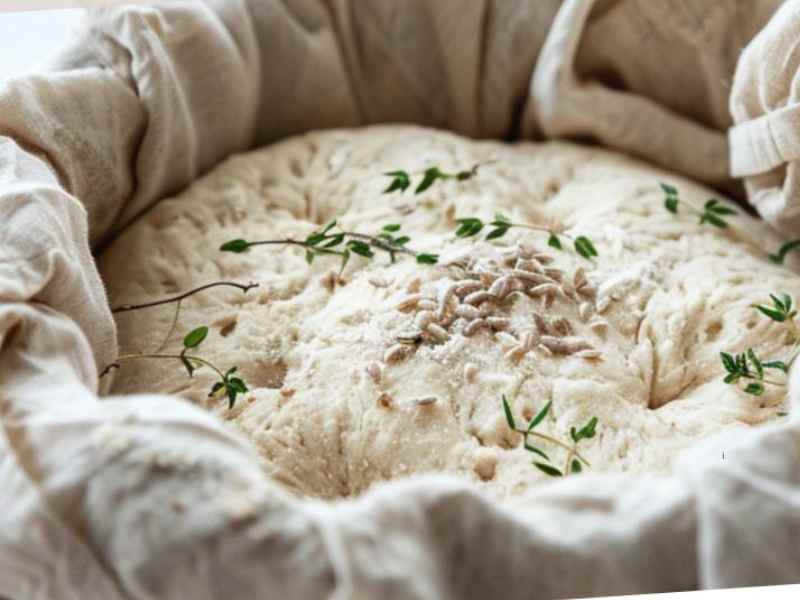
Photo credit: @ Sourdough Cravings
Baking your first sourdough loaf is exciting on its own, but adding flavors can make it even more special. You don’t need complicated ingredients or fancy tools, just simple add-ins that elevate your bread while keeping it beginner-friendly. Adding flavors into your sourdough is also a great way to make your baking experience fun and personal.
Some easy ways to flavor your sourdough include mixing in seeds like sunflower, sesame, or pumpkin seeds, adding dried fruits such as raisins or cranberries, or folding in fresh or dried herbs like rosemary or thyme.
Cheese lovers can experiment with grated cheddar or parmesan, while garlic and caramelized onions can create a savory loaf perfect for sandwiches. The key is to gently fold these ingredients into your dough during the stretch-and-fold stage to avoid deflating your starter.
These simple additions allow beginners to personalize their bread without risking the integrity of the dough. As you try different flavors, you’ll discover which combinations you enjoy most and how to balance moisture and texture. Flavoring your loaf is not just about taste, it’s also about making sourdough baking creative and satisfying.
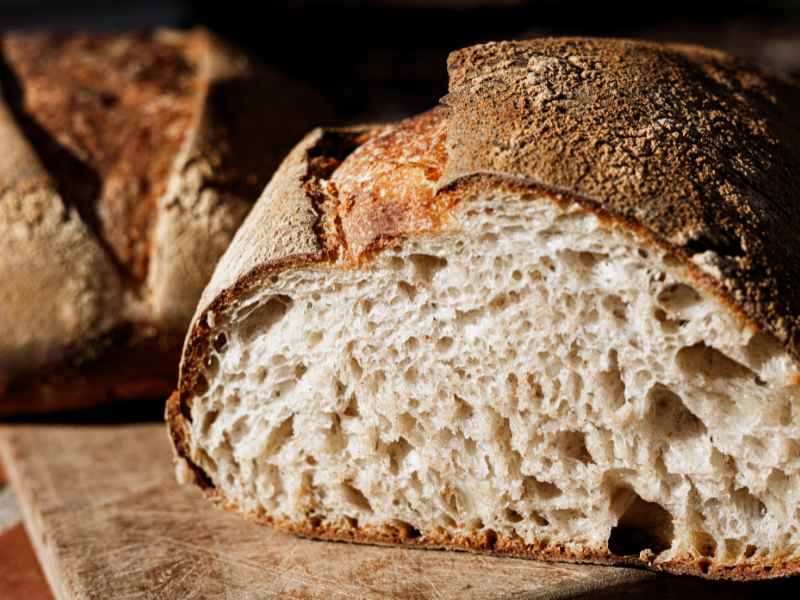
How to Know When Your Sourdough is Perfectly Baked
One of the most common questions for beginners is: how do I know when my sourdough loaf is done? While recipes often give bake times, every oven and dough is different. Learning to recognize the signs of a perfectly baked loaf helps you gain confidence and ensures your bread comes out just right.
Start by looking at the crust, it should be a deep golden brown and feel firm to the touch. Tap the bottom of the loaf; it should sound hollow, which indicates it’s baked through. You can also check the internal temperature with a food thermometer; a perfectly baked sourdough reads around 200–210°F (93–99°C).
Additionally, the loaf should feel light for its size, not dense or overly heavy. The aroma is another clue: your kitchen will be filled with that warm, slightly tangy scent that only sourdough produces. Recognizing these signs ensures that your first loaf comes out well, even if your timing or oven settings aren’t perfect.
These observations are especially helpful for beginners learning how to bake sourdough bread for the first time, they allow you to trust your senses, not just the clock.
Common Sourdough Bread Mistakes Beginners Make
Baking sourdough bread for the first time can feel intimidating, and it’s easy to make mistakes that affect the texture, rise, or flavor. Understanding these common pitfalls can save frustration and help you succeed faster.
- Ignoring the Starter’s Readiness
One of the biggest mistakes is using a starter that isn’t fully active. A healthy starter should be bubbly, slightly frothy, and have a gentle tangy aroma. If your starter is sluggish, your dough won’t rise properly. Always check your starter before mixing your dough, this ensures your first sourdough loaf has the lift it needs. - Skipping Autolyse or Resting Steps
Beginners often rush straight to kneading. Allowing the flour and water to rest for 20–60 minutes before adding salt and starter helps gluten form naturally. This simple step improves the dough’s structure, making it easier to shape and giving your bread a better crumb. - Over- or Under-Kneading the Dough
Too much kneading can make the dough tight and dense, while too little leaves it weak and unable to hold air. Gentle folding and stretching techniques during bulk fermentation are ideal for beginners. These methods strengthen the dough without the risk of overworking it. - Incorrect Proofing Times
Proofing is where many first-timers go wrong. Over-proofing makes the dough collapse, while under-proofing results in dense bread. Learning to read the dough, it should be slightly puffy and spring back slowly when pressed — is more important than following strict times. Temperature, flour type, and starter strength all affect proofing. - Using the Wrong Oven Temperature or Baking Method
Baking at too low a temperature leads to pale crusts, while too hot can burn the exterior before the inside cooks. Beginners often skip preheating or fail to create steam, which helps the crust develop. Using a Dutch oven or adding a pan of water in the oven can help get that signature golden, crackling crust. - Not Scoring the Bread Properly
Scoring (slashing) the dough before baking controls where the bread expands. Beginners sometimes skip this or make shallow cuts, causing irregular cracks or bursting. A sharp blade and confident, single strokes work best.